
Sublimation Manual
Page 8
Driver Setup To setup the Ricoh GX7000 Driver ready for Sublimation printing using windows XP or previous operating systems). If you do not see the window below : 1. Click Start > Control Panel > Printers ('Printers and Faxes' if using Corel Draw follow the steps below , click OK, and then click OK on the GelSprinter GX7000 option and select Printing Preferences as shown below. 2. Right click on the second window that appears. (If you see this option skip to step 3). 6
Driver Setup To setup the Ricoh GX7000 Driver ready for Sublimation printing using windows XP or previous operating systems). If you do not see the window below : 1. Click Start > Control Panel > Printers ('Printers and Faxes' if using Corel Draw follow the steps below , click OK, and then click OK on the GelSprinter GX7000 option and select Printing Preferences as shown below. 2. Right click on the second window that appears. (If you see this option skip to step 3). 6

Sublimation Manual
Page 15
CorelDRAW 10 - When you have your image ready to print, go to confirm the changes. Now click 'Apply' to File > Print and select the relevant printer (GelSprint GX7000). X4 Setup 7. Now select the Prepress tab, make sure the 'Apply ICC Profile' option is ticked as shown below . (Sublimation requires the images to be printed in Mirror). 8. Now select the Misc Tab, make sure that the 'Mirror' option is ticked as shown below . The system is now ready for printing. 13
CorelDRAW 10 - When you have your image ready to print, go to confirm the changes. Now click 'Apply' to File > Print and select the relevant printer (GelSprint GX7000). X4 Setup 7. Now select the Prepress tab, make sure the 'Apply ICC Profile' option is ticked as shown below . (Sublimation requires the images to be printed in Mirror). 8. Now select the Misc Tab, make sure that the 'Mirror' option is ticked as shown below . The system is now ready for printing. 13
Printer Setup
Page 2
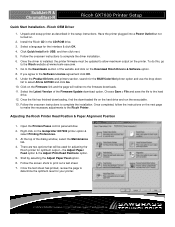
...on the Gelsprinter GX7000 printer option & select Printing Preferences. 3. Once the driver is installed, the printer firmware must be used for adjusting the Ricoh printer for the interface & click OK. 4. To do this, go to complete the driver installation. 6. Open the Printers/Faxes control...page to determine the optimum level for the B&W/Color/Gel printer option and use the drop down list to the firmware downloads. 11. SubliJet-R & ChromaBlast-R Ricoh GX7000 Printer Setup Quick Start Installation - Adjusting the Ricoh Printer Head Position & Paper Alignment Position 1. There...
...on the Gelsprinter GX7000 printer option & select Printing Preferences. 3. Once the driver is installed, the printer firmware must be used for adjusting the Ricoh printer for the interface & click OK. 4. To do this, go to complete the driver installation. 6. Open the Printers/Faxes control...page to determine the optimum level for the B&W/Color/Gel printer option and use the drop down list to the firmware downloads. 11. SubliJet-R & ChromaBlast-R Ricoh GX7000 Printer Setup Quick Start Installation - Adjusting the Ricoh Printer Head Position & Paper Alignment Position 1. There...
Printer Setup
Page 4
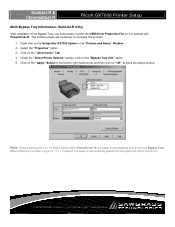
...is automatically pulled from the Bypass Tray. Right click on the Gelsprinter GX7000 Option in the bottom right-hand corner and then click on the "Apply" Button in the "Printers and Faxes" Window. 2. Under the "Select Printer Options" section, click on the "Accessories" Tab. 4. Select... the "Properties" option. 3. Note: When selecting the 13 x 19 Paper Option within the printer. Click on "OK" to close the dialog window. SubliJet-R & ChromaBlast-R Ricoh GX7000 Printer Setup Multi-Bypass Tray Information: (SubliJet-R Only) After installation of the Bypass Tray, you must enable...
...is automatically pulled from the Bypass Tray. Right click on the Gelsprinter GX7000 Option in the bottom right-hand corner and then click on the "Apply" Button in the "Printers and Faxes" Window. 2. Under the "Select Printer Options" section, click on the "Accessories" Tab. 4. Select... the "Properties" option. 3. Note: When selecting the 13 x 19 Paper Option within the printer. Click on "OK" to close the dialog window. SubliJet-R & ChromaBlast-R Ricoh GX7000 Printer Setup Multi-Bypass Tray Information: (SubliJet-R Only) After installation of the Bypass Tray, you must enable...

Installation Guide
Page 1
... right (as you will start automatically. Open the printer box, remove the cables and other accessories, and place them aside. PowerDriver-R Installation 1. Visit the Sawgrass Technologies web site at www.sawgrassink.com and navigate to the License Agreement Window. Figure 1 2. Figure 2 4. Figure 3 3. Ricoh GX7000 & Gelsprinter are Registered Trademarks, and Sawgrass is associated with the...
... right (as you will start automatically. Open the printer box, remove the cables and other accessories, and place them aside. PowerDriver-R Installation 1. Visit the Sawgrass Technologies web site at www.sawgrassink.com and navigate to the License Agreement Window. Figure 1 2. Figure 2 4. Figure 3 3. Ricoh GX7000 & Gelsprinter are Registered Trademarks, and Sawgrass is associated with the...

Installation Guide
Page 2
...to the Choose Install Location 9. Sawgrass Sawgrass Sawgrass Sawgrass Sawgrass Sawgrass Sawgrass Sawgrass Installation Guide: Setup Instructions: Printer, Driver Software, and SubliJet-R Ink for Ricoh aficio GX7000 gelsprinter setup instructions: (continued) 4. Figure 8 Figure 9 6. However received, copy the number provided into ... completion, a new window will open applications, and click Yes to restart (reboot) your computer to disable the color management elements in the required information and obtain the registration code. Figure 10 Figure 11 7. Follow the prompts to...
...to the Choose Install Location 9. Sawgrass Sawgrass Sawgrass Sawgrass Sawgrass Sawgrass Sawgrass Sawgrass Installation Guide: Setup Instructions: Printer, Driver Software, and SubliJet-R Ink for Ricoh aficio GX7000 gelsprinter setup instructions: (continued) 4. Figure 8 Figure 9 6. However received, copy the number provided into ... completion, a new window will open applications, and click Yes to restart (reboot) your computer to disable the color management elements in the required information and obtain the registration code. Figure 10 Figure 11 7. Follow the prompts to...

Printing Guide
Page 4
... CS~CS5 (Continued; A check mark should now be visible beside RGB Color (see FIGURE 7). Click the drop-down arrow and select GelSprinter GX7000 B. This will open the Color Management window (see FIGURE 5). 1 2 3 FIGURE 5 3.) Once your settings to the ones shown below: A C B FIGURE 6 A. R: Ricoh GX7000 - Click the drop-down arrow and select Size: Defined by clicking File...
... CS~CS5 (Continued; A check mark should now be visible beside RGB Color (see FIGURE 7). Click the drop-down arrow and select GelSprinter GX7000 B. This will open the Color Management window (see FIGURE 5). 1 2 3 FIGURE 5 3.) Once your settings to the ones shown below: A C B FIGURE 6 A. R: Ricoh GX7000 - Click the drop-down arrow and select Size: Defined by clicking File...

Printing Guide
Page 5
...GelSprinter GX7000, adjust the paper size according to the print window (see FIGURE 7). 1 2 3 FIGURE 8 E. Clicking OK will open the Page Setup window (see FIGURE 7). This will return you to the transfer paper size being used and click OK. to the ones shown below: (see FIGURE 7). SubliJet - R: Ricoh GX7000 - Click Printer...... Click the drop-down arrow and select Color Handling: Let Illustrator determine colors B. Illustrator CS~CS5 (Continued; A. Click the drop-down arrow and ...
...GelSprinter GX7000, adjust the paper size according to the print window (see FIGURE 7). 1 2 3 FIGURE 8 E. Clicking OK will open the Page Setup window (see FIGURE 7). This will return you to the transfer paper size being used and click OK. to the ones shown below: (see FIGURE 7). SubliJet - R: Ricoh GX7000 - Click Printer...... Click the drop-down arrow and select Color Handling: Let Illustrator determine colors B. Illustrator CS~CS5 (Continued; A. Click the drop-down arrow and ...

Printing Guide
Page 12
... to select GelSprinter GX7000 each time you are ready to our Website: www.sawgrassink.com PAGE 12 of 12 >> SubliJet - Congratulations! Mac OS-X - Illustrator CS~CS5 (Continued; NOTE: For the absolute latest Information and Updates on all offerings by clicking Print (see FIGURE 21). Adobe Illustrator setup is now complete. R: Ricoh GX7000 - FIGURE 21...
... to select GelSprinter GX7000 each time you are ready to our Website: www.sawgrassink.com PAGE 12 of 12 >> SubliJet - Congratulations! Mac OS-X - Illustrator CS~CS5 (Continued; NOTE: For the absolute latest Information and Updates on all offerings by clicking Print (see FIGURE 21). Adobe Illustrator setup is now complete. R: Ricoh GX7000 - FIGURE 21...

Setup and Print Guide
Page 3
...drop-down arrow and select GelSprinter GX7000 B. Mac OS-X - ICC Profile Setup and Print Guide - Click the drop-down arrow E. Click the drop-down arrow FIGURE 5 and select Color Handling: Photoshop Elements Manages Color and select Printer Profile: sg_GX7000_IQr_RGB_v2 PAGE 3 of... the Print window, click More Options C. This will open the Print window (see FIGURE 5). In the More Options window, click Color Management (see FIGURE 4). SubliJet-R: Ricoh GX7000 - ...
...drop-down arrow and select GelSprinter GX7000 B. Mac OS-X - ICC Profile Setup and Print Guide - Click the drop-down arrow E. Click the drop-down arrow FIGURE 5 and select Color Handling: Photoshop Elements Manages Color and select Printer Profile: sg_GX7000_IQr_RGB_v2 PAGE 3 of... the Print window, click More Options C. This will open the Print window (see FIGURE 5). In the More Options window, click Color Management (see FIGURE 4). SubliJet-R: Ricoh GX7000 - ...

Setup and Print Guide
Page 4
... FIGURE 6 I. You are able to do this within Photoshop. H. Click OK to manually mirror each image within the OEM printer driver or you to Mirror the image before printing. Click Print to continue (see FIGURE 4). 2.) Once Print has been selected... the printer driver, Check Flip horizontally (see FIGURE 7). Click the drop-down arrow and select Rendering Intent: Perceptual G. L. SubliJet-R: Ricoh GX7000 - Remember to the Print window (see FIGURE 6). Photoshop Elements 8 & 9 (Continued; Click the drop-down arrow and select Format For: GelSprinter GX7000 J. Clicking...
... FIGURE 6 I. You are able to do this within Photoshop. H. Click OK to manually mirror each image within the OEM printer driver or you to Mirror the image before printing. Click Print to continue (see FIGURE 4). 2.) Once Print has been selected... the printer driver, Check Flip horizontally (see FIGURE 7). Click the drop-down arrow and select Rendering Intent: Perceptual G. L. SubliJet-R: Ricoh GX7000 - Remember to the Print window (see FIGURE 6). Photoshop Elements 8 & 9 (Continued; Click the drop-down arrow and select Format For: GelSprinter GX7000 J. Clicking...

Setup and Print Guide
Page 10
Mac OS-X - Photoshop Elements 8 & 9 (Continued; Photoshop setup is now complete. NOTE: For the absolute latest Information and Updates on all Products, Materials, Processes, and/or Procedures relative to all offerings by clicking Print (see FIGURE 19). FIGURE 19 Congratulations! Page 10:10) 13.) You can now print your image by or through Sawgrass Technologies, Inc., please refer to print. SubliJet-R: Ricoh GX7000 - ICC Profile Setup and Print Guide - Remember to select GelSprinter GX7000 each time you are ready to our Website: www.sawgrassink.com PAGE 10 of 10 >>
Mac OS-X - Photoshop Elements 8 & 9 (Continued; Photoshop setup is now complete. NOTE: For the absolute latest Information and Updates on all Products, Materials, Processes, and/or Procedures relative to all offerings by clicking Print (see FIGURE 19). FIGURE 19 Congratulations! Page 10:10) 13.) You can now print your image by or through Sawgrass Technologies, Inc., please refer to print. SubliJet-R: Ricoh GX7000 - ICC Profile Setup and Print Guide - Remember to select GelSprinter GX7000 each time you are ready to our Website: www.sawgrassink.com PAGE 10 of 10 >>

