
Sublimation Manual
Page 3
...: Black, Cyan, Magenta & Yellow Once all cartridges are in the indicated order. Unpack and setup the p r i nter as described in the printer setup instructions. Have the printer plugged into a power outlet but not turned on. Note: DO NOT TURN ON THE POWER FOR THE... Installation Guide - Ink Cartridge Setup CAUTION: DO NOT INSTALL THE STANDARD EPSON INKS BEFORE INSTALLING SUBLIMATION INK. Do not power ON the printer before or after installation. Press each cartridge body until it engages securely. IMPORTANT: DO NOT INSTALL THE STANDARD EPSON CARTRIDGES. Ricoh Driver and Inks 1.
...: Black, Cyan, Magenta & Yellow Once all cartridges are in the indicated order. Unpack and setup the p r i nter as described in the printer setup instructions. Have the printer plugged into a power outlet but not turned on. Note: DO NOT TURN ON THE POWER FOR THE... Installation Guide - Ink Cartridge Setup CAUTION: DO NOT INSTALL THE STANDARD EPSON INKS BEFORE INSTALLING SUBLIMATION INK. Do not power ON the printer before or after installation. Press each cartridge body until it engages securely. IMPORTANT: DO NOT INSTALL THE STANDARD EPSON CARTRIDGES. Ricoh Driver and Inks 1.

Sublimation Manual
Page 5
Installation 6. You will now begin. 8. The installation process will be prompted to turn the printer On to confirm the driver installatio n 7. Click 'Next' to allow detection of the Ricoh GX7000. 3
Installation 6. You will now begin. 8. The installation process will be prompted to turn the printer On to confirm the driver installatio n 7. Click 'Next' to allow detection of the Ricoh GX7000. 3
Sublimation Manual
Page 6
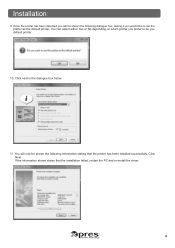
Once the printer has been detected you will now be shown the following dialogue box, asking if you default printer. 10. If the information shown states that the printer has been installed successfully, Click Next. You can select either Yes or No depending on which printer you prefer to set the printer as the default printer. Installation 9. You will be you would like to be shown the following information stating that the installation failed, restart the PC and re-install the driver. 4 Click next in the dialogue box below. 11.
Once the printer has been detected you will now be shown the following dialogue box, asking if you default printer. 10. If the information shown states that the printer has been installed successfully, Click Next. You can select either Yes or No depending on which printer you prefer to set the printer as the default printer. Installation 9. You will be you would like to be shown the following information stating that the installation failed, restart the PC and re-install the driver. 4 Click next in the dialogue box below. 11.

Sublimation Manual
Page 8
Click Start > Control Panel > Printers ('Printers and Faxes' if using Corel Draw follow the steps below , click OK, and then click OK on the GelSprinter GX7000 option and select Printing Preferences as shown below. 2. If you do not see this option skip to step 3). 6 Driver Setup To setup the Ricoh GX7000 Driver ready for Sublimation printing using windows XP or previous operating systems). Right click on the second window that appears. (If you see the window below : 1.
Click Start > Control Panel > Printers ('Printers and Faxes' if using Corel Draw follow the steps below , click OK, and then click OK on the GelSprinter GX7000 option and select Printing Preferences as shown below. 2. If you do not see this option skip to step 3). 6 Driver Setup To setup the Ricoh GX7000 Driver ready for Sublimation printing using windows XP or previous operating systems). Right click on the second window that appears. (If you see the window below : 1.

Sublimation Manual
Page 13
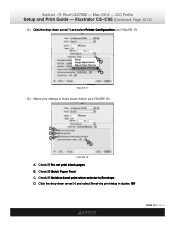
X4 Setup 3. Firstly, make sure that the drop down option below the printer to the left hand side states 'Ricoh - 7000 v1.15'. 11 To select or deselect an arrow, click directly on the arrow itself. Now click Tools > Colour Management, you will see the Colour Management Dialogue Box appear as above. Also select RGB under the 'Color mode used for effects:' option. Fraser (1998)', and the drop down option below . CorelDRAW 10 - Make sure that the arrows are highlighted as shown below the centre circle shows 'Internal RGB -
X4 Setup 3. Firstly, make sure that the drop down option below the printer to the left hand side states 'Ricoh - 7000 v1.15'. 11 To select or deselect an arrow, click directly on the arrow itself. Now click Tools > Colour Management, you will see the Colour Management Dialogue Box appear as above. Also select RGB under the 'Color mode used for effects:' option. Fraser (1998)', and the drop down option below . CorelDRAW 10 - Make sure that the arrows are highlighted as shown below the centre circle shows 'Internal RGB -

Sublimation Manual
Page 14
Fraser (1998)' as 'Subli Print' and click OK to all printers. 6. CorelDRAW 10 - X4 Setup 4. Advanced Printer Settings Icon Make sure that 'Do Not Override' under Colour Profile is selected next to confirm. Save the settings as shown. 5. Then click OK in ...the Colour Management window. 12 Now click on the [+] option to open the window below . Click on the 'Advanced Printer Settings' to save your settings. Now click on the Import/Export icon to open the window below Import/Export Icon Select 'Always Convert Using' and...
Fraser (1998)' as 'Subli Print' and click OK to all printers. 6. CorelDRAW 10 - X4 Setup 4. Advanced Printer Settings Icon Make sure that 'Do Not Override' under Colour Profile is selected next to confirm. Save the settings as shown. 5. Then click OK in ...the Colour Management window. 12 Now click on the [+] option to open the window below . Click on the 'Advanced Printer Settings' to save your settings. Now click on the Import/Export icon to open the window below Import/Export Icon Select 'Always Convert Using' and...

Sublimation Manual
Page 15
Now click 'Apply' to File > Print and select the relevant printer (GelSprint GX7000). Now select the Prepress tab, make sure the 'Apply ICC Profile' option is ticked as shown below . (Sublimation requires the images to be printed in Mirror). 8. Now select the Misc Tab, make sure that the 'Mirror' option is ticked as shown below . The system is now ready for printing. 13 X4 Setup 7. When you have your image ready to print, go to confirm the changes. CorelDRAW 10 -
Now click 'Apply' to File > Print and select the relevant printer (GelSprint GX7000). Now select the Prepress tab, make sure the 'Apply ICC Profile' option is ticked as shown below . (Sublimation requires the images to be printed in Mirror). 8. Now select the Misc Tab, make sure that the 'Mirror' option is ticked as shown below . The system is now ready for printing. 13 X4 Setup 7. When you have your image ready to print, go to confirm the changes. CorelDRAW 10 -

Sublimation Manual
Page 18
CorelDRAW X5 Setup When your image is ready to print open the print window: File > Print 1 Select the appropriate printer from the drop down list. 2 Select the 'Color' tab. 1 Select 'Print Composite'. 2 Select 'Use document color setting'. 3 Select 'CorelDRAW' from 'Color conversions performed by:'. 4 Select 'RGB' from 'Output colors as:'. 5 Select the 'Ricoh 7000 1.15' profile from 'Correct colors using color profile:'. 6 Select 'Perceptual' from 'Rendering intent:'. 16
CorelDRAW X5 Setup When your image is ready to print open the print window: File > Print 1 Select the appropriate printer from the drop down list. 2 Select the 'Color' tab. 1 Select 'Print Composite'. 2 Select 'Use document color setting'. 3 Select 'CorelDRAW' from 'Color conversions performed by:'. 4 Select 'RGB' from 'Output colors as:'. 5 Select the 'Ricoh 7000 1.15' profile from 'Correct colors using color profile:'. 6 Select 'Perceptual' from 'Rendering intent:'. 16

Printer Setup
Page 1
...leading developer of digital printing technology for profitable production of mass customized products. Next, the Ricoh printer driver must be installed and the printer head position and paper alignment position must be set. Once all cartridges are accompanied by ... customized, high-quality full color images. Insert the SubliJet-R cartridges in Charleston, SC and our European Headquarters is committed to the international marketplace. SubliJet-R & ChromaBlast-R Ricoh GX7000 Printer Setup Ink Cartridge Setup CAUTION: DO NOT INSTALL RICOH OEM INK BEFORE INSTALLING SUBLIJET...
...leading developer of digital printing technology for profitable production of mass customized products. Next, the Ricoh printer driver must be installed and the printer head position and paper alignment position must be set. Once all cartridges are accompanied by ... customized, high-quality full color images. Insert the SubliJet-R cartridges in Charleston, SC and our European Headquarters is committed to the international marketplace. SubliJet-R & ChromaBlast-R Ricoh GX7000 Printer Setup Ink Cartridge Setup CAUTION: DO NOT INSTALL RICOH OEM INK BEFORE INSTALLING SUBLIJET...
Printer Setup
Page 2
... & Software option. 8. Once the driver is installed, the printer firmware must be used for adjusting the Ricoh printer for the B&W/Color/Gel printer option and use the drop down list to the Downloads section of the website and click on . 2. Go to select Aficio GX7000 and click Go. 10. Select the Latest Version of the dialog...
... & Software option. 8. Once the driver is installed, the printer firmware must be used for adjusting the Ricoh printer for the B&W/Color/Gel printer option and use the drop down list to the Downloads section of the website and click on . 2. Go to select Aficio GX7000 and click Go. 10. Select the Latest Version of the dialog...

Printer Setup
Page 3
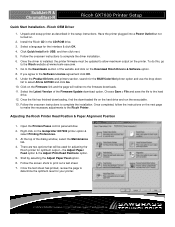
... window & type in the value. SubliJet-R & ChromaBlast-R Ricoh GX7000 Printer Setup 8. Next select the Adjust Print-Head Positions option. 11. If banding is extreme, start from step one and adjust the settings again until the .... Please Note the minimum system requirements for printing the test pattern. 12. Once the optimum value is optimum, look for your printer. 13. Once completed, run a test print to the Printer Dialog Window & type in the opposite direction. (Figure 2) Figure 1 Figure 2 9. Hit Next to the lines broken in the value. To determine...
... window & type in the value. SubliJet-R & ChromaBlast-R Ricoh GX7000 Printer Setup 8. Next select the Adjust Print-Head Positions option. 11. If banding is extreme, start from step one and adjust the settings again until the .... Please Note the minimum system requirements for printing the test pattern. 12. Once the optimum value is optimum, look for your printer. 13. Once completed, run a test print to the Printer Dialog Window & type in the opposite direction. (Figure 2) Figure 1 Figure 2 9. Hit Next to the lines broken in the value. To determine...
Printer Setup
Page 4
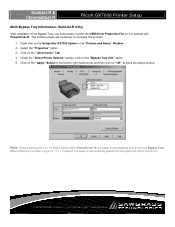
...operate with PowerDriver-R. Click on the "Bypass Tray Unit" option. 5. Under the "Select Printer Options" section, click on the "Accessories" Tab. 4. Select the "Properties" option. 3. Right click on the Gelsprinter GX7000 Option in the bottom right-hand corner and then click on the "Apply" Button in... pulled from the paper tray within the OEM Driver Properties File for it to complete this process: 1. SubliJet-R & ChromaBlast-R Ricoh GX7000 Printer Setup Multi-Bypass Tray Information: (SubliJet-R Only) After installation of the Bypass Tray, you must enable it within the...
...operate with PowerDriver-R. Click on the "Bypass Tray Unit" option. 5. Under the "Select Printer Options" section, click on the "Accessories" Tab. 4. Select the "Properties" option. 3. Right click on the Gelsprinter GX7000 Option in the bottom right-hand corner and then click on the "Apply" Button in... pulled from the paper tray within the OEM Driver Properties File for it to complete this process: 1. SubliJet-R & ChromaBlast-R Ricoh GX7000 Printer Setup Multi-Bypass Tray Information: (SubliJet-R Only) After installation of the Bypass Tray, you must enable it within the...

Installation Guide
Page 1
... to advance to right (as you will be using. Figure 3 3. On your printer that opens (Figure 3), click on the printer yet. Remove the paper tray, pull the cover straight up, and adjust the guides for Ricoh aficio GX7000 GelSprinter setup instructions: Ricoh aficio gx7000 Gelsprinter 1. Visit the Sawgrass Technologies web site at this time. 1 2 4 3 3. Follow the...
... to advance to right (as you will be using. Figure 3 3. On your printer that opens (Figure 3), click on the printer yet. Remove the paper tray, pull the cover straight up, and adjust the guides for Ricoh aficio GX7000 GelSprinter setup instructions: Ricoh aficio gx7000 Gelsprinter 1. Visit the Sawgrass Technologies web site at this time. 1 2 4 3 3. Follow the...

Installation Guide
Page 2
...the installation process. Sawgrass Sawgrass Sawgrass Sawgrass Sawgrass Sawgrass Sawgrass Sawgrass Installation Guide: Setup Instructions: Printer, Driver Software, and SubliJet-R Ink for Ricoh aficio GX7000 gelsprinter setup instructions: (continued) 4. Once you click Install, you will see the installation ...color management elements in the required information and obtain the registration code. Ignore this program. Figure 8 Figure 9 6. However received, copy the number provided into the blank Registration Code space, and click Apply Code (see illustrations below). 10. Ricoh GX7000...
...the installation process. Sawgrass Sawgrass Sawgrass Sawgrass Sawgrass Sawgrass Sawgrass Sawgrass Installation Guide: Setup Instructions: Printer, Driver Software, and SubliJet-R Ink for Ricoh aficio GX7000 gelsprinter setup instructions: (continued) 4. Once you click Install, you will see the installation ...color management elements in the required information and obtain the registration code. Ignore this program. Figure 8 Figure 9 6. However received, copy the number provided into the blank Registration Code space, and click Apply Code (see illustrations below). 10. Ricoh GX7000...

Setup Guide
Page 1
For Assistance with driver installation, refer to the Getting Started Guide. Ricoh GX7000 Setup and Print Guide: Photoshop CS5 Before proceeding, please be the same. NOTE: Your screens and menus may differ depending on the version of 5 >> Photoshop CS5 Setup Guide 1. Begin by opening Photoshop. In the menu bar, click Edit > Color Settings (Ctrl+Shift+K): (see FIGURE 1) FIGURE 1 PAGE 1 of software and operating system you have the correct OEM printer driver and PowerDriver installed. However, the settings will be sure you are using.
For Assistance with driver installation, refer to the Getting Started Guide. Ricoh GX7000 Setup and Print Guide: Photoshop CS5 Before proceeding, please be the same. NOTE: Your screens and menus may differ depending on the version of 5 >> Photoshop CS5 Setup Guide 1. Begin by opening Photoshop. In the menu bar, click Edit > Color Settings (Ctrl+Shift+K): (see FIGURE 1) FIGURE 1 PAGE 1 of software and operating system you have the correct OEM printer driver and PowerDriver installed. However, the settings will be sure you are using.
Setup Guide
Page 5
... Printer Manages Colors E. Select printer PowerDriver R GX7000 H. Click Print when you are ready to print. Photoshop CS5 setup is now complete. NOTE: For the absolute latest Information and Updates on all Products, Materials, Processes, and/or Procedures relative to all offerings by clicking Print. G PowerDriver R GX7000 ... You can begin printing your image by or through Sawgrass Technologies, Inc., please refer to select PowerDriver R GX7000 each time you have entered the correct settings. SubliJet-R: Ricoh GX7000 Setup and Print Guide: Photoshop CS5 (cont'd 5:5) D.
... Printer Manages Colors E. Select printer PowerDriver R GX7000 H. Click Print when you are ready to print. Photoshop CS5 setup is now complete. NOTE: For the absolute latest Information and Updates on all Products, Materials, Processes, and/or Procedures relative to all offerings by clicking Print. G PowerDriver R GX7000 ... You can begin printing your image by or through Sawgrass Technologies, Inc., please refer to select PowerDriver R GX7000 each time you have entered the correct settings. SubliJet-R: Ricoh GX7000 Setup and Print Guide: Photoshop CS5 (cont'd 5:5) D.

Printing Guide
Page 5
... print window (see FIGURE 7). 1 2 3 FIGURE 8 E. Clicking OK will open the Page Setup window (see FIGURE 7). Click Printer... R: Ricoh GX7000 - ICC Profile Setup and Print Guide - Click the drop-down arrow and select Color Handling: Let Illustrator determine colors B. Illustrator CS~CS5 (Continued; Click the drop-down arrow and select Rendering Intent: Perceptual D. SubliJet - Select the...
... print window (see FIGURE 7). 1 2 3 FIGURE 8 E. Clicking OK will open the Page Setup window (see FIGURE 7). Click Printer... R: Ricoh GX7000 - ICC Profile Setup and Print Guide - Click the drop-down arrow and select Color Handling: Let Illustrator determine colors B. Illustrator CS~CS5 (Continued; Click the drop-down arrow and select Rendering Intent: Perceptual D. SubliJet - Select the...

Printing Guide
Page 6
Mac OS-X - Page 6:12) 5.) Once Printer has been selected, the following Print window will appear (see FIGURE 10). 1 2 FIGURE 10 PAGE 6 of 12 >> Illustrator CS~CS5 (Continued; Remember to manually mirror each image within Illustrator. You are able to do this within the OEM printer driver or you may choose to Mirror the image before printing. To mirror the image using the printer driver, Check Flip horizontally (see FIGURE 9). 1 FIGURE 9 6.) Click the drop-down arrow and select Paper Feed (see FIGURE 9). R: Ricoh GX7000 - SubliJet - ICC Profile Setup and Print Guide -
Mac OS-X - Page 6:12) 5.) Once Printer has been selected, the following Print window will appear (see FIGURE 10). 1 2 FIGURE 10 PAGE 6 of 12 >> Illustrator CS~CS5 (Continued; Remember to manually mirror each image within Illustrator. You are able to do this within the OEM printer driver or you may choose to Mirror the image before printing. To mirror the image using the printer driver, Check Flip horizontally (see FIGURE 9). 1 FIGURE 9 6.) Click the drop-down arrow and select Paper Feed (see FIGURE 9). R: Ricoh GX7000 - SubliJet - ICC Profile Setup and Print Guide -

Printing Guide
Page 7
R: Ricoh GX7000 - This will instead select Bypass Tray (see FIGURE 11). 1 2 FIGURE 11 8.) Click the drop-down arrow and select Printer Features (see FIGURE 13). 1 2 FIGURE 12 PAGE 7 of 12 >> Illustrator CS~CS5 (Continued; Page 7:12) 7.) In the paper feed window you have purchased a Bypass Tray. Mac OS-X - We recommend using Auto Select unless you are able to select the printer's paper source. For those users printing with a Bypass Tray, you will open the Print Features window (see FIGURE 12). ICC Profile Setup and Print Guide - SubliJet -
R: Ricoh GX7000 - This will instead select Bypass Tray (see FIGURE 11). 1 2 FIGURE 11 8.) Click the drop-down arrow and select Printer Features (see FIGURE 13). 1 2 FIGURE 12 PAGE 7 of 12 >> Illustrator CS~CS5 (Continued; Page 7:12) 7.) In the paper feed window you have purchased a Bypass Tray. Mac OS-X - We recommend using Auto Select unless you are able to select the printer's paper source. For those users printing with a Bypass Tray, you will open the Print Features window (see FIGURE 12). ICC Profile Setup and Print Guide - SubliJet -
Printing Guide
Page 10
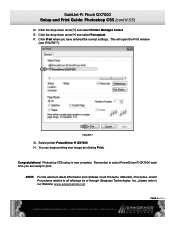
Check Do not print blank pages B. Click the drop-down arrow and select Printer Configuration (see FIGURE 17). 1 2 FIGURE 17 13.) Match your settings to those shown below: (see FIGURE 18) A B C D FIGURE 18 A. Check Quick Paper Feed C. Check Unidirectional print when selector is Envelope D. Illustrator CS~CS5 (Continued; Page 10:12) 12.) Click the drop-down arrow and select Sheet-dry print delay in duplex: Off PAGE 10 of 12 >> SubliJet - Mac OS-X - ICC Profile Setup and Print Guide - R: Ricoh GX7000 -
Check Do not print blank pages B. Click the drop-down arrow and select Printer Configuration (see FIGURE 17). 1 2 FIGURE 17 13.) Match your settings to those shown below: (see FIGURE 18) A B C D FIGURE 18 A. Check Quick Paper Feed C. Check Unidirectional print when selector is Envelope D. Illustrator CS~CS5 (Continued; Page 10:12) 12.) Click the drop-down arrow and select Sheet-dry print delay in duplex: Off PAGE 10 of 12 >> SubliJet - Mac OS-X - ICC Profile Setup and Print Guide - R: Ricoh GX7000 -


