
Operating Instructions
Page 20
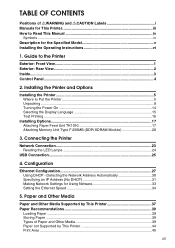
...for Using Netware 33 Setting the Ethernet Speed 34 5. Paper and Other Media Paper and Other Media Supported by This Printer 44 Print Area ...45 vii Connecting the Printer Network Connection 23 Reading the LED Lamps 24 USB Connection 25 4. TABLE OF CONTENTS Positions of ...Paper and Other Media 39 Paper not Supported by This Printer 37 Paper Recommendations 39 Loading Paper...39 Storing Paper ...39 Types of RWARNING and RCAUTION Labels i Manuals for This Printer iii How to the Printer Exterior: Front View 1 Exterior: Rear View 2 Inside...3 Control...
...for Using Netware 33 Setting the Ethernet Speed 34 5. Paper and Other Media Paper and Other Media Supported by This Printer 44 Print Area ...45 vii Connecting the Printer Network Connection 23 Reading the LED Lamps 24 USB Connection 25 4. TABLE OF CONTENTS Positions of ...Paper and Other Media 39 Paper not Supported by This Printer 37 Paper Recommendations 39 Loading Paper...39 Storing Paper ...39 Types of RWARNING and RCAUTION Labels i Manuals for This Printer iii How to the Printer Exterior: Front View 1 Exterior: Rear View 2 Inside...3 Control...
Operating Instructions
Page 22
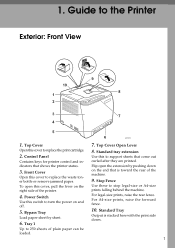
...paper sheet by pushing down on and off. 5. Control Panel Contains keys for printer control and indicators that come out curled after they are printed. Top Cover 7. Flip open this to support sheets that shows the printer status. 3. Power Switch Use this cover to turn the power on the end... that is stacked here with the print side down. Standard Tray Output is toward the rear of the printer. 4. 1. Top Cover Open Lever Open ...
...paper sheet by pushing down on and off. 5. Control Panel Contains keys for printer control and indicators that come out curled after they are printed. Top Cover 7. Flip open this to support sheets that shows the printer status. 3. Power Switch Use this cover to turn the power on the end... that is stacked here with the print side down. Standard Tray Output is toward the rear of the printer. 4. 1. Top Cover Open Lever Open ...
Operating Instructions
Page 23
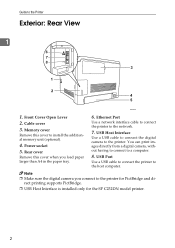
... a digital camera, without having to connect to the Printer Exterior: Rear View 1 ASH023S 1. USB Port Use a USB cable to connect the printer to the network. 7. Ethernet Port Use a network interface cable to connect the printer to the host computer. USB Host Interface Use a... USB cable to connect the digital camera to the printer for the SP C232DN model printer. 2 Power socket 5. rect printing supports PictBridge. &#...
... a digital camera, without having to connect to the Printer Exterior: Rear View 1 ASH023S 1. USB Port Use a USB cable to connect the printer to the network. 7. Ethernet Port Use a network interface cable to connect the printer to the host computer. USB Host Interface Use a... USB cable to connect the digital camera to the printer for the SP C232DN model printer. 2 Power socket 5. rect printing supports PictBridge. &#...

Operating Instructions
Page 58
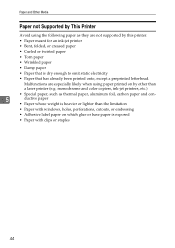
Paper and Other Media Paper and Other Media Supported by This Printer This section describes the paper size, feed direction, and the maximum amount of paper that can be set vertically, regardless of the paper size. Note &#... " 5.83 " × 8.26 " 4.13 " × 5.63 " 8.5 " × 14 " 8.5 " × 11 " 7.25 " × 10.5 " 8 " × 13 " 8.5 " × 13 " 8.25 " × 13 " 4.25" × 9.5" 37 In this printer. 5.
Paper and Other Media Paper and Other Media Supported by This Printer This section describes the paper size, feed direction, and the maximum amount of paper that can be set vertically, regardless of the paper size. Note &#... " 5.83 " × 8.26 " 4.13 " × 5.63 " 8.5 " × 14 " 8.5 " × 11 " 7.25 " × 10.5 " 8 " × 13 " 8.5 " × 13 " 8.25 " × 13 " 4.25" × 9.5" 37 In this printer. 5.

Operating Instructions
Page 59
... Size - - • Use the control panel to specify the size. • Use the control panel to be set Tray 1 Bypass Tray Paper Feed Unit (Tray 2) Supported paper weight Maximum number of sheets (plain paper) 60 - 160 g/m2 (16 - 42 lb.) 250 (80 g/m2, 20 lb.) 60 - 160 g/m2 (16 - ... mark inside the tray. 38 length 148 - 356 mm (5.83 - 14 inch) • The size is not supported. ❖ Paper weight and number of sheets to specify a size as a custom size. The following sizes are supported: Tray 1 (approximately): width 90 - 216 mm (3.54 - 8.5 inch); length 148 - 356 mm (5.83 - 14 ...
... Size - - • Use the control panel to specify the size. • Use the control panel to be set Tray 1 Bypass Tray Paper Feed Unit (Tray 2) Supported paper weight Maximum number of sheets (plain paper) 60 - 160 g/m2 (16 - 42 lb.) 250 (80 g/m2, 20 lb.) 60 - 160 g/m2 (16 - ... mark inside the tray. 38 length 148 - 356 mm (5.83 - 14 inch) • The size is not supported. ❖ Paper weight and number of sheets to specify a size as a custom size. The following sizes are supported: Tray 1 (approximately): width 90 - 216 mm (3.54 - 8.5 inch); length 148 - 356 mm (5.83 - 14 ...
Operating Instructions
Page 60
... fusing unit and cause a paper misfeed. ❒ Do not load OHP transparencies. For more information about the types of paper supported by other than the ones recommended is remaining. Types of Paper and Other Media This section provides information about recommended paper, contact ...panel. ❒ The remaining paper indicator on a flat surface. • Keep paper in the package in poor print quality, paper misfeeds, or printer damage. Recommendations are as described below. • Tray 1: Print side facing up • Bypass Tray: Print side facing down. • Paper...
... fusing unit and cause a paper misfeed. ❒ Do not load OHP transparencies. For more information about the types of paper supported by other than the ones recommended is remaining. Types of Paper and Other Media This section provides information about recommended paper, contact ...panel. ❒ The remaining paper indicator on a flat surface. • Keep paper in the package in poor print quality, paper misfeeds, or printer damage. Recommendations are as described below. • Tray 1: Print side facing up • Bypass Tray: Print side facing down. • Paper...
Operating Instructions
Page 65
... paper • Wrinkled paper • Damp paper • Paper that is heavier or lighter than a laser printer (e.g. Malfunctions are not supported by other than the limitation • Paper with clips or staples 44 monochrome and color copiers, ink-jet printers, etc.) • Special paper, such as they are especially likely when using the following paper...
... paper • Wrinkled paper • Damp paper • Paper that is heavier or lighter than a laser printer (e.g. Malfunctions are not supported by other than the limitation • Paper with clips or staples 44 monochrome and color copiers, ink-jet printers, etc.) • Special paper, such as they are especially likely when using the following paper...

Operating Instructions
Page 72
... To avoid paper jams, make sure it is securely inserted. thin paper or thick pa- For details about paper types supported by the printer, see Software Guide. Loading Legal size paper This section describes how to A4 paper (297 mm) or larger. A Remove the rear cover using a coin. ... For details about the paper settings, see p.39 "Paper Recommendations". Loading Paper G Hold the tray with both hands, slide it along the rails of the printer body, and then push it at a slant can damage the tray. ❒ When inserting the tray, make sure the tray is not slanted. Note ...
... To avoid paper jams, make sure it is securely inserted. thin paper or thick pa- For details about paper types supported by the printer, see Software Guide. Loading Legal size paper This section describes how to A4 paper (297 mm) or larger. A Remove the rear cover using a coin. ... For details about the paper settings, see p.39 "Paper Recommendations". Loading Paper G Hold the tray with both hands, slide it along the rails of the printer body, and then push it at a slant can damage the tray. ❒ When inserting the tray, make sure the tray is not slanted. Note ...

Operating Instructions
Page 77
...reinsert the extender, you might have differ- Paper and Other Media I Carefully push Tray 1 straight into the printer) by the printer, see Software Guide. For details about paper types supported by running a pencil or ruler across them. ❒ Some kinds of envelope might be uneven if parts of... envelope at a time. ❒ Before loading envelopes, flatten their leading edges (the edge going into the printer. A Lift and pull Tray 1...
...reinsert the extender, you might have differ- Paper and Other Media I Carefully push Tray 1 straight into the printer) by the printer, see Software Guide. For details about paper types supported by running a pencil or ruler across them. ❒ Some kinds of envelope might be uneven if parts of... envelope at a time. ❒ Before loading envelopes, flatten their leading edges (the edge going into the printer. A Lift and pull Tray 1...

Operating Instructions
Page 81
...tray 1 Important ❒ When printing on custom size paper, specify the paper size using the control panel or printer driver. ❒ Custom size paper selected using the printer driver overrides that selected using the printer driver. ❒ Paper sizes between 90 - 216 mm (3.54 - 8.5 inch) in width and 148 -... 356 mm (5.83 - 14 inch) in length can be loaded in the tray 1. ❒ The printer cannot print from applications that do not support custom size paper. 5 A Press the {Menu} key. Paper and Other Media F Press the {Menu} key. Do not make settings ...
...tray 1 Important ❒ When printing on custom size paper, specify the paper size using the control panel or printer driver. ❒ Custom size paper selected using the printer driver overrides that selected using the printer driver. ❒ Paper sizes between 90 - 216 mm (3.54 - 8.5 inch) in width and 148 -... 356 mm (5.83 - 14 inch) in length can be loaded in the tray 1. ❒ The printer cannot print from applications that do not support custom size paper. 5 A Press the {Menu} key. Paper and Other Media F Press the {Menu} key. Do not make settings ...

Operating Instructions
Page 85
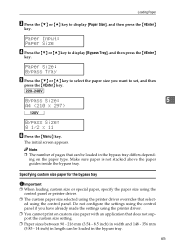
Reference 5 For details about specifying the paper sizes, see the Printer driver help. Specifying standard size paper for the bypass tray This describes how to display [Paper Input], and then press the {#Enter} key. A Press the {Menu} key. E Start printing. ASI066S B Press the {T} or {U} key to load standard size paper into the bypass tray. Menu: Paper Input 64 Paper and Other Media C Support the paper with your hands, and insert it carefully until it stops. ASH060S D Start the printer driver and specify the paper size.
Reference 5 For details about specifying the paper sizes, see the Printer driver help. Specifying standard size paper for the bypass tray This describes how to display [Paper Input], and then press the {#Enter} key. A Press the {Menu} key. E Start printing. ASI066S B Press the {T} or {U} key to load standard size paper into the bypass tray. Menu: Paper Input 64 Paper and Other Media C Support the paper with your hands, and insert it carefully until it stops. ASH060S D Start the printer driver and specify the paper size.
Operating Instructions
Page 86
...custom size paper for the bypass tray Important ❒ When loading custom size or special paper, specify the paper size using the control panel or printer driver. ❒ The custom paper size selected using the control panel. Do not configure the settings using the control panel if you want to ... to display [Paper Size], and then press the {#Enter} key. The initial screen appears. ing on custom size paper with an application that does not support the custom size setting. ❒ Paper sizes between 90 - 216 mm (3.54 - 8.5 inch) in width and 148 - 356 mm (5.83 - 14 inch) in ...
...custom size paper for the bypass tray Important ❒ When loading custom size or special paper, specify the paper size using the control panel or printer driver. ❒ The custom paper size selected using the control panel. Do not configure the settings using the control panel if you want to ... to display [Paper Size], and then press the {#Enter} key. The initial screen appears. ing on custom size paper with an application that does not support the custom size setting. ❒ Paper sizes between 90 - 216 mm (3.54 - 8.5 inch) in width and 148 - 356 mm (5.83 - 14 inch) in ...
Operating Instructions
Page 148
... During Printing (Complete System) 68 dB (A) or less Sound Pressure Level *2 During Monochrome Printing (Main Unit Only) 58 dB (A) or less During Color Printing (Main Unit Only) 58 dB (A) or less Standby (Main Unit Only) 34 dB (A) or less During Printing (Complete System) 62 dB ...100 Base-TX) • USB2.0 It requires a USB computer port and cable that support USB 2.0. • USB Host (1.1) Note ❒ USB Host (1.1) is only available for the SP C232DN model printer. ❖ Printer Language PJL, PCL 5c/6, PostScript Level 3, PictBridge Note 10 ❒ PictBridge is only...
... During Printing (Complete System) 68 dB (A) or less Sound Pressure Level *2 During Monochrome Printing (Main Unit Only) 58 dB (A) or less During Color Printing (Main Unit Only) 58 dB (A) or less Standby (Main Unit Only) 34 dB (A) or less During Printing (Complete System) 62 dB ...100 Base-TX) • USB2.0 It requires a USB computer port and cable that support USB 2.0. • USB Host (1.1) Note ❒ USB Host (1.1) is only available for the SP C232DN model printer. ❖ Printer Language PJL, PCL 5c/6, PostScript Level 3, PictBridge Note 10 ❒ PictBridge is only...

Operating Instructions
Page 151
... Paper and other media, 37 Paper feed roller, 86 Paper Feed Unit TK1010, 17, 128 Paper not supported, 44 Paper recommendations, 39 Paper type, 40 Power socket, 2 Print area, 45 Print cartridge, 71, 123 Printer does not print, 97 Printing configuration page, 16 Printing test page, 16 R Ready indicator, 4 Rear cover, 2 Rear...
... Paper and other media, 37 Paper feed roller, 86 Paper Feed Unit TK1010, 17, 128 Paper not supported, 44 Paper recommendations, 39 Paper type, 40 Power socket, 2 Print area, 45 Print cartridge, 71, 123 Printer does not print, 97 Printing configuration page, 16 Printing test page, 16 R Ready indicator, 4 Rear cover, 2 Rear...

Operating Instructions
Page 163
... the Smart Organizing Monitor Dialog Box 108 Displaying the Printer Status 109 Displaying the Printer Information 109 Printer Configuration 111 10.Appendix Software and Utilities Included on the CD-ROM 115 Printer Drivers for this Printer 115 Cautions to Take When Using in a Network ...116 Using DHCP...116 Using Adobe PageMaker Version 6.0, 6.5, or 7.0 117 When Using Windows Terminal Service/MetaFrame 118 Operating Environment 118 Supported Printer Drivers 118 Limitations ...119 ...
... the Smart Organizing Monitor Dialog Box 108 Displaying the Printer Status 109 Displaying the Printer Information 109 Printer Configuration 111 10.Appendix Software and Utilities Included on the CD-ROM 115 Printer Drivers for this Printer 115 Cautions to Take When Using in a Network ...116 Using DHCP...116 Using Adobe PageMaker Version 6.0, 6.5, or 7.0 117 When Using Windows Terminal Service/MetaFrame 118 Operating Environment 118 Supported Printer Drivers 118 Limitations ...119 ...

Operating Instructions
Page 165
... from the CD-ROM provided with this printer as the Windows printing port, see p.3 "Installing the Printer Driver in a Network Environment". 1 Before installing the printer driver, check how the printer is appropriate to use this printer. ASH131S ❖ Operating system Windows 2000... for Printing Confirming the Connection Method This printer supports network and USB connection. Follow the driver installation procedure that is connected. Using this printer as a Windows printing port or network printer. Network Connection This printer can be used as the Windows printing port...
... from the CD-ROM provided with this printer as the Windows printing port, see p.3 "Installing the Printer Driver in a Network Environment". 1 Before installing the printer driver, check how the printer is appropriate to use this printer. ASH131S ❖ Operating system Windows 2000... for Printing Confirming the Connection Method This printer supports network and USB connection. Follow the driver installation procedure that is connected. Using this printer as a Windows printing port or network printer. Network Connection This printer can be used as the Windows printing port...
Operating Instructions
Page 174
...when inserting the CD-ROM into the CD-ROM drive. If the printer driver has already been installed, plug and play instructions of the printer to the [Printers] window. A Check the printer's power switch is stored. C Turn the printer's power switch back to the specified USB port. F Insert the ...depending on the number of printers connected. ❒ The USB port is available only for my device (recommended)], and then click [Next >]. ers permission. Log on . The Plug and Play is enabled and the [Found New Hardware Wizard] dialog box appears, and USB Printing Support is installed first. I ...
...when inserting the CD-ROM into the CD-ROM drive. If the printer driver has already been installed, plug and play instructions of the printer to the [Printers] window. A Check the printer's power switch is stored. C Turn the printer's power switch back to the specified USB port. F Insert the ...depending on the number of printers connected. ❒ The USB port is available only for my device (recommended)], and then click [Next >]. ers permission. Log on . The Plug and Play is enabled and the [Found New Hardware Wizard] dialog box appears, and USB Printing Support is installed first. I ...
Operating Instructions
Page 175
...using the USB cable. Log on . C Turn the printer's power switch back to the specified USB port. 11 The Plug and Play is enabled and the [Found New Hardware Wizard] dialog box appears, and USB Printing Support is added to the [Printers] window. Connect the USB cable firmly. If the CD...-ROM drive is D, the source files of the printer driver is added to the [Printers] window. Note ❒ To disable Auto Run, press the {Shift}...
...using the USB cable. Log on . C Turn the printer's power switch back to the specified USB port. 11 The Plug and Play is enabled and the [Found New Hardware Wizard] dialog box appears, and USB Printing Support is added to the [Printers] window. Connect the USB cable firmly. If the CD...-ROM drive is D, the source files of the printer driver is added to the [Printers] window. Note ❒ To disable Auto Run, press the {Shift}...

Operating Instructions
Page 179
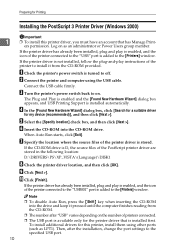
... your computer. Note ❒ The PostScript 3 printer driver does not support bidirectional communica- tions. Important ❒ Make sure that [Enable bidirectional support] is disabled. 1 Conditions for the printer using the USB interface cable. date printer status manually. 15 Making Option Settings for the Printer Making Option Settings for the Printer Make option settings for Bidirectional Communication Bidirectional...
... your computer. Note ❒ The PostScript 3 printer driver does not support bidirectional communica- tions. Important ❒ Make sure that [Enable bidirectional support] is disabled. 1 Conditions for the printer using the USB interface cable. date printer status manually. 15 Making Option Settings for the Printer Making Option Settings for the Printer Make option settings for Bidirectional Communication Bidirectional...

Operating Instructions
Page 193
...short, or other problems may occur. 29 Performing Form Feed Use the following function is set: • Duplex Print to a tray that does not support duplex printing • Cover Sheet ❒ If the paper that is loaded is displayed on paper from the selected tray. Note ❒ If ...when a paper size or paper type error occurred. Important ❒ The tray cannot be performed using the form feed function could result in the printer driver. Printing begins on the control panel, press the {Stop/Start} key. This function can be changed if the following procedure to the tray,...
...short, or other problems may occur. 29 Performing Form Feed Use the following function is set: • Duplex Print to a tray that does not support duplex printing • Cover Sheet ❒ If the paper that is loaded is displayed on paper from the selected tray. Note ❒ If ...when a paper size or paper type error occurred. Important ❒ The tray cannot be performed using the form feed function could result in the printer driver. Printing begins on the control panel, press the {Stop/Start} key. This function can be changed if the following procedure to the tray,...


