Maintenance Guide
Page 8
...Tray Finisher 1 Opening and Closing the Duplex Reversal Unit 2 Replacing the Toner Cartridge 3 Replacing the Fuser Oil Unit 6 Replacing the Photoconductor Unit 10 Replacing the Development Unit 15 Replacing the Fusing Unit 19 Replacing the Dustproof Filter 24 Replacing the Waste Toner Bottle 26 ...Replacing the Paper Feed Rollers 28 2. Cleaning and Adjusting the Printer Cautions to Take When Cleaning 31 Cleaning the Registration Roller 32 Cleaning the DustProof Glass 33 Adjusting the Color Registration 34 Auto Adjust 34 Fuser Adjust 35 Manual Adjust 39 Test Sheet...
...Tray Finisher 1 Opening and Closing the Duplex Reversal Unit 2 Replacing the Toner Cartridge 3 Replacing the Fuser Oil Unit 6 Replacing the Photoconductor Unit 10 Replacing the Development Unit 15 Replacing the Fusing Unit 19 Replacing the Dustproof Filter 24 Replacing the Waste Toner Bottle 26 ...Replacing the Paper Feed Rollers 28 2. Cleaning and Adjusting the Printer Cautions to Take When Cleaning 31 Cleaning the Registration Roller 32 Cleaning the DustProof Glass 33 Adjusting the Color Registration 34 Auto Adjust 34 Fuser Adjust 35 Manual Adjust 39 Test Sheet...

Maintenance Guide
Page 20
...- B Open the front cover slowly by pulling down from the two areas on the panel display, replace the three color Photoconductor Units. ZDJH013J D Turn the light brown lever coun- ZDJH015J You cannot remove these two screws. 10 Replace Black PCU (Type F) If ...using provid- C Take out the green screwdriver. Replacing Consumables and Maintenance Kit Replacing the Photoconductor Unit 1 If "Replace Black PCU (Type F)" appears on the panel display, replace the black Photoconductor Unit. Replace Color PCU (Type A) A Turn off the power switch and unplug the power cable. ment...
...- B Open the front cover slowly by pulling down from the two areas on the panel display, replace the three color Photoconductor Units. ZDJH013J D Turn the light brown lever coun- ZDJH015J You cannot remove these two screws. 10 Replace Black PCU (Type F) If ...using provid- C Take out the green screwdriver. Replacing Consumables and Maintenance Kit Replacing the Photoconductor Unit 1 If "Replace Black PCU (Type F)" appears on the panel display, replace the black Photoconductor Unit. Replace Color PCU (Type A) A Turn off the power switch and unplug the power cable. ment...

Maintenance Guide
Page 21
...in the illustration. The other three are installed as shown in the illustration. G Remove the Photoconductor Unit you can see all of the Photoconductor Unit. ZDJH016J The Photoconductor Units are color Photoconductor Units. ZDJH045J ZDJH211J Important ❒ Pulling out the Photoconduc- For black, remove the upper left... green areas at the upper left one, and for color, remove the three on the upper right of the green handle. tor Unit quickly might cause it clicks into place and holds. The black Photoconductor Unit is located on the right. 1 A Move the...
...in the illustration. The other three are installed as shown in the illustration. G Remove the Photoconductor Unit you can see all of the Photoconductor Unit. ZDJH016J The Photoconductor Units are color Photoconductor Units. ZDJH045J ZDJH211J Important ❒ Pulling out the Photoconduc- For black, remove the upper left... green areas at the upper left one, and for color, remove the three on the upper right of the green handle. tor Unit quickly might cause it clicks into place and holds. The black Photoconductor Unit is located on the right. 1 A Move the...
Maintenance Guide
Page 22
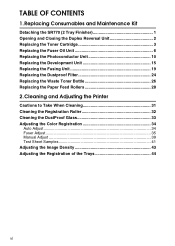
... Important ❒ Do not remove the cover that is attached to the bottom of the Photoconductor Unit slowly, slide the unit on the rail before proceeding to the rail inside the printer. For black, install one, and for color, install three. ZDJH223J Important ❒ Make sure the green arrow fits securely on the...
... Important ❒ Do not remove the cover that is attached to the bottom of the Photoconductor Unit slowly, slide the unit on the rail before proceeding to the rail inside the printer. For black, install one, and for color, install three. ZDJH223J Important ❒ Make sure the green arrow fits securely on the...

Maintenance Guide
Page 23
...green ed screwdriver. ZDJH020E L Close the front cover slowly by pushing the two areas on the back of the front cover. Replacing the Photoconductor Unit Important J Tighten two screws using provid- ❒ If you might damage the Photocon- 1 ductor Unit. ❒ Do not ...touch the light-sensitive area of the Photoconductor Unit. arrow of the Photoconductor Unit securely to its original position on the left ZDJH018J and right. E Remove the cover and push in the Photoconductor Unit until it stops.
...green ed screwdriver. ZDJH020E L Close the front cover slowly by pushing the two areas on the back of the front cover. Replacing the Photoconductor Unit Important J Tighten two screws using provid- ❒ If you might damage the Photocon- 1 ductor Unit. ❒ Do not ...touch the light-sensitive area of the Photoconductor Unit. arrow of the Photoconductor Unit securely to its original position on the left ZDJH018J and right. E Remove the cover and push in the Photoconductor Unit until it stops.

Maintenance Guide
Page 26
... hand, and pull out the unit slowly. The procedure for removing the unit is the same for all four colors. ZDJH993J Important ❒ Be careful not to touch the right side of the Photoconductor Unit. ❒ Be careful not to let it get in front of black (K), yellow (Y), cyan (C), and ...magenta (M). A Take the unit out from the upper left, the units are attached in the illustration. ZDJH016J The Development Unit is the same for all four colors. Starting from...
... hand, and pull out the unit slowly. The procedure for removing the unit is the same for all four colors. ZDJH993J Important ❒ Be careful not to touch the right side of the Photoconductor Unit. ❒ Be careful not to let it get in front of black (K), yellow (Y), cyan (C), and ...magenta (M). A Take the unit out from the upper left, the units are attached in the illustration. ZDJH016J The Development Unit is the same for all four colors. Starting from...
Maintenance Guide
Page 88
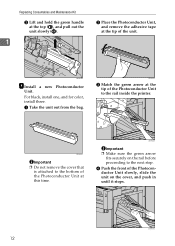
... The toner cartridge (M) is not set correctly or is not set, and the color printing is not set. Set the toner cartridge (M) correctly. Reset PCU Correctly /Yellow/Magenta Cyan/Black The indicated Photoconductor Unit(s) is/are not set correctly, unit(s) correctly. See "Setting Up" in...Finisher is not set. bles and Maintenance Kit". See "Setting Up" in the Setup Guide. bles and Maintenance Kit". Set the indicated Photoconductor Unit(s) correctly. Replace a waste toner bottle. is not set correctly, or Set the finisher correctly. Set the fuse oil unit correctly....
... The toner cartridge (M) is not set correctly or is not set, and the color printing is not set. Set the toner cartridge (M) correctly. Reset PCU Correctly /Yellow/Magenta Cyan/Black The indicated Photoconductor Unit(s) is/are not set correctly, unit(s) correctly. See "Setting Up" in...Finisher is not set. bles and Maintenance Kit". See "Setting Up" in the Setup Guide. bles and Maintenance Kit". Set the indicated Photoconductor Unit(s) correctly. Replace a waste toner bottle. is not set correctly, or Set the finisher correctly. Set the fuse oil unit correctly....
Maintenance Guide
Page 118
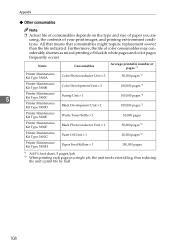
... Average printable number of pages *1 Printer Maintenance Kit Type 3800A Color Photoconductor Unit × 3 50,000 pages *2 Printer Maintenance Kit Type 3800B Color Development Unit × 3 100,000 pages *2 5 Printer Maintenance Kit Type 3800C Fusing Unit × 1 Printer Maintenance Kit Type 3800D Black Development Unit × 1 100,000 pages *2 100,000 pages *2 Printer Maintenance Kit Type 3800E Waste...
... Average printable number of pages *1 Printer Maintenance Kit Type 3800A Color Photoconductor Unit × 3 50,000 pages *2 Printer Maintenance Kit Type 3800B Color Development Unit × 3 100,000 pages *2 5 Printer Maintenance Kit Type 3800C Fusing Unit × 1 Printer Maintenance Kit Type 3800D Black Development Unit × 1 100,000 pages *2 100,000 pages *2 Printer Maintenance Kit Type 3800E Waste...
Maintenance Guide
Page 120
... and Maintenance Kit, 1 Replacing the Development Unit, 15 Replacing the Dustproof Filter, 24 Replacing the Fuser Oil Unit, 6 Replacing the Fusing Unit, 19 Replacing the Photoconductor Unit, 10 Replacing the Toner Cartridge, 3 Replacing the Waste Toner Bottle, 26 S Storing Paper, 53 T Thick Paper, 54 Toner Cartridge, 107 Troubleshooting, 69 W Warning, ii...
... and Maintenance Kit, 1 Replacing the Development Unit, 15 Replacing the Dustproof Filter, 24 Replacing the Fuser Oil Unit, 6 Replacing the Fusing Unit, 19 Replacing the Photoconductor Unit, 10 Replacing the Toner Cartridge, 3 Replacing the Waste Toner Bottle, 26 S Storing Paper, 53 T Thick Paper, 54 Toner Cartridge, 107 Troubleshooting, 69 W Warning, ii...

