
Setup Guide
Page 1
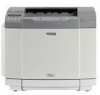
... using the machine. For safe and correct use the machine, you must set up the hardware and install the software. Setting Up the machine Windows® USB Windows® Parallel Installing the Drivers & Software Quick Setup Guide SP C210SF Before you can use , please be sure to read this product and keep it handy...
... using the machine. For safe and correct use the machine, you must set up the hardware and install the software. Setting Up the machine Windows® USB Windows® Parallel Installing the Drivers & Software Quick Setup Guide SP C210SF Before you can use , please be sure to read this product and keep it handy...

Setup Guide
Page 3
... (Letter size). 1 Document Cover 9. Starter cartridges have approx. Paper Tray 6. ADF Document Output Support Flap Quick Setup Guide CD-ROM User's Guide OPC Belt Cartridge AC Power Cord Telephone Line Cord Toner Cartridges (Black, Cyan, Magenta and Yellow)*1 Carton components may differ... Magenta and Yellow) at this machine, are supplied with Support Flap (Support Flap) 4. Connecting the interface cable is done during the software installation process. ■ USB interface cable Please make sure you intend to use a USB 2.0 interface cable that is not a standard accessory. ...
... (Letter size). 1 Document Cover 9. Starter cartridges have approx. Paper Tray 6. ADF Document Output Support Flap Quick Setup Guide CD-ROM User's Guide OPC Belt Cartridge AC Power Cord Telephone Line Cord Toner Cartridges (Black, Cyan, Magenta and Yellow)*1 Carton components may differ... Magenta and Yellow) at this machine, are supplied with Support Flap (Support Flap) 4. Connecting the interface cable is done during the software installation process. ■ USB interface cable Please make sure you intend to use a USB 2.0 interface cable that is not a standard accessory. ...

Setup Guide
Page 7
Setting Up the machine Windows® USB Windows® Parallel 8 Install the toner cartridge by sliding it into the correct guide. K K Y Y M M C C 0 Close the front cover. 2 Pull out the protective part from both sides of the machine. 9 Repeat steps 6 through 8 for ...the remaining toner cartridges. Windows NT® 4.0 Parallel Windows® Network For Network Users 5 Match the cartridge color label to the ...
Setting Up the machine Windows® USB Windows® Parallel 8 Install the toner cartridge by sliding it into the correct guide. K K Y Y M M C C 0 Close the front cover. 2 Pull out the protective part from both sides of the machine. 9 Repeat steps 6 through 8 for ...the remaining toner cartridges. Windows NT® 4.0 Parallel Windows® Network For Network Users 5 Match the cartridge color label to the ...

Setup Guide
Page 8
Remove the protective sheet. Step 1 Setting Up the machine 3 Install the OPC Belt Cartridge 4 Put the OPC belt cartridge into the machine guides with the flat side facing you. Scanner unit 5 Lock the belt cartridge lock levers. 2 Open the inside cover, and then close the scanner unit. 3 Remove ...
Remove the protective sheet. Step 1 Setting Up the machine 3 Install the OPC Belt Cartridge 4 Put the OPC belt cartridge into the machine guides with the flat side facing you. Scanner unit 5 Lock the belt cartridge lock levers. 2 Open the inside cover, and then close the scanner unit. 3 Remove ...

Setup Guide
Page 10
... end to a modular wall jack. If you are sharing one end of the User's Guide. Warning ■ The machine must be grounded using a 3-prong plug. ■ Since the machine is off. Step 1 Setting Up the machine 5 Install the Power Cord and Phone Line Do not connect the Parallel or USB cable yet...
... end to a modular wall jack. If you are sharing one end of the User's Guide. Warning ■ The machine must be grounded using a 3-prong plug. ■ Since the machine is off. Step 1 Setting Up the machine 5 Install the Power Cord and Phone Line Do not connect the Parallel or USB cable yet...

Setup Guide
Page 14
... when connected to automatically repair and re-install the software. *1 The User's Guide on the CD-ROM includes the Software and Network User's Guide for viewing scanned documents. ScanSoft ®... OmniPage®, which is integrated into your default word processor. Multi-Function Suite includes Printer Driver, Scanner Driver, ScanSoft® PaperPort® 9.0SE, ControlCenter2 and ScanSoft® OmniPage®. Repair Multi-Function Suite (For USB and Parallel cable users only.) If you experience errors while installing...
... when connected to automatically repair and re-install the software. *1 The User's Guide on the CD-ROM includes the Software and Network User's Guide for viewing scanned documents. ScanSoft ®... OmniPage®, which is integrated into your default word processor. Multi-Function Suite includes Printer Driver, Scanner Driver, ScanSoft® PaperPort® 9.0SE, ControlCenter2 and ScanSoft® OmniPage®. Repair Multi-Function Suite (For USB and Parallel cable users only.) If you experience errors while installing...

Setup Guide
Page 34
General 1 General Information Using this Guide 1-1 Finding information 1-1 Symbols used in this Guide 1-1 How to access the complete User's Guide 1-2 To view Documentation 1-2 Control panel overview 1-3 About fax machines 1-5 Custom features 1-5 Fax tones and handshake 1-6 ... line settings 3-3 Tone and Pulse dialing mode 3-3 Roll over phone lines 3-3 Two-line phone system 3-3 Converting telephone wall outlets 3-4 Installing machine, external two-line TAD and two-line telephone 3-4 Multi-line connections (PBX 3-5 Connecting an external or extension telephone 3-5 Connecting an...
General 1 General Information Using this Guide 1-1 Finding information 1-1 Symbols used in this Guide 1-1 How to access the complete User's Guide 1-2 To view Documentation 1-2 Control panel overview 1-3 About fax machines 1-5 Custom features 1-5 Fax tones and handshake 1-6 ... line settings 3-3 Tone and Pulse dialing mode 3-3 Roll over phone lines 3-3 Two-line phone system 3-3 Converting telephone wall outlets 3-4 Installing machine, external two-line TAD and two-line telephone 3-4 Multi-line connections (PBX 3-5 Connecting an external or extension telephone 3-5 Connecting an...

Setup Guide
Page 42
... to find the instructions as how to use 1 Windows® Explorer to read. • Quick Setup Guide: Setup and Software Installation Instructions • User's Guide (3 manuals): User's Guide for scanning directly from the root directory of the Fax, Printer, Scanner, PC Fax and Network. Note If this window does not appear, use the advanced features...
... to find the instructions as how to use 1 Windows® Explorer to read. • Quick Setup Guide: Setup and Software Installation Instructions • User's Guide (3 manuals): User's Guide for scanning directly from the root directory of the Fax, Printer, Scanner, PC Fax and Network. Note If this window does not appear, use the advanced features...

Setup Guide
Page 47
...tray can hold up to the top line of the maximum paper mark on the sliding paper width guide). Optional lower tray (Paper Feed Unit Type 1000) The optional lower tray can hold up to ... a lot of paper, please test some to 530 sheets of paper The machine loads paper from the installed standard paper tray or optional lower tray. Do not use any damage, use smooth white paper. ■...Before you can be loaded up to make sure that the paper is 1.76 in the machine driver and this Guide are as follows: Tray and optional unit Standard paper tray Optional lower tray Name Tray 1 Tray 2 2 -...
...tray can hold up to the top line of the maximum paper mark on the sliding paper width guide). Optional lower tray (Paper Feed Unit Type 1000) The optional lower tray can hold up to ... a lot of paper, please test some to 530 sheets of paper The machine loads paper from the installed standard paper tray or optional lower tray. Do not use any damage, use smooth white paper. ■...Before you can be loaded up to make sure that the paper is 1.76 in the machine driver and this Guide are as follows: Tray and optional unit Standard paper tray Optional lower tray Name Tray 1 Tray 2 2 -...
Setup Guide
Page 150
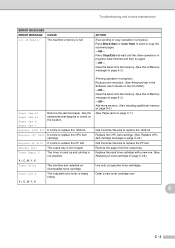
... in progress) Press Black Start or Color Start to send or copy the scanned pages. -OR- Toner Low X The indicated color toner is time to replace the OPC...a toner cartridge on page C-29.) Use only our genuine toner cartridges. Add more memory. (See Installing additional memory on page D-3.) (See Paper jams on the location. C C - 3 Stacker Full The...X = C, M, Y, K (Printing operation in progress) Reduce print resolution. (See Advanced tab in the Software User's Guide on page 5-3.) -OR- X = C, M, Y, K Toner Error The machine has detected an incompatible toner cartridge. Remove...
... in progress) Press Black Start or Color Start to send or copy the scanned pages. -OR- Toner Low X The indicated color toner is time to replace the OPC...a toner cartridge on page C-29.) Use only our genuine toner cartridges. Add more memory. (See Installing additional memory on page D-3.) (See Paper jams on the location. C C - 3 Stacker Full The...X = C, M, Y, K (Printing operation in progress) Reduce print resolution. (See Advanced tab in the Software User's Guide on page 5-3.) -OR- X = C, M, Y, K Toner Error The machine has detected an incompatible toner cartridge. Remove...

Setup Guide
Page 152
... the faxes from the power source for several minutes, and then reconnect it. Transferring faxes to your PC. 1 Press Stop/Exit. 2 Make sure you have installed Multi-Function Suite on your PC, and then turn on PC Fax Receiving on the PC. (For details about PC Fax Receive, see PC-FAX... software in the Software User's Guide on page 8-3.) During setup the LCD will be forwarded. 2 Press Black Start. To exit and leave the faxes in the machine's memory. -OR- If the...
... the faxes from the power source for several minutes, and then reconnect it. Transferring faxes to your PC. 1 Press Stop/Exit. 2 Make sure you have installed Multi-Function Suite on your PC, and then turn on PC Fax Receiving on the PC. (For details about PC Fax Receive, see PC-FAX... software in the Software User's Guide on page 8-3.) During setup the LCD will be forwarded. 2 Press Black Start. To exit and leave the faxes in the machine's memory. -OR- If the...

Setup Guide
Page 160
Select 'SP C210SF' and right-click. See Installing additional memory on the screen but do not appear when ...in and the power switch is turned On. -OR- • The toner cartridge and the OPC belt cartridge are installed properly. (See Replacing a toner cartridge on page C-29 and Replacing the OPC belt cartridge (Photo Conductor Unit Type...; The interface cable is securely connected between the machine and computer. (See the Quick Setup Guide). -OR- • The correct printer driver has been installed and selected. -OR- • Check to work with your application software to the machine ...
Select 'SP C210SF' and right-click. See Installing additional memory on the screen but do not appear when ...in and the power switch is turned On. -OR- • The toner cartridge and the OPC belt cartridge are installed properly. (See Replacing a toner cartridge on page C-29 and Replacing the OPC belt cartridge (Photo Conductor Unit Type...; The interface cable is securely connected between the machine and computer. (See the Quick Setup Guide). -OR- • The correct printer driver has been installed and selected. -OR- • Check to work with your application software to the machine ...
Setup Guide
Page 161
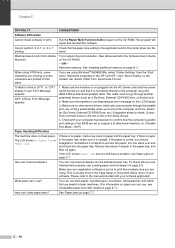
...also communicate through another peripheral device (such as , drivers for laser machines. (For information on page 2-8. If the paper is curled... DIFFICULTY SUGGESTIONS Software Difficulties Cannot install software or print. Cannot perform '2 in 1' or '4 in 1' Check that are printed in the printer driver are using the IEEE-... more memory. Select the properties of paper in the Software User's Guide on page 2-1.) How can I load envelopes? The cable must not... Paper jams on the CD-ROM. Reduce the amount of the 'SP C210SF'. How can use ? Check with your software. When using...
...also communicate through another peripheral device (such as , drivers for laser machines. (For information on page 2-8. If the paper is curled... DIFFICULTY SUGGESTIONS Software Difficulties Cannot install software or print. Cannot perform '2 in 1' or '4 in 1' Check that are printed in the printer driver are using the IEEE-... more memory. Select the properties of paper in the Software User's Guide on page 2-1.) How can I load envelopes? The cable must not... Paper jams on the CD-ROM. Reduce the amount of the 'SP C210SF'. How can use ? Check with your software. When using...

Setup Guide
Page 164
.... ■ Check that the front cover is closed properly. ■ Identify the missing color and check that the room temperature is installed properly. ■ Replace the toner cartridge. (See Replacing a toner cartridge on page ...page C-33.) Colored spots or Toner stain ABCDEFGHIJKLMNOPQRSTUVWXYZ. 0123456789. abcdefghijklmnopqrstuvwxyz. R ABCDEFGHIJKLMNOPQRSTUVWXYZ. 0123456789. abcdefghijklmnopqrstuvwxyz. abcdefghijklmnopqrstuvwxyz. ABCDEFGHIJKLMNOPQRSTUVWXYZ. 0123456789. R ■ Clean the registration roller, the paper pick-up roller, the transfer roller guide and the exit ...
.... ■ Check that the front cover is closed properly. ■ Identify the missing color and check that the room temperature is installed properly. ■ Replace the toner cartridge. (See Replacing a toner cartridge on page ...page C-33.) Colored spots or Toner stain ABCDEFGHIJKLMNOPQRSTUVWXYZ. 0123456789. abcdefghijklmnopqrstuvwxyz. R ABCDEFGHIJKLMNOPQRSTUVWXYZ. 0123456789. abcdefghijklmnopqrstuvwxyz. abcdefghijklmnopqrstuvwxyz. ABCDEFGHIJKLMNOPQRSTUVWXYZ. 0123456789. R ■ Clean the registration roller, the paper pick-up roller, the transfer roller guide and the exit ...

Setup Guide
Page 166
...front cover is closed properly. ■ Check that the toner cartridges are installed properly. ■ Check that the OPC belt cartridge is installed properly. ■ Identify the color causing the problem and replace the toner cartridge. (See Replacing a toner... on page C-33.) ■ Change to thick paper mode through the control panel or the printer driver. (See the Software User's Guide on page C-29.) Insufficient gloss Offset image ABCDEFGHIJKLMNOPQRSTUVWXYZ. 0123456789. abcdefghijklmnopqrstuvwxyz. abcdefghijklmnopqrstuvwxyz. ABCDEFGHIJKLMNOPQRSTUVWXYZ. 0123456789. ...
...front cover is closed properly. ■ Check that the toner cartridges are installed properly. ■ Check that the OPC belt cartridge is installed properly. ■ Identify the color causing the problem and replace the toner cartridge. (See Replacing a toner... on page C-33.) ■ Change to thick paper mode through the control panel or the printer driver. (See the Software User's Guide on page C-29.) Insufficient gloss Offset image ABCDEFGHIJKLMNOPQRSTUVWXYZ. 0123456789. abcdefghijklmnopqrstuvwxyz. abcdefghijklmnopqrstuvwxyz. ABCDEFGHIJKLMNOPQRSTUVWXYZ. 0123456789. ...

Setup Guide
Page 178
... each cartridge color label to the same color label on the machine. When the waste toner pack is nearly full a warning message will automatically be positioned properly when the front cover is closed. Slide it in the guide. it must rest loosely in the guide rails and will... Put in the new toner cartridge by positioning it gently into the machine. Match each color cartridge is full, the following message appears on its end or turn it to prevent improper installation. Troubleshooting and routine maintenance Waste toner pack After you have printed approximately 12,000 images ...
... each cartridge color label to the same color label on the machine. When the waste toner pack is nearly full a warning message will automatically be positioned properly when the front cover is closed. Slide it in the guide. it must rest loosely in the guide rails and will... Put in the new toner cartridge by positioning it gently into the machine. Match each color cartridge is full, the following message appears on its end or turn it to prevent improper installation. Troubleshooting and routine maintenance Waste toner pack After you have printed approximately 12,000 images ...

Setup Guide
Page 187
Note To check that you have installed the SO-DIMM properly, you can print the User Settings listing that shows the current memory size. To print the User Settings listing, see How to your computer. D - 5 Turn on page 9-2. Then, plug the machine's power cord back into the guide rails, and then secure it into the AC power outlet first, and then plug in the telephone line cord. Chapter D 9 Put the side cover back on by sliding it with the screw. 0 Reconnect the interface cable (machine cable) to print a report on the machine's power switch.
Note To check that you have installed the SO-DIMM properly, you can print the User Settings listing that shows the current memory size. To print the User Settings listing, see How to your computer. D - 5 Turn on page 9-2. Then, plug the machine's power cord back into the guide rails, and then secure it into the AC power outlet first, and then plug in the telephone line cord. Chapter D 9 Put the side cover back on by sliding it with the screw. 0 Reconnect the interface cable (machine cable) to print a report on the machine's power switch.
Setup Guide
Page 212
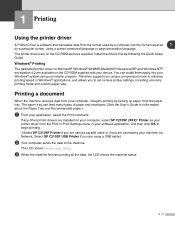
... and custom paper size. If any other printer drivers are installed on your computer, select SP C210SF (XXX)* Printer as your printer driver from the Print or Print Settings menu in Windows® applications, and allows you to the machine. Install the drivers first by following the Quick Setup Guide. The LCD shows Receiving Data. 3 When the...
... and custom paper size. If any other printer drivers are installed on your computer, select SP C210SF (XXX)* Printer as your printer driver from the Print or Print Settings menu in Windows® applications, and allows you to the machine. Install the drivers first by following the Quick Setup Guide. The LCD shows Receiving Data. 3 When the...

Setup Guide
Page 244
...; OCR ScanSoft® PaperPort® 9.0SE is in the Documentation located on the CD-ROM. It allows you install Multi-Function Suite, ScanSoft® PaperPort® 9.0SE and ScanSoft® OmniPage® OCR are installed automatically. 2 - 14 You can be accessed through the ScanSoft® PaperPort® 9.0SE program group. The complete...
...; OCR ScanSoft® PaperPort® 9.0SE is in the Documentation located on the CD-ROM. It allows you install Multi-Function Suite, ScanSoft® PaperPort® 9.0SE and ScanSoft® OmniPage® OCR are installed automatically. 2 - 14 You can be accessed through the ScanSoft® PaperPort® 9.0SE program group. The complete...

Setup Guide
Page 264
...5 clients will not be excluded from the control panel. (Please see the Network User's Guide on a network. If you want to use on the CD-ROM.) 4 Before using Network Scanning Network License SP C210SF includes the PC license for up to an additional 5 Users. Note ■ Max... agreement pack for up to 5 Users. This license supports the installation of the Multi-Function Suite including ScanSoft® PaperPort® 9.0SE on up to 5 PC's for use more than 5 PCs with ScanSoft® PaperPort® 9.0SE installed, please purchase NL-5 which is not supported in Windows NT®...
...5 clients will not be excluded from the control panel. (Please see the Network User's Guide on a network. If you want to use on the CD-ROM.) 4 Before using Network Scanning Network License SP C210SF includes the PC license for up to an additional 5 Users. Note ■ Max... agreement pack for up to 5 Users. This license supports the installation of the Multi-Function Suite including ScanSoft® PaperPort® 9.0SE on up to 5 PC's for use more than 5 PCs with ScanSoft® PaperPort® 9.0SE installed, please purchase NL-5 which is not supported in Windows NT®...


