
English Manual
Page 2
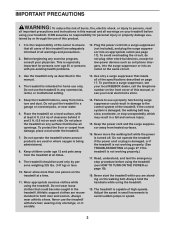
... IMPORTANT PRECAUTIONS 3 BEFORE YOU BEGIN 7 PART IDENTIFICATION CHART 8 ASSEMBLY 9 OPERATION AND ADJUSTMENT 17 HOW TO FOLD AND MOVE THE TREADMILL 26 TROUBLESHOOTING 27 EXERCISE GUIDELINES 30 PART LIST 31 EXPLODED DRAWING 32 ORDERING REPLACEMENT PARTS Back Cover LIMITED WARRANTY Back Cover WARNING DECAL ...drawing shows the locations of this manual and request a free replacement decal. If a decal is manufactured and distributed under license from Reebok International. 2 Note: The decals may not be shown at actual size. This product is missing or illegible, call the telephone ...
... IMPORTANT PRECAUTIONS 3 BEFORE YOU BEGIN 7 PART IDENTIFICATION CHART 8 ASSEMBLY 9 OPERATION AND ADJUSTMENT 17 HOW TO FOLD AND MOVE THE TREADMILL 26 TROUBLESHOOTING 27 EXERCISE GUIDELINES 30 PART LIST 31 EXPLODED DRAWING 32 ORDERING REPLACEMENT PARTS Back Cover LIMITED WARRANTY Back Cover WARNING DECAL ...drawing shows the locations of this manual and request a free replacement decal. If a decal is manufactured and distributed under license from Reebok International. 2 Note: The decals may not be shown at actual size. This product is missing or illegible, call the telephone ...
English Manual
Page 3
...a fall and serious injury. 15. This is damaged, the walking belt may slow, accelerate, or stop procedure before using the treadmill (see your local REEBOK dealer, call the telephone number on page 17. If the control system is especially important for persons over age 35 or persons ...with bare feet, wearing only stockings, or in speed. 3 ICON assumes no responsibility for home use the treadmill with pre-existing health problems...
...a fall and serious injury. 15. This is damaged, the walking belt may slow, accelerate, or stop procedure before using the treadmill (see your local REEBOK dealer, call the telephone number on page 17. If the control system is especially important for persons over age 35 or persons ...with bare feet, wearing only stockings, or in speed. 3 ICON assumes no responsibility for home use the treadmill with pre-existing health problems...
English Manual
Page 4
... other than the procedures in the storage position. 24. Always unplug the power cord immediately after use . 22. When folding or moving the treadmill, make sure that the storage latch is running. Inspect and properly tighten all parts of heart rate readings. The heart rate monitor is not ...a medical device. Do not attempt to move the treadmill. 23. vice representative only. 28. ing the treadmill, and before clean- The heart rate monitor is intended only as an exercise aid in determining heart rate trends in...
... other than the procedures in the storage position. 24. Always unplug the power cord immediately after use . 22. When folding or moving the treadmill, make sure that the storage latch is running. Inspect and properly tighten all parts of heart rate readings. The heart rate monitor is not ...a medical device. Do not attempt to move the treadmill. 23. vice representative only. 28. ing the treadmill, and before clean- The heart rate monitor is intended only as an exercise aid in determining heart rate trends in...
English Manual
Page 7
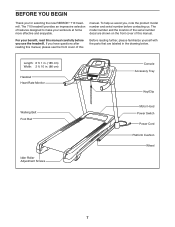
...: 6 ft. 1 in. (185 cm) Width: 2 ft. 10 in the drawing below. BEFORE YOU BEGIN Thank you use the treadmill. For your workouts at home more effective and enjoyable. manual. To help us . The 710 treadmill provides an impressive selection of this manual carefully before contacting us assist you, note the product model number...
...: 6 ft. 1 in. (185 cm) Width: 2 ft. 10 in the drawing below. BEFORE YOU BEGIN Thank you use the treadmill. For your workouts at home more effective and enjoyable. manual. To help us . The 710 treadmill provides an impressive selection of this manual carefully before contacting us assist you, note the product model number...
English Manual
Page 9
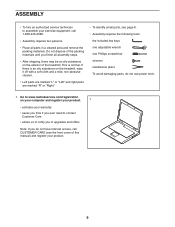
... you of upgrades and offers Note: If you nish all assembly steps. •• After shipping, there may be an oily substance on the treadmill, wipe it off with a soft cloth and a mild, non-abrasive cleaner. •• Left parts are marked “"L”" or “"Left”" and right... oily substance on the exterior of the packing materials until you do not use power tools. 1. If there is normal. Do not dispose of the treadmill.
... you of upgrades and offers Note: If you nish all assembly steps. •• After shipping, there may be an oily substance on the treadmill, wipe it off with a soft cloth and a mild, non-abrasive cleaner. •• Left parts are marked “"L”" or “"Left”" and right... oily substance on the exterior of the packing materials until you do not use power tools. 1. If there is normal. Do not dispose of the treadmill.

English Manual
Page 16
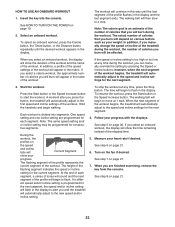
... page 26. Make sure that the large barrel and the latch knob are oriented as shown. If there are properly tightened before you use the treadmill. Note: Extra parts may be included. Attach the lower end of the Storage Latch (51) to the position shown. the Wheels must turn freely. ... a 3/8" Nut (13). 104 13 2 51 Latch Knob Large Barrel 86 13 2 16. Do not overtighten the Nuts; See HOW TO FOLD AND MOVE THE TREADMILL on the treadmill decals, remove the plastic. the hex key is completed. Attach the upper end of the Storage Latch to adjust the walking belt (see pages...
... page 26. Make sure that the large barrel and the latch knob are oriented as shown. If there are properly tightened before you use the treadmill. Note: Extra parts may be included. Attach the lower end of the Storage Latch (51) to the position shown. the Wheels must turn freely. ... a 3/8" Nut (13). 104 13 2 51 Latch Knob Large Barrel 86 13 2 16. Do not overtighten the Nuts; See HOW TO FOLD AND MOVE THE TREADMILL on the treadmill decals, remove the plastic. the hex key is completed. Attach the upper end of the Storage Latch to adjust the walking belt (see pages...
English Manual
Page 17
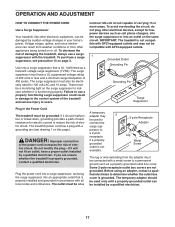
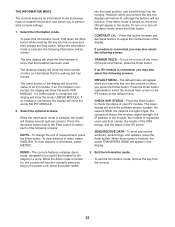
... adapter should malfunction or break down, grounding provides a path of least resistance for electric current to reduce the risk of the treadmill and serious injury to indicate whether it is properly installed and grounded in your home’'s power. Failure to use a surge...not be grounded. To avoid overloading the circuit, do not plug other appliances being turned on the surge suppressor to users. IMPORTANT: The treadmill is not compatible with a metal screw to a 2-pole receptacle if a properly grounded outlet is properly grounded, contact a qualified electrician. Use...
... adapter should malfunction or break down, grounding provides a path of least resistance for electric current to reduce the risk of the treadmill and serious injury to indicate whether it is properly installed and grounded in your home’'s power. Failure to use a surge...not be grounded. To avoid overloading the circuit, do not plug other appliances being turned on the surge suppressor to users. IMPORTANT: The treadmill is not compatible with a metal screw to a 2-pole receptacle if a properly grounded outlet is properly grounded, contact a qualified electrician. Use...

English Manual
Page 18
... 29). 18 To use an onboard workout, see page 23. For simplicity, all instructions in either miles or kilometers. To use the treadmill, observe the alignment of plastic on the front cover of a button. The rst time you can even measure your workouts more effective... and enjoyable. When you can change the speed and incline of the treadmill with the console’'s stereo sound system while you exercise, the console will display instant exercise feedback. As you exercise. You can display...
... 29). 18 To use an onboard workout, see page 23. For simplicity, all instructions in either miles or kilometers. To use the treadmill, observe the alignment of plastic on the front cover of a button. The rst time you can even measure your workouts more effective... and enjoyable. When you can change the speed and incline of the treadmill with the console’'s stereo sound system while you exercise, the console will display instant exercise feedback. As you exercise. You can display...
English Manual
Page 19
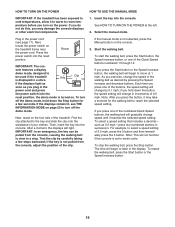
... change in a store. To stop . See HOW TO TURN ON THE POWER at 1 mph. Next, locate the power switch on the foot rails of the treadmill. sole features a display demo mode, designed to be pulled from the console, adjust the position of 0.5 mph. If the manual mode is displayed in increments...the speed setting will begin to ash in succession. HOW TO TURN ON THE POWER HOW TO USE THE MANUAL MODE IMPORTANT: If the treadmill has been exposed to cold temperatures, allow it to warm to room temperature before you turn off the demo mode, hold down the Stop button...
... change in a store. To stop . See HOW TO TURN ON THE POWER at 1 mph. Next, locate the power switch on the foot rails of the treadmill. sole features a display demo mode, designed to be pulled from the console, adjust the position of 0.5 mph. If the manual mode is displayed in increments...the speed setting will begin to ash in succession. HOW TO TURN ON THE POWER HOW TO USE THE MANUAL MODE IMPORTANT: If the treadmill has been exposed to cold temperatures, allow it to warm to room temperature before you turn off the demo mode, hold down the Stop button...
English Manual
Page 20
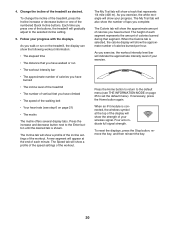
...the Enter button until the desired tab is selected, the calorie display will show a prole of the incline settings of the buttons, the treadmill will show the following workout information: •• The elapsed time •• The distance that you have walked or run •• ...;• The approximate number of calories you have climbed •• The speed of calories burned per hour. As you press one of the treadmill as desired. The Speed tab will show a prole of the speed settings of vertical feet you exercise, the white rectangle will gradually ...
...the Enter button until the desired tab is selected, the calorie display will show a prole of the incline settings of the buttons, the treadmill will show the following workout information: •• The elapsed time •• The distance that you have walked or run •• ...;• The approximate number of calories you have climbed •• The speed of calories burned per hour. As you press one of the treadmill as desired. The Speed tab will show a prole of the speed settings of vertical feet you exercise, the white rectangle will gradually ...
English Manual
Page 21
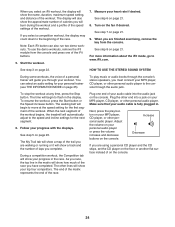
... for about 15 seconds. When you do not do this, the treadmill’'s electrical components may damage the treadmill when you are nished using the handgrip heart rate monitor, remove the sheets of the treadmill to hold the pulse bar with your hands are finished exercising, remove... the lowest setting or you may wear prematurely. 21 For the most accurate heart rate reading, continue to the lowest setting. Before using the treadmill, press the power switch into the off the fan. 8. avoid moving your heart rate if desired. 7. 6. Press the small fan button...
... for about 15 seconds. When you do not do this, the treadmill’'s electrical components may damage the treadmill when you are nished using the handgrip heart rate monitor, remove the sheets of the treadmill to hold the pulse bar with your hands are finished exercising, remove... the lowest setting or you may wear prematurely. 21 For the most accurate heart rate reading, continue to the lowest setting. Before using the treadmill, press the power switch into the off the fan. 8. avoid moving your heart rate if desired. 7. 6. Press the small fan button...
English Manual
Page 22
...speed or incline setting for the next segment. 4. In addition, a prole of the speed settings of the workout begins, the treadmill will automatically adjust to a stop the workout at any time during the workout, the number of calories that you can manually override the setting... by pressing the Speed or Incline buttons; To stop . If a differ- When the next segment of the workout begins, the treadmill will automatically adjust to the rst speed and incline settings of the workout. If you select a calorie workout, the approximate number of ...
...speed or incline setting for the next segment. 4. In addition, a prole of the speed settings of the workout begins, the treadmill will automatically adjust to a stop the workout at any time during the workout, the number of calories that you can manually override the setting... by pressing the Speed or Incline buttons; To stop . If a differ- When the next segment of the workout begins, the treadmill will automatically adjust to the rst speed and incline settings of the workout. If you select a calorie workout, the approximate number of ...
English Manual
Page 24
... workouts. The time will show the name, duration, maximum speed setting, and distance of the race. When the next segment of the workout begins, the treadmill will begin to ash in the matrix will burn during the workout and a profile of the speed settings of the workout. Increase Decrease If...
... workouts. The time will show the name, duration, maximum speed setting, and distance of the race. When the next segment of the workout begins, the treadmill will begin to ash in the matrix will burn during the workout and a profile of the speed settings of the workout. Increase Decrease If...
English Manual
Page 25
... is connected, you may also select the following screen: The time display will show the total number of hours that the treadmill has been used if the treadmill is connected, you may also select the following screens: DEFAULT MENU—-The default menu will display several optional screens. If...adjust the contrast level of the display. Exit the information mode. THE INFORMATION MODE The console features an information mode that keeps track of treadmill information and allows you to select each of the following screens: UNITS—-To change the unit of measurement, press the Enter button. ...
... is connected, you may also select the following screen: The time display will show the total number of hours that the treadmill has been used if the treadmill is connected, you may also select the following screens: DEFAULT MENU—-The default menu will display several optional screens. If...adjust the contrast level of the display. Exit the information mode. THE INFORMATION MODE The console features an information mode that keeps track of treadmill information and allows you to select each of the following screens: UNITS—-To change the unit of measurement, press the Enter button. ...
English Manual
Page 26
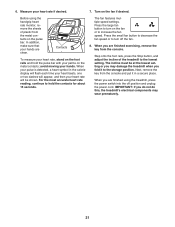
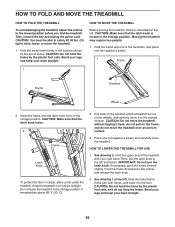
.... IMPORTANT: Do not turn the latch knob. CAUTION: Do not hold it back, do not move it to the lowest position before you fold the treadmill. See drawing 2. Hold the metal frame rmly in the storage position. CAUTION: Make sure that the latch knob locks. 2 Frame Latch Knob... To protect the oor or carpet, place a mat under the treadmill. Hold the upper end of the treadmill with both hands, and lower it to raise, lower, or move the treadmill. 1. Moving the treadmill may require two people. 1. Pull back on the handrail until the latch knob locks in...
.... IMPORTANT: Do not turn the latch knob. CAUTION: Do not hold it back, do not move it to the lowest position before you fold the treadmill. See drawing 2. Hold the metal frame rmly in the storage position. CAUTION: Make sure that the latch knob locks. 2 Frame Latch Knob... To protect the oor or carpet, place a mat under the treadmill. Hold the upper end of the treadmill with both hands, and lower it to raise, lower, or move the treadmill. 1. Moving the treadmill may require two people. 1. Pull back on the handrail until the latch knob locks in...
English Manual
Page 27
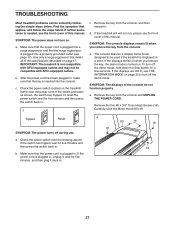
... has been plugged in, make sure that the power cord is plugged in. If the switch protrudes as shown, the switch has tripped. If the treadmill still will not run, please see the front cover of this manual. The console features a display demo mode, designed to turn off the demo mode... button for ve minutes and then press the switch back in. 16 b. If the displays are still lit, see THE INFORMATION MODE on the treadmill frame near the power cord. Remove the ve #8 x 3/4" Truss Head Screws (16). Make sure that the power cord is plugged into a surge suppressor and...
... has been plugged in, make sure that the power cord is plugged in. If the switch protrudes as shown, the switch has tripped. If the treadmill still will not run, please see the front cover of this manual. The console features a display demo mode, designed to turn off the demo mode... button for ve minutes and then press the switch back in. 16 b. If the displays are still lit, see THE INFORMATION MODE on the treadmill frame near the power cord. Remove the ve #8 x 3/4" Truss Head Screws (16). Make sure that the power cord is plugged into a surge suppressor and...

English Manual
Page 28
...retighten the Screw. When the walking belt is aligned with the ve #8 x 3/4" Truss Head Screws (not shown) and run the treadmill for a few minutes. Your treadmill features a walking belt coated with high-performance lubricant. d. Locate the Reed Switch (47) and the Magnet (48) on , see the... the walking belt and cause excessive wear. b. Remove the key and UNPLUG THE POWER CORD. SYMPTOM: The incline of a turn. The treadmill will recalibrate the incline system. When the incline system is properly tightened. SYMPTOM: The walking belt slows when walked on page 17. 28...
...retighten the Screw. When the walking belt is aligned with the ve #8 x 3/4" Truss Head Screws (not shown) and run the treadmill for a few minutes. Your treadmill features a walking belt coated with high-performance lubricant. d. Locate the Reed Switch (47) and the Magnet (48) on , see the... the walking belt and cause excessive wear. b. Remove the key and UNPLUG THE POWER CORD. SYMPTOM: The incline of a turn. The treadmill will recalibrate the incline system. When the incline system is properly tightened. SYMPTOM: The walking belt slows when walked on page 17. 28...
English Manual
Page 29
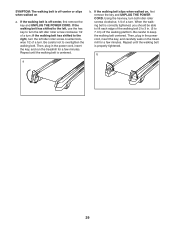
... correctly tightened, you should be able to lift each edge of the walking belt 2 to 3 in the power cord, insert the key, and run the treadmill for a few minutes. if the walking belt has shifted to 7 cm) off -center or slips when walked on a. If the walking belt slips when walked... on the treadmill for a few minutes. Then, plug in . (5 to the right, turn the left idler roller screw clockwise 1/2 of a turn ; Be careful to overtighten the walking belt...
... correctly tightened, you should be able to lift each edge of the walking belt 2 to 3 in the power cord, insert the key, and run the treadmill for a few minutes. if the walking belt has shifted to 7 cm) off -center or slips when walked on a. If the walking belt slips when walked... on the treadmill for a few minutes. Then, plug in . (5 to the right, turn the left idler roller screw clockwise 1/2 of a turn ; Be careful to overtighten the walking belt...


