Owners Manual
Page 3
...A Device on next page... continued on page 14. Acting like its namesake, Kameleon changes the Device Menu for the user. It is a revolutionary universal remote control that contains channel selection, volume control, and a keypad. The result is a stunning, bright display with the feel..., including TV, video, and audio components. For example, selecting TV displays a main menu that uses Universal Electronics' Kameleon Technology. The remote control includes convenient Menu Driven programming. After installing four (4) new AAA alkaline batteries, you can immediately use ,...
...A Device on next page... continued on page 14. Acting like its namesake, Kameleon changes the Device Menu for the user. It is a revolutionary universal remote control that contains channel selection, volume control, and a keypad. The result is a stunning, bright display with the feel..., including TV, video, and audio components. For example, selecting TV displays a main menu that uses Universal Electronics' Kameleon Technology. The remote control includes convenient Menu Driven programming. After installing four (4) new AAA alkaline batteries, you can immediately use ,...
Owners Manual
Page 4
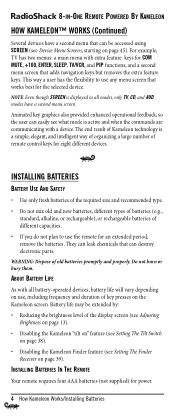
... best for power. 4 How Kameleon Works/Installing Batteries INSTALLING BATTERIES IN THE REMOTE Your remote requires four AAA batteries (not supplied) for the selected device. This way a user has the flexibility to use , including frequency and duration of remote control keys for an extended period,... remove the batteries. NOTE: Even though SCREEN is a simple, elegant, and intelligent way of organizing a large number of key presses on use the remote for eight different devices. INSTALLING BATTERIES...
... best for power. 4 How Kameleon Works/Installing Batteries INSTALLING BATTERIES IN THE REMOTE Your remote requires four AAA batteries (not supplied) for the selected device. This way a user has the flexibility to use , including frequency and duration of remote control keys for an extended period,... remove the batteries. NOTE: Even though SCREEN is a simple, elegant, and intelligent way of organizing a large number of key presses on use the remote for eight different devices. INSTALLING BATTERIES...
Owners Manual
Page 6
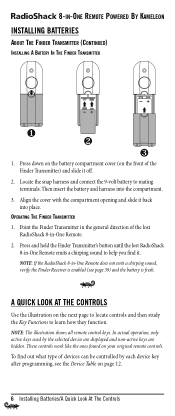
... is fresh. A QUICK LOOK AT THE CONTROLS Use the illustration on the front of devices can be controlled by the selected device are displayed and non-active keys are hidden. NOTE: The illustration shows all remote control keys. In actual operation, only active keys...remote controls. Locate the snap harness and connect the 9-volt battery to help you find out what type of the Finder Transmitter) and slide it . These controls work like the ones found on page 12. 6 Installing Batteries/A Quick Look At The Controls To find it off. 2. 8-IN-ONE REMOTE POWERED BY KAMELEON...
... is fresh. A QUICK LOOK AT THE CONTROLS Use the illustration on the front of devices can be controlled by the selected device are displayed and non-active keys are hidden. NOTE: The illustration shows all remote control keys. In actual operation, only active keys...remote controls. Locate the snap harness and connect the 9-volt battery to help you find out what type of the Finder Transmitter) and slide it . These controls work like the ones found on page 12. 6 Installing Batteries/A Quick Look At The Controls To find it off. 2. 8-IN-ONE REMOTE POWERED BY KAMELEON...
Owners Manual
Page 10
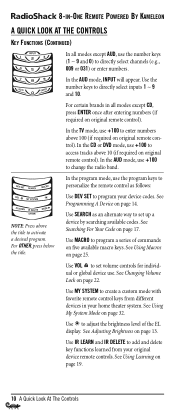
... Searching For Your Code on page 13. 8-IN-ONE REMOTE POWERED BY KAMELEON A QUICK LOOK AT THE CONTROLS KEY FUNCTIONS (CONTINUED) In all modes except CD, press ENTER once after entering numbers (if required on original remote control). Use VOL to add and delete key functions learned from..., use the number keys (1 ~ 9 and 0) to change the radio band. Use to program a series of the EL display. See Adjusting Brightness on page 17. Use MY SYSTEM to create a custom mode with favorite remote control keys from your device codes. See Programming A Device on five available ...
... Searching For Your Code on page 13. 8-IN-ONE REMOTE POWERED BY KAMELEON A QUICK LOOK AT THE CONTROLS KEY FUNCTIONS (CONTINUED) In all modes except CD, press ENTER once after entering numbers (if required on original remote control). Use VOL to add and delete key functions learned from..., use the number keys (1 ~ 9 and 0) to change the radio band. Use to program a series of the EL display. See Adjusting Brightness on page 17. Use MY SYSTEM to create a custom mode with favorite remote control keys from your device codes. See Programming A Device on five available ...
Owners Manual
Page 18
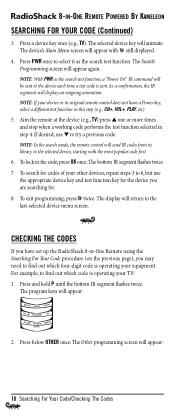
8-IN-ONE REMOTE POWERED BY KAMELEON SEARCHING FOR YOUR CODE (Continued) 3. NOTE: With PWR as the search test function. For example, to the selected device, starting with still displayed. 4. The device's Main Menu screen will send IR codes from its original remote control does not have set up the... OTHER once. The Search Programming screen will appear: 18 Searching For Your Code/Checking The Codes NOTE: In the search mode, the remote control will appear with the most popular code first. 6. To exit programming, press twice. Press a device key once (e.g., TV). The Other...
8-IN-ONE REMOTE POWERED BY KAMELEON SEARCHING FOR YOUR CODE (Continued) 3. NOTE: With PWR as the search test function. For example, to the selected device, starting with still displayed. 4. The device's Main Menu screen will send IR codes from its original remote control does not have set up the... OTHER once. The Search Programming screen will appear: 18 Searching For Your Code/Checking The Codes NOTE: In the search mode, the remote control will appear with the most popular code first. 6. To exit programming, press twice. Press a device key once (e.g., TV). The Other...
Owners Manual
Page 19
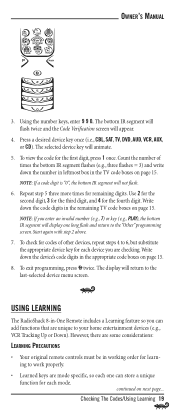
... 6, but substitute the appropriate device key for each mode. Using the number keys, enter 9 9 0. continued on page 15. To exit programming, press twice. However, there are some considerations: LEARNING PRECAUTIONS • Your original remote controls must be in the remaining TV code boxes on next page... To view the code for each device...
... 6, but substitute the appropriate device key for each mode. Using the number keys, enter 9 9 0. continued on page 15. To exit programming, press twice. However, there are some considerations: LEARNING PRECAUTIONS • Your original remote controls must be in the remaining TV code boxes on next page... To view the code for each device...
Owners Manual
Page 20
...page) from your original remote control.Also locate the key (on page 28). • Certain device codes are assigned to the same key, the last programmed function will be stored. • A learned function cannot be displayed. 4. 8-IN-ONE REMOTE POWERED BY KAMELEON USING LEARNING LEARNING PRECAUTIONS... (CONTINUED) • Learned keys can be used in macros (see Using Keymover on your original remote control) that will serve as the teaching function. 20 Using Learning Be ...
...page) from your original remote control.Also locate the key (on page 28). • Certain device codes are assigned to the same key, the last programmed function will be stored. • A learned function cannot be displayed. 4. 8-IN-ONE REMOTE POWERED BY KAMELEON USING LEARNING LEARNING PRECAUTIONS... (CONTINUED) • Learned keys can be used in macros (see Using Keymover on your original remote control) that will serve as the teaching function. 20 Using Learning Be ...

Owners Manual
Page 21
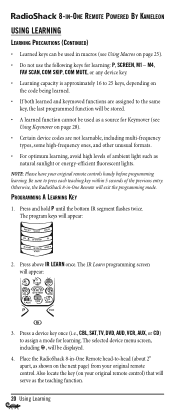
... off, press and hold P until the bottom IR segment flashes twice. To exit programming, press twice. Press and hold the teaching key (on your original remote control) until a successful capture occurs. Press a device key once (i.e., CBL, SAT, TV, DVD, AUD, VCR, AUX, or CD) for three revolutions, ...and then the entire display will be deleted resides. The program keys will appear: 2. continued on page 43. On the RadioShack 8-in -One Remote) turns on page 19. Upon deletion, the bottom IR segment will flash twice when the code is successfully captured. If needed, also see "...
... off, press and hold P until the bottom IR segment flashes twice. To exit programming, press twice. Press and hold the teaching key (on your original remote control) until a successful capture occurs. Press a device key once (i.e., CBL, SAT, TV, DVD, AUD, VCR, AUX, or CD) for three revolutions, ...and then the entire display will be deleted resides. The program keys will appear: 2. continued on page 43. On the RadioShack 8-in -One Remote) turns on page 19. Upon deletion, the bottom IR segment will flash twice when the code is successfully captured. If needed, also see "...
Owners Manual
Page 27
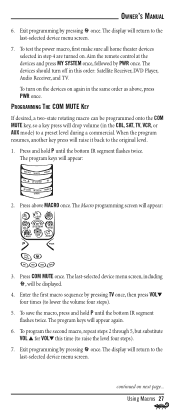
... MUTE KEY If desired, a two-state rotating macro can be displayed. 4. The Macro programming screen will drop volume (in step 4 are turned on.Aim the remote control at the devices and press MY SYSTEM once, followed by pressing once.
... MUTE KEY If desired, a two-state rotating macro can be displayed. 4. The Macro programming screen will drop volume (in step 4 are turned on.Aim the remote control at the devices and press MY SYSTEM once, followed by pressing once.
Owners Manual
Page 30
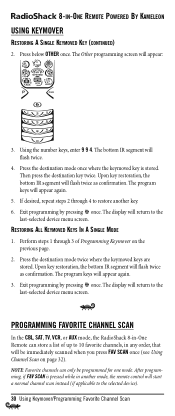
... Exit programming by pressing once. NOTE: Favorite channels can store a list of Programming Keymover on page 32). 8-IN-ONE REMOTE POWERED BY KAMELEON USING KEYMOVER RESTORING A SINGLE KEYMOVED KEY (CONTINUED) 2. Upon key restoration, the bottom IR segment will flash twice as confirmation...: 3. Exit programming by pressing once. If desired, repeat steps 2 through 3 of up to restore another mode, the remote control will return to the selected device). 30 Using Keymover/Programming Favorite Channel Scan Perform steps 1 through 4 to 10 favorite channels, in ...
... Exit programming by pressing once. NOTE: Favorite channels can store a list of Programming Keymover on page 32). 8-IN-ONE REMOTE POWERED BY KAMELEON USING KEYMOVER RESTORING A SINGLE KEYMOVED KEY (CONTINUED) 2. Upon key restoration, the bottom IR segment will flash twice as confirmation...: 3. Exit programming by pressing once. If desired, repeat steps 2 through 3 of up to restore another mode, the remote control will return to the selected device). 30 Using Keymover/Programming Favorite Channel Scan Perform steps 1 through 4 to 10 favorite channels, in ...
Owners Manual
Page 31
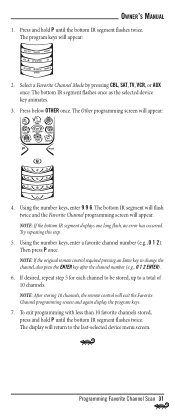
...the Favorite Channel programming screen will exit the Favorite Channel programming screen and again display the program keys. 7. NOTE: If the original remote control required pressing an Enter key to a total of 10 channels. If desired, repeat step 5 for each channel to be stored, up... to change the channel, also press the ENTER key after the channel number (e.g., 0 1 2 ENTER). 6. NOTE: After storing 10 channels, the remote control will appear. Press below OTHER once. Using the number keys, enter 9 9 6. To exit programming with less than 10 favorite channels stored, press and ...
...the Favorite Channel programming screen will exit the Favorite Channel programming screen and again display the program keys. 7. NOTE: If the original remote control required pressing an Enter key to a total of 10 channels. If desired, repeat step 5 for each channel to be stored, up... to change the channel, also press the ENTER key after the channel number (e.g., 0 1 2 ENTER). 6. NOTE: After storing 10 channels, the remote control will appear. Press below OTHER once. Using the number keys, enter 9 9 6. To exit programming with less than 10 favorite channels stored, press and ...
Owners Manual
Page 32
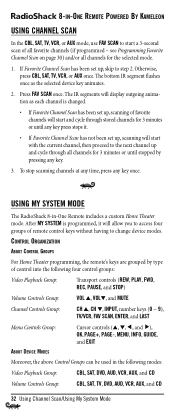
... channels will start and cycle through all channels for 3 minutes or until any key press stops it will allow you to access four groups of remote control keys without having to step 2. After MY SYSTEM is changed. • If Favorite Channel Scan has been set up, skip to change device modes. ...Scan/Using My System Mode Press FAV SCAN once. The IR segments will display outgoing animation as the selected device key animates. 2. 8-IN-ONE REMOTE POWERED BY KAMELEON USING CHANNEL SCAN In the CBL, SAT, TV, VCR, or AUX mode, use FAV SCAN to start with the current channel, then proceed to...
... channels will start and cycle through all channels for 3 minutes or until any key press stops it will allow you to access four groups of remote control keys without having to step 2. After MY SYSTEM is changed. • If Favorite Channel Scan has been set up, skip to change device modes. ...Scan/Using My System Mode Press FAV SCAN once. The IR segments will display outgoing animation as the selected device key animates. 2. 8-IN-ONE REMOTE POWERED BY KAMELEON USING CHANNEL SCAN In the CBL, SAT, TV, VCR, or AUX mode, use FAV SCAN to start with the current channel, then proceed to...
Owners Manual
Page 36
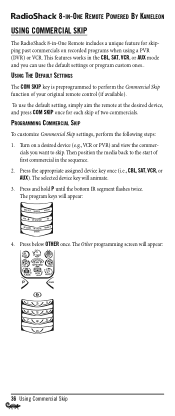
.... 3. 8-IN-ONE REMOTE POWERED BY KAMELEON USING COMMERCIAL SKIP The RadioShack 8-in-One Remote includes a unique feature for each skip of first commercial in the CBL, SAT, VCR, or AUX mode and you want to perform the Commercial Skip function of your original remote control (if available). USING... PROGRAMMING COMMERCIAL SKIP To customize Commercial Skip settings, perform the following steps: 1. cials you can use the default setting, simply aim the remote at the desired device, and press COM SKIP once for skipping past commercials on a desired device (e.g.,VCR or PVR) and view the ...
.... 3. 8-IN-ONE REMOTE POWERED BY KAMELEON USING COMMERCIAL SKIP The RadioShack 8-in-One Remote includes a unique feature for each skip of first commercial in the CBL, SAT, VCR, or AUX mode and you want to perform the Commercial Skip function of your original remote control (if available). USING... PROGRAMMING COMMERCIAL SKIP To customize Commercial Skip settings, perform the following steps: 1. cials you can use the default setting, simply aim the remote at the desired device, and press COM SKIP once for skipping past commercials on a desired device (e.g.,VCR or PVR) and view the ...
Owners Manual
Page 37
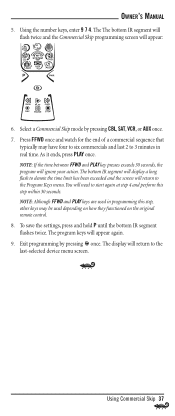
... in real time.As it ends, press PLAY once. NOTE: Although FFWD and PLAY keys are used depending on how they functioned on the original remote control. 8. You will return to the Program Keys menu. NOTE: If the time between FFWD and PLAY key presses exceeds 30 seconds, the program will appear...
... in real time.As it ends, press PLAY once. NOTE: Although FFWD and PLAY keys are used depending on how they functioned on the original remote control. 8. You will return to the Program Keys menu. NOTE: If the time between FFWD and PLAY key presses exceeds 30 seconds, the program will appear...
Owners Manual
Page 42
... • Home entertainment or home automation devices controlled by remote controls. 42 Upgrade Exclusions Only devices controlled by infrared remote controls are covered. • Home entertainment or home automation devices not controlled by radio frequency (RF/UHF), wired, or ultrasonic remote controls. 8-IN-ONE REMOTE POWERED BY KAMELEON ABOUT UPGRADING Your RadioShack 8-in-One Remote has the largest infrared code library available and...
... • Home entertainment or home automation devices controlled by remote controls. 42 Upgrade Exclusions Only devices controlled by infrared remote controls are covered. • Home entertainment or home automation devices not controlled by radio frequency (RF/UHF), wired, or ultrasonic remote controls. 8-IN-ONE REMOTE POWERED BY KAMELEON ABOUT UPGRADING Your RadioShack 8-in-One Remote has the largest infrared code library available and...
Owners Manual
Page 43
... return to be operated with an infrared remote control. Try all times. No display when programming. Display has turned off due to exit completely. Replace battery with four new AAA alkaline batteries. During programming, the bottom IR segment displays a long flash. The unit does not control home entertainment devices or commands are not... to inactivity.Start programming again and do I stop programming? Then repeat Searching For Your Code on page 17. also verify Finder Receiver is less than 15. Make sure they can be pressed and start program again.
... return to be operated with an infrared remote control. Try all times. No display when programming. Display has turned off due to exit completely. Replace battery with four new AAA alkaline batteries. During programming, the bottom IR segment displays a long flash. The unit does not control home entertainment devices or commands are not... to inactivity.Start programming again and do I stop programming? Then repeat Searching For Your Code on page 17. also verify Finder Receiver is less than 15. Make sure they can be pressed and start program again.
Owners Manual
Page 44
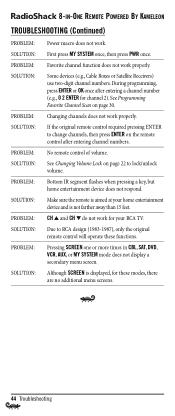
...RCA design (1983-1987), only the original remote control will operate these modes, there are no additional menu screens. 44 Troubleshooting 8-IN-ONE REMOTE POWERED BY KAMELEON TROUBLESHOOTING (Continued) PROBLEM: SOLUTION: PROBLEM: ... ENTER or OK once after entering channel numbers. No remote control of volume. Make sure the remote is aimed at your RCA TV. Favorite channel function does... 2).See Programming Favorite Channel Scan on page 30. See Changing Volume Lock on the remote control after entering a channel number (e.g., 0 2 ENTER for these functions. Pressing SCREEN one...
...RCA design (1983-1987), only the original remote control will operate these modes, there are no additional menu screens. 44 Troubleshooting 8-IN-ONE REMOTE POWERED BY KAMELEON TROUBLESHOOTING (Continued) PROBLEM: SOLUTION: PROBLEM: ... ENTER or OK once after entering channel numbers. No remote control of volume. Make sure the remote is aimed at your RCA TV. Favorite channel function does... 2).See Programming Favorite Channel Scan on page 30. See Changing Volume Lock on the remote control after entering a channel number (e.g., 0 2 ENTER for these functions. Pressing SCREEN one...

Owners Manual
Page 46
Pressing SCREEN once will display a secondary AUD Menu (as shown on a built-in CD player (or DVD player, if HTiB device), and access menu or preset functions. 8-IN-ONE REMOTE POWERED BY KAMELEON DEVICE MENU SCREENS (Continued) AUD MAIN MENU Pressing AUD once displays the AUD Main Menu screen. After device programming, use these keys to remotely control your Audio Receiver's or Amplifier's volume and stations, select source inputs, operate transport functions on the next page). 46 Device Menu Screens
Pressing SCREEN once will display a secondary AUD Menu (as shown on a built-in CD player (or DVD player, if HTiB device), and access menu or preset functions. 8-IN-ONE REMOTE POWERED BY KAMELEON DEVICE MENU SCREENS (Continued) AUD MAIN MENU Pressing AUD once displays the AUD Main Menu screen. After device programming, use these keys to remotely control your Audio Receiver's or Amplifier's volume and stations, select source inputs, operate transport functions on the next page). 46 Device Menu Screens
Owners Manual
Page 47
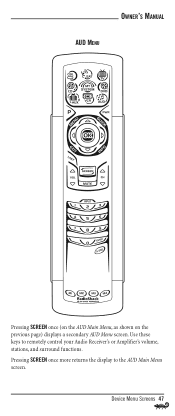
Pressing SCREEN once more returns the display to remotely control your Audio Receiver's or Amplifier's volume, stations, and surround functions. OWNER'S MANUAL AUD MENU Pressing SCREEN once (on the AUD Main Menu, as shown on the previous page) displays a secondary AUD Menu screen. Device Menu Screens 47 Use these keys to the AUD Main Menu screen.
Pressing SCREEN once more returns the display to remotely control your Audio Receiver's or Amplifier's volume, stations, and surround functions. OWNER'S MANUAL AUD MENU Pressing SCREEN once (on the AUD Main Menu, as shown on the previous page) displays a secondary AUD Menu screen. Device Menu Screens 47 Use these keys to the AUD Main Menu screen.
Owners Manual
Page 48
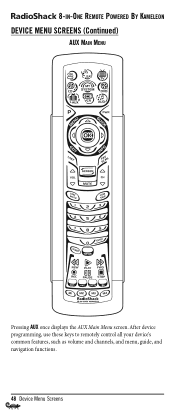
After device programming, use these keys to remotely control all your device's common features, such as volume and channels, and menu, guide, and navigation functions. 48 Device Menu Screens 8-IN-ONE REMOTE POWERED BY KAMELEON DEVICE MENU SCREENS (Continued) AUX MAIN MENU Pressing AUX once displays the AUX Main Menu screen.
After device programming, use these keys to remotely control all your device's common features, such as volume and channels, and menu, guide, and navigation functions. 48 Device Menu Screens 8-IN-ONE REMOTE POWERED BY KAMELEON DEVICE MENU SCREENS (Continued) AUX MAIN MENU Pressing AUX once displays the AUX Main Menu screen.


