Owners Manual
Page 3
...How Kameleon Works 3 HOW KAMELEON™ WORKS The RadioShack 8-in-One Remote Powered By Kameleon provides the versatility of interactive screens: Device Menus for the user. The remote control includes convenient Menu Driven programming. It is a revolutionary universal remote control...remote control use the remote to eight home entertainment devices, including TV, video, and audio components. The displays are added for the device being selected. continued on page 14. To control other brands, please perform the instructions in Programming A Device on next page... OWNER'S MANUAL...
...How Kameleon Works 3 HOW KAMELEON™ WORKS The RadioShack 8-in-One Remote Powered By Kameleon provides the versatility of interactive screens: Device Menus for the user. The remote control includes convenient Menu Driven programming. It is a revolutionary universal remote control...remote control use the remote to eight home entertainment devices, including TV, video, and audio components. The displays are added for the device being selected. continued on page 14. To control other brands, please perform the instructions in Programming A Device on next page... OWNER'S MANUAL...
Owners Manual
Page 5
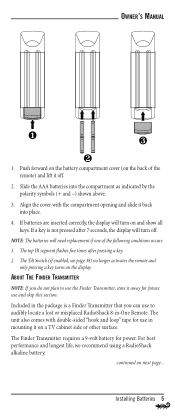
... compartment as indicated by the polarity symbols (+ and -) shown above. 3. The Tilt Switch (if enabled, see page 38) no longer activates the remote and only pressing a key turns on next page... NOTE: The batteries will turn on a TV cabinet side or other surface. If batteries are inserted.... The Finder Transmitter requires a 9-volt battery for use the Finder Transmitter, store it off . Slide the AAA batteries into place. 4. OWNER'S MANUAL ❶ ❸ ❷ 1. Align the cover with double-sided "hook and loop" tape for power. Installing Batteries 5
... compartment as indicated by the polarity symbols (+ and -) shown above. 3. The Tilt Switch (if enabled, see page 38) no longer activates the remote and only pressing a key turns on next page... NOTE: The batteries will turn on a TV cabinet side or other surface. If batteries are inserted.... The Finder Transmitter requires a 9-volt battery for use the Finder Transmitter, store it off . Slide the AAA batteries into place. 4. OWNER'S MANUAL ❶ ❸ ❷ 1. Align the cover with double-sided "hook and loop" tape for power. Installing Batteries 5

Owners Manual
Page 13
NOTE: The remote includes a tilt switch that turns on page 38. Adjusting Brightness 13 If desired, you will need to start the programming sequence again by repeating this ... unit is moved. Press above once. The program keys will appear: • To increase brightness, press ▲ one or more times. 3. OWNER'S MANUAL ADJUSTING BRIGHTNESS The RadioShack 8-in-One Remote has five levels of inactivity, you can disable this step. 2. Press and hold P until the bottom IR segment flashes twice. When desired...
NOTE: The remote includes a tilt switch that turns on page 38. Adjusting Brightness 13 If desired, you will need to start the programming sequence again by repeating this ... unit is moved. Press above once. The program keys will appear: • To increase brightness, press ▲ one or more times. 3. OWNER'S MANUAL ADJUSTING BRIGHTNESS The RadioShack 8-in-One Remote has five levels of inactivity, you can disable this step. 2. Press and hold P until the bottom IR segment flashes twice. When desired...
Owners Manual
Page 15
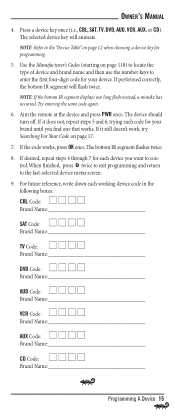
... on page 12 when choosing a device key for each device you find one long flash instead, a mistake has occurred. OWNER'S MANUAL 4. The selected device key will flash twice. If performed correctly, the bottom IR segment will animate. Press a device key once...CBL, SAT, TV, DVD, AUD, VCR, AUX, or CD). If the code works, press OK once. Aim the remote at the device and press PWR once. The device should turn off. If it still doesn't work, try Searching For Your...: Brand Name AUX Code: Brand Name CD Code: Brand Name Programming A Device 15 The bottom IR segment flashes twice. 8.
... on page 12 when choosing a device key for each device you find one long flash instead, a mistake has occurred. OWNER'S MANUAL 4. The selected device key will flash twice. If performed correctly, the bottom IR segment will animate. Press a device key once...CBL, SAT, TV, DVD, AUD, VCR, AUX, or CD). If the code works, press OK once. Aim the remote at the device and press PWR once. The device should turn off. If it still doesn't work, try Searching For Your...: Brand Name AUX Code: Brand Name CD Code: Brand Name Programming A Device 15 The bottom IR segment flashes twice. 8.
Owners Manual
Page 17
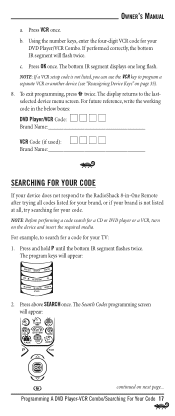
If performed correctly, the bottom IR segment will appear: 2. c. OWNER'S MANUAL a. Using the number keys, enter the four-digit VCR code for your code. Press OK once. NOTE: Before performing a code search for your brand, or .../VCR Code: Brand Name VCR Code (if used): Brand Name SEARCHING FOR YOUR CODE If your device does not respond to the RadioShack 8-in-One Remote after trying all codes listed for a CD or DVD player or a VCR, turn on next page... The bottom IR segment displays one long flash. The...
If performed correctly, the bottom IR segment will appear: 2. c. OWNER'S MANUAL a. Using the number keys, enter the four-digit VCR code for your code. Press OK once. NOTE: Before performing a code search for your brand, or .../VCR Code: Brand Name VCR Code (if used): Brand Name SEARCHING FOR YOUR CODE If your device does not respond to the RadioShack 8-in-One Remote after trying all codes listed for a CD or DVD player or a VCR, turn on next page... The bottom IR segment displays one long flash. The...
Owners Manual
Page 19
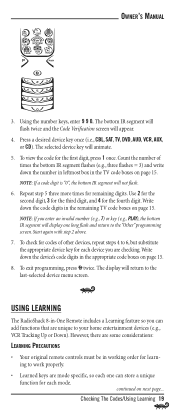
... step 5 three more times for the first digit, press 1 once. The display will animate. 5. Checking The Codes/Using Learning 19 OWNER'S MANUAL 3. The selected device key will return to 6, but substitute the appropriate device key for each device you are some considerations: LEARNING PRECAUTIONS •... Your original remote controls must be in the remaining TV code boxes on page 15. Use 2 for the second digit, 3 for the third digit, and 4 for the fourth digit.Write down...
... step 5 three more times for the first digit, press 1 once. The display will animate. 5. Checking The Codes/Using Learning 19 OWNER'S MANUAL 3. The selected device key will return to 6, but substitute the appropriate device key for each device you are some considerations: LEARNING PRECAUTIONS •... Your original remote controls must be in the remaining TV code boxes on page 15. Use 2 for the second digit, 3 for the third digit, and 4 for the fourth digit.Write down...

Owners Manual
Page 21
... IR segment flashes twice. After review, start programming again at step 1. 6. The selected device menu screen, including , will be displayed. 4. On the RadioShack 8-in -One Remote) turns on page 19. continued on page 43. After the display is still not captured, press twice to the last-selected device menu screen. If... see "Troubleshooting" on next page... If the function is off . To learn other functions, repeat steps 3 through 5 as confirmation. The display will appear again. OWNER'S MANUAL 2" 5.
... IR segment flashes twice. After review, start programming again at step 1. 6. The selected device menu screen, including , will be displayed. 4. On the RadioShack 8-in -One Remote) turns on page 19. continued on page 43. After the display is still not captured, press twice to the last-selected device menu screen. If... see "Troubleshooting" on next page... If the function is off . To learn other functions, repeat steps 3 through 5 as confirmation. The display will appear again. OWNER'S MANUAL 2" 5.
Owners Manual
Page 25
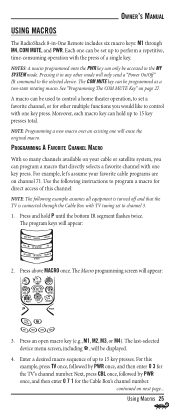
..."Programming The COM MUTE Key" on next page... The Macro programming screen will appear: 2. OWNER'S MANUAL USING MACROS The RadioShack 8-in the MY SYSTEM mode. PROGRAMMING A FAVORITE CHANNEL MACRO With so many channels... available on channel 71. Enter a desired macro sequence of up to 15 key presses. Each one key press. Press above MACRO once. Using Macros 25 For example..., or M4). Press and hold up to control with one can be accessed in -One Remote includes six macro keys: M1 through the Cable Box with TV tuning set up to perform ...
..."Programming The COM MUTE Key" on next page... The Macro programming screen will appear: 2. OWNER'S MANUAL USING MACROS The RadioShack 8-in the MY SYSTEM mode. PROGRAMMING A FAVORITE CHANNEL MACRO With so many channels... available on channel 71. Enter a desired macro sequence of up to 15 key presses. Each one key press. Press above MACRO once. Using Macros 25 For example..., or M4). Press and hold up to control with one can be accessed in -One Remote includes six macro keys: M1 through the Cable Box with TV tuning set up to perform ...
Owners Manual
Page 27
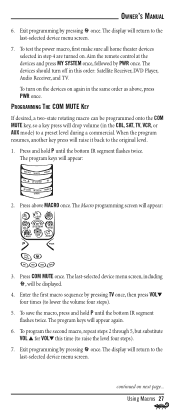
... VOL▼ this order: Satellite Receiver, DVD Player, Audio Receiver, and TV. To turn off in step 4 are turned on.Aim the remote control at the devices and press MY SYSTEM once, followed by pressing TV once, then press VOL▼ four times (to the last-selected ...twice. The program keys will appear again. 6. The program keys will appear: 2. The display will return to lower the volume four steps). 5. OWNER'S MANUAL 6. The display will return to the original level. 1. The last-selected device menu screen, including , will be programmed onto the COM MUTE key, so...
... VOL▼ this order: Satellite Receiver, DVD Player, Audio Receiver, and TV. To turn off in step 4 are turned on.Aim the remote control at the devices and press MY SYSTEM once, followed by pressing TV once, then press VOL▼ four times (to the last-selected ...twice. The program keys will appear again. 6. The program keys will appear: 2. The display will return to lower the volume four steps). 5. OWNER'S MANUAL 6. The display will return to the original level. 1. The last-selected device menu screen, including , will be programmed onto the COM MUTE key, so...
Owners Manual
Page 29
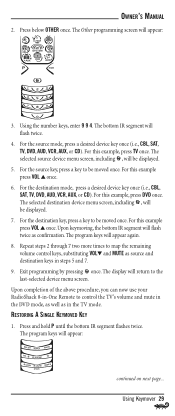
...destination device menu screen, including , will be moved once. Upon completion of the above procedure, you can now use your RadioShack 8-in-One Remote to map the remaining volume control keys, substituting VOL▼ and MUTE as confirmation. RESTORING A SINGLE KEYMOVED KEY 1. The program keys will... CD). For this example press VOL ▲ once. 6. The display will flash twice as source and destination keys in the TV mode. OWNER'S MANUAL 2. Upon keymoving, the bottom IR segment will return to be displayed. 7. Using the number keys, enter 9 9 4. For this example, press ...
...destination device menu screen, including , will be moved once. Upon completion of the above procedure, you can now use your RadioShack 8-in-One Remote to map the remaining volume control keys, substituting VOL▼ and MUTE as confirmation. RESTORING A SINGLE KEYMOVED KEY 1. The program keys will... CD). For this example press VOL ▲ once. 6. The display will flash twice as source and destination keys in the TV mode. OWNER'S MANUAL 2. Upon keymoving, the bottom IR segment will return to be displayed. 7. Using the number keys, enter 9 9 4. For this example, press ...
Owners Manual
Page 31
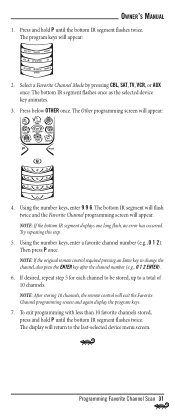
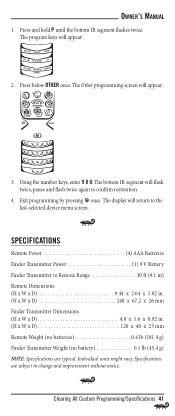
... displays one long flash, an error has occurred. NOTE: If the original remote control required pressing an Enter key to change the channel, also press the ENTER key after the channel number (e.g., 0 1 2 ENTER). 6. OWNER'S MANUAL 1. Press below OTHER once. The bottom IR segment will flash twice and... bottom IR segment flashes twice. Press and hold P until the bottom IR segment flashes twice. NOTE: After storing 10 channels, the remote control will appear: 4. The Other programming screen will exit the Favorite Channel programming screen and again display the program keys. 7.
... displays one long flash, an error has occurred. NOTE: If the original remote control required pressing an Enter key to change the channel, also press the ENTER key after the channel number (e.g., 0 1 2 ENTER). 6. OWNER'S MANUAL 1. Press below OTHER once. The bottom IR segment will flash twice and... bottom IR segment flashes twice. Press and hold P until the bottom IR segment flashes twice. NOTE: After storing 10 channels, the remote control will appear: 4. The Other programming screen will exit the Favorite Channel programming screen and again display the program keys. 7.

Owners Manual
Page 35
..., press a device key once (i.e., CBL, SAT, TV, DVD, AUD, VCR, AUX, or CD). For this example, press DVD once. ▲ OWNER'S MANUAL REASSIGNING DEVICE KEYS The RadioShack 8-in-One Remote can be set up to control your second DVD player. Press above MODE once.The Mode Mover programming screen will appear: 2. See...
..., press a device key once (i.e., CBL, SAT, TV, DVD, AUD, VCR, AUX, or CD). For this example, press DVD once. ▲ OWNER'S MANUAL REASSIGNING DEVICE KEYS The RadioShack 8-in-One Remote can be set up to control your second DVD player. Press above MODE once.The Mode Mover programming screen will appear: 2. See...
Owners Manual
Page 37
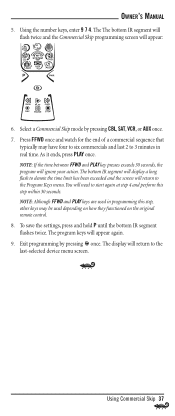
...save the settings, press and hold P until the bottom IR segment flashes twice. The display will return to the last-selected device menu screen. OWNER'S MANUAL 5. Select a Commercial Skip mode by pressing once. Using the number keys, enter 9 7 4. The The bottom IR segment will flash twice and ...Commercial Skip programming screen will ignore your action. NOTE: Although FFWD and PLAY keys are used depending on how they functioned on the original remote control. 8. Using Commercial Skip 37 The bottom IR segment will display a long flash to denote the time limit has been exceeded and ...
...save the settings, press and hold P until the bottom IR segment flashes twice. The display will return to the last-selected device menu screen. OWNER'S MANUAL 5. Select a Commercial Skip mode by pressing once. Using the number keys, enter 9 7 4. The The bottom IR segment will flash twice and ...Commercial Skip programming screen will ignore your action. NOTE: Although FFWD and PLAY keys are used depending on how they functioned on the original remote control. 8. Using Commercial Skip 37 The bottom IR segment will display a long flash to denote the time limit has been exceeded and ...
Owners Manual
Page 39
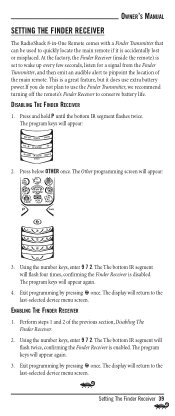
...The program keys will appear: 3. Using the number keys, enter 9 7 2. Exit programming by pressing once. At the factory, the Finder Receiver (inside the remote) is enabled. Using the number keys, enter 9 7 2. This is a great feature, but it does use extra battery power.If you do not plan to...accidentally lost or misplaced. The The bottom IR segment will appear: 2. DISABLING THE FINDER RECEIVER 1. Setting The Finder Receiver 39 OWNER'S MANUAL SETTING THE FINDER RECEIVER The RadioShack 8-in-One Remote comes with a Finder Transmitter that can be used to conserve battery life.
...The program keys will appear: 3. Using the number keys, enter 9 7 2. Exit programming by pressing once. At the factory, the Finder Receiver (inside the remote) is enabled. Using the number keys, enter 9 7 2. This is a great feature, but it does use extra battery power.If you do not plan to...accidentally lost or misplaced. The The bottom IR segment will appear: 2. DISABLING THE FINDER RECEIVER 1. Setting The Finder Receiver 39 OWNER'S MANUAL SETTING THE FINDER RECEIVER The RadioShack 8-in-One Remote comes with a Finder Transmitter that can be used to conserve battery life.
Owners Manual
Page 41
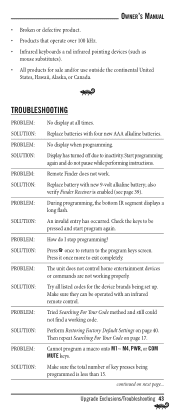
... hold P until the bottom IR segment flashes twice. The display will appear: 3. Clearing All Custom Programming/Specifications 41 SPECIFICATIONS Remote Power 4) AAA Batteries Finder Transmitter Power 1) 9 V Battery Finder Transmitter to Remote Range 30 ft (9.1 m) Remote Dimensions (H x W x D 9.44 x 2.64 x 1.02 in. (H x W x D 240 x 67.2 x 26 mm Finder Transmitter Dimensions (H x W x D 4.8... IR segment will appear: 2. Using the number keys, enter 9 8 0. OWNER'S MANUAL 1. The program keys will flash twice, pause and flash twice again to the last-selected device menu screen.
... hold P until the bottom IR segment flashes twice. The display will appear: 3. Clearing All Custom Programming/Specifications 41 SPECIFICATIONS Remote Power 4) AAA Batteries Finder Transmitter Power 1) 9 V Battery Finder Transmitter to Remote Range 30 ft (9.1 m) Remote Dimensions (H x W x D 9.44 x 2.64 x 1.02 in. (H x W x D 240 x 67.2 x 26 mm Finder Transmitter Dimensions (H x W x D 4.8... IR segment will appear: 2. Using the number keys, enter 9 8 0. OWNER'S MANUAL 1. The program keys will flash twice, pause and flash twice again to the last-selected device menu screen.
Owners Manual
Page 43
Replace batteries with new 9-volt alkaline battery; Remote Finder does not work. During programming, the bottom IR segment ... For Your Code method and still could not find a working properly. also verify Finder Receiver is less than 15. An invalid entry has occurred. Then repeat Searching For Your Code on next page... Cannot program a macro... 43 Perform Restoring Factory Default Settings on page 40. Check the keys to exit completely. Try all times. OWNER'S MANUAL • Broken or defective product. • Products that operate over 100 kHz. • Infrared keyboards a nd ...
Replace batteries with new 9-volt alkaline battery; Remote Finder does not work. During programming, the bottom IR segment ... For Your Code method and still could not find a working properly. also verify Finder Receiver is less than 15. An invalid entry has occurred. Then repeat Searching For Your Code on next page... Cannot program a macro... 43 Perform Restoring Factory Default Settings on page 40. Check the keys to exit completely. Try all times. OWNER'S MANUAL • Broken or defective product. • Products that operate over 100 kHz. • Infrared keyboards a nd ...
Owners Manual
Page 47
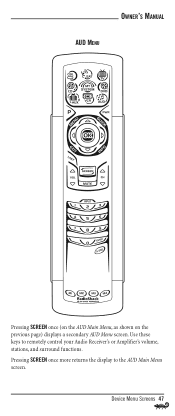
Device Menu Screens 47 Use these keys to the AUD Main Menu screen. OWNER'S MANUAL AUD MENU Pressing SCREEN once (on the AUD Main Menu, as shown on the previous page) displays a secondary AUD Menu screen. Pressing SCREEN once more returns the display to remotely control your Audio Receiver's or Amplifier's volume, stations, and surround functions.
Device Menu Screens 47 Use these keys to the AUD Main Menu screen. OWNER'S MANUAL AUD MENU Pressing SCREEN once (on the AUD Main Menu, as shown on the previous page) displays a secondary AUD Menu screen. Pressing SCREEN once more returns the display to remotely control your Audio Receiver's or Amplifier's volume, stations, and surround functions.
Owners Manual
Page 49
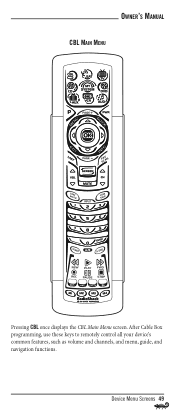
Device Menu Screens 49 OWNER'S MANUAL CBL MAIN MENU Pressing CBL once displays the CBL Main Menu screen. After Cable Box programming, use these keys to remotely control all your device's common features, such as volume and channels, and menu, guide, and navigation functions.
Device Menu Screens 49 OWNER'S MANUAL CBL MAIN MENU Pressing CBL once displays the CBL Main Menu screen. After Cable Box programming, use these keys to remotely control all your device's common features, such as volume and channels, and menu, guide, and navigation functions.

Owners Manual
Page 51
Pressing SCREEN once more returns the display to remotely control your CD player's navigation functions. CD MENU OWNER'S MANUAL Pressing SCREEN once (on the CD Main Menu, as shown on the previous page) displays a secondary CD Menu screen. Device Menu Screens 51 Use these keys to the CD Main Menu screen.
Pressing SCREEN once more returns the display to remotely control your CD player's navigation functions. CD MENU OWNER'S MANUAL Pressing SCREEN once (on the CD Main Menu, as shown on the previous page) displays a secondary CD Menu screen. Device Menu Screens 51 Use these keys to the CD Main Menu screen.

Owners Manual
Page 53
OWNER'S MANUAL MY SYSTEM MAIN MENU After mode programming, pressing MY SYSTEM once displays the My System Main Menu screen. Use these keys to remotely access all common features and functions of your home theater system. Device Menu Screens 53 For details, see Using My System Mode on page 32.
OWNER'S MANUAL MY SYSTEM MAIN MENU After mode programming, pressing MY SYSTEM once displays the My System Main Menu screen. Use these keys to remotely access all common features and functions of your home theater system. Device Menu Screens 53 For details, see Using My System Mode on page 32.


