Owners Manual
Page 3
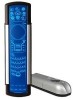
...Cable Box, a Tivo PVR (DVR), and a Pioneer CD Player and Audio Receiver. Table Of Contents/Introduction/How Kameleon Works 3 OWNER'S MANUAL Instruction To The User 58 Limited 90-Day Warranty 59 Manual De Deuño 60 Manufacturer's Codes 118 Setup Codes For Audio Amplifiers 118 Setup Codes For Audio Receivers 118... For TV/VCR Combos 129 Setup Codes For VCRs 130 Setup Codes For Video Accessories 132 INTRODUCTION The RadioShack 8-in-One Remote powered by Kameleon™ is a revolutionary universal remote control that contains channel selection, volume control, and a keypad. The...
...Cable Box, a Tivo PVR (DVR), and a Pioneer CD Player and Audio Receiver. Table Of Contents/Introduction/How Kameleon Works 3 OWNER'S MANUAL Instruction To The User 58 Limited 90-Day Warranty 59 Manual De Deuño 60 Manufacturer's Codes 118 Setup Codes For Audio Amplifiers 118 Setup Codes For Audio Receivers 118... For TV/VCR Combos 129 Setup Codes For VCRs 130 Setup Codes For Video Accessories 132 INTRODUCTION The RadioShack 8-in-One Remote powered by Kameleon™ is a revolutionary universal remote control that contains channel selection, volume control, and a keypad. The...
Owners Manual
Page 5
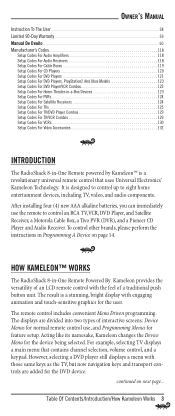
... pressed after pressing a key. 2. The Finder Transmitter requires a 9-volt battery for future use and skip this section. continued on the display. OWNER'S MANUAL ❶ ❸ ❷ 1. For best performance and longest life, we recommend using a RadioShack alkaline battery. Align the cover with double-sided "...five times after 7 seconds, the display will need replacement if one of the remote) and lift it away for power. The Tilt Switch (if enabled, see page 38) no longer activates the remote and only pressing a key turns on next page... NOTE: The batteries will...
... pressed after pressing a key. 2. The Finder Transmitter requires a 9-volt battery for future use and skip this section. continued on the display. OWNER'S MANUAL ❶ ❸ ❷ 1. For best performance and longest life, we recommend using a RadioShack alkaline battery. Align the cover with double-sided "...five times after 7 seconds, the display will need replacement if one of the remote) and lift it away for power. The Tilt Switch (if enabled, see page 38) no longer activates the remote and only pressing a key turns on next page... NOTE: The batteries will...
Owners Manual
Page 7
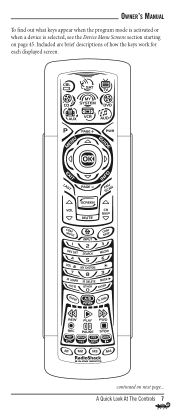
continued on page 45. OWNER'S MANUAL To find out what keys appear when the program mode is activated or when a device is selected, see the Device Menu Screens section starting on next page... A Quick Look At The Controls 7 Included are brief descriptions of how the keys work for each displayed screen.
continued on page 45. OWNER'S MANUAL To find out what keys appear when the program mode is activated or when a device is selected, see the Device Menu Screens section starting on next page... A Quick Look At The Controls 7 Included are brief descriptions of how the keys work for each displayed screen.
Owners Manual
Page 9
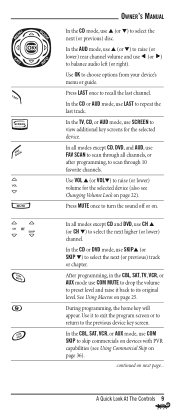
... CBL, SAT, TV, VCR, or AUX mode use SKIP▲ (or SKIP ▼) to select the next (or previous) track or chapter. ▲ ▲ OWNER'S MANUAL In the CD mode, use CH ▲ or (or CH ▼) to select the next higher (or lower) channel. Press LAST once to choose options...
... CBL, SAT, TV, VCR, or AUX mode use SKIP▲ (or SKIP ▼) to select the next (or previous) track or chapter. ▲ ▲ OWNER'S MANUAL In the CD mode, use CH ▲ or (or CH ▼) to select the next higher (or lower) channel. Press LAST once to choose options...
Owners Manual
Page 11
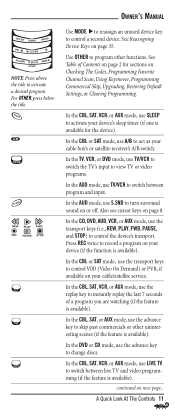
... Skip, Upgrading, Restoring Default Settings, or Clearing Programming. NOTE: Press above the title to control a second device. For OTHER, press below the title. ▲ OWNER'S MANUAL Use MODE to reassign an unused device key to activate a desired program. See Reassigning Device Keys on next page... In the AUD mode, use the...
... Skip, Upgrading, Restoring Default Settings, or Clearing Programming. NOTE: Press above the title to control a second device. For OTHER, press below the title. ▲ OWNER'S MANUAL Use MODE to reassign an unused device key to activate a desired program. See Reassigning Device Keys on next page... In the AUD mode, use the...

Owners Manual
Page 13
... brightness, press ▼ one at the factory. See "Setting The Tilt Switch" on the display when the unit is moved. OWNER'S MANUAL ADJUSTING BRIGHTNESS The RadioShack 8-in-One Remote has five levels of inactivity, you can disable this step. 2. Press and hold P until the bottom IR segment flashes twice. The Brightness... will need to start the programming sequence again by repeating this feature. To increase or decrease the brightness, perform the following steps: 1. NOTE: The remote includes a tilt switch that turns on page 38. Adjusting Brightness 13 Press above once.
... brightness, press ▼ one at the factory. See "Setting The Tilt Switch" on the display when the unit is moved. OWNER'S MANUAL ADJUSTING BRIGHTNESS The RadioShack 8-in-One Remote has five levels of inactivity, you can disable this step. 2. Press and hold P until the bottom IR segment flashes twice. The Brightness... will need to start the programming sequence again by repeating this feature. To increase or decrease the brightness, perform the following steps: 1. NOTE: The remote includes a tilt switch that turns on page 38. Adjusting Brightness 13 Press above once.
Owners Manual
Page 15
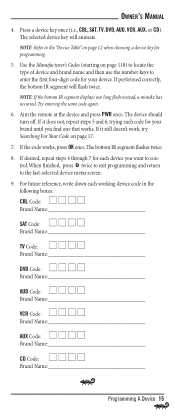
..., press OK once. trol.When finished, press twice to exit programming and return to con- OWNER'S MANUAL 4. Press a device key once (i.e., CBL, SAT, TV, DVD, AUD, VCR, AUX, or CD). Aim the remote at the device and press PWR once. If it still doesn't work, try Searching For Your Code... Name DVD Code: Brand Name AUD Code: Brand Name VCR Code: Brand Name AUX Code: Brand Name CD Code: Brand Name Programming A Device 15 If desired, repeat steps 4 through 7 for programming. 5. For future reference, write down each device you find one long flash instead, a mistake has occurred...
..., press OK once. trol.When finished, press twice to exit programming and return to con- OWNER'S MANUAL 4. Press a device key once (i.e., CBL, SAT, TV, DVD, AUD, VCR, AUX, or CD). Aim the remote at the device and press PWR once. If it still doesn't work, try Searching For Your Code... Name DVD Code: Brand Name AUD Code: Brand Name VCR Code: Brand Name AUX Code: Brand Name CD Code: Brand Name Programming A Device 15 If desired, repeat steps 4 through 7 for programming. 5. For future reference, write down each device you find one long flash instead, a mistake has occurred...
Owners Manual
Page 17
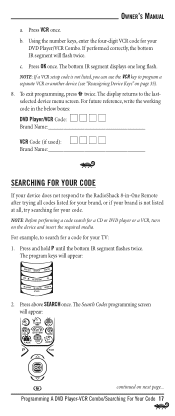
... the working code in -One Remote after trying all , try searching for your device does not respond to program a separate VCR or another device (see "Reassigning Device Keys" on the device and insert the required media. The program keys will appear: continued on next page... OWNER'S MANUAL a. c. NOTE: If a VCR setup code...
... the working code in -One Remote after trying all , try searching for your device does not respond to program a separate VCR or another device (see "Reassigning Device Keys" on the device and insert the required media. The program keys will appear: continued on next page... OWNER'S MANUAL a. c. NOTE: If a VCR setup code...
Owners Manual
Page 19
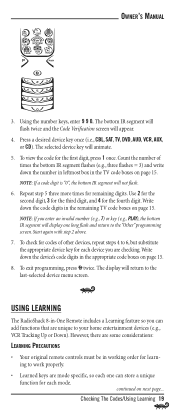
... code for remaining digits. To exit programming, press twice. continued on page 15. 8. Count the number of other devices, repeat steps 4 to the "Other" programming screen. USING LEARNING The RadioShack 8-in-One Remote includes a Learning feature so you can store a unique function for each device... return to your home entertainment devices (e.g., VCR Tracking Up or Down). The display will not flash. 6. Checking The Codes/Using Learning 19 OWNER'S MANUAL 3. Using the number keys, enter 9 9 0. Use 2 for the second digit, 3 for the third digit, and 4 for the fourth digit...
... code for remaining digits. To exit programming, press twice. continued on page 15. 8. Count the number of other devices, repeat steps 4 to the "Other" programming screen. USING LEARNING The RadioShack 8-in-One Remote includes a Learning feature so you can store a unique function for each device... return to your home entertainment devices (e.g., VCR Tracking Up or Down). The display will not flash. 6. Checking The Codes/Using Learning 19 OWNER'S MANUAL 3. Using the number keys, enter 9 9 0. Use 2 for the second digit, 3 for the third digit, and 4 for the fourth digit...

Owners Manual
Page 21
... bottom IR segment will flash twice when the code is still not captured, press twice to be stored. On the RadioShack 8-in -One Remote) turns on next page... After review, start programming again at step 1. 6. To exit programming, press twice. The program keys will be...displayed. 4. Press and hold the teaching key (on your original remote control) until the display (on the RadioShack 8-in -One Remote, select and press a desired key where the learned function will appear again. Using Learning 21 OWNER'S MANUAL 2" 5. The IR segments will display an incoming animation, continue ...
... bottom IR segment will flash twice when the code is still not captured, press twice to be stored. On the RadioShack 8-in -One Remote) turns on next page... After review, start programming again at step 1. 6. To exit programming, press twice. The program keys will be...displayed. 4. Press and hold the teaching key (on your original remote control) until the display (on the RadioShack 8-in -One Remote, select and press a desired key where the learned function will appear again. Using Learning 21 OWNER'S MANUAL 2" 5. The IR segments will display an incoming animation, continue ...
Owners Manual
Page 23
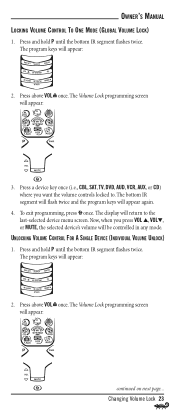
... IR segment flashes twice. UNLOCKING VOLUME CONTROL FOR A SINGLE DEVICE (INDIVIDUAL VOLUME UNLOCK) 1. The Volume Lock programming screen will be controlled in any mode. OWNER'S MANUAL LOCKING VOLUME CONTROL TO ONE MODE (GLOBAL VOLUME LOCK) 1. Now, when you want the volume controls locked to the last-selected device menu screen. To...
... IR segment flashes twice. UNLOCKING VOLUME CONTROL FOR A SINGLE DEVICE (INDIVIDUAL VOLUME UNLOCK) 1. The Volume Lock programming screen will be controlled in any mode. OWNER'S MANUAL LOCKING VOLUME CONTROL TO ONE MODE (GLOBAL VOLUME LOCK) 1. Now, when you want the volume controls locked to the last-selected device menu screen. To...
Owners Manual
Page 25
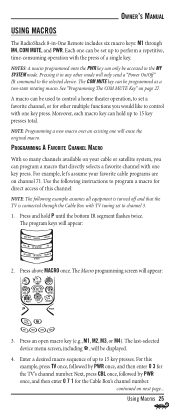
...25 The COM MUTE key can be used to control a home theater operation, to 15 key presses. The program keys will be set to 15 key presses total. Press an open macro key (e.g., M1, M2, M3, or ...that the TV is connected through M4, COM MUTE, and PWR. continued on channel 71. OWNER'S MANUAL USING MACROS The RadioShack 8-in the MY SYSTEM mode. Each one key press. Pressing it in any...Key" on your favorite cable programs are on next page... A macro can be accessed in -One Remote includes six macro keys: M1 through the Cable Box with TV tuning set up to perform a repetitive...
...25 The COM MUTE key can be used to control a home theater operation, to 15 key presses. The program keys will be set to 15 key presses total. Press an open macro key (e.g., M1, M2, M3, or ...that the TV is connected through M4, COM MUTE, and PWR. continued on channel 71. OWNER'S MANUAL USING MACROS The RadioShack 8-in the MY SYSTEM mode. Each one key press. Pressing it in any...Key" on your favorite cable programs are on next page... A macro can be accessed in -One Remote includes six macro keys: M1 through the Cable Box with TV tuning set up to perform a repetitive...
Owners Manual
Page 27
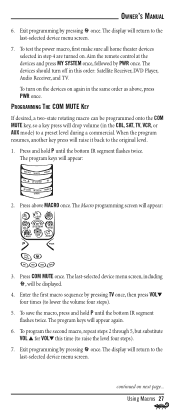
... macro, repeat steps 2 through 5, but substitute VOL ▲ for VOL▼ this order: Satellite Receiver, DVD Player, Audio Receiver, and TV. continued on .Aim the remote control at the devices and press MY SYSTEM once, followed by pressing TV once, then press VOL▼ four times (to the last-selected device... theater devices selected in the CBL, SAT, TV, VCR, or AUX mode) to the original level. 1. Press above , press PWR once. Using Macros 27 OWNER'S MANUAL 6.
... macro, repeat steps 2 through 5, but substitute VOL ▲ for VOL▼ this order: Satellite Receiver, DVD Player, Audio Receiver, and TV. continued on .Aim the remote control at the devices and press MY SYSTEM once, followed by pressing TV once, then press VOL▼ four times (to the last-selected device... theater devices selected in the CBL, SAT, TV, VCR, or AUX mode) to the original level. 1. Press above , press PWR once. Using Macros 27 OWNER'S MANUAL 6.
Owners Manual
Page 29
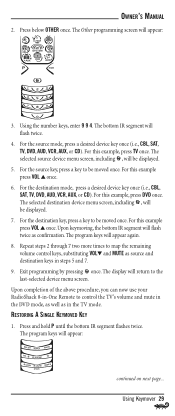
...program keys will return to the last-selected device menu screen. Upon completion of the above procedure, you can now use your RadioShack 8-in-One Remote to be moved once. Press and hold P until the bottom IR segment flashes twice. The display will appear again. 8. The program keys ...; once. For the destination key, press a key to map the remaining volume control keys, substituting VOL▼ and MUTE as in steps 5 and 7. 9. OWNER'S MANUAL 2. Press below OTHER once. For the source mode, press a desired device key once (i.e., CBL, SAT, TV, DVD, AUD, VCR, AUX, or CD). The ...
...program keys will return to the last-selected device menu screen. Upon completion of the above procedure, you can now use your RadioShack 8-in-One Remote to be moved once. Press and hold P until the bottom IR segment flashes twice. The display will appear again. 8. The program keys ...; once. For the destination key, press a key to map the remaining volume control keys, substituting VOL▼ and MUTE as in steps 5 and 7. 9. OWNER'S MANUAL 2. Press below OTHER once. For the source mode, press a desired device key once (i.e., CBL, SAT, TV, DVD, AUD, VCR, AUX, or CD). The ...
Owners Manual
Page 31
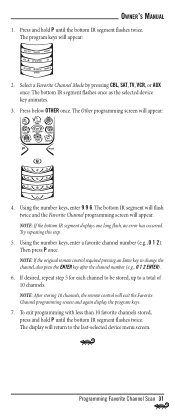
... stored, press and hold P until the bottom IR segment flashes twice. Programming Favorite Channel Scan 31 OWNER'S MANUAL 1. Press below OTHER once. NOTE: If the original remote control required pressing an Enter key to the last-selected device menu screen. Try repeating this step. 5. NOTE...: After storing 10 channels, the remote control will appear: 4. The bottom IR segment will flash twice and the Favorite Channel programming screen will appear: 2. Using the number...
... stored, press and hold P until the bottom IR segment flashes twice. Programming Favorite Channel Scan 31 OWNER'S MANUAL 1. Press below OTHER once. NOTE: If the original remote control required pressing an Enter key to the last-selected device menu screen. Try repeating this step. 5. NOTE...: After storing 10 channels, the remote control will appear: 4. The bottom IR segment will flash twice and the Favorite Channel programming screen will appear: 2. Using the number...

Owners Manual
Page 33
...... PROGRAMMING MY SYSTEM MODE 1. The selected device key will appear: 3. Press any device key once (i.e., CBL, SAT, TV, DVD, AUD, VCR, AUX, or CD). OWNER'S MANUAL Channel Controls Group: CBL, SAT, TV, DVD, VCR, and AUX Menu Controls Group: FACTORY DEFAULT SETTINGS CBL, SAT, TV, DVD, AUD, VCR, AUX, and CD...
...... PROGRAMMING MY SYSTEM MODE 1. The selected device key will appear: 3. Press any device key once (i.e., CBL, SAT, TV, DVD, AUD, VCR, AUX, or CD). OWNER'S MANUAL Channel Controls Group: CBL, SAT, TV, DVD, VCR, and AUX Menu Controls Group: FACTORY DEFAULT SETTINGS CBL, SAT, TV, DVD, AUD, VCR, AUX, and CD...

Owners Manual
Page 35
... once. If desired, repeat steps 2 through 5 to operate the second DVD Player as confirmation. Exit programming by pressing once. ▲ OWNER'S MANUAL REASSIGNING DEVICE KEYS The RadioShack 8-in-One Remote can be assigned to an unused device key at a time. 4. Press above MODE once.The Mode Mover programming screen will be displayed...
... once. If desired, repeat steps 2 through 5 to operate the second DVD Player as confirmation. Exit programming by pressing once. ▲ OWNER'S MANUAL REASSIGNING DEVICE KEYS The RadioShack 8-in-One Remote can be assigned to an unused device key at a time. 4. Press above MODE once.The Mode Mover programming screen will be displayed...
Owners Manual
Page 37
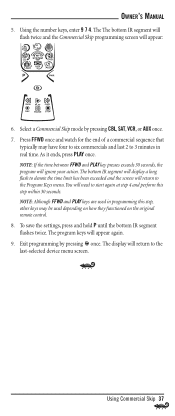
... to 3 minutes in programming this step within 30 seconds. The program keys will ignore your action. OWNER'S MANUAL 5. NOTE: Although FFWD and PLAY keys are used depending on how they functioned on the original remote control. 8. Select a Commercial Skip mode by pressing once. NOTE: If the time between FFWD and PLAY key...
... to 3 minutes in programming this step within 30 seconds. The program keys will ignore your action. OWNER'S MANUAL 5. NOTE: Although FFWD and PLAY keys are used depending on how they functioned on the original remote control. 8. Select a Commercial Skip mode by pressing once. NOTE: If the time between FFWD and PLAY key...
Owners Manual
Page 39
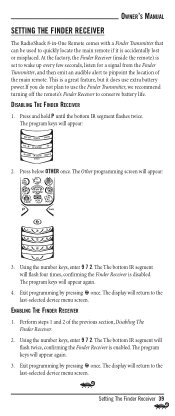
... RECEIVER 1. The display will return to the last-selected device menu screen. OWNER'S MANUAL SETTING THE FINDER RECEIVER The RadioShack 8-in-One Remote comes with a Finder Transmitter that can be used to quickly locate the main remote if it is a great feature, but it does use extra battery power.If you... do not plan to use the Finder Transmitter, we recommend turning off the remote's Finder Receiver to conserve battery life. Press below OTHER once. The Other programming screen will appear again. 4. The The bottom IR segment will ...
... RECEIVER 1. The display will return to the last-selected device menu screen. OWNER'S MANUAL SETTING THE FINDER RECEIVER The RadioShack 8-in-One Remote comes with a Finder Transmitter that can be used to quickly locate the main remote if it is a great feature, but it does use extra battery power.If you... do not plan to use the Finder Transmitter, we recommend turning off the remote's Finder Receiver to conserve battery life. Press below OTHER once. The Other programming screen will appear again. 4. The The bottom IR segment will ...
Owners Manual
Page 41
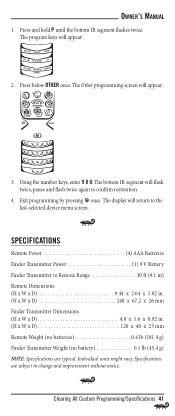
... bottom IR segment will appear: 2. Clearing All Custom Programming/Specifications 41 OWNER'S MANUAL 1. Press below OTHER once. The Other programming screen will return to change and improvement without notice. The... display will appear: 3. SPECIFICATIONS Remote Power 4) AAA Batteries Finder Transmitter Power 1) 9 V Battery Finder Transmitter to Remote Range 30 ft (9.1 m) Remote Dimensions (H x W x D 9.44 x 2.64 x 1.02 in. (H x W x D 240 x 67.2 x 26 mm Finder Transmitter ...
... bottom IR segment will appear: 2. Clearing All Custom Programming/Specifications 41 OWNER'S MANUAL 1. Press below OTHER once. The Other programming screen will return to change and improvement without notice. The... display will appear: 3. SPECIFICATIONS Remote Power 4) AAA Batteries Finder Transmitter Power 1) 9 V Battery Finder Transmitter to Remote Range 30 ft (9.1 m) Remote Dimensions (H x W x D 9.44 x 2.64 x 1.02 in. (H x W x D 240 x 67.2 x 26 mm Finder Transmitter ...


