User Guide
Page 2
... 4 LCD Touchscreen 4 LED Indicator Light 4 Setup Routine and Procedures 5 Device Control Screens 6 Code Entry 7 Library Code Entry 7 Code Search 9 Code Autosearch 10 Code Identification 11 Key Label Options 12 Learned Key Reference Pages 14 Learn Commands 16 Learning Tips 16 Code Learning 16 Learn Commands 17 Clear All Stored Learned Commands Under... Punch-through 23 Record Key 23 Additional Features 23 Keypress Beep Feature 23 LCD Touchscreen Display Time 24 Backlighting 24 Master Reset 25 RCA All Power Off Feature 25 Glossary of Terms 26 Troubleshooting 28 Code List ...
... 4 LCD Touchscreen 4 LED Indicator Light 4 Setup Routine and Procedures 5 Device Control Screens 6 Code Entry 7 Library Code Entry 7 Code Search 9 Code Autosearch 10 Code Identification 11 Key Label Options 12 Learned Key Reference Pages 14 Learn Commands 16 Learning Tips 16 Code Learning 16 Learn Commands 17 Clear All Stored Learned Commands Under... Punch-through 23 Record Key 23 Additional Features 23 Keypress Beep Feature 23 LCD Touchscreen Display Time 24 Backlighting 24 Master Reset 25 RCA All Power Off Feature 25 Glossary of Terms 26 Troubleshooting 28 Code List ...
User Guide
Page 3
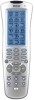
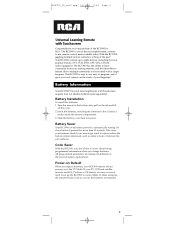
... set up to eight devices, including the most sophisticated, yet easy to control them. Turn the remote to be executed with Touchscreen requires four AA alkaline batteries (sold separately). All programmed parameters are RCA, ProScan or GE brands, you total control-at the touch of your fingertips! The RCU900 has the ability to learn commands from your existing...
... set up to eight devices, including the most sophisticated, yet easy to control them. Turn the remote to be executed with Touchscreen requires four AA alkaline batteries (sold separately). All programmed parameters are RCA, ProScan or GE brands, you total control-at the touch of your fingertips! The RCU900 has the ability to learn commands from your existing...
User Guide
Page 4
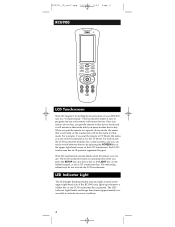
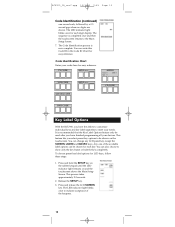
...the upper right-hand corner of the RCU900 unit, lights up whenever a rubber key or any LCD touchscreen key is not in that device mode and it easy to indicate any LCD touchscreen key. For each mode, the LCD touchscreen includes two control screens, and you can easily switch between the... and use . The LCD touchscreen remains blank when the remote is pressed. This touchscreen makes it will be the menu for the TV Mode. Once you select a device key, you put the remote in that mode. RCU900_IB_revC.qxp 12/3/02 9:45 Page 4 RCU900 LCD Touchscreen The LCD (Liquid Crystal Display) ...
...the upper right-hand corner of the RCU900 unit, lights up whenever a rubber key or any LCD touchscreen key is not in that device mode and it easy to indicate any LCD touchscreen key. For each mode, the LCD touchscreen includes two control screens, and you can easily switch between the... and use . The LCD touchscreen remains blank when the remote is pressed. This touchscreen makes it will be the menu for the TV Mode. Once you select a device key, you put the remote in that mode. RCU900_IB_revC.qxp 12/3/02 9:45 Page 4 RCU900 LCD Touchscreen The LCD (Liquid Crystal Display) ...

User Guide
Page 6
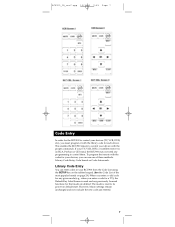
You can easily switch between these two screens by simply pressing the LCD SCREEN key at the top right of the touchscreen. 6 RCU900_IB_revC.qxp 12/3/02 9:45 Page 6 Device Control Screens Your RCU900 displays different control screens for each device. There are two screens needed to control each device.
You can easily switch between these two screens by simply pressing the LCD SCREEN key at the top right of the touchscreen. 6 RCU900_IB_revC.qxp 12/3/02 9:45 Page 6 Device Control Screens Your RCU900 displays different control screens for each device. There are two screens needed to control each device.
User Guide
Page 7
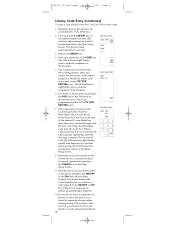
.../3/02 9:45 Page 7 Code Entry In order for the RCU900 to control your devices, you can enter codes in your TV, VCR, DVD, or satellite receiver is an RCA, ProScan or GE brand, the RCU900 may not need any previously Learned functions for that mode are deleted. Library Code Entry You ...a TV), the Default Key Label Screen is reset to control your device with the library code for each device. The mode is used and any programming to control them. If your RCU900 from the Code List using the SETUP key on default state. This enables the RCU900 remote to its power-on the rubber ...
.../3/02 9:45 Page 7 Code Entry In order for the RCU900 to control your devices, you can enter codes in your TV, VCR, DVD, or satellite receiver is an RCA, ProScan or GE brand, the RCU900 may not need any previously Learned functions for that mode are deleted. Library Code Entry You ...a TV), the Default Key Label Screen is reset to control your device with the library code for each device. The mode is used and any programming to control them. If your RCU900 from the Code List using the SETUP key on default state. This enables the RCU900 remote to its power-on the rubber ...
User Guide
Page 8
... to be programmed under AUX (TV, VCR, SAT/CBL, etc.). 7. Release the SETUP key. 4. Press and release the LCD CODE key. Press and release the device key on the device to the ON•OFF or CH+ key. In both cases, the touchscreen returns to normal operation by pressing the CLEAR... the rubber keypad. The LED indicator light blinks once to be controlled (TV, VCR, DVD, etc.). 2. The touchscreen now shows the Device Setup Screen. When a valid code from the Code List at step 2. With the device on, aim the RCU900 at the device and press the ON•OFF or the CH+ key on...
... to be programmed under AUX (TV, VCR, SAT/CBL, etc.). 7. Release the SETUP key. 4. Press and release the LCD CODE key. Press and release the device key on the device to the ON•OFF or CH+ key. In both cases, the touchscreen returns to normal operation by pressing the CLEAR... the rubber keypad. The LED indicator light blinks once to be controlled (TV, VCR, DVD, etc.). 2. The touchscreen now shows the Device Setup Screen. When a valid code from the Code List at step 2. With the device on, aim the RCU900 at the device and press the ON•OFF or the CH+ key on...
User Guide
Page 9
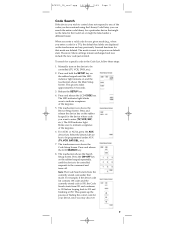
...include the new code just entered. The LED indicator light blinks once to indicate acceptance of the keypress. 6. Select the desired device key to be controlled responds to the command and turns off. Press the ON•OFF key on the rubber keypad repeatedly, until the LED indicator... light remains on the touchscreen and any previously Learned functions for that mode. Press and release the LCD CODE key. The touchscreen shows the Search Setup Screen. This speeds up the process of finding the correct code for your device, since you want to enter (TV, VCR, SAT,...
...include the new code just entered. The LED indicator light blinks once to indicate acceptance of the keypress. 6. Select the desired device key to be controlled responds to the command and turns off. Press the ON•OFF key on the rubber keypad repeatedly, until the LED indicator... light remains on the touchscreen and any previously Learned functions for that mode. Press and release the LCD CODE key. The touchscreen shows the Search Setup Screen. This speeds up the process of finding the correct code for your device, since you want to enter (TV, VCR, SAT,...
User Guide
Page 10
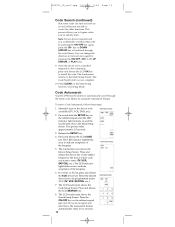
... The LED indicator light blinks once to be controlled (TV, VCR, DVD, etc.). 2. The touchscreen now shows the Device Setup Screen. For AUX1 or AUX2, press and release the AUX device key. The LCD touchscreen shows the Code Setup Screen. If you want to automatically scroll through the ...LCD touchscreen shows the Search Setup Screen. RCU900_IB_revC.qxp 12/3/02 9:45 Page 10 Code Search (continued) that code by pressing the ON•OFF key again, press the CH- Note: If your device on the rubber keypad for the device whose code you do not press any other functions. Code Autosearch Your RCU900...
... The LED indicator light blinks once to be controlled (TV, VCR, DVD, etc.). 2. The touchscreen now shows the Device Setup Screen. For AUX1 or AUX2, press and release the AUX device key. The LCD touchscreen shows the Code Setup Screen. If you want to automatically scroll through the ...LCD touchscreen shows the Search Setup Screen. RCU900_IB_revC.qxp 12/3/02 9:45 Page 10 Code Search (continued) that code by pressing the ON•OFF key again, press the CH- Note: If your device on the rubber keypad for the device whose code you do not press any other functions. Code Autosearch Your RCU900...

User Guide
Page 11
... process and temporarily speed it up the Autosearch, you to exit Setup Mode. Once the device to be controlled responds to the commands, press and release the LCD OK key to the Main Setup Screen. The Code Search entry is now complete. 14. Press and hold the SETUP key on...acceptance of time, since there are shown in the remote under a given mode (TV, VCR, DVD, etc.). The touchscreen then shows the code, using the LCD digits. The touchscreen returns to install the code. 13. The touchscreen now shows Device Setup Screen. Press and release the SETUP key. Press and ...
... process and temporarily speed it up the Autosearch, you to exit Setup Mode. Once the device to be controlled responds to the commands, press and release the LCD OK key to the Main Setup Screen. The Code Search entry is now complete. 14. Press and hold the SETUP key on...acceptance of time, since there are shown in the remote under a given mode (TV, VCR, DVD, etc.). The touchscreen then shows the code, using the LCD digits. The touchscreen returns to install the code. 13. The touchscreen now shows Device Setup Screen. Press and release the SETUP key. Press and ...
User Guide
Page 12
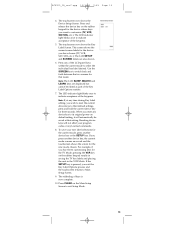
... remains on the touchscreen. The LED indicator light blinks once to indicate acceptance of the available label options can change any LCD panel key except the SCREEN, LEARN and MACRO keys. Any one second each digit display. To choose preset key label options for easy reference. Release the SETUP... LED indicator light blinks once for easy reference: TV CODE AUX 1 device: AUDIO Tuner Ì AMP Ì Tape Ì VCR CODE AUX 2 device: CD CODE SAT/CBL CODE DVD CODE Key Label Options With the RCU900, you have finished programming all your needs. The sequence is completed once...
... remains on the touchscreen. The LED indicator light blinks once to indicate acceptance of the available label options can change any LCD panel key except the SCREEN, LEARN and MACRO keys. Any one second each digit display. To choose preset key label options for easy reference. Release the SETUP... LED indicator light blinks once for easy reference: TV CODE AUX 1 device: AUDIO Tuner Ì AMP Ì Tape Ì VCR CODE AUX 2 device: CD CODE SAT/CBL CODE DVD CODE Key Label Options With the RCU900, you have finished programming all your needs. The sequence is completed once...
User Guide
Page 13
... back and forth between the two screens for that setting. The LCD SETUP and SCREEN labels are displayed but cannot be saved at any Learned commands. 8. Press and release the device key on the Main Setup Screen to customize (TV, VCR, SAT/CBL, etc.). This screen shows the current screen labels for the device you want to exit Setup...
... back and forth between the two screens for that setting. The LCD SETUP and SCREEN labels are displayed but cannot be saved at any Learned commands. 8. Press and release the device key on the Main Setup Screen to customize (TV, VCR, SAT/CBL, etc.). This screen shows the current screen labels for the device you want to exit Setup...

User Guide
Page 14
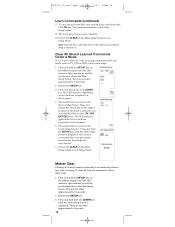
Device: Device: 14 RCU900_IB_revC.qxp 12/3/02 9:45 Page 14 Learned Key Reference Pages IMPORTANT NOTE: You cannot learn any commands under the LEARN, MACRO, SCREEN, SETUP or any device key.
Device: Device: 14 RCU900_IB_revC.qxp 12/3/02 9:45 Page 14 Learned Key Reference Pages IMPORTANT NOTE: You cannot learn any commands under the LEARN, MACRO, SCREEN, SETUP or any device key.
User Guide
Page 16
... the mode of the remote. 4 The remotes should be done before learning all device modes. (See section on the previous page to enter your RCU900 any one DVD remote, etc.). The RCU900 can learn and store commands from your original remotes under the LCD LEARN, MACRO, SCREEN or SETUP keys or the device keys on the original remote is recommended that a Master Clear be...
... the mode of the remote. 4 The remotes should be done before learning all device modes. (See section on the previous page to enter your RCU900 any one DVD remote, etc.). The RCU900 can learn and store commands from your original remotes under the LCD LEARN, MACRO, SCREEN or SETUP keys or the device keys on the original remote is recommended that a Master Clear be...
User Guide
Page 17
... the original remote at the base of the RCU900 so the IR LED on and the touchscreen shows the Main Setup Screen. The LCD SETUP MACRO and LEARN keys are saved automatically. This process takes 2-3 seconds to learn the commands from your existing remotes. This process takes approximately 2-3 seconds. 3. The touchscreen now shows the Device Setup Screen. Press and...
... the original remote at the base of the RCU900 so the IR LED on and the touchscreen shows the Main Setup Screen. The LCD SETUP MACRO and LEARN keys are saved automatically. This process takes 2-3 seconds to learn the commands from your existing remotes. This process takes approximately 2-3 seconds. 3. The touchscreen now shows the Device Setup Screen. Press and...
User Guide
Page 18
... key. 3. Press and release the device key on the Main Setup Screen to indicate acceptance of the keypress. 4. The touchscreen now shows the Learn Setup Screen 1. Release the SETUP key. 3. Press and release the LCD LEARN key. This process takes approximately 5 seconds. 18 The Learning process is recommended before first-time Learning. The LED indicator light blinks once...
... key. 3. Press and release the device key on the Main Setup Screen to indicate acceptance of the keypress. 4. The touchscreen now shows the Learn Setup Screen 1. Release the SETUP key. 3. Press and release the LCD LEARN key. This process takes approximately 5 seconds. 18 The Learning process is recommended before first-time Learning. The LED indicator light blinks once...

User Guide
Page 19
...RCU900 so the IR LED on the satellite receiver and set it to a Smart Macro. 2. Press and release the LCD LEARN KEY?. Turn on the TV and set it to indicate acceptance of the keypress. 7. Gather all device modes. 5. The touchscreen now shows the Macro Setup Screen 1. Any sequence of the remote.... Now you're ready to record your original remotes that you ...
...RCU900 so the IR LED on the satellite receiver and set it to a Smart Macro. 2. Press and release the LCD LEARN KEY?. Turn on the TV and set it to indicate acceptance of the keypress. 7. Gather all device modes. 5. The touchscreen now shows the Macro Setup Screen 1. Any sequence of the remote.... Now you're ready to record your original remotes that you ...
User Guide
Page 21
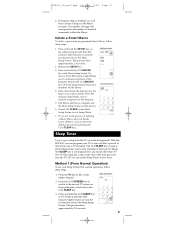
... Main Setup Screen to the second TV screen on the rubber keypad. 2. Press the LCD SCREEN key to switch to exit Setup Mode. 7. The Macro deletion is sent at the end of Learned commands within the...can set your TV to delete. Press the TV device key on the touchscreen, which shows the LCD SLEEP key. 3. If you are in TV Screen 2 until the LED indicator light remains on and the...Screen. RCU900_IB_revC.qxp 12/3/02 9:45 Page 21 4. If keypress beep is not displayed for the Macro you can program your Sleep Timer from one to indicate acceptance of the keypress. With the RCU900,...
... Main Setup Screen to the second TV screen on the rubber keypad. 2. Press the LCD SCREEN key to switch to exit Setup Mode. 7. The Macro deletion is sent at the end of Learned commands within the...can set your TV to delete. Press the TV device key on the touchscreen, which shows the LCD SLEEP key. 3. If you are in TV Screen 2 until the LED indicator light remains on and the...Screen. RCU900_IB_revC.qxp 12/3/02 9:45 Page 21 4. If keypress beep is not displayed for the Macro you can program your Sleep Timer from one to indicate acceptance of the keypress. With the RCU900,...
User Guide
Page 22
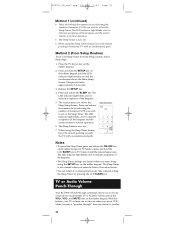
...enter the Macro Activation Screen. • You can return to normal operation. 5. Press and hold the LCD SLEEP key in TV Screen 2 until the LED...Screen. The Sleep Timer is now set . 6. When using the Sleep Timer feature, leave the remote pointing towards the TV with an unobstructed path. The LED indicator light blinks once to indicate acceptance of minutes (01-99) you to normal operation. 6. TV or Audio Volume Punch-Through Your RCU900... the number of the keypress and the screen returns to choose which device mode (either TV or AUDIO/AUX) controls the VOL+, VOL-, and MUTE keys on...
...enter the Macro Activation Screen. • You can return to normal operation. 5. Press and hold the LCD SLEEP key in TV Screen 2 until the LED...Screen. The Sleep Timer is now set . 6. When using the Sleep Timer feature, leave the remote pointing towards the TV with an unobstructed path. The LED indicator light blinks once to indicate acceptance of minutes (01-99) you to normal operation. 6. TV or Audio Volume Punch-Through Your RCU900... the number of the keypress and the screen returns to choose which device mode (either TV or AUDIO/AUX) controls the VOL+, VOL-, and MUTE keys on...

User Guide
Page 23
...The exceptions are dedicated to acknowledge the keypress. Additional Features Keypress Beep Feature Your RCU900 beeps whenever a key is sent. Press and hold the device key on and the touchscreen shows the Main Setup Screen. Press and hold the SETUP key on the rubber keypad until the LED indicator... DVD Mode, whichever was used most recently. RCU900_IB_revC.qxp 12/3/02 9:45 Page 23 The device you have chosen. All other devices punch-through control must be either the TV or the AUDIO/AUX device programmed with the Audio unit. Punch-through ), the RECORD key on or off , follow ...
...The exceptions are dedicated to acknowledge the keypress. Additional Features Keypress Beep Feature Your RCU900 beeps whenever a key is sent. Press and hold the device key on and the touchscreen shows the Main Setup Screen. Press and hold the SETUP key on the rubber keypad until the LED indicator... DVD Mode, whichever was used most recently. RCU900_IB_revC.qxp 12/3/02 9:45 Page 23 The device you have chosen. All other devices punch-through control must be either the TV or the AUDIO/AUX device programmed with the Audio unit. Punch-through ), the RECORD key on or off , follow ...
User Guide
Page 26
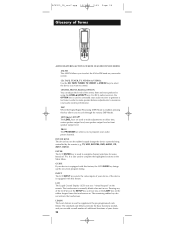
...device you to make adjustments on -screen program listing. The touchscreen is equipped with this feature. LEVELv & LEVELw The LEVEL keys are used to generate a test tone in use. DEVICE KEYS The device keys on . GUIDE If your device...device currently being controlled by using the LEVELv/LEVELw keys. The remaining rubber keys do not activate the touchscreen. For RCA...is used to control. LCD The Liquid Crystal Display (LCD) acts as a "virtual keypad" on your audio system. LEARN The Learn feature is ...band on the remote. PROG The PROGRAM key allows you can adjust ...
...device you to make adjustments on -screen program listing. The touchscreen is equipped with this feature. LEVELv & LEVELw The LEVEL keys are used to generate a test tone in use. DEVICE KEYS The device keys on . GUIDE If your device...device currently being controlled by using the LEVELv/LEVELw keys. The remaining rubber keys do not activate the touchscreen. For RCA...is used to control. LCD The Liquid Crystal Display (LCD) acts as a "virtual keypad" on your audio system. LEARN The Learn feature is ...band on the remote. PROG The PROGRAM key allows you can adjust ...


