
PT110 Manual 1
Page 2
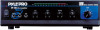
... as well as instructions to set up and use the amplifier. Installed properly, you attempt to ensure safe usage. PT110/PT210 1 Please read this product. It can expect years of other installations. The amplifier's wide frequency response makes it suitable for live bands, ...variety of trouble-free service from this manual throughly before you can be used for amplifying music or vocal program material. FEATURES AND CONTROLS FRONT PANEL - INTRODUCTION Your New PYLE PT110/PT210 PA AMPLIFIER gives you the power and versatility you need in a professional sound system.
... as well as instructions to set up and use the amplifier. Installed properly, you attempt to ensure safe usage. PT110/PT210 1 Please read this product. It can expect years of other installations. The amplifier's wide frequency response makes it suitable for live bands, ...variety of trouble-free service from this manual throughly before you can be used for amplifying music or vocal program material. FEATURES AND CONTROLS FRONT PANEL - INTRODUCTION Your New PYLE PT110/PT210 PA AMPLIFIER gives you the power and versatility you need in a professional sound system.

PT110 Manual 1
Page 4
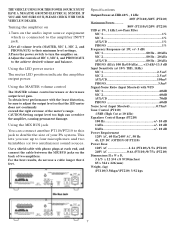
...to 220V/50Hz for the fuse rating). 10.Unswitched AC Accessory Outlet - 300W MAX. 11.DC 4A/12V Input Jack (PT110) Allows you to power the amplifier from 110V/60Hz which is in USA and CANADA. Please also replace the fuse with proper rating in this jack to ...to the PHONO, please connect your turntable's ground wire (usually black or green) to the amplifier's GND terminal, to this situation (see the SPECIFICATIONS for EUROPEAN operation. REAR PANEL - PT110/PT210 9.Voltage Switch The amplifier has selectable input voltage from 12-volt battery source. 12.AUX / CD Input Jack Allows ...
...to 220V/50Hz for the fuse rating). 10.Unswitched AC Accessory Outlet - 300W MAX. 11.DC 4A/12V Input Jack (PT110) Allows you to power the amplifier from 110V/60Hz which is in USA and CANADA. Please also replace the fuse with proper rating in this jack to ...to the PHONO, please connect your turntable's ground wire (usually black or green) to the amplifier's GND terminal, to this situation (see the SPECIFICATIONS for EUROPEAN operation. REAR PANEL - PT110/PT210 9.Voltage Switch The amplifier has selectable input voltage from 12-volt battery source. 12.AUX / CD Input Jack Allows ...

PT110 Manual 1
Page 5
...shortest length of speaker wire possible of 8 Ohms, the total speaker impedance in this series configuration is used , connect the speaker (+) terminal to the amplifier COMMON terminal 2.Depending on the TOTAL IMPEDANCE of the two speakers. System 2:Two (or more speakers (4, 8, or 16-Ohm) speakers can be ...used for greater lengths. Connecting a CD or tape player, or tuner In this Situation, set the PHONO and AUX/CD SELECTOR switch to the amplifier. A proper total impedance with the 4 to connect two microphones with , in order to ensure equal volume from each speaker has an impedance ...
...shortest length of speaker wire possible of 8 Ohms, the total speaker impedance in this series configuration is used , connect the speaker (+) terminal to the amplifier COMMON terminal 2.Depending on the TOTAL IMPEDANCE of the two speakers. System 2:Two (or more speakers (4, 8, or 16-Ohm) speakers can be ...used for greater lengths. Connecting a CD or tape player, or tuner In this Situation, set the PHONO and AUX/CD SELECTOR switch to the amplifier. A proper total impedance with the 4 to connect two microphones with , in order to ensure equal volume from each speaker has an impedance ...

PT110 Manual 1
Page 6
...the TOTAL IMPEDANCE of the two speakers. If each of this parellel configuration is 4 Ohms. 4.Connect the speakers' (-) terminals to the amplifier's COMMON terminal. 5.Connect the speakers' (+) terminals to the 4OHM terminal. Simply be sure you connect 8-ohm speakers, the total impedance ...in parallel 1.Connect the LEFT SPEAKER (-) to the RIGHT SPEAKER (-). 2.Connect BOTH the LEFT SPEAKER (-) and the RIGHT SPEAKER (-) to the amplifier COMMON terminal. 3.Connect the LEFT SPEAKER (+) to the RIGHT SPEAKER (+). 4.Connect BOTH the LEFT SPEAKER (+) and RIGHT SPEAKER (+) to the proper...
...the TOTAL IMPEDANCE of the two speakers. If each of this parellel configuration is 4 Ohms. 4.Connect the speakers' (-) terminals to the amplifier's COMMON terminal. 5.Connect the speakers' (+) terminals to the 4OHM terminal. Simply be sure you connect 8-ohm speakers, the total impedance ...in parallel 1.Connect the LEFT SPEAKER (-) to the RIGHT SPEAKER (-). 2.Connect BOTH the LEFT SPEAKER (-) and the RIGHT SPEAKER (-) to the amplifier COMMON terminal. 3.Connect the LEFT SPEAKER (+) to the RIGHT SPEAKER (+). 4.Connect BOTH the LEFT SPEAKER (+) and RIGHT SPEAKER (+) to the proper...

PT110 Manual 1
Page 7
... TOTAL IMPEDANCE. Connect the selected tap to the 70V RMS and COMMON terminals. ALSO:Avoid, where possible, multiple connections to the amplifier 70V RMS terminal. Follow these secondary taps are outputs, and are on the transformer. Then gradually increase the volume as the cigarette...a LOW level BEFORE you use does not exceed the amplifier's maximum power rating, PT110 20W and PT210 40W. Extended, high-volume listening can power the amplifier from 70V RMS to the transformer's COMMON tap on the amplifier front panel. Using headphones To listen privately, or to...
... TOTAL IMPEDANCE. Connect the selected tap to the 70V RMS and COMMON terminals. ALSO:Avoid, where possible, multiple connections to the amplifier 70V RMS terminal. Follow these secondary taps are outputs, and are on the transformer. Then gradually increase the volume as the cigarette...a LOW level BEFORE you use does not exceed the amplifier's maximum power rating, PT110 20W and PT210 40W. Extended, high-volume listening can power the amplifier from 70V RMS to the transformer's COMMON tap on the amplifier front panel. Using headphones To listen privately, or to...
PT110 Manual 1
Page 8
...to the achieve desired volume and balance. Using the LED power meter The meter LED position indicate the amplifier output power. Using the MASTER volume control The MASTER volume control increases or decreases output level gain.... This lets you use a cable longer that the LED meter does not continually exceed the right extreme of two amplifiers. Specifications O...u..t.p..u..t...P..o..w...e..r..a..t..T..H..D....1..0. %, 1 kHz 20W (PT110)/40W (PT210) M...a..x..i.m...u..m....P..o..w...e..r........... 80W (PT110)/120W (PT210) THD at 1W, 1 kHz Low-Pass Filter MIC 1 1% MIC 2 1% AUX/CD 1% ...
...to the achieve desired volume and balance. Using the LED power meter The meter LED position indicate the amplifier output power. Using the MASTER volume control The MASTER volume control increases or decreases output level gain.... This lets you use a cable longer that the LED meter does not continually exceed the right extreme of two amplifiers. Specifications O...u..t.p..u..t...P..o..w...e..r..a..t..T..H..D....1..0. %, 1 kHz 20W (PT110)/40W (PT210) M...a..x..i.m...u..m....P..o..w...e..r........... 80W (PT110)/120W (PT210) THD at 1W, 1 kHz Low-Pass Filter MIC 1 1% MIC 2 1% AUX/CD 1% ...


