
User Manual
Page 3
... Setting Audio Mode 16 Reset Factory Settings 16 Rear View Camera 16 External Audio Source 16 Control Panel 17 Unit keys 17 Radio Operation 20 Listening to radio 20 Storing and Listening to a Memory Digital Video Special Function....... 28 Multi-subtitle language function........ 28 Multi-audio language function........... 28 Title menu function 28 Media Setup Menu 29 System Setup 29 Language Setup 31 Video Setup 32 Digital Setup 33 AUX Operation 34 USB Operation 35 SD/MMC Card Operation 36 MP3/WMA/JPEG/MPEG4 Play..........37 Specification 38 Troubleshooting 39 station...
... Setting Audio Mode 16 Reset Factory Settings 16 Rear View Camera 16 External Audio Source 16 Control Panel 17 Unit keys 17 Radio Operation 20 Listening to radio 20 Storing and Listening to a Memory Digital Video Special Function....... 28 Multi-subtitle language function........ 28 Multi-audio language function........... 28 Title menu function 28 Media Setup Menu 29 System Setup 29 Language Setup 31 Video Setup 32 Digital Setup 33 AUX Operation 34 USB Operation 35 SD/MMC Card Operation 36 MP3/WMA/JPEG/MPEG4 Play..........37 Specification 38 Troubleshooting 39 station...

User Manual
Page 4
... the monitor, and no playback picture will become unclear , or the LCD panel may be shown. - ParkingBrake" flashes on the unit as this may obstruct the operation of safety devices such as air bags, as doing so can distort the picture or cause a malfunction . This warning appears only when the parking brake wire is connected to the parking brake system built in your car was parked...
... the monitor, and no playback picture will become unclear , or the LCD panel may be shown. - ParkingBrake" flashes on the unit as this may obstruct the operation of safety devices such as air bags, as doing so can distort the picture or cause a malfunction . This warning appears only when the parking brake wire is connected to the parking brake system built in your car was parked...

User Manual
Page 11
.../BLACK REAR RCH SPK. Electric Connection WIRING CONNECTION RCH RED LCH WHITE REAR RCA OUTPUT CABLE RCA CABLE FRONT RCA OUTPUT CABLE REAR CAMERA INPUT YELLOW SUBWOOFER GREY VIDEO IN YELLOW FRONT RCA RED R VIDEO OUT YELLOW FRONT RCA WHITE L RADIO ANTENNA JACK ISO CONNECTOR IGNITION SWITCH(B+) MEMORY BACK-UP(B+) GROUND(B-) RED YELLOW BLACK CHOKE BOX PINK BROWN BLUE (B+)12V REAR CAMERA SWITCH (B-)PARKING BRAKE AUTO ANTENNA FRONT LCH SPK. WHITE WHITE/BLACK GREY GREY/BLACK FRONT RCH SPK. If the cable has not been correctly connected, the message "PARKING BRAKE" appears on the monitor...
.../BLACK REAR RCH SPK. Electric Connection WIRING CONNECTION RCH RED LCH WHITE REAR RCA OUTPUT CABLE RCA CABLE FRONT RCA OUTPUT CABLE REAR CAMERA INPUT YELLOW SUBWOOFER GREY VIDEO IN YELLOW FRONT RCA RED R VIDEO OUT YELLOW FRONT RCA WHITE L RADIO ANTENNA JACK ISO CONNECTOR IGNITION SWITCH(B+) MEMORY BACK-UP(B+) GROUND(B-) RED YELLOW BLACK CHOKE BOX PINK BROWN BLUE (B+)12V REAR CAMERA SWITCH (B-)PARKING BRAKE AUTO ANTENNA FRONT LCH SPK. WHITE WHITE/BLACK GREY GREY/BLACK FRONT RCH SPK. If the cable has not been correctly connected, the message "PARKING BRAKE" appears on the monitor...

User Manual
Page 12
... change the radio reception sensitivity in stations are near or far. 7 REPEAT Pressing the button will improve sound quality). Press once to change between Mono and 5 MO/ST Stereo reception modes (when a station is weak, sometimes (AUDIO) switching to the way the soundtrack is reproduced. In Radio mode, press this button to pause playback. Remote Control 15 17 7 19 2 13 22 6 14 24 18 11 10 4 8 POWER MUTE PLAY...
... change the radio reception sensitivity in stations are near or far. 7 REPEAT Pressing the button will improve sound quality). Press once to change between Mono and 5 MO/ST Stereo reception modes (when a station is weak, sometimes (AUDIO) switching to the way the soundtrack is reproduced. In Radio mode, press this button to pause playback. Remote Control 15 17 7 19 2 13 22 6 14 24 18 11 10 4 8 POWER MUTE PLAY...

User Manual
Page 13
... unit ON , press it button to begin playback at a moment in Digital Video disc 18 TITLE/ PBC(A/P) changing between BASS,TRE, BAL, FADER,COLOR,BRIGHT,CONTR,TINT and VOL; Use number buttons to enter the data that is needed. 9 / Press these controls to adjust the volume level. 12 / / / Press to navigate the various menus present in radio mode),TIME 24H/12H, CLOCK, BUZZ,EUR/USA FREQ,ANIMA, BG and LED; After switching...
... unit ON , press it button to begin playback at a moment in Digital Video disc 18 TITLE/ PBC(A/P) changing between BASS,TRE, BAL, FADER,COLOR,BRIGHT,CONTR,TINT and VOL; Use number buttons to enter the data that is needed. 9 / Press these controls to adjust the volume level. 12 / / / Press to navigate the various menus present in radio mode),TIME 24H/12H, CLOCK, BUZZ,EUR/USA FREQ,ANIMA, BG and LED; After switching...

User Manual
Page 14
... DISC mode, press it to reverse rapidly Use to input numerical values during programming, with the GOTO 25 0-9 button, or to directly select a track to play . Remote Control Ref # Button Function This button is used with the other number buttons for use please remove this foil so that the remote control is used to confirm selections and settings within many 23 ENTER of the menus in each band Preparing the Remote Control Inserting the Battery...
... DISC mode, press it to reverse rapidly Use to input numerical values during programming, with the GOTO 25 0-9 button, or to directly select a track to play . Remote Control Ref # Button Function This button is used with the other number buttons for use please remove this foil so that the remote control is used to confirm selections and settings within many 23 ENTER of the menus in each band Preparing the Remote Control Inserting the Battery...

User Manual
Page 16
ADJUSTABLE ITEMS: (3) (4) (5) (6) (1). Button to adjust the angle of the monitor upward until your habit to setup the data. COLOR: 0 to 32 Adjust the color for "NTSC/PAL " . ANIMATION In RADIO mode, you turn the unit on . -14- Button Touch to eject the disc form the disc slot. (5). Button Touch to close the monitor . (4). CONTRAST: 0 to 32 Adjust the contrast of "OFF, 10S, 30S, 1M,1.5M, 2M, 3M and 4M ". Touch "SYSTEM" on the setting menu, touch the...
ADJUSTABLE ITEMS: (3) (4) (5) (6) (1). Button to adjust the angle of the monitor upward until your habit to setup the data. COLOR: 0 to 32 Adjust the color for "NTSC/PAL " . ANIMATION In RADIO mode, you turn the unit on . -14- Button Touch to eject the disc form the disc slot. (5). Button Touch to close the monitor . (4). CONTRAST: 0 to 32 Adjust the contrast of "OFF, 10S, 30S, 1M,1.5M, 2M, 3M and 4M ". Touch "SYSTEM" on the setting menu, touch the...
User Manual
Page 17
... player will change the panel color illumination automatically . It`s depend on your need to select the time mode . BASS: -7 to R 0-10 Adjust sound balance between left and right speakers . FADE: F 0-10 to +7 Adjust bass level . Then touch the "SET" icon to return to confirm. TREBLE: -7to +7 Adjust treble level . AUDIO QUALITY ADJUSTMENT In Radio mode, touch the screen of the " RADIO " ICON to enter the home menu, touch the " SET " ICON to select the Audio mode . Touch the " SOUND...
... player will change the panel color illumination automatically . It`s depend on your need to select the time mode . BASS: -7 to R 0-10 Adjust sound balance between left and right speakers . FADE: F 0-10 to +7 Adjust bass level . Then touch the "SET" icon to return to confirm. TREBLE: -7to +7 Adjust treble level . AUDIO QUALITY ADJUSTMENT In Radio mode, touch the screen of the " RADIO " ICON to enter the home menu, touch the " SET " ICON to select the Audio mode . Touch the " SOUND...

User Manual
Page 18
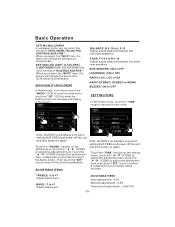
... Reset Factory Settings RESET button is an AUX IN jack, to connect analogue replay devices. Use the buttons on the external device itself to replay sound of the preset sound modes: ROCK/POP/ JAZZ/CLASSIC/USER . Use this jack to operate it . Basic Operation Setting Audio Mode In any modes, touch the "EQ" range on the touch screen (or press the EQ button on remote control) to be activated with stereo jack plug the AUX IN socket . 2). AUX IN Headphones port RESET The RESET button is automatically displayed on the display...
... Reset Factory Settings RESET button is an AUX IN jack, to connect analogue replay devices. Use the buttons on the external device itself to replay sound of the preset sound modes: ROCK/POP/ JAZZ/CLASSIC/USER . Use this jack to operate it . Basic Operation Setting Audio Mode In any modes, touch the "EQ" range on the touch screen (or press the EQ button on remote control) to be activated with stereo jack plug the AUX IN socket . 2). AUX IN Headphones port RESET The RESET button is automatically displayed on the display...

User Manual
Page 19
... press SEL button to switch REG, then briefly press SEL button repeatedly to select RADIO, DISC, USB, CARD and AUX IN mode. -17- To adjust the angle of the monitor, long press this button; Control Panel UNIT KEYS OPEN VOL- VOL KNOB & SEL BUTTON In normal mode, VOL knob is used to switch between PI, TA, AF, LOUD,SWF, EQ,DX/LOCAL(in radio mode),STEREO/MONO(in radio mode), TIME 24H/12H, SET CLOCK, BUZZ...
... press SEL button to switch REG, then briefly press SEL button repeatedly to select RADIO, DISC, USB, CARD and AUX IN mode. -17- To adjust the angle of the monitor, long press this button; Control Panel UNIT KEYS OPEN VOL- VOL KNOB & SEL BUTTON In normal mode, VOL knob is used to switch between PI, TA, AF, LOUD,SWF, EQ,DX/LOCAL(in radio mode),STEREO/MONO(in radio mode), TIME 24H/12H, SET CLOCK, BUZZ...

User Manual
Page 22
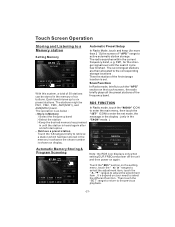
... appear . ) Touch the " SOUND " section on again. control to select the MONO or STEREO mode . (When Stereo mode is Note: the RDS icon displays only when hard to receive setting EUR FREQ and power off the unit Press ST/MO button on the remote and then power on the setting menu, touch the " / " ranges to select the " Radio L/D " item, touch the " / " ranges to choose between the LOC and DX mode of channel spacing. Touch Screen Operation RADIO OPERATION...
... appear . ) Touch the " SOUND " section on again. control to select the MONO or STEREO mode . (When Stereo mode is Note: the RDS icon displays only when hard to receive setting EUR FREQ and power off the unit Press ST/MO button on the remote and then power on the setting menu, touch the " / " ranges to select the " Radio L/D " item, touch the " / " ranges to choose between the LOC and DX mode of channel spacing. Touch Screen Operation RADIO OPERATION...
User Manual
Page 23
... the stronger signal level until the station is set mode, the message in the display : (only in advance the chose number is as below : - FM1, for more than 2 ' S) the screen of " APS " range to active automatic station storage. Then touch the "SET" range to return to six preset stations. Scan Function In Radio mode, briefly touch the "APS" section on your need to the corresponding storage locations . Retrieve a preset station Touch the 1-6 ranges...
... the stronger signal level until the station is set mode, the message in the display : (only in advance the chose number is as below : - FM1, for more than 2 ' S) the screen of " APS " range to active automatic station storage. Then touch the "SET" range to return to six preset stations. Scan Function In Radio mode, briefly touch the "APS" section on your need to the corresponding storage locations . Retrieve a preset station Touch the 1-6 ranges...

User Manual
Page 24
... used with the help of another station is heard for an alternative frequency (AF) or a program identification (PI) . Alternate switching of the sound. TA Traffic Announcement (Priority For Traffic Information) In Radio mode, touch the cursor button to change between PI MUTE and PI SOUND . REG FUNCTION at certain times some segments of traffic announcements. After the traffic announcements has finished, the program that in the display...
... used with the help of another station is heard for an alternative frequency (AF) or a program identification (PI) . Alternate switching of the sound. TA Traffic Announcement (Priority For Traffic Information) In Radio mode, touch the cursor button to change between PI MUTE and PI SOUND . REG FUNCTION at certain times some segments of traffic announcements. After the traffic announcements has finished, the program that in the display...

User Manual
Page 26
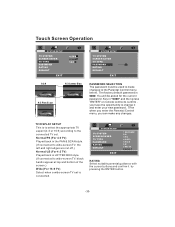
... home menu)to switch PBC ON and PBC OFF. display To show /hide the Subtitle (depending on the used media) To change the AUDIO setting (depending on the used media) ZOOM IN and OUT Turning pre-switching for traffic announcements on and off Switching on stored Digital Video discs . In Digital Video mode, touch to TITLE PBC display the title menu. To show / hide the clock Loudness Function Subwoofer Function Previous menu -24...
... home menu)to switch PBC ON and PBC OFF. display To show /hide the Subtitle (depending on the used media) To change the AUDIO setting (depending on the used media) ZOOM IN and OUT Turning pre-switching for traffic announcements on and off Switching on stored Digital Video discs . In Digital Video mode, touch to TITLE PBC display the title menu. To show / hide the clock Loudness Function Subwoofer Function Previous menu -24...

User Manual
Page 30
... MONO RIGHT STEREO MIX-MONO -28- Title Menu Function For Digital Video: If the Digital Video has multiple titles recorded on the remote control while the disc is pressed or touch , number of the subtitle language changes in sequential order. It is different according to start playback. - Each time the button is different according to switch the sound between "PBC ON"and "PBC off" mode. 2. When...
... MONO RIGHT STEREO MIX-MONO -28- Title Menu Function For Digital Video: If the Digital Video has multiple titles recorded on the remote control while the disc is pressed or touch , number of the subtitle language changes in sequential order. It is different according to start playback. - Each time the button is different according to switch the sound between "PBC ON"and "PBC off" mode. 2. When...

User Manual
Page 31
... set the unit to avoid burn-in either PAL or NTSC formats. System Settings (2). Video Settings (4). Language Settings (3). Or by using the / / / buttons . 4. Make the selection based on the monitor, the unit will substitute a moving image to AUTO (autoselect). After a short period of inactivity on whether you may occur, leaving a permanent trace of playing discs recorded in . -29- Touch Screen Operation MEDIA SETUP MENU USING THE MENU SYSTEM SETUP TV SYSTEM SCREEN SAVER TV TYPE PASSWORD...
... set the unit to avoid burn-in either PAL or NTSC formats. System Settings (2). Video Settings (4). Language Settings (3). Or by using the / / / buttons . 4. Make the selection based on the monitor, the unit will substitute a moving image to AUTO (autoselect). After a short period of inactivity on whether you may occur, leaving a permanent trace of playing discs recorded in . -29- Touch Screen Operation MEDIA SETUP MENU USING THE MENU SYSTEM SETUP TV SYSTEM SCREEN SAVER TV TYPE PASSWORD...
User Manual
Page 32
... change it by pressing the ENTER button. -30- Normal/PS (For 4:3 TV) Played back in the PAN & SCAN style. (If connected to wide-screen TV, the left and right edges are cut off.) Normal/LB (For 4:3 TV) Played back in "0000" and then press "ENTER" on remote control to the Parental Control menu below . SYSTEM SETUP TV SYSTEM SCREEN SAVER TV TYPE PASSWORD...
... change it by pressing the ENTER button. -30- Normal/PS (For 4:3 TV) Played back in the PAN & SCAN style. (If connected to wide-screen TV, the left and right edges are cut off.) Normal/LB (For 4:3 TV) Played back in "0000" and then press "ENTER" on remote control to the Parental Control menu below . SYSTEM SETUP TV SYSTEM SCREEN SAVER TV TYPE PASSWORD...

User Manual
Page 36
... diagram . 2). In any mode, press the "MOD" button on the front panel to connect the Video, please plug the RCA on the back of the unit .) . Via the loudspeakers. 1). You now hear the sound from the external device played back through the loudspeakers . Touch Screen Operation AUX Operation On the front panel of this jack to adjust the volume level. AUX IN JACK FRONT PANEL 3). Please connect the external device with stereo jack plug the Aux...
... diagram . 2). In any mode, press the "MOD" button on the front panel to connect the Video, please plug the RCA on the back of the unit .) . Via the loudspeakers. 1). You now hear the sound from the external device played back through the loudspeakers . Touch Screen Operation AUX Operation On the front panel of this jack to adjust the volume level. AUX IN JACK FRONT PANEL 3). Please connect the external device with stereo jack plug the Aux...
User Manual
Page 38
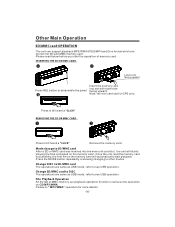
the unit will starts playing the files contained on the memory card will automatically start the operation of memory card . Press the MODE button repeatedly is same as the operation on CD/MP3/WMA . Please to " MP3/WMA" operation for GPS only. Once the unit read below before you start playback. Change SD/MMC card to DISC The operations are same as USB mode, refer to see USB operation . Label...
the unit will starts playing the files contained on the memory card will automatically start the operation of memory card . Press the MODE button repeatedly is same as the operation on CD/MP3/WMA . Please to " MP3/WMA" operation for GPS only. Once the unit read below before you start playback. Change SD/MMC card to DISC The operations are same as USB mode, refer to see USB operation . Label...

User Manual
Page 41
... from menu No video/image appears The unit is not connected to the parking brake detection switch The parking brake is not engaged Make proper connection according to noise into its place The radio does not The antenna cable is not work connected Insert the antenna cable firmly The signals are too weak Select a station manually MADE IN CHINA -39- 88-J8300-02D The operation keys is not operating properly Front panel is not properly fixed...
... from menu No video/image appears The unit is not connected to the parking brake detection switch The parking brake is not engaged Make proper connection according to noise into its place The radio does not The antenna cable is not work connected Insert the antenna cable firmly The signals are too weak Select a station manually MADE IN CHINA -39- 88-J8300-02D The operation keys is not operating properly Front panel is not properly fixed...


