User Manual
Page 2
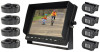
... not watch videos or operate features on the monitor while driving. If the unit malfunctions please return to your vehicle . We are no serviceable parts in the video camera system setup. Connection Connect the camera's threaded locking 4‐pin cable connectors into the female receiving connection of the vehicle's safety features, wiring, components, etc. See the wiring diagram for any connection / installation. To ensure your monitor. Use the included wiring harness to provide power and video signals to your safety, the driver...
... not watch videos or operate features on the monitor while driving. If the unit malfunctions please return to your vehicle . We are no serviceable parts in the video camera system setup. Connection Connect the camera's threaded locking 4‐pin cable connectors into the female receiving connection of the vehicle's safety features, wiring, components, etc. See the wiring diagram for any connection / installation. To ensure your monitor. Use the included wiring harness to provide power and video signals to your safety, the driver...

User Manual
Page 3
PLCMTR ‐ Commercial Grade Camera System Wiring & Connection www.pyleaudio.com Red: Power 12/24V Ch.2 / V2 is used as the rearview cameras as the backup camera input Black: GND Green: Reverse Trigger (Backup Camera) Blue: Turning Signal ‐ Left ‐ Trigger White: Turning Signal ‐ Right ‐ Trigger Brown: Forward Trigger When the Reverse Trigger (Green) wire is connected and powered through the vehicle, the display monitor will automatically switch to Ch.2 / V2 when placing your vehicle into reverse gear *For additional information visit www.PyleAudio.com
PLCMTR ‐ Commercial Grade Camera System Wiring & Connection www.pyleaudio.com Red: Power 12/24V Ch.2 / V2 is used as the rearview cameras as the backup camera input Black: GND Green: Reverse Trigger (Backup Camera) Blue: Turning Signal ‐ Left ‐ Trigger White: Turning Signal ‐ Right ‐ Trigger Brown: Forward Trigger When the Reverse Trigger (Green) wire is connected and powered through the vehicle, the display monitor will automatically switch to Ch.2 / V2 when placing your vehicle into reverse gear *For additional information visit www.PyleAudio.com
User Manual
Page 4
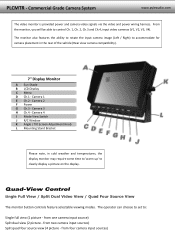
... the video and power wiring harness. Quad-View Control Single Full View / Split Dual Video View / Quad Four Source View The monitor button controls feature selectable viewing modes. The monitor also features the ability to rotate the input camera image (Left / Right) to accommodate for camera placement in the rear of the vehicle (Rear view camera compatibility). 7'' Display Monitor A Sun Shade B LCD Display C Menu D Ch.1 ‐ Camera 1 E Ch.2 ‐ Camera 2 F Power G Ch.3 ‐ Camera 3 H Ch.4 ‐ Camera 4 I Mode View Switch J R/C Window K Angle / Tilt Screen Adjustment Knob...
... the video and power wiring harness. Quad-View Control Single Full View / Split Dual Video View / Quad Four Source View The monitor button controls feature selectable viewing modes. The monitor also features the ability to rotate the input camera image (Left / Right) to accommodate for camera placement in the rear of the vehicle (Rear view camera compatibility). 7'' Display Monitor A Sun Shade B LCD Display C Menu D Ch.1 ‐ Camera 1 E Ch.2 ‐ Camera 2 F Power G Ch.3 ‐ Camera 3 H Ch.4 ‐ Camera 4 I Mode View Switch J R/C Window K Angle / Tilt Screen Adjustment Knob...

User Manual
Page 5
... tightening the side knob. Once screwed into the desired location, attach the LCD display monitor housing and tighten with the tightening knob to your desired location. Adjust the angle / tilt of the LCD display before attempting to secure the bracket to the side of the bracket. Please remove the LCD display monitor from the LCD display housing for attachment / fixture. The U‐shaped bracket...
... tightening the side knob. Once screwed into the desired location, attach the LCD display monitor housing and tighten with the tightening knob to your desired location. Adjust the angle / tilt of the LCD display before attempting to secure the bracket to the side of the bracket. Please remove the LCD display monitor from the LCD display housing for attachment / fixture. The U‐shaped bracket...

User Manual
Page 6
...;Screen at the Same Time Includes All Necessary Cables & Wiring Monitor: 10.1'' TFT/LCD Active Matrix Video Monitor Built‐in Quad Control Box Screen Function Supports up to (4) Video Camera Inputs (V1/V2/V3/V4) Selectable Viewing Modes: Single Full View / Split Dual Video View / Quad Four Source View Reverse Image (Backup Camera) Ability Aspect Ratio: 16:9 Widescreen Format PAL/NTSC Video Format Compatible Signal Sense: Auto Power‐On Reversing High Resolution: 1024 x 800 Pixels Universal Stand & Anti‐Glare Sun Visor 4‐Pin Video Connectors Power...
...;Screen at the Same Time Includes All Necessary Cables & Wiring Monitor: 10.1'' TFT/LCD Active Matrix Video Monitor Built‐in Quad Control Box Screen Function Supports up to (4) Video Camera Inputs (V1/V2/V3/V4) Selectable Viewing Modes: Single Full View / Split Dual Video View / Quad Four Source View Reverse Image (Backup Camera) Ability Aspect Ratio: 16:9 Widescreen Format PAL/NTSC Video Format Compatible Signal Sense: Auto Power‐On Reversing High Resolution: 1024 x 800 Pixels Universal Stand & Anti‐Glare Sun Visor 4‐Pin Video Connectors Power...


