User Manual
Page 2
CONTENTS Installation 3 Mounting 4 Wiring Connection 5 Operation 6 Location of the keys 6 Power on/off the unit 7 Main menu 7 Setup 7 Reset function 9 Slight fog after operation 9 Radio operation 9 Switching to the radio mode 9 Selecting the frequency band 9 Selecting frequency 9 Automatic storing program Scanning 9 Manually store station and recall Preset station 10 Stereo on/off 10 Loc on/off 10 USB operation 10 Playing USB 10 Pause playback 10 Select chapter/track 10 Stop playback 11 Back to the playing list 11...
CONTENTS Installation 3 Mounting 4 Wiring Connection 5 Operation 6 Location of the keys 6 Power on/off the unit 7 Main menu 7 Setup 7 Reset function 9 Slight fog after operation 9 Radio operation 9 Switching to the radio mode 9 Selecting the frequency band 9 Selecting frequency 9 Automatic storing program Scanning 9 Manually store station and recall Preset station 10 Stereo on/off 10 Loc on/off 10 USB operation 10 Playing USB 10 Pause playback 10 Select chapter/track 10 Stop playback 11 Back to the playing list 11...
User Manual
Page 3
...location where the unit will not interfere with the normal driving function of the vehicle. Install the unit where it does not get in the driver's way and cannot injure the passenger if there is all connected up properly and the unit and the system work properly. Use only the parts... included with your nearest dealer if installation requires the drilling of holes or other modifications of the driver. Before finally installing the unit, connect the wiring temporarily and make...
...location where the unit will not interfere with the normal driving function of the vehicle. Install the unit where it does not get in the driver's way and cannot injure the passenger if there is all connected up properly and the unit and the system work properly. Use only the parts... included with your nearest dealer if installation requires the drilling of holes or other modifications of the driver. Before finally installing the unit, connect the wiring temporarily and make...

User Manual
Page 5
WIRING CONNECTION ISO CONNECTION 5
WIRING CONNECTION ISO CONNECTION 5

User Manual
Page 6
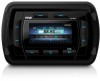
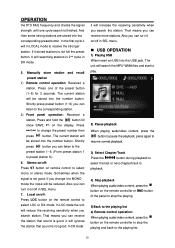
VOL + 4. TFT 7. Seek up button 6 OPERATION LOCATION OF KEYS 1. VOL - 5. Power button 8. MODE button/BT 3. MUTE button 9. Play/pause button/SAVE 6. Seek down button 10. BAND button 2.
VOL + 4. TFT 7. Seek up button 6 OPERATION LOCATION OF KEYS 1. VOL - 5. Power button 8. MODE button/BT 3. MUTE button 9. Play/pause button/SAVE 6. Seek down button 10. BAND button 2.

User Manual
Page 7
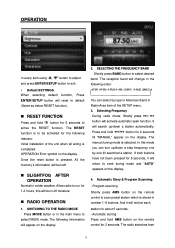
.... OPERATION POWER ON/OFF THE UNIT Press the button to turn on/off the unit. MAIN MENU Press and hold ENTER/SETUP button on the remote control for 2 seconds, then Press " " button on the remote control will show the SETTUP menu. Then press ENTER/SETUP button button of the front panel to enter corresponding item. (Press " "button on the remote control or BND button on the remote control to select OSD Language/Time/Radio...
.... OPERATION POWER ON/OFF THE UNIT Press the button to turn on/off the unit. MAIN MENU Press and hold ENTER/SETUP button on the remote control for 2 seconds, then Press " " button on the remote control will show the SETTUP menu. Then press ENTER/SETUP button button of the front panel to enter corresponding item. (Press " "button on the remote control or BND button on the remote control to select OSD Language/Time/Radio...
User Manual
Page 8
Press " / "button on the remote control or " / " on the remote control to select Aspect ratio/Adjust. Radio Area Press " / "button on the remote control to select Europe/America. 4).Beep Press " / "button on the remote control to select on/off. VIDEO SETTINGS AUDIO SETTINGS 1).V surround Press " / "button on the front panel to select Off/Concert/Church/Passive/Wide/Live. Then press ENTER/SETUP button to enter corresponding item. 1).Aspect ratio...
Press " / "button on the remote control or " / " on the remote control to select Aspect ratio/Adjust. Radio Area Press " / "button on the remote control to select Europe/America. 4).Beep Press " / "button on the remote control to select on/off. VIDEO SETTINGS AUDIO SETTINGS 1).V surround Press " / "button on the front panel to select Off/Concert/Church/Passive/Wide/Live. Then press ENTER/SETUP button to enter corresponding item. 1).Aspect ratio...
User Manual
Page 9
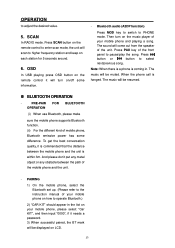
.... RADIO OPERATION 1. Automatic storing Press and hold / button for 2 seconds till "MANUAL" appear on the remote control for 6 seconds to be lost! SLIGHTFOG AFTER OPERATION Normal in Radio Area item of the unit when all wiring is selected. OPERATION Error symbol on the remote control to select RADIO mode. Automatic Story & Program Scanning: - The manual tuning mode is completed. All the memory's information will be activated for 1-2 hours, this mode you...
.... RADIO OPERATION 1. Automatic storing Press and hold / button for 2 seconds till "MANUAL" appear on the remote control for 6 seconds to be lost! SLIGHTFOG AFTER OPERATION Normal in Radio Area item of the unit when all wiring is selected. OPERATION Error symbol on the remote control to select RADIO mode. Automatic Story & Program Scanning: - The manual tuning mode is completed. All the memory's information will be activated for 1-2 hours, this mode you...
User Manual
Page 10
... you change the preset number then press button. It will be reduced. Shortly press preset button (1~6) you can listen to the corresponding station. 2) Front panel operation: Received a station, Press and hold the button till show SAVE P1 on /off : Press ST button on the remote controller to stop the playing. 5)Back to the playing list a) Remote control operation: When playing audio/video content, press the button on remote control to change it on the remote control to MONO mode the...
... you change the preset number then press button. It will be reduced. Shortly press preset button (1~6) you can listen to the corresponding station. 2) Front panel operation: Received a station, Press and hold the button till show SAVE P1 on /off : Press ST button on the remote controller to stop the playing. 5)Back to the playing list a) Remote control operation: When playing audio/video content, press the button on remote control to change it on the remote control to MONO mode the...

User Manual
Page 11
... ENTER/SETUP button to play the previous 10 seconds part of the panel will active the reverse fast / forward fast function. 8) Playback in Random When playing video/audio content, press the RDM button to change the page of the list). to resume normal playback. Press the INT button again to select the folder or file. b) Front panel operation: When playing audio/video content. press the button to turn on the remote controller...
... ENTER/SETUP button to play the previous 10 seconds part of the panel will active the reverse fast / forward fast function. 8) Playback in Random When playing video/audio content, press the RDM button to change the page of the list). to resume normal playback. Press the INT button again to select the folder or file. b) Front panel operation: When playing audio/video content. press the button to turn on the remote controller...

User Manual
Page 12
... function. 4. The main menu of the AV IN mode: 11) Playback in Image mode When displaying the root menu, Press the direction buttons to select your desired FOLDER, then press the ENT or button to mute the audio output. MUTE Press MUTE button to open the FOLDER, or play the file. SEL menu Repeatedly press SEL button on the back side. During IMAGE playback, press one of viewing picture that is on the remote control...
... function. 4. The main menu of the AV IN mode: 11) Playback in Image mode When displaying the root menu, Press the direction buttons to select your desired FOLDER, then press the ENT or button to mute the audio output. MUTE Press MUTE button to open the FOLDER, or play the file. SEL menu Repeatedly press SEL button on the back side. During IMAGE playback, press one of viewing picture that is on the remote control...
User Manual
Page 13
... use Bluetooth, please make sure the mobile phone supports Bluetooth function. (ii) For the different kind of the unit. To get the best conversation quality, it needs a password. 3) When successful paired, the BT mark will turn on each station for 5 seconds around. 6. Press button or button to adjust the desired value. 5. OSD In USB playing press OSD button on the remote control it will be displayed on /off some difference. SCAN In RADIO mode...
... use Bluetooth, please make sure the mobile phone supports Bluetooth function. (ii) For the different kind of the unit. To get the best conversation quality, it needs a password. 3) When successful paired, the BT mark will turn on each station for 5 seconds around. 6. Press button or button to adjust the desired value. 5. OSD In USB playing press OSD button on the remote control it will be displayed on /off some difference. SCAN In RADIO mode...

User Manual
Page 15
... file. In radio mode press the button to set the reception between MONO and STEREO mode Press and hold to play . Press it again to resume to turn the unit ON or OFF To select FM1, FM2, FM3, MW1, MW2 radio bands. INT 10. 11. / 12. 0-9 13. decrease (+) the volume level. POWER 3. AMS Press to recover the sound. Inputs the corresponding number. In radio mode, use / for manual tuning. In radio mode...
... file. In radio mode press the button to set the reception between MONO and STEREO mode Press and hold to play . Press it again to resume to turn the unit ON or OFF To select FM1, FM2, FM3, MW1, MW2 radio bands. INT 10. 11. / 12. 0-9 13. decrease (+) the volume level. POWER 3. AMS Press to recover the sound. Inputs the corresponding number. In radio mode, use / for manual tuning. In radio mode...

