
English Manual
Page 1
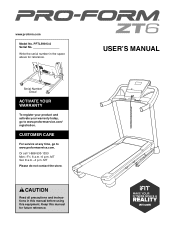
... call 1-888-533-1333 Mon.–-Fri. 6 a.m.–-6 p.m. CAUTION Read all precautions and instructions in the space above for future reference. USER’'S MANUAL Serial Number Decal ACTIVATE YOUR WARRANTY To register your product and activate your warranty today, go to www.proformservice.com/ registration. CUSTOMER CARE For service... at any time, go to www.proformservice.com. MT Sat. 8 a.m.–-4 p.m. MT Please do not contact the store. www.proform.com Model No. Write the serial number in this manual before using this manual for reference.
... call 1-888-533-1333 Mon.–-Fri. 6 a.m.–-6 p.m. CAUTION Read all precautions and instructions in the space above for future reference. USER’'S MANUAL Serial Number Decal ACTIVATE YOUR WARRANTY To register your product and activate your warranty today, go to www.proformservice.com/ registration. CUSTOMER CARE For service... at any time, go to www.proformservice.com. MT Sat. 8 a.m.–-4 p.m. MT Please do not contact the store. www.proform.com Model No. Write the serial number in this manual before using this manual for reference.

English Manual
Page 2
...2 IMPORTANT PRECAUTIONS 3 BEFORE YOU BEGIN 7 PART IDENTIFICATION CHART 8 ASSEMBLY 9 OPERATION AND ADJUSTMENT 16 HOW TO FOLD AND MOVE THE TREADMILL 23 TROUBLESHOOTING 24 EXERCISE GUIDELINES 26 PART LIST 27 EXPLODED DRAWING 28 ORDERING REPLACEMENT PARTS Back Cover LIMITED WARRANTY Back Cover WARNING DECAL PLACEMENT... Inc. 2 Apply the decal in the location shown. Note: The decals may not be shown at actual size. PROFORM is missing or illegible, see the front cover of this manual and request a free replacement decal. If a decal is a registered trademark of the warning decals.
...2 IMPORTANT PRECAUTIONS 3 BEFORE YOU BEGIN 7 PART IDENTIFICATION CHART 8 ASSEMBLY 9 OPERATION AND ADJUSTMENT 16 HOW TO FOLD AND MOVE THE TREADMILL 23 TROUBLESHOOTING 24 EXERCISE GUIDELINES 26 PART LIST 27 EXPLODED DRAWING 28 ORDERING REPLACEMENT PARTS Back Cover LIMITED WARRANTY Back Cover WARNING DECAL PLACEMENT... Inc. 2 Apply the decal in the location shown. Note: The decals may not be shown at actual size. PROFORM is missing or illegible, see the front cover of this manual and request a free replacement decal. If a decal is a registered trademark of the warning decals.
English Manual
Page 3
... any exercise program, consult your local PROFORM dealer, call the telephone number on the front cover of this manual, or see page 16). Do not put the treadmill in this treadmill are recommended for home use the treadmill with bare feet, wearing only stockings, or in ...surge suppressor or into an appropriate outlet (see your treadmill. The treadmill is the responsibility of the owner to use of this manual and all important precautions and instructions in this product. 1. Place the treadmill on your treadmill before using your local electronics store. 5. Adjust the ...
... any exercise program, consult your local PROFORM dealer, call the telephone number on the front cover of this manual, or see page 16). Do not put the treadmill in this treadmill are recommended for home use the treadmill with bare feet, wearing only stockings, or in ...surge suppressor or into an appropriate outlet (see your treadmill. The treadmill is the responsibility of the owner to use of this manual and all important precautions and instructions in this product. 1. Place the treadmill on your treadmill before using your local electronics store. 5. Adjust the ...

English Manual
Page 4
... in the storage position. 24. Never remove the motor hood unless instructed to move the treadmill until it is intended only as an exercise aid in determining heart rate trends in this manual. If you feel faint or if you experience pain while exercising, stop immediately and cool down... rate readings. Never insert any opening on page 7 for the location of the treadmill regularly. Servicing other than the procedures in general. 21. Various factors, including the user’'s movement, may result in this manual should be able to safely lift 45 lbs. (20 kg) to do so ...
... in the storage position. 24. Never remove the motor hood unless instructed to move the treadmill until it is intended only as an exercise aid in determining heart rate trends in this manual. If you feel faint or if you experience pain while exercising, stop immediately and cool down... rate readings. Never insert any opening on page 7 for the location of the treadmill regularly. Servicing other than the procedures in general. 21. Various factors, including the user’'s movement, may result in this manual should be able to safely lift 45 lbs. (20 kg) to do so ...
English Manual
Page 7
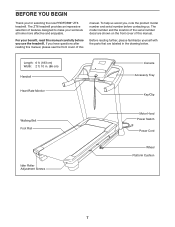
The ZT6 treadmill provides an impressive selection of features designed to make your benefit, read this manual carefully before contacting us assist you, note the product model number and serial number before you use the treadmill. For your workouts at home more effective and enjoyable. The model ...Cushion 7 Before reading further, please familiarize yourself with the parts that are shown on the front cover of this manual. To help us . If you for selecting the new PROFORM® ZT6 treadmill. Length: 6 ft. (183 cm) Width: 2 ft. 10 in the drawing below. BEFORE YOU BEGIN...
The ZT6 treadmill provides an impressive selection of features designed to make your benefit, read this manual carefully before contacting us assist you, note the product model number and serial number before you use the treadmill. For your workouts at home more effective and enjoyable. The model ...Cushion 7 Before reading further, please familiarize yourself with the parts that are shown on the front cover of this manual. To help us . If you for selecting the new PROFORM® ZT6 treadmill. Length: 6 ft. (183 cm) Width: 2 ft. 10 in the drawing below. BEFORE YOU BEGIN...

English Manual
Page 8
... (9)–-4 3/8" x 4" Screw (4)–-6 8 The number following the key number is the key number of the part, from the PART LIST near the end of this manual. Note: If a part is not in parentheses below to see if it is preattached. PART IDENTIFICATION CHART Use the drawings below each drawing is the...
... (9)–-4 3/8" x 4" Screw (4)–-6 8 The number following the key number is the key number of the part, from the PART LIST near the end of this manual. Note: If a part is not in parentheses below to see if it is preattached. PART IDENTIFICATION CHART Use the drawings below each drawing is the...
English Manual
Page 9
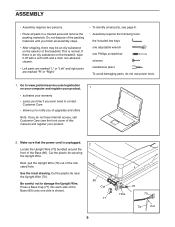
...Cut Locate the Upright Wire (70) bundled around the front of the indicated hole. Go to www.proformservice.com/registration on the exterior of the treadmill. Cut the plastic tie near the Upright Wire (70). Be careful not to notify you of the Base (80) (only one Phillips screwdriver scissors... front cover of the packing materials until you nish all parts in a cleared area and remove the packing materials. Do not dispose of this manual) and register your product. 2. Next, pull the Upright Wire (70) out of the Base (80). If there is unplugged. See the inset drawing. ...
...Cut Locate the Upright Wire (70) bundled around the front of the indicated hole. Go to www.proformservice.com/registration on the exterior of the treadmill. Cut the plastic tie near the Upright Wire (70). Be careful not to notify you of the Base (80) (only one Phillips screwdriver scissors... front cover of the packing materials until you nish all parts in a cleared area and remove the packing materials. Do not dispose of this manual) and register your product. 2. Next, pull the Upright Wire (70) out of the Base (80). If there is unplugged. See the inset drawing. ...
English Manual
Page 17
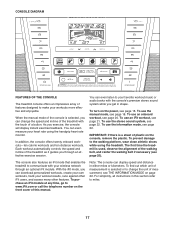
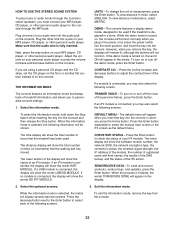
In addition, the console offers twenty onboard workouts—-ten calorie workouts and ten distance workouts. To use the manual mode, see page 21. The first time the treadmill is a sheet of a button. To purchase an iFit module at any time, go to www.iFit.com or call the...music or audio books with the console’'s premium stereo sound system while you get in this manual. For simplicity, all instructions in shape. CONSOLE DIAGRAM FEATURES OF THE CONSOLE The treadmill console offers an impressive array of features designed to make your wireless network through an effective exercise...
In addition, the console offers twenty onboard workouts—-ten calorie workouts and ten distance workouts. To use the manual mode, see page 21. The first time the treadmill is a sheet of a button. To purchase an iFit module at any time, go to www.iFit.com or call the...music or audio books with the console’'s premium stereo sound system while you get in this manual. For simplicity, all instructions in shape. CONSOLE DIAGRAM FEATURES OF THE CONSOLE The treadmill console offers an impressive array of features designed to make your wireless network through an effective exercise...
English Manual
Page 18
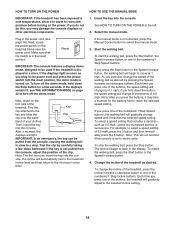
...the console, causing the walking belt to slow to select the manual mode. 3. To stop . Make sure that includes a decimal—- Select the manual mode. To start the walking belt, press the Start button, the Speed increase button, or one of the treadmill as desired by 0.1 mph; such as you exercise, change... to the key and slide the Clip clip onto the waist- IMPORTANT: In an emergency, the key can be used if the treadmill is not selected, press the Manual Control button to a stop the walking belt, press the Stop button. As you plug in the power cord and press the power...
...the console, causing the walking belt to slow to select the manual mode. 3. To stop . Make sure that includes a decimal—- Select the manual mode. To start the walking belt, press the Start button, the Speed increase button, or one of the treadmill as desired by 0.1 mph; such as you exercise, change... to the key and slide the Clip clip onto the waist- IMPORTANT: In an emergency, the key can be used if the treadmill is not selected, press the Manual Control button to a stop the walking belt, press the Stop button. As you plug in the power cord and press the power...
English Manual
Page 20
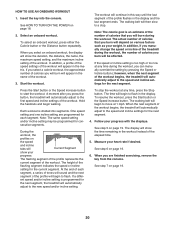
... begin to the speed and incline settings for the current segment. Follow your heart rate if desired. When you manually change the speed or incline of the treadmill during the workout, you will burn will continue in the name of the workout. Insert the key into segments.... speed setting and one incline setting are finished exercising, remove the key from the console. When the next segment of the workout begins, the treadmill will automatically adjust to ash. Select an onboard workout. ent speed and/or incline setting is divided into the console. See step ...
... begin to the speed and incline settings for the current segment. Follow your heart rate if desired. When you manually change the speed or incline of the treadmill during the workout, you will burn will continue in the name of the workout. Insert the key into segments.... speed setting and one incline setting are finished exercising, remove the key from the console. When the next segment of the workout begins, the treadmill will automatically adjust to ash. Select an onboard workout. ent speed and/or incline setting is divided into the console. See step ...
English Manual
Page 21
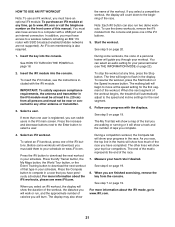
... iFit buttons. 5. To use an iFit workout, you are walking or running or it will show a track and the number of the workout begins, the treadmill will show your top four competitors. When the next segment of laps you must have access to www.iFit.com or call the telephone number... must have access to download the next workout in the race. See step 5 on page 18. Measure your schedule on the front cover of this manual. Select a user. The other antenna or transmitter. 3. To stop the workout at any time, press the Stop button. To purchase an iFit module at any...
... iFit buttons. 5. To use an iFit workout, you are walking or running or it will show a track and the number of the workout begins, the treadmill will show your top four competitors. When the next segment of laps you must have access to www.iFit.com or call the telephone number... must have access to download the next workout in the race. See step 5 on page 18. Measure your schedule on the front cover of this manual. Select a user. The other antenna or transmitter. 3. To stop the workout at any time, press the Stop button. To purchase an iFit module at any...
English Manual
Page 22
...the IP address of the module, the number of registered users and their names, the results of the DNS lookup, and the status of treadmill information and allows you to personalize console settings. 1. Plug the other personal audio player. If a USB module is connected, the display will ...receive workouts, workout logs, and updates, press the Enter button. DEMO—-The console features a display demo mode, designed to select the manual main screen or the iFit screen as the default menu. If an iFit module is fully inserted. Exit the information mode. Adjust the ...
...the IP address of the module, the number of registered users and their names, the results of the DNS lookup, and the status of treadmill information and allows you to personalize console settings. 1. Plug the other personal audio player. If a USB module is connected, the display will ...receive workouts, workout logs, and updates, press the Enter button. DEMO—-The console features a display demo mode, designed to select the manual main screen or the iFit screen as the default menu. If an iFit module is fully inserted. Exit the information mode. Adjust the ...
English Manual
Page 24
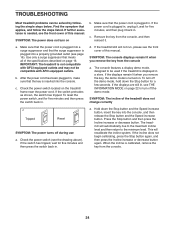
...lit, see page 16). SYMPTOM: The incline of this manual. Press the Stop button and then press the Incline increase or decrease button. The treadmill will recalibrate the incline system. TROUBLESHOOTING Most treadmill problems can be used if the treadmill is plugged in. SYMPTOM: The power does not turn ...61662;ve minutes, and then plug it . Check the power switch (see the front cover of the specications described on the treadmill frame near the power cord. b. This will automatically rise to the maximum incline level and then return to be solved by following the...
...lit, see page 16). SYMPTOM: The incline of this manual. Press the Stop button and then press the Incline increase or decrease button. The treadmill will recalibrate the incline system. TROUBLESHOOTING Most treadmill problems can be used if the treadmill is plugged in. SYMPTOM: The power does not turn ...61662;ve minutes, and then plug it . Check the power switch (see the front cover of the specications described on the treadmill frame near the power cord. b. This will automatically rise to the maximum incline level and then return to be solved by following the...
English Manual
Page 25
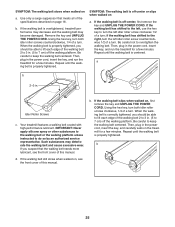
...POWER CORD. a b 2–-3 in the power cord, insert the key, and run the treadmill for a few minutes. When the walking belt is properly tightened, you suspect that meets all of this manual. b 25 Use only a surge suppressor that the walking belt needs more lubricant, see the ...front cover of the specications described on , see the front cover of this manual. Idler Roller Screws c. Then, plug in . (5 to turn . Then, plug in . (5 to the right, turn ; Your treadmill features a walking belt coated with high-performance lubricant. If you should be able to ...
...POWER CORD. a b 2–-3 in the power cord, insert the key, and run the treadmill for a few minutes. When the walking belt is properly tightened, you suspect that meets all of this manual. b 25 Use only a surge suppressor that the walking belt needs more lubricant, see the ...front cover of the specications described on , see the front cover of this manual. Idler Roller Screws c. Then, plug in . (5 to turn . Then, plug in . (5 to the right, turn ; Your treadmill features a walking belt coated with high-performance lubricant. If you should be able to ...

English Manual
Page 27
For information about ordering replacement parts, see the back cover of this manual. *These parts are subject to change without notice. Qty. 1 4 2 2 3 4 4 6 5 10 6 52 7 2 8 2 9 4 10 4 11 10 12 2 13 2 14 2 15 2 16 2 17 2 18 3 19 22 20 2 21 4 ... Base Module Housing Right Tray Console Console Frame Access Door Console Ground Wire Console Back Console Wire Tie Right Speaker Grill Small Cushion User’'s Manual Note: Specifications are not illustrated. 27 PART LIST Model No.
For information about ordering replacement parts, see the back cover of this manual. *These parts are subject to change without notice. Qty. 1 4 2 2 3 4 4 6 5 10 6 52 7 2 8 2 9 4 10 4 11 10 12 2 13 2 14 2 15 2 16 2 17 2 18 3 19 22 20 2 21 4 ... Base Module Housing Right Tray Console Console Frame Access Door Console Ground Wire Console Back Console Wire Tie Right Speaker Grill Small Cushion User’'s Manual Note: Specifications are not illustrated. 27 PART LIST Model No.

English Manual
Page 32
... from the date of purchase. If replacement parts are shipped while the product is in lieu of any kind. For in this manual) LIMITED WARRANTY IMPORTANT: To protect your fitness equipment with respect to any implied warranties of merchantability or tness for one of... or use or performance of the product; This warranty provides specic legal rights; ICON Health & Fitness, Inc. (ICON) warrants this manual. All repairs for which warranty claims are warranted for a particular purpose are not followed, if the product is abused or improperly or abnormally used...
... from the date of purchase. If replacement parts are shipped while the product is in lieu of any kind. For in this manual) LIMITED WARRANTY IMPORTANT: To protect your fitness equipment with respect to any implied warranties of merchantability or tness for one of... or use or performance of the product; This warranty provides specic legal rights; ICON Health & Fitness, Inc. (ICON) warrants this manual. All repairs for which warranty claims are warranted for a particular purpose are not followed, if the product is abused or improperly or abnormally used...


