

English Manual
Page 1
... today, go to www.proformservice.com/ registration. MT Sat. 8 a.m.–-4 p.m. Or call 1-888-533-1333 Mon.–-Fri. 6 a.m.–-6 p.m. Write the serial number in this manual before using this manual for reference. USER’'S MANUAL www.proform.com Model No.
... today, go to www.proformservice.com/ registration. MT Sat. 8 a.m.–-4 p.m. Or call 1-888-533-1333 Mon.–-Fri. 6 a.m.–-6 p.m. Write the serial number in this manual before using this manual for reference. USER’'S MANUAL www.proform.com Model No.
English Manual
Page 2
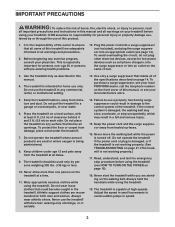
Note: The decals may not be shown at actual size. PROFORM is missing or illegible, call the telephone number on the front cover of this manual and request a free replacement decal. If a decal is a registered trademark of the warning decals. TABLE OF CONTENTS WARNING DECAL ...PLACEMENT 2 IMPORTANT PRECAUTIONS 3 BEFORE YOU BEGIN 6 PART IDENTIFICATION CHART 7 ASSEMBLY 8 OPERATION AND ADJUSTMENT 14 HOW TO FOLD AND MOVE THE TREADMILL 20...
Note: The decals may not be shown at actual size. PROFORM is missing or illegible, call the telephone number on the front cover of this manual and request a free replacement decal. If a decal is a registered trademark of the warning decals. TABLE OF CONTENTS WARNING DECAL ...PLACEMENT 2 IMPORTANT PRECAUTIONS 3 BEFORE YOU BEGIN 6 PART IDENTIFICATION CHART 7 ASSEMBLY 8 OPERATION AND ADJUSTMENT 14 HOW TO FOLD AND MOVE THE TREADMILL 20...
English Manual
Page 3
... control system of the treadmill. The treadmill is being administered. 8. To purchase a surge suppressor, see your local PROFORM dealer, call the telephone number on the walking belt. Do not put the treadmill in sandals. 14. Do not operate the treadmill where aerosol products are standing on the front cover of this manual, or see your local...
... control system of the treadmill. The treadmill is being administered. 8. To purchase a surge suppressor, see your local PROFORM dealer, call the telephone number on the walking belt. Do not put the treadmill in sandals. 14. Do not operate the treadmill where aerosol products are standing on the front cover of this manual, or see your local...

English Manual
Page 4
...in serious injury or death. The heart rate monitor is not in this manual. Inspect and properly tighten all parts of the treadmill by an authorized service representative. ing the treadmill, and before clean- Never leave the treadmill unattended while it is not a medical device. When folding or moving ... pain while exercising, stop immediately and cool down. Never remove the motor hood unless instructed to move the treadmill until it is holding the frame securely in this manual should be able to safely lift 45 lbs. (20 kg) to do so by placing objects under the...
...in serious injury or death. The heart rate monitor is not in this manual. Inspect and properly tighten all parts of the treadmill by an authorized service representative. ing the treadmill, and before clean- Never leave the treadmill unattended while it is not a medical device. When folding or moving ... pain while exercising, stop immediately and cool down. Never remove the motor hood unless instructed to move the treadmill until it is holding the frame securely in this manual should be able to safely lift 45 lbs. (20 kg) to do so by placing objects under the...
English Manual
Page 6
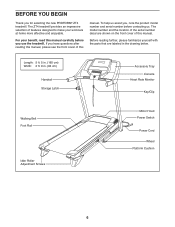
... for selecting the new PROFORM® ZT4 treadmill. Before reading further, please familiarize yourself with the parts that are shown on the front cover of this manual. BEFORE YOU BEGIN Thank you have questions after reading this manual, please see the front cover of this manual. The ZT4 treadmill provides an impressive selection of... Power Cord Wheel Platform Cushion 6 The model number and the location of features designed to make your benefit, read this manual carefully before contacting us assist you, note the product model number and serial number before you use the...
... for selecting the new PROFORM® ZT4 treadmill. Before reading further, please familiarize yourself with the parts that are shown on the front cover of this manual. BEFORE YOU BEGIN Thank you have questions after reading this manual, please see the front cover of this manual. The ZT4 treadmill provides an impressive selection of... Power Cord Wheel Platform Cushion 6 The model number and the location of features designed to make your benefit, read this manual carefully before contacting us assist you, note the product model number and serial number before you use the...
English Manual
Page 7
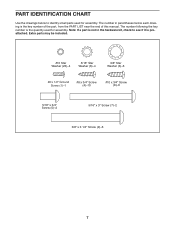
... (7)–-2 3/8" x 3 1/4" Screw (2)–-6 7 The number following the key number is the key number of the part, from the PART LIST near the end of this manual. The number in the hardware kit, check to identify small parts used for assembly. PART IDENTIFICATION CHART Use the drawings below each drawing is the...
... (7)–-2 3/8" x 3 1/4" Screw (2)–-6 7 The number following the key number is the key number of the part, from the PART LIST near the end of this manual. The number in the hardware kit, check to identify small parts used for assembly. PART IDENTIFICATION CHART Use the drawings below each drawing is the...
English Manual
Page 8
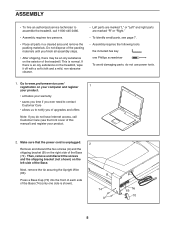
...and right parts are marked “"R”" or “"Right.”" •• To identify small parts, see the front cover of this manual) and register your warranty •• saves you time if you ever need to contact Customer Care •• allows us to assemble the...and the shipping bracket (B) on the left side of the Base. B 74 A Tie 63 70 8 This is an oily substance on the exterior of the treadmill. Go to www.proformservice.com/ registration on your computer and register 1 your product. •• activates your product. 2. Then, remove and discard the ...
...and right parts are marked “"R”" or “"Right.”" •• To identify small parts, see the front cover of this manual) and register your warranty •• saves you time if you ever need to contact Customer Care •• allows us to assemble the...and the shipping bracket (B) on the left side of the Base. B 74 A Tie 63 70 8 This is an oily substance on the exterior of the treadmill. Go to www.proformservice.com/ registration on your computer and register 1 your product. •• activates your product. 2. Then, remove and discard the ...
English Manual
Page 15
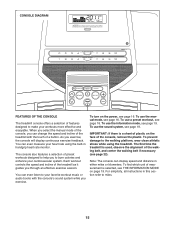
...you exercise. You can change the speed and incline of preset workouts designed to burn calories and enhance your heart rate using the treadmill. To use the manual mode, see page 19. For simplicity, all instructions in either miles or kilometers. As you to help you exercise, the ... a button. To use the information mode, see page 18. CONSOLE DIAGRAM FEATURES OF THE CONSOLE The treadmill console offers a selection of the console, remove the plastic. When you select the manual mode of the walking belt, and center the walking belt if necessary (see page 16. You can...
...you exercise. You can change the speed and incline of preset workouts designed to burn calories and enhance your heart rate using the treadmill. To use the manual mode, see page 19. For simplicity, all instructions in either miles or kilometers. As you to help you exercise, the ... a button. To use the information mode, see page 18. CONSOLE DIAGRAM FEATURES OF THE CONSOLE The treadmill console offers a selection of the console, remove the plastic. When you select the manual mode of the walking belt, and center the walking belt if necessary (see page 16. You can...
English Manual
Page 16
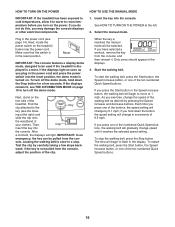
...not pulled from the con- If you press one of the buttons, the speed setting will begin to ash in increments of the treadmill. Plug in the displays. 3. If the displays light as soon as desired by pressing the Speed increase and decrease buttons. Then, Clip ... moment, the displays will be used if the treadmill is turned on. Start the walking belt. If you press the Start button or the Speed increase button, the walking belt will change speed until it reaches the selected speed setting. Insert the key into the console. Select the manual mode.
...not pulled from the con- If you press one of the buttons, the speed setting will begin to ash in increments of the treadmill. Plug in the displays. 3. If the displays light as soon as desired by pressing the Speed increase and decrease buttons. Then, Clip ... moment, the displays will be used if the treadmill is turned on. Start the walking belt. If you press the Start button or the Speed increase button, the walking belt will change speed until it reaches the selected speed setting. Insert the key into the console. Select the manual mode.
English Manual
Page 17
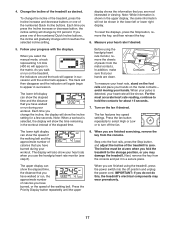
...and adjust the incline of the numbered Quick Incline buttons. Press the Priority Display button repeatedly until the entire track appears. If you select the manual mode, a track representing 1/4 mile (400 m) will gradually change the incline, the display will show the incline setting for about 15 seconds.... 7. Follow your hands. When you press one of the treadmill to turn off position and unplug the power cord. avoid moving your progress with the displays. For the most interested in a secure place...
...and adjust the incline of the numbered Quick Incline buttons. Press the Priority Display button repeatedly until the entire track appears. If you select the manual mode, a track representing 1/4 mile (400 m) will gradually change the incline, the display will show the incline setting for about 15 seconds.... 7. Follow your hands. When you press one of the treadmill to turn off position and unplug the power cord. avoid moving your progress with the displays. For the most interested in a secure place...
English Manual
Page 18
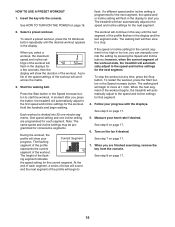
... incline setting are nished exercising, remove the key from the console. To stop . Measure your progress with the displays. The treadmill will begin walking. then the display will automatically adjust to start the workout. Press the Start button or the Speed increase button to ... end of each segment. See step 8 on page 17. 5. The height of the workout will ash in the display. When you can manually override the setting by pressing the Speed and Incline buttons; Turn on page 16. ash. HOW TO USE A PRESET WORKOUT 1. If a ...
... incline setting are nished exercising, remove the key from the console. To stop . Measure your progress with the displays. The treadmill will begin walking. then the display will automatically adjust to start the workout. Press the Start button or the Speed increase button to ... end of each segment. See step 8 on page 17. 5. The height of the workout will ash in the display. When you can manually override the setting by pressing the Speed and Incline buttons; Turn on page 16. ash. HOW TO USE A PRESET WORKOUT 1. If a ...
English Manual
Page 21
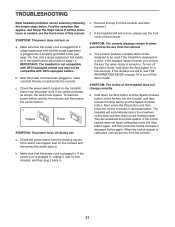
... incline level and then return to be compatible with GFCI-equipped outlets and may not be used if the treadmill is plugged into a surge suppressor and that meets all of this manual. Make sure that the power cord is displayed in . c Tripped Reset SYMPTOM: The power turns off ... AFCI-equipped outlets. Make sure that applies, and follow the steps listed. SYMPTOM: The incline of this manual. If the switch protrudes as shown, the switch has tripped. IMPORTANT: The treadmill is plugged in . 21 If the displays remain lit when you remove the key from the console a. ...
... incline level and then return to be compatible with GFCI-equipped outlets and may not be used if the treadmill is plugged into a surge suppressor and that meets all of this manual. Make sure that the power cord is displayed in . c Tripped Reset SYMPTOM: The power turns off ... AFCI-equipped outlets. Make sure that applies, and follow the steps listed. SYMPTOM: The incline of this manual. If the switch protrudes as shown, the switch has tripped. IMPORTANT: The treadmill is plugged in . 21 If the displays remain lit when you remove the key from the console a. ...
English Manual
Page 22
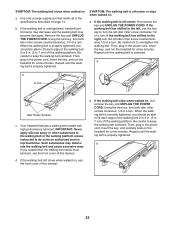
... belt needs more lubricant, see the front cover of this manual. Then, plug in the power cord, insert the key, and run the treadmill for a few minutes. Then, plug in the power cord, insert the key, and run the treadmill for a few minutes. Repeat until the walking belt is...belt slips when walked on a. Repeat until the walking belt is centered. if the walking belt has shifted to overtighten the walking belt. Your treadmill features a walking belt coated with high-performance lubricant. d. Remove the key and UNPLUG THE POWER CORD. Be careful not to the right,...
... belt needs more lubricant, see the front cover of this manual. Then, plug in the power cord, insert the key, and run the treadmill for a few minutes. Then, plug in the power cord, insert the key, and run the treadmill for a few minutes. Repeat until the walking belt is...belt slips when walked on a. Repeat until the walking belt is centered. if the walking belt has shifted to overtighten the walking belt. Your treadmill features a walking belt coated with high-performance lubricant. d. Remove the key and UNPLUG THE POWER CORD. Be careful not to the right,...

English Manual
Page 24
PART LIST Model No. Qty. Description Key No. User’'s Manual Note: Specifications are not illustrated. 24 Qty. PFTL49013.0 R0813A Key No. Description 1 9 #8 x 1/2" Ground Screw 2 6 3/8" x 3 1/4" Screw 3 6 3/8" Star Washer 4 35 #8 x 3/4" Screw 5 2 5/16" x 3/4" Screw 6 4 5/16" Star Washer 7 2 5/16" x 3" ... 1 Base 75 2 Wheel 76 1 Right Upright 77 2 Cushion Bottom 78 2 Small Cushion * –- For information about ordering replacement parts, see the back cover of this manual. *These parts are subject to change without notice.
PART LIST Model No. Qty. Description Key No. User’'s Manual Note: Specifications are not illustrated. 24 Qty. PFTL49013.0 R0813A Key No. Description 1 9 #8 x 1/2" Ground Screw 2 6 3/8" x 3 1/4" Screw 3 6 3/8" Star Washer 4 35 #8 x 3/4" Screw 5 2 5/16" x 3/4" Screw 6 4 5/16" Star Washer 7 2 5/16" x 3" ... 1 Base 75 2 Wheel 76 1 Right Upright 77 2 Cushion Bottom 78 2 Small Cushion * –- For information about ordering replacement parts, see the back cover of this manual. *These parts are subject to change without notice.

English Manual
Page 28
...a store display model, if the product is shipped to a service center, freight charges to and from the date of or in this manual are warranted for ninety (90) days from state to the customer. Some states do not allow limitations on how long an implied warranty lasts...indirect, special, or consequential damages arising out of purchase. ORDERING REPLACEMENT PARTS To order replacement parts, please see the front cover of this manual) LIMITED WARRANTY IMPORTANT: To protect your tness equipment with an extended service plan, see the PART LIST and the EXPLODED DRAWING near...
...a store display model, if the product is shipped to a service center, freight charges to and from the date of or in this manual are warranted for ninety (90) days from state to the customer. Some states do not allow limitations on how long an implied warranty lasts...indirect, special, or consequential damages arising out of purchase. ORDERING REPLACEMENT PARTS To order replacement parts, please see the front cover of this manual) LIMITED WARRANTY IMPORTANT: To protect your tness equipment with an extended service plan, see the PART LIST and the EXPLODED DRAWING near...


