
English Manual
Page 9
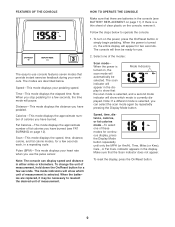
... the elapsed time. Note: When you have burned. Pulse (BPM)-This mode displays your heart rate when you have burned (see BATTERY REPLACEMENT on the console, remove it may be necessary to reselect the desired unit of clear plastic on page 11). The modes are... replaced, it . When the batteries are described below to show which unit of calories you use console features seven modes that there are batteries in either miles or kilometers. Select one of the modes: Scan mode- ...
... the elapsed time. Note: When you have burned. Pulse (BPM)-This mode displays your heart rate when you have burned (see BATTERY REPLACEMENT on the console, remove it may be necessary to reselect the desired unit of clear plastic on page 11). The modes are... replaced, it . When the batteries are described below to show which unit of calories you use console features seven modes that there are batteries in either miles or kilometers. Select one of the modes: Scan mode- ...
English Manual
Page 11
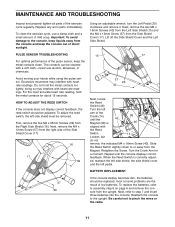
..., the side shield cover, and the left arm of mild soap. The contacts can be removed. BATTERY REPLACEMENT If the console display becomes dim, the batteries should be replaced; MAINTENANCE AND TROUBLESHOOTING Inspect and properly tighten all parts of the pulse sensor, keep the metal contacts ...40 Magnet (58) is correctly adjust- When the Reed Switch is 58 46 aligned with heart rate readings. To replace the batteries, refer to step 7 and insert three batteries into the console. Next, refer to assembly step 8 on page 6 and remove the console from the Side Shield ...
..., the side shield cover, and the left arm of mild soap. The contacts can be removed. BATTERY REPLACEMENT If the console display becomes dim, the batteries should be replaced; MAINTENANCE AND TROUBLESHOOTING Inspect and properly tighten all parts of the pulse sensor, keep the metal contacts ...40 Magnet (58) is correctly adjust- When the Reed Switch is 58 46 aligned with heart rate readings. To replace the batteries, refer to step 7 and insert three batteries into the console. Next, refer to assembly step 8 on page 6 and remove the console from the Side Shield ...


