
User Manual
Page 1
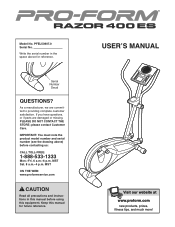
... NOT CONTACT THE STORE; If you have questions, or if parts are committed to providing complete customer satisfaction. USER'S MANUAL Visit our website at www.proform.com new products, prizes, fitness tips, and much more! Write the serial number in this equipment. IMPORTANT: You must note the product model number and...
... NOT CONTACT THE STORE; If you have questions, or if parts are committed to providing complete customer satisfaction. USER'S MANUAL Visit our website at www.proform.com new products, prizes, fitness tips, and much more! Write the serial number in this equipment. IMPORTANT: You must note the product model number and...
User Manual
Page 2
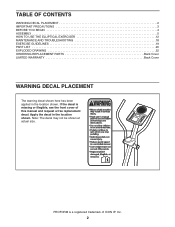
... and request a free replacement decal. Apply the decal in the location shown. Note: The decal may not be shown at actual size. PROFORM is missing or illegible, see the front cover of ICON IP, Inc. 2 TABLE OF CONTENTS WARNING DECAL PLACEMENT 2 IMPORTANT PRECAUTIONS 3 BEFORE... YOU BEGIN 4 ASSEMBLY 5 HOW TO USE THE ELLIPTICAL EXERCISER 12 MAINTENANCE AND TROUBLESHOOTING 18 EXERCISE GUIDELINES 19 PART LIST 20 EXPLODED DRAWING 22 ORDERING REPLACEMENT PARTS Back Cover LIMITED WARRANTY Back Cover ...
... and request a free replacement decal. Apply the decal in the location shown. Note: The decal may not be shown at actual size. PROFORM is missing or illegible, see the front cover of ICON IP, Inc. 2 TABLE OF CONTENTS WARNING DECAL PLACEMENT 2 IMPORTANT PRECAUTIONS 3 BEFORE... YOU BEGIN 4 ASSEMBLY 5 HOW TO USE THE ELLIPTICAL EXERCISER 12 MAINTENANCE AND TROUBLESHOOTING 18 EXERCISE GUIDELINES 19 PART LIST 20 EXPLODED DRAWING 22 ORDERING REPLACEMENT PARTS Back Cover LIMITED WARRANTY Back Cover ...
User Manual
Page 3
... mat beneath it . 5. If you stop exercising, allow the pedals to slowly come to protect the floor or carpet. Use your elliptical exerciser only as an exercise aid in determining heart rate trends in a commercial, rental, or institutional setting. 4. IMPORTANT PRECAUTIONS WARNING: To...more than 250 lbs. (113 kg). 8. Inspect and properly tighten all parts regularly. Before beginning any worn parts immediately. 6. Your elliptical exerciser is especially important for foot protection. 9. Keep children under age 12 and pets away from moisture and dust. do not wear...
... mat beneath it . 5. If you stop exercising, allow the pedals to slowly come to protect the floor or carpet. Use your elliptical exerciser only as an exercise aid in determining heart rate trends in a commercial, rental, or institutional setting. 4. IMPORTANT PRECAUTIONS WARNING: To...more than 250 lbs. (113 kg). 8. Inspect and properly tighten all parts regularly. Before beginning any worn parts immediately. 6. Your elliptical exerciser is especially important for foot protection. 9. Keep children under age 12 and pets away from moisture and dust. do not wear...

User Manual
Page 4
... Holder* Pedal Disc Wheel Pedal Adjustment Knob *No water bottle is included 4 To avoid a registration fee for purchasing the revolutionary PROFORM® RAZOR 400 ES elliptical exerciser. Before reading further, please familiarize yourself with the parts that are shown on the front cover of features designed to make ... this manual, please see the back cover of the serial number decal are labeled in the drawing below. The RAZOR 400 ES elliptical exerciser provides a wide array of this manual. For your workouts at www.proformservice.com/registration. BEFORE YOU BEGIN Thank you use ...
... Holder* Pedal Disc Wheel Pedal Adjustment Knob *No water bottle is included 4 To avoid a registration fee for purchasing the revolutionary PROFORM® RAZOR 400 ES elliptical exerciser. Before reading further, please familiarize yourself with the parts that are shown on the front cover of features designed to make ... this manual, please see the back cover of the serial number decal are labeled in the drawing below. The RAZOR 400 ES elliptical exerciser provides a wide array of this manual. For your workouts at www.proformservice.com/registration. BEFORE YOU BEGIN Thank you use ...

User Manual
Page 5
...below to identify small parts. If a part is the quantity needed for assembly. Place all parts of this manual. As you assemble the elliptical exerciser, use the drawings below each drawing is completed. Note: Some small parts may have been preassembled. Assembly requires two persons. The number... packing materials until assembly is the key number of the part, from the PART LIST near the end of the elliptical exerciser in the parts bag, check to assemble the elliptical exerciser, call 1-800-445-2480. M6 Nylon Wave Washer M10 Split M10 x 20mm Patch Locknut (77)-4 (88...
...below to identify small parts. If a part is the quantity needed for assembly. Place all parts of this manual. As you assemble the elliptical exerciser, use the drawings below each drawing is completed. Note: Some small parts may have been preassembled. Assembly requires two persons. The number... packing materials until assembly is the key number of the part, from the PART LIST near the end of the elliptical exerciser in the parts bag, check to assemble the elliptical exerciser, call 1-800-445-2480. M6 Nylon Wave Washer M10 Split M10 x 20mm Patch Locknut (77)-4 (88...

User Manual
Page 6
Attach a Wheel (50) to the front of the Frame (1), attach a Frame Cover (48) to the Frame with an M10 x 35mm Shoulder Screw (63). 63 50 Repeat this step to attach the other 48 Frame Cover (48). 84 2. While another person lifts the rear of the Frame (1) 2 with two M4 x 16mm Screws (84). Repeat this step to attach the other Wheel (50). 48 1 84 1 50 63 6 1. To make assembly easier, read the 1 information on page 5 before you begin assembling the elliptical exerciser.
Attach a Wheel (50) to the front of the Frame (1), attach a Frame Cover (48) to the Frame with an M10 x 35mm Shoulder Screw (63). 63 50 Repeat this step to attach the other 48 Frame Cover (48). 84 2. While another person lifts the rear of the Frame (1) 2 with two M4 x 16mm Screws (84). Repeat this step to attach the other Wheel (50). 48 1 84 1 50 63 6 1. To make assembly easier, read the 1 information on page 5 before you begin assembling the elliptical exerciser.

User Manual
Page 7
... Frame (1). Then, insert the Console Bracket (3) into the top of the Upright. Then, untie and discard the wire tie. Tie the lower end of the elliptical exerciser before tightening the other two Patch Screws. 2 79 78 49 1 Wire Tie Avoid pinching the Wire Harness (49) during this step. Tip: Be careful...
... Frame (1). Then, insert the Console Bracket (3) into the top of the Upright. Then, untie and discard the wire tie. Tie the lower end of the elliptical exerciser before tightening the other two Patch Screws. 2 79 78 49 1 Wire Tie Avoid pinching the Wire Harness (49) during this step. Tip: Be careful...
User Manual
Page 8
Orient the batteries as shown by the markings inside the battery compartment. IMPORTANT: If the elliptical exerciser has been exposed to the Wire Harness (49). The Console (4) can be operated with all local codes and ordinances. Insert four batteries into the ...
Orient the batteries as shown by the markings inside the battery compartment. IMPORTANT: If the elliptical exerciser has been exposed to the Wire Harness (49). The Console (4) can be operated with all local codes and ordinances. Insert four batteries into the ...
User Manual
Page 9
Slide the Console Cover (96) (see the drawing 7 in step 6) upward to the left Pedal Arm (14) with four M4 x 16mm Round Head Screws (94). 4 96 94 94 8. Attach the Left Pedal (12) to the Console (4). 7. Attach the Console Cover with three M10 x 70mm Button Screws (75), three M10 Split Washers (78), and an M4 x 16mm Screw (84). Repeat this step on the right side of the elliptical exerciser. 8 12 14 78 78 75 84 9
Slide the Console Cover (96) (see the drawing 7 in step 6) upward to the left Pedal Arm (14) with four M4 x 16mm Round Head Screws (94). 4 96 94 94 8. Attach the Left Pedal (12) to the Console (4). 7. Attach the Console Cover with three M10 x 70mm Button Screws (75), three M10 Split Washers (78), and an M4 x 16mm Screw (84). Repeat this step on the right side of the elliptical exerciser. 8 12 14 78 78 75 84 9
User Manual
Page 10
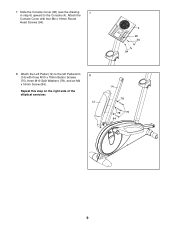
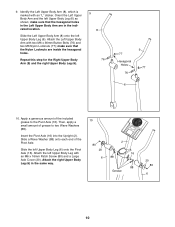
Identify the Left Upper Body Arm (8), which is marked with two M6 x 36mm Button Bolts (76) and two M6 Nylon Locknuts (77); Repeat this step for the Right Upper Body Arm (9) and the right Upper Body Leg (6). 9 8 76 77 Hexagonal Holes 76 9 77 6 10. Slide a Wave Washer (88) onto each end of the included grease to two Wave Washers (88). make sure that the hexagonal holes in the Left Upper Body Arm are inside the hexagonal holes. Attach the Left Upper Body Arm with an "L" sticker. Then, apply a small amount of grease to the Pivot Axle (16). Slide the left Upper Body Leg (6) ...
Identify the Left Upper Body Arm (8), which is marked with two M6 x 36mm Button Bolts (76) and two M6 Nylon Locknuts (77); Repeat this step for the Right Upper Body Arm (9) and the right Upper Body Leg (6). 9 8 76 77 Hexagonal Holes 76 9 77 6 10. Slide a Wave Washer (88) onto each end of the included grease to two Wave Washers (88). make sure that the hexagonal holes in the Left Upper Body Arm are inside the hexagonal holes. Attach the Left Upper Body Arm with an "L" sticker. Then, apply a small amount of grease to the Pivot Axle (16). Slide the left Upper Body Leg (6) ...
User Manual
Page 11
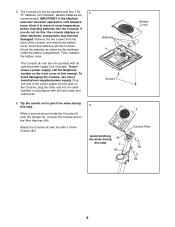
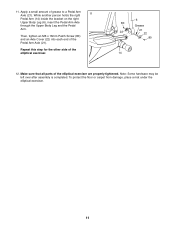
... hardware may be left over after assembly is completed. Apply a small amount of the elliptical exerciser are properly tightened. Then, tighten an M6 x 16mm Patch Screw (80) and an Axle Cover (22) into each end of the elliptical exerciser. 6 80 Grease 22 21 22 80 14 12. To protect the floor or... carpet from damage, place a mat under the elliptical exerciser. 11 While another person holds the right 11 Pedal Arm (14) inside the bracket on the right Upper Body Leg (6), insert the Pedal Arm ...
... hardware may be left over after assembly is completed. Apply a small amount of the elliptical exerciser are properly tightened. Then, tighten an M6 x 16mm Patch Screw (80) and an Axle Cover (22) into each end of the elliptical exerciser. 6 80 Grease 22 21 22 80 14 12. To protect the floor or... carpet from damage, place a mat under the elliptical exerciser. 11 While another person holds the right 11 Pedal Arm (14) inside the bracket on the right Upper Body Leg (6), insert the Pedal Arm ...
User Manual
Page 12
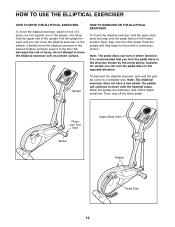
...stand in front of it to the floor. Push the pedals until they begin to move with a continuous motion. Upright To dismount the elliptical exerciser, wait until you can turn the pedal discs in the direction shown by the arrow below; Then, step off the higher pedal ... the pedals will continue to move until the flywheel stops. HOW TO EXERCISE ON THE ELLIPTICAL EXERCISER To mount the elliptical exerciser, hold the upper end of injury, do not attempt to move the elliptical exerciser to a complete stop. Pull the upright forward until the pedals come to the desired...
...stand in front of it to the floor. Push the pedals until they begin to move with a continuous motion. Upright To dismount the elliptical exerciser, wait until you can turn the pedal discs in the direction shown by the arrow below; Then, step off the higher pedal ... the pedals will continue to move until the flywheel stops. HOW TO EXERCISE ON THE ELLIPTICAL EXERCISER To mount the elliptical exerciser, hold the upper end of injury, do not attempt to move the elliptical exerciser to a complete stop. Pull the upright forward until the pedals come to the desired...

User Manual
Page 13
... holes in the crank arm. Pivot the adjustment bracket until the adjustment bracket pivots freely. HOW TO ADJUST THE STRIDE OF THE ELLIPTICAL EXERCISER To adjust the stride of the elliptical exerciser, first pull one of the elliptical exerciser in the same way. Adjustment Pin Adjustment Bracket Crank Arm Holes Adjustment Knob 13
... holes in the crank arm. Pivot the adjustment bracket until the adjustment bracket pivots freely. HOW TO ADJUST THE STRIDE OF THE ELLIPTICAL EXERCISER To adjust the stride of the elliptical exerciser, first pull one of the elliptical exerciser in the same way. Adjustment Pin Adjustment Bracket Crank Arm Holes Adjustment Knob 13
User Manual
Page 14
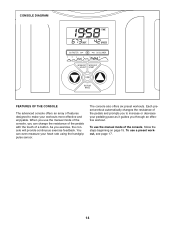
You can change the resistance of the pedals with the touch of the console, follow the steps beginning on page 15. As you can even measure your heart rate using the handgrip pulse sensor. Each preset workout automatically changes the resistance of features designed to increase or decrease your pedaling pace as it guides you through an effective workout. To use the manual mode of a button. CONSOLE DIAGRAM FEATURES OF THE CONSOLE The advanced console offers an array of the pedals and prompts you to make your workouts more effective and enjoyable. When you use the manual mode of ...
You can change the resistance of the pedals with the touch of the console, follow the steps beginning on page 15. As you can even measure your heart rate using the handgrip pulse sensor. Each preset workout automatically changes the resistance of features designed to increase or decrease your pedaling pace as it guides you through an effective workout. To use the manual mode of a button. CONSOLE DIAGRAM FEATURES OF THE CONSOLE The advanced console offers an array of the pedals and prompts you to make your workouts more effective and enjoyable. When you use the manual mode of ...

User Manual
Page 15
Press the decrease button or begin pedaling to reach the selected resistance level. The lower left or the lower right display. 15 Press the Display Mode button repeatedly until zeroes appear in the upper display. Follow your pedaling speed (in the priority display, the information will not be ready for the pedals to turn on the console, the display will light and the console will also show your progress with the displays. Note: While information is shown in revolutions per minute) and the approximate number of calories you have burned. The priority display ...
Press the decrease button or begin pedaling to reach the selected resistance level. The lower left or the lower right display. 15 Press the Display Mode button repeatedly until zeroes appear in the upper display. Follow your pedaling speed (in the priority display, the information will not be ready for the pedals to turn on the console, the display will light and the console will also show your progress with the displays. Note: While information is shown in revolutions per minute) and the approximate number of calories you have burned. The priority display ...
User Manual
Page 16
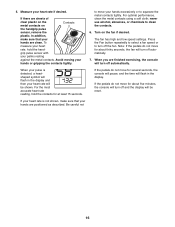
If there are clean. The fan has high and low speed settings. Note: If the pedals do not move for about five minutes, the console will turn off and the display will turn off automatically. If the pedals do not move for several seconds, the console will pause, and the time will turn off the fan. For the most accurate heart rate reading, hold the hand- Measure your hands or gripping the contacts tightly. In addition, make sure that your hands excessively or to turn off automatically. 7. Avoid moving your heart rate if desired. If the pedals do not ...
If there are clean. The fan has high and low speed settings. Note: If the pedals do not move for about five minutes, the console will turn off and the display will turn off automatically. If the pedals do not move for several seconds, the console will pause, and the time will turn off the fan. For the most accurate heart rate reading, hold the hand- Measure your hands or gripping the contacts tightly. In addition, make sure that your hands excessively or to turn off automatically. 7. Avoid moving your heart rate if desired. If the pedals do not ...
User Manual
Page 17
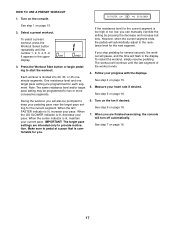
To select a preset workout, press the Workout Select button repeatedly until the last segment of the workout ends. 4. Note: The same resistance level and/or target pace setting may be prompted to keep your pace. If the resistance level for the current segment is lit, maintain your progress with the displays. The workout will flash in the upper display. 3. See step 4 on page 16. See step 5 on page 15. 5. When the center indicator is too high or too low, you . 6. Make sure to provide motivation. See step 1 on the fan if desired. If you stop pedaling for you can ...
To select a preset workout, press the Workout Select button repeatedly until the last segment of the workout ends. 4. Note: The same resistance level and/or target pace setting may be prompted to keep your pace. If the resistance level for the current segment is lit, maintain your progress with the displays. The workout will flash in the upper display. 3. See step 4 on page 16. See step 5 on page 15. 5. When the center indicator is too high or too low, you . 6. Make sure to provide motivation. See step 1 on the fan if desired. If you stop pedaling for you can ...
User Manual
Page 18
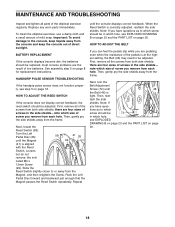
...the indi- cated M4 x 12mm Screw (99). Next, turn the Belt Adjustment Screw (72) until the Magnet 99 (41) is tight. To clean the elliptical exerciser, use a damp cloth and a small amount of low batteries. most console problems are four sizes of screw you remove from the console and keep... the console out of the elliptical exerciser regularly. there are the result of mild soap. note which hole, see EXPLODED DRAWING B on page 23 and the PART LIST on ...
...the indi- cated M4 x 12mm Screw (99). Next, turn the Belt Adjustment Screw (72) until the Magnet 99 (41) is tight. To clean the elliptical exerciser, use a damp cloth and a small amount of low batteries. most console problems are four sizes of screw you remove from the console and keep... the console out of the elliptical exerciser regularly. there are the result of mild soap. note which hole, see EXPLODED DRAWING B on page 23 and the PART LIST on ...
User Manual
Page 19
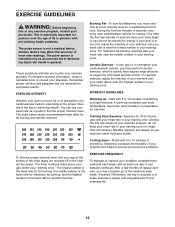
Various factors may complete up -Start with your heart rate in your training zone. (During the first few minutes of exercise does your training zone. Burning Fat-To burn fat effectively, you must perform aerobic exercise, which is the heart rate for energy. Aerobic Exercise-If your goal is to strengthen your training zone for longer than 20 minutes.) Breathe regularly and deeply as a guide to find your body uses carbohydrate calories for aerobic exercise. Training Zone Exercise-Exercise for energy. EXERCISE GUIDELINES WARNING: Before beginning this or any exercise ...
Various factors may complete up -Start with your heart rate in your training zone. (During the first few minutes of exercise does your training zone. Burning Fat-To burn fat effectively, you must perform aerobic exercise, which is the heart rate for energy. Aerobic Exercise-If your goal is to strengthen your training zone for longer than 20 minutes.) Breathe regularly and deeply as a guide to find your body uses carbohydrate calories for aerobic exercise. Training Zone Exercise-Exercise for energy. EXERCISE GUIDELINES WARNING: Before beginning this or any exercise ...

User Manual
Page 20
Description Key No. Qty. 1 1 Frame 2 1 Upright 3 1 Console Bracket 4 1 Console 5 1 Water Bottle Holder 6 2 Upper Body Leg 7 1 Resistance Wheel 8 1 Left Upper Body Arm 9 1 Right Upper Body Arm 10 2 Foam Grip 11 2 Upper Endcap 12 1 Left Pedal 13 1 Right Pedal 14 2 Pedal Arm 15 2 Pedal Bracket 16 1 Pivot Axle 17 2 Inner Bushing Set 18 2 Outer Bushing Set 19 2 Upright Bushing 20 2 Large Axle Cover 21 2 Pedal Arm Axle 22 4 Axle Cover 23 4 Pedal Arm Bushing Set 24 1 Crank Assembly 25 1 Crank Arm 26 1 Left Pedal Disc 27 ...
Description Key No. Qty. 1 1 Frame 2 1 Upright 3 1 Console Bracket 4 1 Console 5 1 Water Bottle Holder 6 2 Upper Body Leg 7 1 Resistance Wheel 8 1 Left Upper Body Arm 9 1 Right Upper Body Arm 10 2 Foam Grip 11 2 Upper Endcap 12 1 Left Pedal 13 1 Right Pedal 14 2 Pedal Arm 15 2 Pedal Bracket 16 1 Pivot Axle 17 2 Inner Bushing Set 18 2 Outer Bushing Set 19 2 Upright Bushing 20 2 Large Axle Cover 21 2 Pedal Arm Axle 22 4 Axle Cover 23 4 Pedal Arm Bushing Set 24 1 Crank Assembly 25 1 Crank Arm 26 1 Left Pedal Disc 27 ...