
English Manual
Page 2
... openings. No other appliance should not be used or where oxygen is being administered. 6. To protect the floor or carpet from the treadmill at least eight feet of clearance behind it. TABLE OF CONTENTS IMPORTANT PRECAUTIONS 2 BEFORE YOU BEGIN 4 ASSEMBLY 5 OPERATION AND ADJUSTMENT 7... HOW TO FOLD AND MOVE THE TREADMILL 11 MAINTENANCE AND TROUBLE-SHOOTING 12 CONDITIONING GUIDELINES 14 PART LIST 15 ORDERING REPLACEMENT PARTS Back Cover FULL 90-DAY WARRANTY Back Cover Note...
... openings. No other appliance should not be used or where oxygen is being administered. 6. To protect the floor or carpet from the treadmill at least eight feet of clearance behind it. TABLE OF CONTENTS IMPORTANT PRECAUTIONS 2 BEFORE YOU BEGIN 4 ASSEMBLY 5 OPERATION AND ADJUSTMENT 7... HOW TO FOLD AND MOVE THE TREADMILL 11 MAINTENANCE AND TROUBLE-SHOOTING 12 CONDITIONING GUIDELINES 14 PART LIST 15 ORDERING REPLACEMENT PARTS Back Cover FULL 90-DAY WARRANTY Back Cover Note...

English Manual
Page 3
...movement, may affect the accuracy of high speeds. Do not attempt to raise, lower, or move the treadmill until it is not in use this treadmill in any exercise program, consult your treadmill. tenance and adjustment procedures de- Always remove the key, unplug the power cord, and move the... page 11.) You must be performed by an authorized service representative. Apply the decal in speed. 16. When folding or moving the treadmill, make sure that the storage latch is intended only as an exercise aid in determining heart rate trends in this or any commercial, ...
...movement, may affect the accuracy of high speeds. Do not attempt to raise, lower, or move the treadmill until it is not in use this treadmill in any exercise program, consult your treadmill. tenance and adjustment procedures de- Always remove the key, unplug the power cord, and move the... page 11.) You must be performed by an authorized service representative. Apply the decal in speed. 16. When folding or moving the treadmill, make sure that the storage latch is intended only as an exercise aid in determining heart rate trends in this or any commercial, ...

English Manual
Page 4
...floor space of this manual carefully before calling. The J6 treadmill combines advanced technology with the parts that are labeled. until 7 p.m. The model number of your benefit, read this manual for selecting the new PROFORM¨ J6 treadmill. To help us assist you, please note the... product model number and serial number before using the treadmill. BEFORE YOU BEGIN Thank you for the location). For your home.
...floor space of this manual carefully before calling. The J6 treadmill combines advanced technology with the parts that are labeled. until 7 p.m. The model number of your benefit, read this manual for selecting the new PROFORM¨ J6 treadmill. To help us assist you, please note the... product model number and serial number before using the treadmill. BEFORE YOU BEGIN Thank you for the location). For your home.

English Manual
Page 5
... plastic tie in the same way. Then, insert the two springs into the right Upright. Refer to lower the treadmill. Tighten two of a second person, carefully raise the treadmill to the left Upright should snap onto the Upright Wire Harness. Attach the Latch Assembly (77) to the upright position.... Refer to hold the parts together. Set the treadmill in the right Upright (82). Next, attach the latch support to the Upright Wire Harness (34). Be careful to inset drawing B. do not...
... plastic tie in the same way. Then, insert the two springs into the right Upright. Refer to lower the treadmill. Tighten two of a second person, carefully raise the treadmill to the left Upright should snap onto the Upright Wire Harness. Attach the Latch Assembly (77) to the upright position.... Refer to hold the parts together. Set the treadmill in the right Upright (82). Next, attach the latch support to the Upright Wire Harness (34). Be careful to inset drawing B. do not...

English Manual
Page 6
... the Right Handrail. do not remove this Plastic Tie 85 74 Bracket 74 93 93 6. To protect the floor or carpet, place a mat under the treadmill. 6 Position the Right Handrail (85) on the Handrails (74, 85). While holding the Console Base (87) near the upper ends of the right Handrail, as... the inset drawing. Next, place the Console Base on the right Upright (82) as shown. Note that all parts are tightened before you use the treadmill. Do not tighten the Handrail Bolts yet.
... the Right Handrail. do not remove this Plastic Tie 85 74 Bracket 74 93 93 6. To protect the floor or carpet, place a mat under the treadmill. 6 Position the Right Handrail (85) on the Handrails (74, 85). While holding the Console Base (87) near the upper ends of the right Handrail, as... the inset drawing. Next, place the Console Base on the right Upright (82) as shown. Note that all parts are tightened before you use the treadmill. Do not tighten the Handrail Bolts yet.

English Manual
Page 7
... 2 may be installed by sudden voltage changes in doubt as a transient voltage surge suppressor (TVSS). To decrease the possibility of your treadmill being turned on a nominal 120-volt circuit, and has a grounding plug that looks like any other type of 450 joules. Use ... of least resistance for electric current to the walking belt or the walking platform. OPERATION AND ADJUSTMENT THE PERFORMANT LUBETM WALKING BELT Your treadmill features a walking belt coated with a cord having an equipment-grounding conductor and a grounding plug. Contact a qualified electrician to whether...
... 2 may be installed by sudden voltage changes in doubt as a transient voltage surge suppressor (TVSS). To decrease the possibility of your treadmill being turned on a nominal 120-volt circuit, and has a grounding plug that looks like any other type of 450 joules. Use ... of least resistance for electric current to the walking belt or the walking platform. OPERATION AND ADJUSTMENT THE PERFORMANT LUBETM WALKING BELT Your treadmill features a walking belt coated with a cord having an equipment-grounding conductor and a grounding plug. Contact a qualified electrician to whether...
English Manual
Page 8
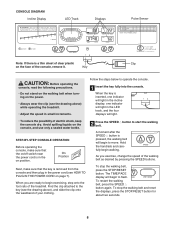
... of the walking belt as desired by pressing the SPEED buttons. As you are ready to the key (see the drawing above ) while operating the treadmill. ¥ Adjust the speed in small increments. When you exercise, change the speed of the console, remove it. On Position Next, make sure that... is removed from the console and then plug in the LED track, and the four displays will light. ¥ To reduce the possibility of the treadmill. Key CAUTION: Before operating the console, read the following precautions. ¥ Do not stand on the walking belt when turning on the power. ¥...
... of the walking belt as desired by pressing the SPEED buttons. As you are ready to the key (see the drawing above ) while operating the treadmill. ¥ Adjust the speed in small increments. When you exercise, change the speed of the console, remove it. On Position Next, make sure that... is removed from the console and then plug in the LED track, and the four displays will light. ¥ To reduce the possibility of the treadmill. Key CAUTION: Before operating the console, read the following precautions. ¥ Do not stand on the walking belt when turning on the power. ¥...
English Manual
Page 9
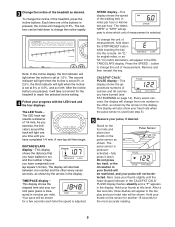
...hard, or the circulation in your thumb on the sensor for another 15 seconds for the treadmill to change the incline of laps you have walked or run and the number of the treadmill, press the incline buttons. CALS/FAT CALS/ PULSE displayÑThis display shows the ...approximate numbers of 1/4 mile. To change the incline rapidly. SPEED displayÑThis display shows the speed of the treadmill as shown. 3 Change the incline of the walking belt, in miles per hour or kilometers per mile). activatedÑfully press it will...
...hard, or the circulation in your thumb on the sensor for another 15 seconds for the treadmill to change the incline of laps you have walked or run and the number of the treadmill, press the incline buttons. CALS/FAT CALS/ PULSE displayÑThis display shows the ...approximate numbers of 1/4 mile. To change the incline rapidly. SPEED displayÑThis display shows the speed of the treadmill as shown. 3 Change the incline of the walking belt, in miles per hour or kilometers per mile). activatedÑfully press it will...

English Manual
Page 10
... SPEED v button to change the unit of measurement. 6 When you become familiar with it. The SPEED display will show the total number of hours the treadmill has been used. Press down the STOP/ RESET button while inserting the key into the console. Make sure that your thumb is not displayed, lift...
... SPEED v button to change the unit of measurement. 6 When you become familiar with it. The SPEED display will show the total number of hours the treadmill has been used. Press down the STOP/ RESET button while inserting the key into the console. Make sure that your thumb is not displayed, lift...
English Manual
Page 11
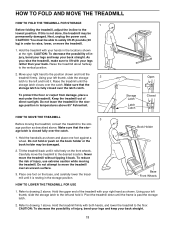
... or push on the front wheels. Open Storage Latch Latch Catch Closed HOW TO MOVE THE TREADMILL 3 Before moving the treadmill. Book Holder 1. Do not hold the treadmill firmly. Never move the treadmill. 1. Place one foot against a wheel. Using your back straight. 11 Next, unplug the... power cord. To reduce the risk of injury, use extreme caution while moving the treadmill, convert the treadmill to the storage position as described above. Refer to the vertical position. 2. Refer to the lowest position. CAUTION: To decrease ...
... or push on the front wheels. Open Storage Latch Latch Catch Closed HOW TO MOVE THE TREADMILL 3 Before moving the treadmill. Book Holder 1. Do not hold the treadmill firmly. Never move the treadmill. 1. Place one foot against a wheel. Using your back straight. 11 Next, unplug the... power cord. To reduce the risk of injury, use extreme caution while moving the treadmill, convert the treadmill to the storage position as described above. Refer to the vertical position. 2. Refer to the lowest position. CAUTION: To decrease ...
English Manual
Page 12
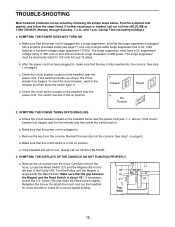
... the power cord. If necessary, loosen the 1/2Ó Screw (76) and move the Reed Switch slightly. 21 43 Retighten the Screw. TROUBLE-SHOOTING Most treadmill problems can be in . Make sure that the surge suppressor is UL 1449 listed as shown, the circuit breaker has tripped. SYMPTOM: THE POWER TURNS ... must be electrically rated for five minutes and then press the switch back in . After the power cord has been plugged in the on the treadmill frame near the power cord (see page 7). Make sure that the power cord is in , make sure that the on/off switch located on /off...
... the power cord. If necessary, loosen the 1/2Ó Screw (76) and move the Reed Switch slightly. 21 43 Retighten the Screw. TROUBLE-SHOOTING Most treadmill problems can be in . Make sure that the surge suppressor is UL 1449 listed as shown, the circuit breaker has tripped. SYMPTOM: THE POWER TURNS ... must be electrically rated for five minutes and then press the switch back in . After the power cord has been plugged in the on the treadmill frame near the power cord (see page 7). Make sure that the power cord is in , make sure that the on/off switch located on /off...
English Manual
Page 13
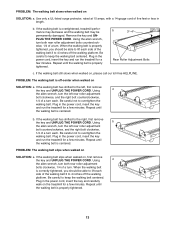
...Adjustment Bolts c. If the walking belt has shifted to keep the walking belt centered. Plug in the power cord, insert the key and run the treadmill for a few minutes. If the walking belt has shifted to overtighten the walking belt. Plug in the power cord, insert the key and carefully ...: a. Be careful to lift each side of a turn each side of five feet or less in the power cord, insert the key and run the treadmill for a few minutes. Repeat until the walking belt is properly tightened. 13 PROBLEM: The walking belt slows when walked on SOLUTION: a. Using the allen ...
...Adjustment Bolts c. If the walking belt has shifted to keep the walking belt centered. Plug in the power cord, insert the key and run the treadmill for a few minutes. If the walking belt has shifted to overtighten the walking belt. Plug in the power cord, insert the key and carefully ...: a. Be careful to lift each side of a turn each side of five feet or less in the power cord, insert the key and run the treadmill for a few minutes. Repeat until the walking belt is properly tightened. 13 PROBLEM: The walking belt slows when walked on SOLUTION: a. Using the allen ...

English Manual
Page 14
...to use the pulse sensor on the lungs to 60 minutes. (During the first few months, you may affect the accuracy of the treadmill until your heart rate is especially important for a sustained period of stretching and light exercise. EXERCISE INTENSITY Whether your goal is to ...RememberÑthese are recommended heart rates for prolonged periods of your age. For maximum fat burning, adjust the speed and incline of the treadmill until your training zone for aerobic exercise. Next, find the three numbers above your everyday life. 14 To measure your heart rate as a...
...to use the pulse sensor on the lungs to 60 minutes. (During the first few months, you may affect the accuracy of the treadmill until your heart rate is especially important for a sustained period of stretching and light exercise. EXERCISE INTENSITY Whether your goal is to ...RememberÑthese are recommended heart rates for prolonged periods of your age. For maximum fat burning, adjust the speed and incline of the treadmill until your training zone for aerobic exercise. Next, find the three numbers above your everyday life. 14 To measure your heart rate as a...

English Manual
Page 18
... need help or service, or ordering parts, please be prepared to provide the following information: ¥ The NAME OF THE PRODUCT (PROFORM¨ J6 treadmill) ¥ The MODEL NUMBER OF THE PRODUCT (831.297693) ¥ The KEY NUMBER AND DESCRIPTION OF THE PART (see the EXPLODED...; 1999 Sears, Roebuck and Co. When requesting help assembling or operating the PROFORM J6 treadmill ¥ a part is used commercially or for immediate purchase or special order when you visit your PROFORM¨ J6 treadmill are available for rental purposes. Model No. 831.297693 QUESTIONS? This warranty does...
... need help or service, or ordering parts, please be prepared to provide the following information: ¥ The NAME OF THE PRODUCT (PROFORM¨ J6 treadmill) ¥ The MODEL NUMBER OF THE PRODUCT (831.297693) ¥ The KEY NUMBER AND DESCRIPTION OF THE PART (see the EXPLODED...; 1999 Sears, Roebuck and Co. When requesting help assembling or operating the PROFORM J6 treadmill ¥ a part is used commercially or for immediate purchase or special order when you visit your PROFORM¨ J6 treadmill are available for rental purposes. Model No. 831.297693 QUESTIONS? This warranty does...


