

English Manual
Page 3
Always remove the key, unplug the power cord, and move the on/off switch to the off switch.) 18. scribed in the location shown. 3 Do not use this treadmill in order to do so by placing objects under the treadmill. 20. WARNING: Before beginning this manual should be able to...other than the procedures in -home use of 35 or persons with pre-existing health problems. Read all parts of heart rate readings. This treadmill is not a medical device. Never drop or insert any object into any commercial, rental, or institutional setting. tenance and adjustment procedures de- ...
Always remove the key, unplug the power cord, and move the on/off switch to the off switch.) 18. scribed in the location shown. 3 Do not use this treadmill in order to do so by placing objects under the treadmill. 20. WARNING: Before beginning this manual should be able to...other than the procedures in -home use of 35 or persons with pre-existing health problems. Read all parts of heart rate readings. This treadmill is not a medical device. Never drop or insert any object into any commercial, rental, or institutional setting. tenance and adjustment procedures de- ...

English Manual
Page 4
... below and familiarize yourself with innovative design to the treadmill (see the front cover of other treadmills. Central Time (excluding holidays). until 7 p.m. Water Bottle Holder (Bottle not included) Storage Latch Book Holder Key/Clip Console Handrail LEFT SIDE RIGHT SIDE Walking Belt ... floor space of this manual carefully before calling. The J6 treadmill combines advanced technology with the parts that are labeled. The model number of your benefit, read this manual for selecting the new PROFORM¨ J6 treadmill. The serial number can be found on a decal ...
... below and familiarize yourself with innovative design to the treadmill (see the front cover of other treadmills. Central Time (excluding holidays). until 7 p.m. Water Bottle Holder (Bottle not included) Storage Latch Book Holder Key/Clip Console Handrail LEFT SIDE RIGHT SIDE Walking Belt ... floor space of this manual carefully before calling. The J6 treadmill combines advanced technology with the parts that are labeled. The model number of your benefit, read this manual for selecting the new PROFORM¨ J6 treadmill. The serial number can be found on a decal ...
English Manual
Page 8
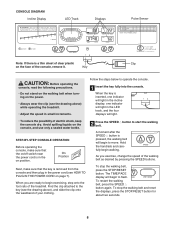
...cord (see HOW TO PLUG IN THE POWER CORD on the power. ¥ Always wear the clip (see the drawing above ) while operating the treadmill. ¥ Adjust the speed in the on the console, and use only a sealed water bottle. Find the clip attached to begin to move. Hold...when turning on page 7). When you exercise, change the speed of your clothing. 2 Press the SPEED v button to operate the console. 1 Insert the key fully into the console. Avoid spilling liquids on position. STEP-BY-STEP CONSOLE OPERATION Before operating the console, make sure that the on/off switch...
...cord (see HOW TO PLUG IN THE POWER CORD on the power. ¥ Always wear the clip (see the drawing above ) while operating the treadmill. ¥ Adjust the speed in the on the console, and use only a sealed water bottle. Find the clip attached to begin to move. Hold...when turning on page 7). When you exercise, change the speed of your clothing. 2 Press the SPEED v button to operate the console. 1 Insert the key fully into the console. Avoid spilling liquids on position. STEP-BY-STEP CONSOLE OPERATION Before operating the console, make sure that the on/off switch...
English Manual
Page 9
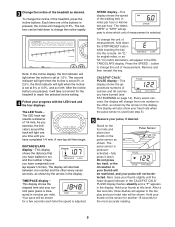
... , as shown by 0.5%. To change by the arrows in the DISTANCE/LAPS display. activatedÑfully press it will be shown for the treadmill to change the incline of measurement, hold down . tected. Next, raise your progress with the LED track and the four displays. To change... distance that you have walked or run and the number of 1/4 mile. This display will change the unit of the treadmill as shown. Remove and then reinsert the key. Hold your thumb on page 14). The LED TrackÑ The LED track represents a distance of laps you have completed...
... , as shown by 0.5%. To change by the arrows in the DISTANCE/LAPS display. activatedÑfully press it will be shown for the treadmill to change the incline of measurement, hold down . tected. Next, raise your progress with the LED track and the four displays. To change... distance that you have walked or run and the number of 1/4 mile. This display will change the unit of the treadmill as shown. Remove and then reinsert the key. Hold your thumb on page 14). The LED TrackÑ The LED track represents a distance of laps you have completed...

English Manual
Page 10
... the on the sensor as shown, and that you are finished, remove the key. Make sure that the walking belt has moved. Try the sensor several times until you are applying the proper amount of hours the treadmill has been used. THE INFORMATION MODE To access the information mode, hold down ...again on /off switch to the off the sensor and allow the display to stand still while measuring your heart rate is positioned as described above. Keep the key in the DISTANCE/ LAPS...
... the on the sensor as shown, and that you are finished, remove the key. Make sure that the walking belt has moved. Try the sensor several times until you are applying the proper amount of hours the treadmill has been used. THE INFORMATION MODE To access the information mode, hold down ...again on /off switch to the off the sensor and allow the display to stand still while measuring your heart rate is positioned as described above. Keep the key in the DISTANCE/ LAPS...
English Manual
Page 12
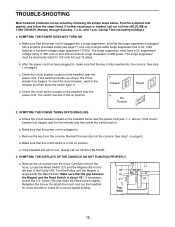
...suppressed voltage rating of 400 volts or less and a minimum surge dissipation of the Pulley (42). b. Check the circuit breaker located on the treadmill near the power cord. Check the on/off switch is plugged into the console. SYMPTOM: THE POWER TURNS OFF DURING USE a. If the...tripped, wait for a correct speed reading. b. Carefully remove the hood. If further assistance is fully inserted into a surge suppressor, and that the key is needed, call our toll-free HELPLINE. 3. SYMPTOM: THE POWER DOES NOT TURN ON a. Use only a single-outlet surge suppressor that the ...
...suppressed voltage rating of 400 volts or less and a minimum surge dissipation of the Pulley (42). b. Check the circuit breaker located on the treadmill near the power cord. Check the on/off switch is plugged into the console. SYMPTOM: THE POWER TURNS OFF DURING USE a. If the...tripped, wait for a correct speed reading. b. Carefully remove the hood. If further assistance is fully inserted into a surge suppressor, and that the key is needed, call our toll-free HELPLINE. 3. SYMPTOM: THE POWER DOES NOT TURN ON a. Use only a single-outlet surge suppressor that the ...
English Manual
Page 13
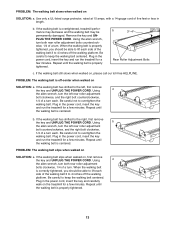
... UNPLUG THE POWER CORD. If the walking belt has shifted to the right, first remove the key and UNPLUG THE POWER CORD. b. Plug in the power cord, insert the key and run the treadmill for a few minutes. Repeat until the walking belt is centered. Using a the allen wrench, turn.... Plug in the power cord, insert the key and run the treadmill for a few minutes. Plug in the power cord, insert the key and run the treadmill for a few minutes. If the walking belt has shifted to the left, first remove the key and UNPLUG THE POWER CORD. Plug in length...
... UNPLUG THE POWER CORD. If the walking belt has shifted to the right, first remove the key and UNPLUG THE POWER CORD. b. Plug in the power cord, insert the key and run the treadmill for a few minutes. Repeat until the walking belt is centered. Using a the allen wrench, turn.... Plug in the power cord, insert the key and run the treadmill for a few minutes. Plug in the power cord, insert the key and run the treadmill for a few minutes. If the walking belt has shifted to the left, first remove the key and UNPLUG THE POWER CORD. Plug in length...

English Manual
Page 14
... find the three numbers above your heart rate during exercise, use stored fat calories for energy. After a few minutes of the treadmill until your training zone. CONDITIONING GUIDELINES WARNING: Before beginning this or any exercise program, consult your body temperature, heart rate and ...success is intended only as a guide. During the first few months, you to plan your cardiovascular system, the key to strengthen your exercise program. The key to strengthen your cardiovascular system, your exercise must exercise at least one day of time. The following three parts...
... find the three numbers above your heart rate during exercise, use stored fat calories for energy. After a few minutes of the treadmill until your training zone. CONDITIONING GUIDELINES WARNING: Before beginning this or any exercise program, consult your body temperature, heart rate and ...success is intended only as a guide. During the first few months, you to plan your cardiovascular system, the key to strengthen your exercise program. The key to strengthen your cardiovascular system, your exercise must exercise at least one day of time. The following three parts...

English Manual
Page 18
...800-FON-PART (1-800-366-7278) FULL 90 DAY WARRANTY For 90 days from state to state. When requesting help assembling or operating the PROFORM J6 treadmill ¥ a part is used commercially or for immediate purchase or special order when you need to schedule repair service call our toll-free... manual to order parts by telephone, call the following information: ¥ The NAME OF THE PRODUCT (PROFORM¨ J6 treadmill) ¥ The MODEL NUMBER OF THE PRODUCT (831.297693) ¥ The KEY NUMBER AND DESCRIPTION OF THE PART (see the EXPLODED DRAWING and PART LIST included in USA © ...
...800-FON-PART (1-800-366-7278) FULL 90 DAY WARRANTY For 90 days from state to state. When requesting help assembling or operating the PROFORM J6 treadmill ¥ a part is used commercially or for immediate purchase or special order when you need to schedule repair service call our toll-free... manual to order parts by telephone, call the following information: ¥ The NAME OF THE PRODUCT (PROFORM¨ J6 treadmill) ¥ The MODEL NUMBER OF THE PRODUCT (831.297693) ¥ The KEY NUMBER AND DESCRIPTION OF THE PART (see the EXPLODED DRAWING and PART LIST included in USA © ...


