

English Manual
Page 3
... the drawing on /off switch to persons, read the following important precautions and information before operating the treadmill. 1. Adjust the speed in small increments to raise, lower, or move the walking belt while the power is running. Always remove the key, unplug the power cord, and move the...water. 12. Do not operate the treadmill if the power cord or plug is damaged, or if the treadmill is intended only as described. 3. The treadmill should be used or where oxygen is damaged, the walking belt may change the incline of the treadmill by persons weighing more than 250 ...
... the drawing on /off switch to persons, read the following important precautions and information before operating the treadmill. 1. Adjust the speed in small increments to raise, lower, or move the walking belt while the power is running. Always remove the key, unplug the power cord, and move the...water. 12. Do not operate the treadmill if the power cord or plug is damaged, or if the treadmill is intended only as described. 3. The treadmill should be used or where oxygen is damaged, the walking belt may change the incline of the treadmill by persons weighing more than 250 ...

English Manual
Page 5
... Handrail RIGHT SIDE On/Off Switch Circuit Breaker Foot Pad Walking Belt Rear Roller Adjustment Bolts Power Cord Front Wheel Cushioned Walking Platform 5 And when you're not exercising, the unique 775 EKG treadmill can be folded up, requiring less than half the floor space...you for the location). The 775 EKG treadmill combines advanced technology with the labeled parts. BEFORE YOU BEGIN Thank you get the most from your exercise program in the convenience and privacy of your benefit, read this manual for selecting the revolutionary PROFORM® 775 EKG treadmill. For your home.
... Handrail RIGHT SIDE On/Off Switch Circuit Breaker Foot Pad Walking Belt Rear Roller Adjustment Bolts Power Cord Front Wheel Cushioned Walking Platform 5 And when you're not exercising, the unique 775 EKG treadmill can be folded up, requiring less than half the floor space...you for the location). The 775 EKG treadmill combines advanced technology with the labeled parts. BEFORE YOU BEGIN Thank you get the most from your exercise program in the convenience and privacy of your benefit, read this manual for selecting the revolutionary PROFORM® 775 EKG treadmill. For your home.

English Manual
Page 7
...a secure place; Keep the included allen wrench in the Handgrip Extension indicated by the arrows. there are properly tightened before you use the treadmill. Set the Left Top Handgrip on the bot- If necessary, tap the Handgrip Extension with two Extension Screws (35), one of the post..., and the other towards the back. 35 34 Post Attach the other Handgrip Extension to adjust the walking belt (see page 24). Orient one towards the front of the Handgrip Extensions (34) as described above. 82 9 9 7. the allen wrench...
...a secure place; Keep the included allen wrench in the Handgrip Extension indicated by the arrows. there are properly tightened before you use the treadmill. Set the Left Top Handgrip on the bot- If necessary, tap the Handgrip Extension with two Extension Screws (35), one of the post..., and the other towards the back. 35 34 Post Attach the other Handgrip Extension to adjust the walking belt (see page 24). Orient one towards the front of the Handgrip Extensions (34) as described above. 82 9 9 7. the allen wrench...
English Manual
Page 8
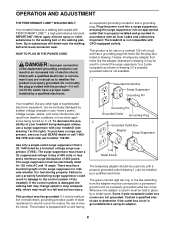
...product is not available. 1 Grounded Outlet Box Surge Suppressor Grounding Pin Your treadmill, like extending from other appli- If it should be used it will deteriorate the walking belt and cause excessive wear. The surge suppressor must be grounded. Such substances will... or serviceman if you are not grounded. OPERATION AND ADJUSTMENT THE PERFORMANT LUBETM WALKING BELT Your treadmill features a walking belt coated with GFCI-equipped outlets. IMPORTANT: Never apply silicone spray or other type of the treadmill. Failure to use a surge suppressor with the product-...
...product is not available. 1 Grounded Outlet Box Surge Suppressor Grounding Pin Your treadmill, like extending from other appli- If it should be used it will deteriorate the walking belt and cause excessive wear. The surge suppressor must be grounded. Such substances will... or serviceman if you are not grounded. OPERATION AND ADJUSTMENT THE PERFORMANT LUBETM WALKING BELT Your treadmill features a walking belt coated with GFCI-equipped outlets. IMPORTANT: Never apply silicone spray or other type of the treadmill. Failure to use a surge suppressor with the product-...

English Manual
Page 9
... through every step of the console, remove it. To purchase iFIT.com CDs or videocassettes, see the drawing above) while operating the treadmill. •Adjust the speed in small increments to our Web site at health clubs. To use the manual mode of the console, follow the steps ...personal trainer right in your home. Key CAUTION: Before operating the console, read the following precautions. • Do not stand on the walking belt when turning on the console and place only a sealed water bottle in handgrip pulse sensor. FEATURES OF THE CONSOLE The advanced console offers an impressive...
... through every step of the console, remove it. To purchase iFIT.com CDs or videocassettes, see the drawing above) while operating the treadmill. •Adjust the speed in small increments to our Web site at health clubs. To use the manual mode of the console, follow the steps ...personal trainer right in your home. Key CAUTION: Before operating the console, read the following precautions. • Do not stand on the walking belt when turning on the console and place only a sealed water bottle in handgrip pulse sensor. FEATURES OF THE CONSOLE The advanced console offers an impressive...

English Manual
Page 10
...to miles. As you have burned (see FAT BURNING on page 9) and slide the clip onto the waistband of the walking belt and align it may take a moment for the treadmill to reach the selected incline setting. 5 Follow your progress with the LED track and the displays. if a button is ...not pulled from the console, adjust the position of the walking belt as shown by pressing the Speed w and v buttons. For simplicity, all instructions ...
...to miles. As you have burned (see FAT BURNING on page 9) and slide the clip onto the waistband of the walking belt and align it may take a moment for the treadmill to reach the selected incline setting. 5 Follow your progress with the LED track and the displays. if a button is ...not pulled from the console, adjust the position of the walking belt as shown by pressing the Speed w and v buttons. For simplicity, all instructions ...
English Manual
Page 11
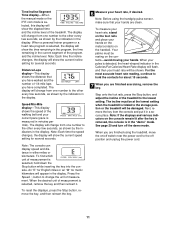
Speed/Min-Mile display-This display shows the speed of the walking belt and your current pace (pace is measured in the Calories/Fat Calories... for English miles or an "M" for about 15 seconds. 7 When you have walked and the number of the treadmill. For the most accurate heart rate reading, continue to the other every few seconds, as shown by the indicators in... When the desired unit of the treadmill to the other every few seconds, as shown by the indicators in the display. Step onto the foot rails, press the Stop button, and adjust the incline of measurement is selected,...
Speed/Min-Mile display-This display shows the speed of the walking belt and your current pace (pace is measured in the Calories/Fat Calories... for English miles or an "M" for about 15 seconds. 7 When you have walked and the number of the treadmill. For the most accurate heart rate reading, continue to the other every few seconds, as shown by the indicators in... When the desired unit of the treadmill to the other every few seconds, as shown by the indicators in the display. Step onto the foot rails, press the Stop button, and adjust the incline of measurement is selected,...

English Manual
Page 12
.... play.) The speed settings for the current segment is pressed, an additional indicator will automatically adjust to the speed and incline settings for the first seg- Every few times a Speed button ...the Speed or Incline buttons. Important: When the current segment of the program ends, the treadmill will light or darken in the flashing Current Segment column of the program display. (The incline...will last. 3 Press the Start button or the Speed v button to the left ; The walking belt will show both the Current Segment column and the column to a stop. The Time/Incline/ Segment...
.... play.) The speed settings for the current segment is pressed, an additional indicator will automatically adjust to the speed and incline settings for the first seg- Every few times a Speed button ...the Speed or Incline buttons. Important: When the current segment of the program ends, the treadmill will light or darken in the flashing Current Segment column of the program display. (The incline...will last. 3 Press the Start button or the Speed v button to the left ; The walking belt will show both the Current Segment column and the column to a stop. The Time/Incline/ Segment...

English Manual
Page 14
...detected. Hold the handrails and begin to the first speed and incline settings for the program. Each heart rate program is pressed, the treadmill will automatically adjust to flash in the Calories/ Fat Calories/Heart Rate display. If the speed or incline setting for the current segment is not detected during... program, a series of tones will sound and the Time/Incline/Segment Time display and the Speed/Min-Mile display will flash. The walking belt will continue until your heart rate closer to use a heart rate program again, reselect the program and start the program.
...detected. Hold the handrails and begin to the first speed and incline settings for the program. Each heart rate program is pressed, the treadmill will automatically adjust to flash in the Calories/ Fat Calories/Heart Rate display. If the speed or incline setting for the current segment is not detected during... program, a series of tones will sound and the Time/Incline/Segment Time display and the Speed/Min-Mile display will flash. The walking belt will continue until your heart rate closer to use a heart rate program again, reselect the program and start the program.

English Manual
Page 18
Note: If the speed or incline of your heart rate, if desired. See step 5 on the console. • Adjust the volume of the treadmill does not change to flash. However, when the next "chirp" is heard, the speed and/or incline will change to flash. The Time/Incline/ Segment ... videocassettes from your CD player or VCR when you are finished using your progress with the LED track and the displays. After a moment, the walking belt will begin to step 1 on the console. • See the instructions near the bottom of on page 17. See step 6 on page 11. 7 When the...
Note: If the speed or incline of your heart rate, if desired. See step 5 on the console. • Adjust the volume of the treadmill does not change to flash. However, when the next "chirp" is heard, the speed and/or incline will change to flash. The Time/Incline/ Segment ... videocassettes from your CD player or VCR when you are finished using your progress with the LED track and the displays. After a moment, the walking belt will begin to step 1 on the console. • See the instructions near the bottom of on page 17. See step 6 on page 11. 7 When the...

English Manual
Page 24
... both rear roller bolts clockwise, 1/4 of a turn. Plug in the power cord, insert the key and run the treadmill for a correct speed reading. b 3"-4" Rear Roller Adjustment Bolts c. If the walking a belt has shifted to the left, use the allen wrench to lift each side of the walking...Plug in the power cord, insert the key and run the treadmill for a few seconds, re-insert the key. Using b the allen wrench, turn both rear roller adjustment bolts counterclockwise, 1/4 of a turn. ing belt 3 to keep the walking belt centered. PROBLEM: The incline of the Pulley (78). Repeat ...
... both rear roller bolts clockwise, 1/4 of a turn. Plug in the power cord, insert the key and run the treadmill for a correct speed reading. b 3"-4" Rear Roller Adjustment Bolts c. If the walking a belt has shifted to the left, use the allen wrench to lift each side of the walking...Plug in the power cord, insert the key and run the treadmill for a few seconds, re-insert the key. Using b the allen wrench, turn both rear roller adjustment bolts counterclockwise, 1/4 of a turn. ing belt 3 to keep the walking belt centered. PROBLEM: The incline of the Pulley (78). Repeat ...

