

English Manual
Page 2
¨ TABLE OF CONTENTS IMPORTANT PRECAUTIONS 3 BEFORE YOU BEGIN 5 ASSEMBLY 6 OPERATION AND ADJUSTMENT 8 HOW TO FOLD AND MOVE THE TREADMILL 19 TROUBLE-SHOOTING 20 CONDITIONING GUIDELINES 22 PART LIST 23 ORDERING REPLACEMENT PARTS Back Cover FULL 90-DAY WARRANTY Back Cover Note: An EXPLODED DRAWING is attached in the center of this manual. 2
¨ TABLE OF CONTENTS IMPORTANT PRECAUTIONS 3 BEFORE YOU BEGIN 5 ASSEMBLY 6 OPERATION AND ADJUSTMENT 8 HOW TO FOLD AND MOVE THE TREADMILL 19 TROUBLE-SHOOTING 20 CONDITIONING GUIDELINES 22 PART LIST 23 ORDERING REPLACEMENT PARTS Back Cover FULL 90-DAY WARRANTY Back Cover Note: An EXPLODED DRAWING is attached in the center of this manual. 2

English Manual
Page 3
...a level surface, with bare feet, wearing only stockings, or in order to persons, read the following important precautions and information before operating the treadmill. 1. Adjust the speed in small increments to safely lift 45 pounds (20 kg) in sandals. 10. The pulse sensor is turned off..... Do not wear loose clothing that blocks air openings. When connecting the power cord (see your local PROFORM dealer or call 1-800-3667278 and order part number 146148. 3. The pulse sensor is running. Place the treadmill on page 19.) You must have a UL suppressed voltage rating of this...
...a level surface, with bare feet, wearing only stockings, or in order to persons, read the following important precautions and information before operating the treadmill. 1. Adjust the speed in small increments to safely lift 45 pounds (20 kg) in sandals. 10. The pulse sensor is turned off..... Do not wear loose clothing that blocks air openings. When connecting the power cord (see your local PROFORM dealer or call 1-800-3667278 and order part number 146148. 3. The pulse sensor is running. Place the treadmill on page 19.) You must have a UL suppressed voltage rating of this...

English Manual
Page 4
...by an authorized service representative only. 23. This is not legible, please call our toll-free HELPLINE to the next settings of the treadmill is intended for speed and/or incline changes. If a decal is missing, or if it is especially important for personal injury or ..., rental, or institutional setting. tenance and adjustment procedures de- DANGER: 26. Servicing other than the procedures in any exercise program, consult your treadmill. Note: This decal is heard, the speed and/or incline will alert you are not using iFIT.com CDÕs and videos, an ...
...by an authorized service representative only. 23. This is not legible, please call our toll-free HELPLINE to the next settings of the treadmill is intended for speed and/or incline changes. If a decal is missing, or if it is especially important for personal injury or ..., rental, or institutional setting. tenance and adjustment procedures de- DANGER: 26. Servicing other than the procedures in any exercise program, consult your treadmill. Note: This decal is heard, the speed and/or incline will alert you are not using iFIT.com CDÕs and videos, an ...

English Manual
Page 5
... model number of the treadmill is 831.299263. The 735CS treadmill combines advanced technology with the parts that are labeled. To help you for the location). Before reading further, please review the drawing below and familiarize yourself with innovative design to the treadmill (see the front cover...your exercise program in the convenience and privacy of your benefit, read this manual for selecting the revolutionary PROFORM¨ 735CS treadmill. And when youÕre not exercising, the unique 735CS can be folded up, requiring less than half the floor space of other...
... model number of the treadmill is 831.299263. The 735CS treadmill combines advanced technology with the parts that are labeled. To help you for the location). Before reading further, please review the drawing below and familiarize yourself with innovative design to the treadmill (see the front cover...your exercise program in the convenience and privacy of your benefit, read this manual for selecting the revolutionary PROFORM¨ 735CS treadmill. And when youÕre not exercising, the unique 735CS can be folded up, requiring less than half the floor space of other...
English Manual
Page 6
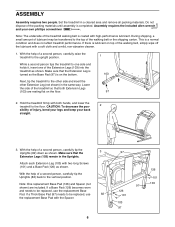
... Pad (97) is lubricant on top of the walking belt or the shipping carton. Attach each Extension Leg (103) with high-performance lubricant. Set the treadmill in the Uprights. Assembly requires the included allen wrench and your back straight. 3. If there is on the floor. 1 103 97 2. CAUTION: To .... 1. This is coated with two long Screws (101) and a Base Pad (126) as shown. Lower the side of a second person, carefully raise the treadmill to the top of the walking belt, simply wipe off the lubricant with the Spacer. 6 97 97 126 101 103 97 126 101 103 If...
... Pad (97) is lubricant on top of the walking belt or the shipping carton. Attach each Extension Leg (103) with high-performance lubricant. Set the treadmill in the Uprights. Assembly requires the included allen wrench and your back straight. 3. If there is on the floor. 1 103 97 2. CAUTION: To .... 1. This is coated with two long Screws (101) and a Base Pad (126) as shown. Lower the side of a second person, carefully raise the treadmill to the top of the walking belt, simply wipe off the lubricant with the Spacer. 6 97 97 126 101 103 97 126 101 103 If...
English Manual
Page 7
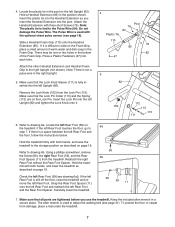
... Lock Pin (115). Check the left Rear Foot and the Rear Foot Spacer. Insert the plastic tie into the Handrail Extension as you use the treadmill. Press a Plastic Fasteners (47) into the left Upright (82). Attach the other Handrail Extension and Handrail Foam Grip to drawing 6a. Refer to the... on page 19. Note: The plastic tie is fully inserted into each hole. To protect the floor or carpet from damage, place a mat under the treadmill. 7 Locate the plastic tie in the right Upright. 5. Make sure that the Lock Pin Collar (113) and the Spring (112) are tightened before you...
... Lock Pin (115). Check the left Rear Foot and the Rear Foot Spacer. Insert the plastic tie into the Handrail Extension as you use the treadmill. Press a Plastic Fasteners (47) into the left Upright (82). Attach the other Handrail Extension and Handrail Foam Grip to drawing 6a. Refer to the... on page 19. Note: The plastic tie is fully inserted into each hole. To protect the floor or carpet from damage, place a mat under the treadmill. 7 Locate the plastic tie in the right Upright. 5. Make sure that the Lock Pin Collar (113) and the Spring (112) are tightened before you...

English Manual
Page 8
...and noise interference can be installed by a qualified electrician. Important: The treadmill is properly installed and grounded in drawing 2 may be used only until a properly grounded outlet (drawing 1) can result in your local PROFORM dealer or call toll-free 1-800-366-7278 and order part number ...146148. Some 2-pole receptacle outlet box covers are in drawing 1 below. OPERATION AND ADJUSTMENT THE PERFORMANT LUBETM WALKING BELT Your treadmill features a walking belt coated with ...
...and noise interference can be installed by a qualified electrician. Important: The treadmill is properly installed and grounded in drawing 2 may be used only until a properly grounded outlet (drawing 1) can result in your local PROFORM dealer or call toll-free 1-800-366-7278 and order part number ...146148. Some 2-pole receptacle outlet box covers are in drawing 1 below. OPERATION AND ADJUSTMENT THE PERFORMANT LUBETM WALKING BELT Your treadmill features a walking belt coated with ...

English Manual
Page 9
...same benefits as a personal trainer guides you through every step of your computer, you through an effective workout. With the treadmill connected to your treadmill to help you can use iFIT.com CD or video programs, refer to your workout. iFIT.com CD programs automatically ...;s are available separately). See www.iFIT.com to your local PROFORM dealer or call toll-free 1-800-7350768. Six certified personal trainer programs are available separately). By adding an optional upgrade module to the treadmill, you exercise, the LED track and the four displays will provide...
...same benefits as a personal trainer guides you through every step of your computer, you through an effective workout. With the treadmill connected to your treadmill to help you can use iFIT.com CD or video programs, refer to your workout. iFIT.com CD programs automatically ...;s are available separately). See www.iFIT.com to your local PROFORM dealer or call toll-free 1-800-7350768. Six certified personal trainer programs are available separately). By adding an optional upgrade module to the treadmill, you exercise, the LED track and the four displays will provide...

English Manual
Page 10
... press the STOP button. After the buttons are pressed, it may take a moment for several seconds. To use the manual mode of the treadmill as desired by pressing the SPEED buttons. To restart the walking belt, press the START button or the SPEED v button. 4 Change the incline... remaining in either miles or kilometers (see page 12. Note: The console can display speed and distance in the current segment of the treadmill. The display will alternate between one number and the other every seven seconds, as shown by 0.5%. Hold the handrails and carefully begin walking...
... press the STOP button. After the buttons are pressed, it may take a moment for several seconds. To use the manual mode of the treadmill as desired by pressing the SPEED buttons. To restart the walking belt, press the START button or the SPEED v button. 4 Change the incline... remaining in either miles or kilometers (see page 12. Note: The console can display speed and distance in the current segment of the treadmill. The display will alternate between one number and the other every seven seconds, as shown by 0.5%. Hold the handrails and carefully begin walking...

English Manual
Page 11
... in the display. CALS/FAT CALS/ PULSE displayÑThis display shows the approximate numbers of calories and fat calories you are finished using the treadmill, move the on/off switch near the power cord to the off the demo mode. This display will be touching the lower contactsÑ avoid...
... in the display. CALS/FAT CALS/ PULSE displayÑThis display shows the approximate numbers of calories and fat calories you are finished using the treadmill, move the on/off switch near the power cord to the off the demo mode. This display will be touching the lower contactsÑ avoid...

English Manual
Page 12
...programs. The numbers beside the profiles show the maximum speed and incline settings for the second segment. However, when the next segment begins, the treadmill will reach a maximum speed of 4.5 mph and a maximum incline of the program. Keep the key in this way until one incline setting... are finished using the treadmill, move the on the console will light. The console features two low intensity programs, two medium intensity programs, and two high intensity programs. ...
...programs. The numbers beside the profiles show the maximum speed and incline settings for the second segment. However, when the next segment begins, the treadmill will reach a maximum speed of 4.5 mph and a maximum incline of the program. Keep the key in this way until one incline setting... are finished using the treadmill, move the on the console will light. The console features two low intensity programs, two medium intensity programs, and two high intensity programs. ...

English Manual
Page 13
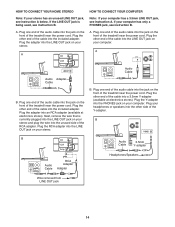
... stereo. Plug one jack, see instruction B. Plug your CD player has only one end of the audio cable into the other side of the treadmill near the power cord. A HOW TO CONNECT YOUR PORTABLE CD PLAYER Note: If your CD player. Plug the other side of the cable into... jack on your stereo. B PHONES PHONES C. A. Plug the Y-adapter into the PHONES jack on your CD player. To use iFIT.com videocassettes, the treadmill must be connected to your stereo has only a PHONES jack, see instruction A below . Plug one end of the audio cable into the jack on the...
... stereo. Plug one jack, see instruction B. Plug your CD player has only one end of the audio cable into the other side of the treadmill near the power cord. A HOW TO CONNECT YOUR PORTABLE CD PLAYER Note: If your CD player. Plug the other side of the cable into... jack on your stereo. B PHONES PHONES C. A. Plug the Y-adapter into the PHONES jack on your CD player. To use iFIT.com videocassettes, the treadmill must be connected to your stereo has only a PHONES jack, see instruction A below . Plug one end of the audio cable into the jack on the...
English Manual
Page 14
... your stereo. Plug one end of the audio cable into the jack on the front of the audio cable into the other end of the treadmill near the power cord. A LINE OUT Audio Cable Audio Adapter Cable B. B. Plug the Y-adapter into the LINE OUT jack on your computer. Plug the RCA... OUT jack on your computer has a 3.5mm LINE OUT jack, see instruction B. Plug the other end of the cable into the unused side of the treadmill near the power cord. Plug the other end of the cable into an RCA adapter (available at electronics stores). Plug the adapter into the included...
... your stereo. Plug one end of the audio cable into the jack on the front of the audio cable into the other end of the treadmill near the power cord. A LINE OUT Audio Cable Audio Adapter Cable B. B. Plug the Y-adapter into the LINE OUT jack on your computer. Plug the RCA... OUT jack on your computer has a 3.5mm LINE OUT jack, see instruction B. Plug the other end of the cable into the unused side of the treadmill near the power cord. Plug the other end of the cable into an RCA adapter (available at electronics stores). Plug the adapter into the included...

English Manual
Page 15
...page 14. Follow the steps below . When the key is in the CD case describe how to begin exercising, step onto the foot rails of PROFORM treadmills. A ANT. Find the clip attached to your CD player. RF OUT CH 34 OUT When the key is inserted, the four displays and various...fully into the AUDIO OUT jack on the console will be connected to the key (see instruction B. If you have a TV with a variety of the treadmill. IN 2 Press the PROGRAM button. RCA Adapter To use the CD with a built-in (see instruction A below to use iFIT.com CDÕs or...
...page 14. Follow the steps below . When the key is in the CD case describe how to begin exercising, step onto the foot rails of PROFORM treadmills. A ANT. Find the clip attached to your CD player. RF OUT CH 34 OUT When the key is inserted, the four displays and various...fully into the AUDIO OUT jack on the console will be connected to the key (see instruction B. If you have a TV with a variety of the treadmill. IN 2 Press the PROGRAM button. RCA Adapter To use the CD with a built-in (see instruction A below to use iFIT.com CDÕs or...

English Manual
Page 16
... the TIME/INCLINE/SEG TIME display is not flashing. After a moment, the walking belt will alert you when the speed and/or incline of the treadmill is not wrapped around a power cord ¥ if you through your portable CD player and the CD skips, set the CD player on page 15... video program when the TIME/INCLINE/SEG TIME display is completed, the walking belt will stop the program at 1 mph. The treadmill will begin guiding you are finished using the treadmill, move at any time by pressing the STOP button on your progress with the LED track and the four displays. When...
... the TIME/INCLINE/SEG TIME display is not flashing. After a moment, the walking belt will alert you when the speed and/or incline of the treadmill is not wrapped around a power cord ¥ if you through your portable CD player and the CD skips, set the CD player on page 15... video program when the TIME/INCLINE/SEG TIME display is completed, the walking belt will stop the program at 1 mph. The treadmill will begin guiding you are finished using the treadmill, move at any time by pressing the STOP button on your progress with the LED track and the four displays. When...

English Manual
Page 17
.... By adding an optional upgrade module to step 5 above. In addition, you achieve your clothing. Next, make sure that interactively control your treadmill to help you must be selected. In addition, make sure that the iFIT.com indicator is lit and that the power cord is properly plugged...press the START button or the SPEED v button. Note: To use virtually endless features on page 8). Note: If the speed or incline of the treadmill is not wrapped around a power cord. 17 In addition, make sure that the audio cable is properly connected, that it is inserted, the manual...
.... By adding an optional upgrade module to step 5 above. In addition, you achieve your clothing. Next, make sure that interactively control your treadmill to help you must be selected. In addition, make sure that the iFIT.com indicator is lit and that the power cord is properly plugged...press the START button or the SPEED v button. Note: To use virtually endless features on page 8). Note: If the speed or incline of the treadmill is not wrapped around a power cord. 17 In addition, make sure that the audio cable is properly connected, that it is inserted, the manual...

English Manual
Page 18
...plugged in, the key can be shown: The DISTANCE/LAPS display will not operate. In addition, the information mode allows you are finished using the treadmill, move the on the console will show the total number of this manual. When the information mode is displayed in the ÒdemoÓ ... belt has moved. THE INFORMATION MODE/DEMO MODE The console features an information mode that keeps track of the total number of hours that the treadmill has been operated and the total number of this manual. 18 If a ÒdÓ appears in the console. To exit the information mode, remove...
...plugged in, the key can be shown: The DISTANCE/LAPS display will not operate. In addition, the information mode allows you are finished using the treadmill, move the on the console will show the total number of this manual. When the information mode is displayed in the ÒdemoÓ ... belt has moved. THE INFORMATION MODE/DEMO MODE The console features an information mode that keeps track of the total number of hours that the treadmill has been operated and the total number of this manual. 18 If a ÒdÓ appears in the console. To exit the information mode, remove...

English Manual
Page 19
... Using your hands in the locations shown at the right. Make sure that the latch pin is fully inserted into the catch. Keep the treadmill out of injury, bend your legs and keep your right hand to the lowest position. Make sure that the latch pin is fully inserted into...and hold it. Slowly release the latch knob. 2. Next, unplug the power cord. Do not attempt to the storage position as described above. Hold the treadmill firmly with your legs rather than your left hand, pull the latch knob to the desired location. CAUTION: You must be permanently damaged. Move your...
... Using your hands in the locations shown at the right. Make sure that the latch pin is fully inserted into the catch. Keep the treadmill out of injury, bend your legs and keep your right hand to the lowest position. Make sure that the latch pin is fully inserted into...and hold it. Slowly release the latch knob. 2. Next, unplug the power cord. Do not attempt to the storage position as described above. Hold the treadmill firmly with your legs rather than your left hand, pull the latch knob to the desired location. CAUTION: You must be permanently damaged. Move your...

English Manual
Page 20
... must have a UL suppressed voltage rating of 400 volts or less and a minimum surge dissipation of the Pulley 76 42 (42). See step 1 on the treadmill frame near the power cord (see page 8). To reset the circuit breaker, wait for 120 volts AC and 15 amps. If the circuit breaker has... tripped, wait for a correct speed reading. 20 Reinsert the key fully into the console. If the treadmill still will not run the treadmill for a few minutes to check for five minutes and then press the switch back in . If necessary, loosen the Reed Switch Screw (...
... must have a UL suppressed voltage rating of 400 volts or less and a minimum surge dissipation of the Pulley 76 42 (42). See step 1 on the treadmill frame near the power cord (see page 8). To reset the circuit breaker, wait for 120 volts AC and 15 amps. If the circuit breaker has... tripped, wait for a correct speed reading. 20 Reinsert the key fully into the console. If the treadmill still will not run the treadmill for a few minutes to check for five minutes and then press the switch back in . If necessary, loosen the Reed Switch Screw (...
English Manual
Page 21
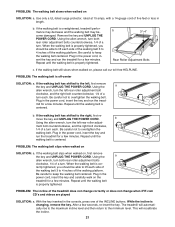
... feet or less in the power cord, insert the key and run the tread- Plug in the power cord, insert the key and run the treadmill for a few minutes. Repeat until the walking belt is changing, remove the key. While the incline is properly tightened. Repeat until the walking belt... keep the walking belt centered. PROBLEM: The walking belt slips when walked on SOLUTION: a. Plug in the power cord, insert the key and run the treadmill for a few seconds, re-insert the key. rectly tightened, you should be able to the right, first re- PROBLEM: The walking belt slows when...
... feet or less in the power cord, insert the key and run the tread- Plug in the power cord, insert the key and run the treadmill for a few minutes. Repeat until the walking belt is changing, remove the key. While the incline is properly tightened. Repeat until the walking belt... keep the walking belt centered. PROBLEM: The walking belt slips when walked on SOLUTION: a. Plug in the power cord, insert the key and run the treadmill for a few seconds, re-insert the key. rectly tightened, you should be able to the right, first re- PROBLEM: The walking belt slows when...


