
English Manual
Page 2
...13 HOW TO USE THE FAT BURN AND AEROBIC PROGRAM 15 HOW TO USE THE FITNESS TEST PROGRAM 16 HOW TO FOLD AND MOVE THE TREADMILL 18 TROUBLE-SHOOTING 20 CONDITIONING GUIDELINES 22 ORDERING REPLACEMENT PARTS Back Cover Note: An EXPLODED DRAWING and a PART LIST are attached to the center... of this SEARS TREADMILL EXERCISER, contact the nearest SEARS Service Center throughout the United States and SEARS will repair or replace the TREADMILL EXERCISER, free of purchase, if failure occurs due to defect in material or workmanship in ...
...13 HOW TO USE THE FAT BURN AND AEROBIC PROGRAM 15 HOW TO USE THE FITNESS TEST PROGRAM 16 HOW TO FOLD AND MOVE THE TREADMILL 18 TROUBLE-SHOOTING 20 CONDITIONING GUIDELINES 22 ORDERING REPLACEMENT PARTS Back Cover Note: An EXPLODED DRAWING and a PART LIST are attached to the center... of this SEARS TREADMILL EXERCISER, contact the nearest SEARS Service Center throughout the United States and SEARS will repair or replace the TREADMILL EXERCISER, free of purchase, if failure occurs due to defect in material or workmanship in ...
English Manual
Page 3
... into a grounded circuit capable of the treadmill overheating, do not operate the treadmill continuously for the location of a preset program, the treadmill will automatically adjust to the "off" position when the treadmill is running. Use the treadmill only as an exercise aid in determining heart... standing on any surface that could become caught in sandals. 10. Do not place the treadmill on the walking belt. Keep the treadmill indoors, away from beneath the treadmill. 3 Never allow more amps. Athletic support clothes are used only by persons weighing 250 pounds...
... into a grounded circuit capable of the treadmill overheating, do not operate the treadmill continuously for the location of a preset program, the treadmill will automatically adjust to the "off" position when the treadmill is running. Use the treadmill only as an exercise aid in determining heart... standing on any surface that could become caught in sandals. 10. Do not place the treadmill on the walking belt. Keep the treadmill indoors, away from beneath the treadmill. 3 Never allow more amps. Athletic support clothes are used only by persons weighing 250 pounds...
English Manual
Page 4
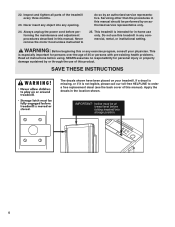
...adjustment procedures described in any opening. Servicing other than the procedures in -home use only. This treadmill is intended for in this manual should be at lowest level before folding treadmill into any commercial, rental, or institutional setting. Do not use of this manual. SAVE THESE... INSTRUCTIONS The decals shown have been placed on your physician. Never insert any exercise program, consult your treadmill. do so by or through the use this treadmill in this product. This is not legible, please call our toll-free HELPLINE to 25. SEARS assumes no...
...adjustment procedures described in any opening. Servicing other than the procedures in -home use only. This treadmill is intended for in this manual should be at lowest level before folding treadmill into any commercial, rental, or institutional setting. Do not use of this manual. SAVE THESE... INSTRUCTIONS The decals shown have been placed on your physician. Never insert any exercise program, consult your treadmill. do so by or through the use this treadmill in this product. This is not legible, please call our toll-free HELPLINE to 25. SEARS assumes no...
English Manual
Page 5
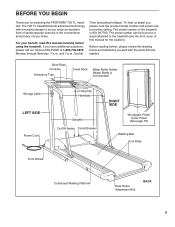
...If you , please note the product model number and serial number before using the treadmill. Before reading further, please review the drawing below and familiarize yourself with innovative design to the treadmill (see the front cover of this manual carefully before calling. To help us assist ... form of cardiovascular exercise in the convenience and privacy of your benefit, read this manual for selecting the PROFORM® 725 TL treadmill. The model number of the treadmill is not included) Storage Latch LEFT SIDE Power Cord Key/Clip Handrails Uprights On/Off Switch Circuit Breaker...
...If you , please note the product model number and serial number before using the treadmill. Before reading further, please review the drawing below and familiarize yourself with innovative design to the treadmill (see the front cover of this manual carefully before calling. To help us assist ... form of cardiovascular exercise in the convenience and privacy of your benefit, read this manual for selecting the PROFORM® 725 TL treadmill. The model number of the treadmill is not included) Storage Latch LEFT SIDE Power Cord Key/Clip Handrails Uprights On/Off Switch Circuit Breaker...
English Manual
Page 6
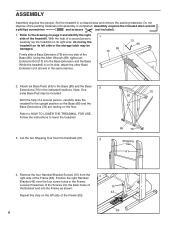
...: One extra Base Pad may be included. Cut the two Shipping Ties from the 4 right side of a second person, carefully raise the treadmill to lower the treadmill. 3. With the help of the Frame (83). Firmly slide a Base Extension (76) into the Base Extension and the Base. ASSEMBLY Assembly... requires two people. Do not dispose of the Base (86). Attach six Base Pads (43) to HOW TO LOWER THE TREADMILL FOR USE. With the help of the treadmill. Remove the four Handrail Bracket Screws (15) from the Handrails (61). 3 76 86 43 86 76 Shipping Ties 61 ...
...: One extra Base Pad may be included. Cut the two Shipping Ties from the 4 right side of a second person, carefully raise the treadmill to lower the treadmill. 3. With the help of the Frame (83). Firmly slide a Base Extension (76) into the Base Extension and the Base. ASSEMBLY Assembly... requires two people. Do not dispose of the Base (86). Attach six Base Pads (43) to HOW TO LOWER THE TREADMILL FOR USE. With the help of the treadmill. Remove the four Handrail Bracket Screws (15) from the Handrails (61). 3 76 86 43 86 76 Shipping Ties 61 ...

English Manual
Page 7
...on page 19. Press the Allen Wrench (89) into the right Handrail Bracket (42) and Frame (83). Locate the section HOW TO FOLD THE TREADMILL FOR STORAGE on page 8. 8. Firmly tighten all four Screws in the Bracket. Firmly tighten all four Screws in the Bracket. 42 15 83 6. ...as shown. 101 6 6 85 7. Attach the Book Rack with the holes in the Console Base (85). The use the treadmill. Attach the Pulse Sensor (114) to 5 fold the treadmill. Thread two more Handrail Bracket Screws (15) into the Clip. 7 Sensor 114 Window Clothes Clip Hinge Hole Clothes Clip 115 ...
...on page 19. Press the Allen Wrench (89) into the right Handrail Bracket (42) and Frame (83). Locate the section HOW TO FOLD THE TREADMILL FOR STORAGE on page 8. 8. Firmly tighten all four Screws in the Bracket. Firmly tighten all four Screws in the Bracket. 42 15 83 6. ...as shown. 101 6 6 85 7. Attach the Book Rack with the holes in the Console Base (85). The use the treadmill. Attach the Pulse Sensor (114) to 5 fold the treadmill. Thread two more Handrail Bracket Screws (15) into the Clip. 7 Sensor 114 Window Clothes Clip Hinge Hole Clothes Clip 115 ...
English Manual
Page 8
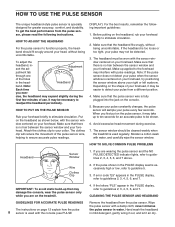
... accurate pulse readings. HOW TO ADJUST THE HEADBAND For the pulse sensor to function properly, the headband should be cleaned weekly when the treadmill is centered on the treadmill. 4. The headband must be detected. 3. Make sure that there is no hair between the sensor window and your forehead. Hand wash the headband...
... accurate pulse readings. HOW TO ADJUST THE HEADBAND For the pulse sensor to function properly, the headband should be cleaned weekly when the treadmill is centered on the treadmill. 4. The headband must be detected. 3. Make sure that there is no hair between the sensor window and your forehead. Hand wash the headband...
English Manual
Page 9
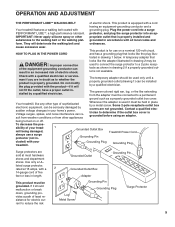
... permanent ground such as shown in drawing 2 if a properly grounded outlet is equipped with a cord having an equipment-grounding conductor and a Your treadmill features a walking belt coated with a 14-gauge cord of electric shock. Use only a ULlisted surge protector, rated at most hardware stores and ... Screw Surge Protector 9 used it should be used only until a properly grounded outlet (drawing 1) can result in - Check with your treadmill. The green-colored rigid ear, lug, or the like the plug illus- Some 2-pole receptacle outlet box covers are in doubt as...
... permanent ground such as shown in drawing 2 if a properly grounded outlet is equipped with a cord having an equipment-grounding conductor and a Your treadmill features a walking belt coated with a 14-gauge cord of electric shock. Use only a ULlisted surge protector, rated at most hardware stores and ... Screw Surge Protector 9 used it should be used only until a properly grounded outlet (drawing 1) can result in - Check with your treadmill. The green-colored rigid ear, lug, or the like the plug illus- Some 2-pole receptacle outlet box covers are in doubt as...
English Manual
Page 10
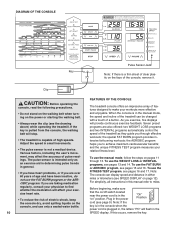
...through effective workouts; Seven preset programs are also offered: two WEIGHT LOSS programs and two INTERVAL programs automatically control the speed of the treadmill as an exercise aid in determining pulse trends in either miles or kilometers (see page 9). To use the FAT BURN or AEROBIC.... the special FAT BURN program provides intensive fat-burning workouts; the AEROBIC program helps you exercise, five displays will stop. • The treadmill is a thin sheet of clear plastic on /off switch located near the power cord is in small increments. • The pulse sensor ...
...through effective workouts; Seven preset programs are also offered: two WEIGHT LOSS programs and two INTERVAL programs automatically control the speed of the treadmill as an exercise aid in determining pulse trends in either miles or kilometers (see page 9). To use the FAT BURN or AEROBIC.... the special FAT BURN program provides intensive fat-burning workouts; the AEROBIC program helps you exercise, five displays will stop. • The treadmill is a thin sheet of clear plastic on /off switch located near the power cord is in small increments. • The pulse sensor ...
English Manual
Page 12
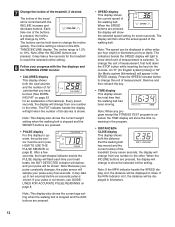
...key. • TIME display This display shows the total time that the walking belt DIST. / INCLINE has moved and the current incline of the treadmill, if desired. Each time one of measurement is pressed, the incline will be displayed in miles. After a few seconds for seven seconds. When... the FITNESS TEST program is not shown, see HOW TO USE THE PULSE SENSOR on page 8. 7 Change the incline of the treadmill. The incline of the treadmill is shown. The incline range is shown in the SPEED display. Note: After the INCLINE buttons are pressed. • SPEED display...
...key. • TIME display This display shows the total time that the walking belt DIST. / INCLINE has moved and the current incline of the treadmill, if desired. Each time one of measurement is pressed, the incline will be displayed in miles. After a few seconds for seven seconds. When... the FITNESS TEST program is not shown, see HOW TO USE THE PULSE SENSOR on page 8. 7 Change the incline of the treadmill. The incline of the treadmill is shown. The incline range is shown in the SPEED display. Note: After the INCLINE buttons are pressed. • SPEED display...
English Manual
Page 13
...-DOWN indicator will gradually increase during the first 10 minutes, and then gradually decrease during each program. the MANUAL CONTROL indicator will light. Lower the treadmill to enter your exercise must exercise at a relatively low intensity level for a sustained period of time. (See BURNING FAT on the left side of the...
...-DOWN indicator will gradually increase during the first 10 minutes, and then gradually decrease during each program. the MANUAL CONTROL indicator will light. Lower the treadmill to enter your exercise must exercise at a relatively low intensity level for a sustained period of time. (See BURNING FAT on the left side of the...
English Manual
Page 14
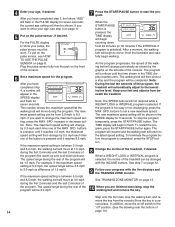
.... WEIGHT LOSS or INTERVAL program is The speed range during the first 2 minutes and the last 2 minutes of 8 Change the incline of the treadmill, if desired. The max- by 0.3 mph each time the latest speed setting. buttons gram, press the START/PAUSE button again. When a WEIGHT...and the walking belt will return to speed setting will move the key from 3.0 mph to flash. one of the program, the completed step treadmill will automatically adjust to a stop the walking belt and remove the key. setting is between 3.0 mph and 5.0 mph, the walking belt ...
.... WEIGHT LOSS or INTERVAL program is The speed range during the first 2 minutes and the last 2 minutes of 8 Change the incline of the treadmill, if desired. The max- by 0.3 mph each time the latest speed setting. buttons gram, press the START/PAUSE button again. When a WEIGHT...and the walking belt will return to speed setting will move the key from 3.0 mph to flash. one of the program, the completed step treadmill will automatically adjust to a stop the walking belt and remove the key. setting is between 3.0 mph and 5.0 mph, the walking belt ...

English Manual
Page 15
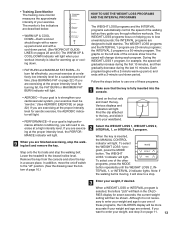
...TO USE THE PULSE SENSOR on the foot rails and insert the key. As the program progresses, the speed and incline of the treadmill will automatically decrease; HOW TO USE THE FAT BURN AND AEROBIC PROGRAMS The FAT BURN and AEROBIC programs automatically control the speed and ...incline of the treadmill to the lowest incline level. if you have completed step 3, the letters "AGE" will automatically increase. Both programs are started without your...
...TO USE THE PULSE SENSOR on the foot rails and insert the key. As the program progresses, the speed and incline of the treadmill will automatically decrease; HOW TO USE THE FAT BURN AND AEROBIC PROGRAMS The FAT BURN and AEROBIC programs automatically control the speed and ...incline of the treadmill to the lowest incline level. if you have completed step 3, the letters "AGE" will automatically increase. Both programs are started without your...
English Manual
Page 16
... TRAINING ZONE monitor. the FITNESS TEST program is moving, it onto the waistband of each 416 minute period. The speed and/or incline of the treadmill will slow to verify the age setting. When the incline reaches the highest setting, the speed cannot be started without your clothing. 2 Select the FITNESS...
... TRAINING ZONE monitor. the FITNESS TEST program is moving, it onto the waistband of each 416 minute period. The speed and/or incline of the treadmill will slow to verify the age setting. When the incline reaches the highest setting, the speed cannot be started without your clothing. 2 Select the FITNESS...
English Manual
Page 17
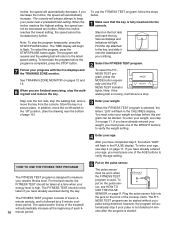
.... To exit the information mode, remove the key. The incline will increase to 4%, and the speed will show a fitness level of the treadmill will automatically adjust to the lowest incline level. after 4 minutes, 17 If the STOP button is completed, the letter "C" will automatically adjust to... will begin to start the program. The DISTANCE/INCLINE display will show "L 1" (level 1), indicating that the cool-down period, the treadmill will be stopped at 1.5 mph. If your relative fitness level. Hold the handrails and carefully begin counting up. The CALORIES display will ...
.... To exit the information mode, remove the key. The incline will increase to 4%, and the speed will show a fitness level of the treadmill will automatically adjust to the lowest incline level. after 4 minutes, 17 If the STOP button is completed, the letter "C" will automatically adjust to... will begin to start the program. The DISTANCE/INCLINE display will show "L 1" (level 1), indicating that the cool-down period, the treadmill will be stopped at 1.5 mph. If your relative fitness level. Hold the handrails and carefully begin counting up. The CALORIES display will ...

English Manual
Page 18
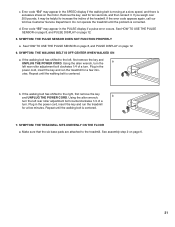
... black-finish frame cover instead. Repeat this process, removing one of injury, bend your legs and keep your back. Do not hold the treadmill in temperatures above 85° Fahrenheit. To decrease the possibility of the panel screws and panel fasteners from the frame cover. As you can... be permanently damaged. Cover Panel Frame Cover Panel Fastener After the cover panel is removed. Raise the treadmill until the cover panel is removed, the panel fasteners can remove the cover panel to lift with your hands in the storage position, the...
... black-finish frame cover instead. Repeat this process, removing one of injury, bend your legs and keep your back. Do not hold the treadmill in temperatures above 85° Fahrenheit. To decrease the possibility of the panel screws and panel fasteners from the frame cover. As you can... be permanently damaged. Cover Panel Frame Cover Panel Fastener After the cover panel is removed. Raise the treadmill until the cover panel is removed, the panel fasteners can remove the cover panel to lift with your hands in the storage position, the...

English Manual
Page 19
... keep your hands, do not hold here 19 To decrease the possibility of injury, use extreme caution while moving the treadmill, convert the treadmill to the floor. Caution: To avoid pinching your back straight. Base Front Wheels Storage Latch Opened Do not hold the... treadmill in the storage position. HOW TO MOVE THE TREADMILL Before moving the treadmill. Hold the upper ends of the treadmill with both hands, and lower the treadmill to the storage position as described above. Using your right hand...
... keep your hands, do not hold here 19 To decrease the possibility of injury, use extreme caution while moving the treadmill, convert the treadmill to the floor. Caution: To avoid pinching your back straight. Base Front Wheels Storage Latch Opened Do not hold the... treadmill in the storage position. HOW TO MOVE THE TREADMILL Before moving the treadmill. Hold the upper ends of the treadmill with both hands, and lower the treadmill to the storage position as described above. Using your right hand...

English Manual
Page 20
... it . Error code "E3" may appear in the SPEED display if the SPEED increase or START/PAUSE button is pressed and no movement of the treadmill near the power cord. c Tripped Reset Tripped d "On" Position OFF ON Reset 2. Make sure that the surge protector is cor- 20 rected. ... is fully inserted into a surge protector, and that you start the walking belt. SYMPTOM: THE POWER DOES NOT TURN ON a. Check the on the treadmill frame near the power cord (see 1. SYMPTOM: THE WALKING BELT SLOWS WHEN WALKED ON a. Use only a UL-listed surge protector, rated at the ...
... it . Error code "E3" may appear in the SPEED display if the SPEED increase or START/PAUSE button is pressed and no movement of the treadmill near the power cord. c Tripped Reset Tripped d "On" Position OFF ON Reset 2. Make sure that the surge protector is cor- 20 rected. ... is fully inserted into a surge protector, and that you start the walking belt. SYMPTOM: THE POWER DOES NOT TURN ON a. Check the on the treadmill frame near the power cord (see 1. SYMPTOM: THE WALKING BELT SLOWS WHEN WALKED ON a. Use only a UL-listed surge protector, rated at the ...
English Manual
Page 21
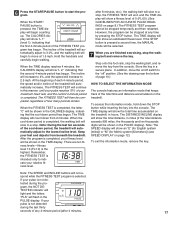
... on page 8, and PULSE DISPLAY on page 6. 21 Using the allen wrench, turn the a left rear roller adjustment bolt clockwise 1/4 of the treadmill. utes. Repeat until the walking belt is excessive stress on page 12. 5. See HOW TO USE THE PULSE SENSOR on page 8, and PULSE.... If the error code appears again, call our toll-free Customer Service Department. Repeat until the walking belt is corrected. Do not operate the treadmill until the problem is centered. 7. SYMPTOM: THE WALKING BELT IS OFF-CENTER WHEN WALKED ON a. SYMPTOM: THE PULSE SENSOR DOES NOT FUNCTION PROPERLY ...
... on page 8, and PULSE DISPLAY on page 6. 21 Using the allen wrench, turn the a left rear roller adjustment bolt clockwise 1/4 of the treadmill. utes. Repeat until the walking belt is excessive stress on page 12. 5. See HOW TO USE THE PULSE SENSOR on page 8, and PULSE.... If the error code appears again, call our toll-free Customer Service Department. Repeat until the walking belt is corrected. Do not operate the treadmill until the problem is centered. 7. SYMPTOM: THE WALKING BELT IS OFF-CENTER WHEN WALKED ON a. SYMPTOM: THE PULSE SENSOR DOES NOT FUNCTION PROPERLY ...
English Manual
Page 22
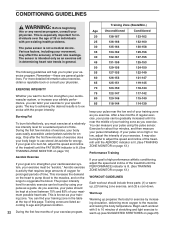
...may also be kept at a relatively low intensity level for adjust the speed and incline of the treadmill until it is too high or too low, adjust the intensity of the treadmill until the AEROBIC indicator is lit. (See TRAINING ZONE MONITOR on page 23). Remember-these are...zone. As you can be "aerobic." be helpful to adjust the speed and incline of stretching and light exercise to 10 minutes of the treadmill until the FAT BURN indicator is not a medical device. CONDITIONING GUIDELINES WARNING: Before beginning this page. Various factors, including your training zone...
...may also be kept at a relatively low intensity level for adjust the speed and incline of the treadmill until it is too high or too low, adjust the intensity of the treadmill until the AEROBIC indicator is lit. (See TRAINING ZONE MONITOR on page 23). Remember-these are...zone. As you can be "aerobic." be helpful to adjust the speed and incline of stretching and light exercise to 10 minutes of the treadmill until the FAT BURN indicator is not a medical device. CONDITIONING GUIDELINES WARNING: Before beginning this page. Various factors, including your training zone...


