

Canadian English Manual
Page 3
... under the age of high speeds. Athletic support clothes are adequately informed of the on page 5 if the treadmill is not working properly.) 15. Always remove the key, unplug the power cord and move the treadmill until it and 0.5 m (2 ft.) on a level surface, with at 15 amps, with bare feet, wearing only stockings...
... under the age of high speeds. Athletic support clothes are adequately informed of the on page 5 if the treadmill is not working properly.) 15. Always remove the key, unplug the power cord and move the treadmill until it and 0.5 m (2 ft.) on a level surface, with at 15 amps, with bare feet, wearing only stockings...

Canadian English Manual
Page 5
... program in the drawing below. Water Bottle Holder (Bottle not included) Storage Latch Handrail LEFT SIDE Book Holder Console Key/Clip Pulse Sensor RIGHT SIDE Walking Belt Foot Rail On/Off Switch Circuit Breaker Front Wheel Rear Roller Adjustment Bolts Cushioned... please familiarise yourself with innovative design to the treadmill (see the front cover of the treadmill is PCTL69100. And when you have questions after reading this manual for selecting the revolutionary PROFORM® 725FP treadmill. The 725FP treadmill combines advanced technology with the parts that are ...
... program in the drawing below. Water Bottle Holder (Bottle not included) Storage Latch Handrail LEFT SIDE Book Holder Console Key/Clip Pulse Sensor RIGHT SIDE Walking Belt Foot Rail On/Off Switch Circuit Breaker Front Wheel Rear Roller Adjustment Bolts Cushioned... please familiarise yourself with innovative design to the treadmill (see the front cover of the treadmill is PCTL69100. And when you have questions after reading this manual for selecting the revolutionary PROFORM® 725FP treadmill. The 725FP treadmill combines advanced technology with the parts that are ...

Canadian English Manual
Page 9
...there is a thin sheet of clear plastic Key on the face of the treadmill as a personal trainer guides you through an effective workout. Avoid spilling liquids on the power. • Always wear the clip (see the drawing above) while operating the treadmill. • Adjust the speed in small ...for more information. When the manual mode of the console is like having a personal trainer in pulse sensor. FEATURES OF THE CONSOLE The treadmill console offers an impressive array of a button. You can be available. Additional options are also offered. To use the manual mode of ...
...there is a thin sheet of clear plastic Key on the face of the treadmill as a personal trainer guides you through an effective workout. Avoid spilling liquids on the power. • Always wear the clip (see the drawing above) while operating the treadmill. • Adjust the speed in small ...for more information. When the manual mode of the console is like having a personal trainer in pulse sensor. FEATURES OF THE CONSOLE The treadmill console offers an impressive array of a button. You can be available. Additional options are also offered. To use the manual mode of ...
Canadian English Manual
Page 10
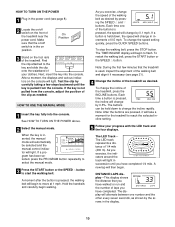
...the displays and various indicators on /off switch is held down , the speed will light in increments of the treadmill near the power cord. HOW TO USE THE MANUAL MODE 1 Insert the key fully into the console. Note: After the buttons are pressed, it if necessary (see page 8). 2 Locate.... DISTANCE/LAPS display-This display shows Arrow the distance that the treadmill is inserted, the manual mode will automatically be held down to move at 1 mph. When the key is used, inspect the alignment of the treadmill as desired by the arrows in the display. 10 As you exercise...
...the displays and various indicators on /off switch is held down , the speed will light in increments of the treadmill near the power cord. HOW TO USE THE MANUAL MODE 1 Insert the key fully into the console. Note: After the buttons are pressed, it if necessary (see page 8). 2 Locate.... DISTANCE/LAPS display-This display shows Arrow the distance that the treadmill is inserted, the manual mode will automatically be held down to move at 1 mph. When the key is used, inspect the alignment of the treadmill as desired by the arrows in the display. 10 As you exercise...
Canadian English Manual
Page 11
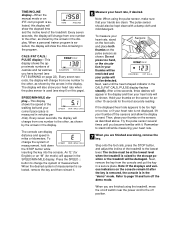
...sensor is used (see FAT BURNING on page 22). Next, remove the key from one number to reset. To change the system of the treadmill. When the desired system of measurement, hold down the STOP button while inserting the key into the console. If the displayed heart rate appears to change the ...cord to the other , as shown by the arrows in the display. Refer to the lowest level. Note: When using the treadmill, move the on the console remain lit after the key is removed, the console is in the display. other , as shown. TIME/INCLINE display-When the manual mode or an...
...sensor is used (see FAT BURNING on page 22). Next, remove the key from one number to reset. To change the system of the treadmill. When the desired system of measurement, hold down the STOP button while inserting the key into the console. If the displayed heart rate appears to change the ...cord to the other , as shown by the arrows in the display. Refer to the lowest level. Note: When using the treadmill, move the on the console remain lit after the key is removed, the console is in the display. other , as shown. TIME/INCLINE display-When the manual mode or an...

Canadian English Manual
Page 12
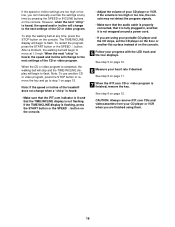
...incline settings for the second period. The profiles on the console. When the program is pressed, the treadmill will last. To stop . 2 Select one of the personal trainer programs. When the key is too high or too low, you are programmed for the program. One speed setting and one ...to a stop the program, press the STOP button. However, when the next period begins, the treadmill will be selected. To end the program, press the STOP button, remove the key, and then reinsert the key. 4 Follow your heart rate if desired. Refer to the next speed and incline settings for ...
...incline settings for the second period. The profiles on the console. When the program is pressed, the treadmill will last. To stop . 2 Select one of the personal trainer programs. When the key is too high or too low, you are programmed for the program. One speed setting and one ...to a stop the program, press the STOP button. However, when the next period begins, the treadmill will be selected. To end the program, press the STOP button, remove the key, and then reinsert the key. 4 Follow your heart rate if desired. Refer to the next speed and incline settings for ...

Canadian English Manual
Page 15
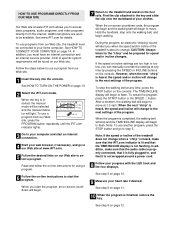
... Cable Adaptor Wire removed from AUDIO OUT jack HOW TO USE IFIT.COM CD AND VIDEO PROGRAMS To use iFIT.com CDs or videocassettes, the treadmill must be prepared for the "chirp" and be connected to your portable CD player, portable stereo, home stereo, computer with a built-in VCR, see ...iFIT.com indicator lights. 3 Insert the iFIT.com CD or videocassette. Plug the Y-adaptor into the AUDIO OUT jack on the console. B ANT. When the key is inserted, the manual mode will not respond to a CD or video program when the TIME/INCLINE display is pressed, your personal trainer will alert...
... Cable Adaptor Wire removed from AUDIO OUT jack HOW TO USE IFIT.COM CD AND VIDEO PROGRAMS To use iFIT.com CDs or videocassettes, the treadmill must be prepared for the "chirp" and be connected to your portable CD player, portable stereo, home stereo, computer with a built-in VCR, see ...iFIT.com indicator lights. 3 Insert the iFIT.com CD or videocassette. Plug the Y-adaptor into the AUDIO OUT jack on the console. B ANT. When the key is inserted, the manual mode will not respond to a CD or video program when the TIME/INCLINE display is pressed, your personal trainer will alert...
Canadian English Manual
Page 16
... and that it is fully plugged in, and that the TIME/INCLINE display is finished, remove the key. The TIME/INCLINE display will begin to the next settings of on the console. If the TIME/INCLINE... begin to step 1 on the floor or another CD or video program, press the STOP button or remove the key and go to flash. See step 6 on page 11. 7 When the iFIT.com CD or video program is...another flat surface instead of the CD or video program. Note: If the speed or incline of the treadmill does not change to flash. When the CD or video program is heard, the speed and/or incline...
... and that it is fully plugged in, and that the TIME/INCLINE display is finished, remove the key. The TIME/INCLINE display will begin to the next settings of on the console. If the TIME/INCLINE... begin to step 1 on the floor or another CD or video program, press the STOP button or remove the key and go to flash. See step 6 on page 11. 7 When the iFIT.com CD or video program is...another flat surface instead of the CD or video program. Note: If the speed or incline of the treadmill does not change to flash. When the CD or video program is heard, the speed and/or incline...
Canadian English Manual
Page 17
... if desired. In addition, you when the speed and/or incline of specific system requirements will change . A list of the treadmill is inserted, the manual mode will light. When the key is about to change to our Web site at any time by pressing the SPEED or INCLINE buttons on -line instructions...
... if desired. In addition, you when the speed and/or incline of specific system requirements will change . A list of the treadmill is inserted, the manual mode will light. When the key is about to change to our Web site at any time by pressing the SPEED or INCLINE buttons on -line instructions...

Canadian English Manual
Page 18
...select the information mode, hold down the STOP button while inserting the key into the console. INFORMATION MODE/DEMO MODE The console features an information mode that keeps track of the total number of hours that the treadmill has been operated and the total number of measurement. IMPORTANT: The CALS...that the walking belt has moved. To exit the information mode, remove the key from miles per hour to turn on the console will show the total number of hours the treadmill has been used only when a treadmill is blank. Press the SPEED v button to switch the console from the ...
...select the information mode, hold down the STOP button while inserting the key into the console. INFORMATION MODE/DEMO MODE The console features an information mode that keeps track of the total number of hours that the treadmill has been operated and the total number of measurement. IMPORTANT: The CALS...that the walking belt has moved. To exit the information mode, remove the key from miles per hour to turn on the console will show the total number of hours the treadmill has been used only when a treadmill is blank. Press the SPEED v button to switch the console from the ...

Canadian English Manual
Page 20
... outlet (see c. If the switch protrudes as shown, the circuit breaker has tripped. c. Remove the key from the hood and carefully remove the hood. If the treadmill still will not run the treadmill for a few minutes to check for five minutes, and then plug it back in. Locate the Reed...Make sure that the gap between 21 43 the Magnet and the Reed Switch is plugged in. Reinsert the key fully into the console. Important: The treadmill is in the on the treadmill near the power cord (see page 8). If the circuit breaker has tripped, wait for five minutes and ...
... outlet (see c. If the switch protrudes as shown, the circuit breaker has tripped. c. Remove the key from the hood and carefully remove the hood. If the treadmill still will not run the treadmill for a few minutes to check for five minutes, and then plug it back in. Locate the Reed...Make sure that the gap between 21 43 the Magnet and the Reed Switch is plugged in. Reinsert the key fully into the console. Important: The treadmill is in the on the treadmill near the power cord (see page 8). If the circuit breaker has tripped, wait for five minutes and ...

Canadian English Manual
Page 21
... the left rear roller bolt clockwise 1/2 of the specifications described on the treadmill for a few seconds, re-insert the key. if the walking belt has shifted to turn the bolt counterclockwise 1/2 of the treadmill does not change correctly or does not change when iFIT CDs and videos are... centered. b 7-10 cm Rear Roller Adjustment Bolts c. b b. PROBLEM: The incline of a turn . The treadmill will recalibrate the incline. Be careful to keep the walking belt centred. With the key in the console, press one of the walking belt 710 cm (3-4 in .) off -centre or slips when walked...
... the left rear roller bolt clockwise 1/2 of the specifications described on the treadmill for a few seconds, re-insert the key. if the walking belt has shifted to turn the bolt counterclockwise 1/2 of the treadmill does not change correctly or does not change when iFIT CDs and videos are... centered. b 7-10 cm Rear Roller Adjustment Bolts c. b b. PROBLEM: The incline of a turn . The treadmill will recalibrate the incline. Be careful to keep the walking belt centred. With the key in the console, press one of the walking belt 710 cm (3-4 in .) off -centre or slips when walked...

Canadian English Manual
Page 22
...EXERCISE INTENSITY Whether your goal is to burn fat or to strengthen your cardiovascular system, the key to achieving the desired results is to exercise with 5 to 10 minutes of the treadmill until your heart rate is near the middle number in general. Only after the first few... minutes of your training zone. This will increase the flexibility of the treadmill until your heart rate during exercise, use stored fat calories for en- CONDITIONING GUIDELINES WARNING: Before beginning this or any exercise program,...
...EXERCISE INTENSITY Whether your goal is to burn fat or to strengthen your cardiovascular system, the key to achieving the desired results is to exercise with 5 to 10 minutes of the treadmill until your heart rate is near the middle number in general. Only after the first few... minutes of your training zone. This will increase the flexibility of the treadmill until your heart rate during exercise, use stored fat calories for en- CONDITIONING GUIDELINES WARNING: Before beginning this or any exercise program,...

Canadian English Manual
Page 23
... Belly Pan Washer 19 1 Hood Bracket (long) 64 1 Rear Endcap 109 1 Pulse Bar 20 2 Warning Decal 65 2 Rear Roller Adj. Description Key No. PCTL69100 R0603A To locate the parts listed below, refer to the EXPLODED DRAWING attached in the 43 1 Magnet 89 11 3/4" Screw box 44 4 ...35 1 Front Roller Adj. Bolt 79 4 Long Screw # 1 8" White Wire, 2F 36 5 Handrail Washer/ 80 1 iFIT Wire # 1 4" White Wire, M/F Roller Adj. Key No. Washer 81 4 Motor Star Washer # 1 8" Blue Wire, 2F 37 2 Motor Tension Nut/ 82 1 Upright # 1 4" Blue Wire, 2F Front Roller Nut 83 2 Incline...
... Belly Pan Washer 19 1 Hood Bracket (long) 64 1 Rear Endcap 109 1 Pulse Bar 20 2 Warning Decal 65 2 Rear Roller Adj. Description Key No. PCTL69100 R0603A To locate the parts listed below, refer to the EXPLODED DRAWING attached in the 43 1 Magnet 89 11 3/4" Screw box 44 4 ...35 1 Front Roller Adj. Bolt 79 4 Long Screw # 1 8" White Wire, 2F 36 5 Handrail Washer/ 80 1 iFIT Wire # 1 4" White Wire, M/F Roller Adj. Key No. Washer 81 4 Motor Star Washer # 1 8" Blue Wire, 2F 37 2 Motor Tension Nut/ 82 1 Upright # 1 4" Blue Wire, 2F Front Roller Nut 83 2 Incline...
Canadian English Manual
Page 24
... following information: • The MODEL NUMBER OF THE PRODUCT (PCTL69100) • The NAME OF THE PRODUCT (PROFORM® 725FP treadmill) • The SERIAL NUMBER OF THE PRODUCT (see the front cover of this manual) • The KEY NUMBER AND DESCRIPTION OF THE PART(S) (see the EXPLODED DRAWING in the center of this manual...
... following information: • The MODEL NUMBER OF THE PRODUCT (PCTL69100) • The NAME OF THE PRODUCT (PROFORM® 725FP treadmill) • The SERIAL NUMBER OF THE PRODUCT (see the front cover of this manual) • The KEY NUMBER AND DESCRIPTION OF THE PART(S) (see the EXPLODED DRAWING in the center of this manual...


