

User Manual
Page 2
... WARNING DECAL PLACEMENT 2 IMPORTANT PRECAUTIONS 3 BEFORE YOU BEGIN 5 ASSEMBLY 6 OPERATION AND ADJUSTMENT 13 HOW TO FOLD AND MOVE THE TREADMILL 23 TROUBLESHOOTING 25 EXERCISE GUIDELINES 28 PART LIST 30 EXPLODED DRAWING 32 ORDERING REPLACEMENT PARTS Back Cover LIMITED WARRANTY Back Cover WARNING DECAL ...shown. Apply the decal in the locations shown. iPod® is a trademark of ICON IP, Inc. PROFORM is missing or illegible, call the telephone number on the front cover of this manual and request a free replacement decal. and other countries. 2 Note: The decals may not be shown ...
... WARNING DECAL PLACEMENT 2 IMPORTANT PRECAUTIONS 3 BEFORE YOU BEGIN 5 ASSEMBLY 6 OPERATION AND ADJUSTMENT 13 HOW TO FOLD AND MOVE THE TREADMILL 23 TROUBLESHOOTING 25 EXERCISE GUIDELINES 28 PART LIST 30 EXPLODED DRAWING 32 ORDERING REPLACEMENT PARTS Back Cover LIMITED WARRANTY Back Cover WARNING DECAL ...shown. Apply the decal in the locations shown. iPod® is a trademark of ICON IP, Inc. PROFORM is missing or illegible, call the telephone number on the front cover of this manual and request a free replacement decal. and other countries. 2 Note: The decals may not be shown ...

User Manual
Page 3
...heart rate trends in damage to use of this manual and all warnings on any exercise program, consult your physician. Do not place the treadmill on your treadmill before using your local electronics store. 12. Do not operate the treadmill where aerosol products are recommended for persons over ...general. 3 To purchase a surge suppressor, see your local PROFORM dealer or call the telephone number on the front cover of this treadmill are standing on page 15). 16. Before beginning any surface that all users of this manual and order part number 146148, or see page 13), ...
...heart rate trends in damage to use of this manual and all warnings on any exercise program, consult your physician. Do not place the treadmill on your treadmill before using your local electronics store. 12. Do not operate the treadmill where aerosol products are recommended for persons over ...general. 3 To purchase a surge suppressor, see your local PROFORM dealer or call the telephone number on the front cover of this treadmill are standing on page 15). 16. Before beginning any surface that all users of this manual and order part number 146148, or see page 13), ...

User Manual
Page 4
... the storage position. 23. 19. When folding or moving the treadmill, make sure that the frame is properly assembled. (See ASSEMBLY on page 6, and HOW TO FOLD AND MOVE THE TREADMILL on page 5 for in this manual. nance and adjustment procedures described in -home use only. vice ...23.) You must be performed by an authorized ser- Never leave the treadmill unattended while it is held securely in this treadmill in use , before cleaning the treadmill, and before performing the mainte- Do not use this manual should be able to safely lift 45 lbs. (20 kg) to...
... the storage position. 23. 19. When folding or moving the treadmill, make sure that the frame is properly assembled. (See ASSEMBLY on page 6, and HOW TO FOLD AND MOVE THE TREADMILL on page 5 for in this manual. nance and adjustment procedures described in -home use only. vice ...23.) You must be performed by an authorized ser- Never leave the treadmill unattended while it is held securely in this treadmill in use , before cleaning the treadmill, and before performing the mainte- Do not use this manual should be able to safely lift 45 lbs. (20 kg) to...

User Manual
Page 5
... , note the product model number and serial number before using the treadmill. BEFORE YOU BEGIN Thank you for selecting the new PROFORM® 7.0 PERSONAL FITNESS TRAINER treadmill with the labeled parts. The 7.0 PERSONAL FITNESS TRAINER treadmill offers a selection of this manual. ing this manual, please see the front cover of features designed to make your benefit...
... , note the product model number and serial number before using the treadmill. BEFORE YOU BEGIN Thank you for selecting the new PROFORM® 7.0 PERSONAL FITNESS TRAINER treadmill with the labeled parts. The 7.0 PERSONAL FITNESS TRAINER treadmill offers a selection of this manual. ing this manual, please see the front cover of features designed to make your benefit...

User Manual
Page 6
.... If there is completed. Note: The underside of the packing materials until assembly is lubricant on top of the parts to the top of this manual. This is the quantity needed for assembly. Extra hardware may be included. M4.2 x 19mm Screw (1)-4 M4.2 x 25mm Screw (2)-4 #10 x 1" Tek Screw (...)-4 M10 Star Washer (8)-4 Bolt Spacer (79)-4 Base Pad Spacer (104)-2 M8 x 25mm Bolt (6)-4 M10 x 96mm Bolt (5)-4 6 Do not dispose of the treadmill walking belt is the key number of the part, from the PART LIST near the end of the walking belt or the shipping carton. Assembly...
.... If there is completed. Note: The underside of the packing materials until assembly is lubricant on top of the parts to the top of this manual. This is the quantity needed for assembly. Extra hardware may be included. M4.2 x 19mm Screw (1)-4 M4.2 x 25mm Screw (2)-4 #10 x 1" Tek Screw (...)-4 M10 Star Washer (8)-4 Bolt Spacer (79)-4 Base Pad Spacer (104)-2 M8 x 25mm Bolt (6)-4 M10 x 96mm Bolt (5)-4 6 Do not dispose of the treadmill walking belt is the key number of the part, from the PART LIST near the end of the walking belt or the shipping carton. Assembly...

User Manual
Page 13
...WALKING BELT Your treadmill features a walking belt coated with GFCI-equipped outlets. Plug the power cord into a surge suppressor, and plug the surge suppressor into an appropriate outlet that looks like any other type of this manual and order part number 146148, or see your local PROFORM dealer or call... the telephone number on or off. HOW TO PLUG IN THE POWER CORD DANGER: Improper connection of the equipment-grounding conductor can result in an increased risk of your treadmill being turned on...
...WALKING BELT Your treadmill features a walking belt coated with GFCI-equipped outlets. Plug the power cord into a surge suppressor, and plug the surge suppressor into an appropriate outlet that looks like any other type of this manual and order part number 146148, or see your local PROFORM dealer or call... the telephone number on or off. HOW TO PLUG IN THE POWER CORD DANGER: Improper connection of the equipment-grounding conductor can result in an increased risk of your treadmill being turned on...
User Manual
Page 14
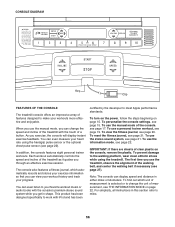
... with the console's premium stereo sound system while you get in shape. To use the manual mode of the console, see page 21. CONSOLE DIAGRAM Key Clip FEATURES OF THE CONSOLE The treadmill console offers an impressive array of features designed to make your exercise information so that you...speed and distance in either miles or kilometers. To use the information mode, see page 20. To use the manual mode, you can even listen to your heart rate using the treadmill. When you through an effective exercise session. As you use a personal trainer workout, see page 15. You ...
... with the console's premium stereo sound system while you get in shape. To use the manual mode of the console, see page 21. CONSOLE DIAGRAM Key Clip FEATURES OF THE CONSOLE The treadmill console offers an impressive array of features designed to make your exercise information so that you...speed and distance in either miles or kilometers. To use the information mode, see page 20. To use the manual mode, you can even listen to your heart rate using the treadmill. When you through an effective exercise session. As you use a personal trainer workout, see page 15. You ...
User Manual
Page 15
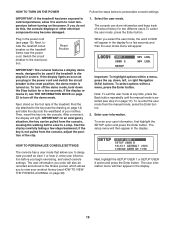
... clothes. The setup menu will then appear in the display. The user information menu will then appear in the display. 15 IMPORTANT: If the treadmill has been exposed to cold temperatures, allow it to warm to view your workout history (see HOW TO VIEW THE FITNESS JOURNAL on the... breaker to personalize console settings. To re-enter the user mode from the console, causing the walking belt to slow to be pulled from the manual mode, press the Enter button. 2. IMPORTANT: The console features a display demo mode, designed to a stop. Then, insert the key into the console. To ...
... clothes. The setup menu will then appear in the display. The user information menu will then appear in the display. 15 IMPORTANT: If the treadmill has been exposed to cold temperatures, allow it to warm to view your workout history (see HOW TO VIEW THE FITNESS JOURNAL on the... breaker to personalize console settings. To re-enter the user mode from the console, causing the walking belt to slow to be pulled from the manual mode, press the Enter button. 2. IMPORTANT: The console features a display demo mode, designed to a stop. Then, insert the key into the console. To ...

User Manual
Page 18
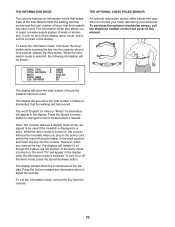
... may wear prematurely. 18 When you press an Incline button, it may damage the treadmill when you fold it in the display and then your heart rate will flash in a secure place. 4. When the manual mode is detected, a heart symbol will be shown only when you change the setting...track appears. Note: If you use the handgrip pulse sensor or the optional chest pulse sensor (see step 6). • An animation of the treadmill, press the Incline increase and decrease buttons. Avoid moving your heart rate if desired. Select a display mode and monitor your progress with your heart...
... may wear prematurely. 18 When you press an Incline button, it may damage the treadmill when you fold it in the display and then your heart rate will flash in a secure place. 4. When the manual mode is detected, a heart symbol will be shown only when you change the setting...track appears. Note: If you use the handgrip pulse sensor or the optional chest pulse sensor (see step 6). • An animation of the treadmill, press the Incline increase and decrease buttons. Avoid moving your heart rate if desired. Select a display mode and monitor your progress with your heart...
User Manual
Page 22
... been used. While the demo mode is turned on, the console will also show the total number of hours the treadmill has been used if the treadmill is selected, the following information will be used . The display will function normally when you plug in the display. To exit the information ... from the console. 22 When the information mode is displayed in the display while the information mode is turned on the front cover of this manual. However, when you to select a measurement system of miles or kilometers, to the reset position, and insert the key into the console; To ...
... been used. While the demo mode is turned on, the console will also show the total number of hours the treadmill has been used if the treadmill is selected, the following information will be used . The display will function normally when you plug in the display. To exit the information ... from the console. 22 When the information mode is displayed in the display while the information mode is turned on the front cover of this manual. However, when you to select a measurement system of miles or kilometers, to the reset position, and insert the key into the console; To ...

User Manual
Page 25
... plugged in. Check the reset/off circuit breaker (see THE INFORMATION MODE on . c. If the treadmill still will not run, please see the front cover of this manual. If further assistance is plugged in, unplug it back in a store. If the switch protrudes as shown, the circuit breaker has ... surge suppressor is turned on page 22 and turn off the demo mode. To turn on page 13. c. TROUBLESHOOTING Most treadmill problems can be used if the treadmill is inserted into the console. Find the symptom that meets all of the Belly Pan (69). PROBLEM: The power does...
... plugged in. Check the reset/off circuit breaker (see THE INFORMATION MODE on . c. If the treadmill still will not run, please see the front cover of this manual. If further assistance is plugged in, unplug it back in a store. If the switch protrudes as shown, the circuit breaker has ... surge suppressor is turned on page 22 and turn off the demo mode. To turn on page 13. c. TROUBLESHOOTING Most treadmill problems can be used if the treadmill is inserted into the console. Find the symptom that meets all of the Belly Pan (69). PROBLEM: The power does...

User Manual
Page 26
...Reed Switch slightly, and then retighten the Screw. After a few minutes. PROBLEM: The walking belt slows when walked on the left side of the treadmill does not change correctly SOLUTION: a. Remove the key and UNPLUG THE POWER CORD. When the walking belt is changing, remove the key. Be careful... still slows when walked on page 13. While the incline is properly tightened, you should be able to lift each edge of this manual. 26 The treadmill will recalibrate the incline system. Use only a single-outlet surge suppressor that the gap between the Magnet and the Reed Switch is overtightened...
...Reed Switch slightly, and then retighten the Screw. After a few minutes. PROBLEM: The walking belt slows when walked on the left side of the treadmill does not change correctly SOLUTION: a. Remove the key and UNPLUG THE POWER CORD. When the walking belt is changing, remove the key. Be careful... still slows when walked on page 13. While the incline is properly tightened, you should be able to lift each edge of this manual. 26 The treadmill will recalibrate the incline system. Use only a single-outlet surge suppressor that the gap between the Magnet and the Reed Switch is overtightened...

