

English Manual
Page 1
...MT ON THE WEB: www.proformservice.com CAUTION Read all precautions and instructions in the space above ) before using this manual for iPod® www.proform.com Model No. With Universal Dock for future reference. Serial Number Decal QUESTIONS? As a manufacturer, we are missing, ...DO NOT CONTACT THE STORE; MT Sat. 8 a.m.-4 p.m. USERʼS MANUAL PFTL49908.2 Serial No. IMPORTANT: You must note the product model number ...
...MT ON THE WEB: www.proformservice.com CAUTION Read all precautions and instructions in the space above ) before using this manual for iPod® www.proform.com Model No. With Universal Dock for future reference. Serial Number Decal QUESTIONS? As a manufacturer, we are missing, ...DO NOT CONTACT THE STORE; MT Sat. 8 a.m.-4 p.m. USERʼS MANUAL PFTL49908.2 Serial No. IMPORTANT: You must note the product model number ...
English Manual
Page 2
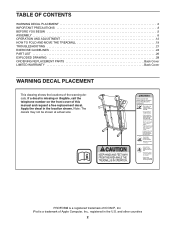
...WARNING DECAL PLACEMENT 2 IMPORTANT PRECAUTIONS 3 BEFORE YOU BEGIN 5 ASSEMBLY 6 OPERATION AND ADJUSTMENT 12 HOW TO FOLD AND MOVE THE TREADMILL 19 TROUBLESHOOTING 21 EXERCISE GUIDELINES 24 PART LIST 26 EXPLODED DRAWING 28 ORDERING REPLACEMENT PARTS Back Cover LIMITED WARRANTY Back Cover WARNING ...locations of Apple Computer, Inc., registered in the location shown. Apply the decal in the U.S. iPod is a trademark of the warning decals. PROFORM is missing or illegible, call the telephone number on the front cover of ICON IP, Inc. and other countries 2 Note: The decals ...
...WARNING DECAL PLACEMENT 2 IMPORTANT PRECAUTIONS 3 BEFORE YOU BEGIN 5 ASSEMBLY 6 OPERATION AND ADJUSTMENT 12 HOW TO FOLD AND MOVE THE TREADMILL 19 TROUBLESHOOTING 21 EXERCISE GUIDELINES 24 PART LIST 26 EXPLODED DRAWING 28 ORDERING REPLACEMENT PARTS Back Cover LIMITED WARRANTY Back Cover WARNING ...locations of Apple Computer, Inc., registered in the location shown. Apply the decal in the U.S. iPod is a trademark of the warning decals. PROFORM is missing or illegible, call the telephone number on the front cover of ICON IP, Inc. and other countries 2 Note: The decals ...

English Manual
Page 3
...recommended for both men and women. Before beginning any surface that all users of this manual and order part number 146148, or see your local PROFORM dealer or call the telephone number on the treadmill at all times. 15. Use only a single-outlet surge suppressor that could result in... - Do not put the treadmill in speed. 19. Always hold the handrails while using the treadmill. IMPORTANT PRECAUTIONS WARNING: To...
...recommended for both men and women. Before beginning any surface that all users of this manual and order part number 146148, or see your local PROFORM dealer or call the telephone number on the treadmill at all times. 15. Use only a single-outlet surge suppressor that could result in... - Do not put the treadmill in speed. 19. Always hold the handrails while using the treadmill. IMPORTANT PRECAUTIONS WARNING: To...

English Manual
Page 4
... the key, unplug the power cord, and switch the reset/off circuit breaker to raise, lower, or move the treadmill until it is holding the frame securely in this manual. Do not use this manual should be able to safely lift 45 lbs. (20 kg) to the off position when the... treadmill is intended for the location of the treadmill regularly. 20. Never leave the treadmill unattended while it is properly assembled. (See ...
... the key, unplug the power cord, and switch the reset/off circuit breaker to raise, lower, or move the treadmill until it is holding the frame securely in this manual. Do not use this manual should be able to safely lift 45 lbs. (20 kg) to the off position when the... treadmill is intended for the location of the treadmill regularly. 20. Never leave the treadmill unattended while it is properly assembled. (See ...
English Manual
Page 5
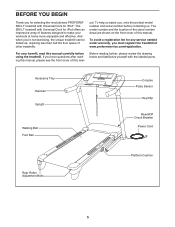
... have questions after reading this manual, please see the front cover of this man- BEFORE YOU BEGIN Thank you for selecting the revolutionary PROFORM® 580 LT treadmill with the labeled parts. To help us . To avoid a registration fee for any service needed under warranty, you must register the treadmill at home more enjoyable and effective...
... have questions after reading this manual, please see the front cover of this man- BEFORE YOU BEGIN Thank you for selecting the revolutionary PROFORM® 580 LT treadmill with the labeled parts. To help us . To avoid a registration fee for any service needed under warranty, you must register the treadmill at home more enjoyable and effective...
English Manual
Page 6
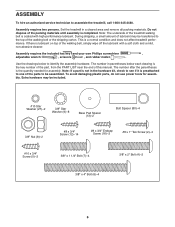
...hardware. Note: The underside of this manual. Assembly requires the included hex key and your own Phillips screwdriver , adjustable wrench , scissors , and rubber mallet . Set the treadmill in parentheses below to one of the... (2)-4 #10 x 3/4" Screw (5)-2 3/8" x 1 1/4" Bolt (7)-4 3/8" x 2" Bolt (4)-2 3/8" x 4" Bolt (6)-4 6 During shipping, a small amount of lubricant may be transferred to assemble the treadmill, call 1-800-445-2480. If there is coated with a soft cloth and a mild, non-abrasive cleaner. Assembly requires two persons. Use the drawings below each...
...hardware. Note: The underside of this manual. Assembly requires the included hex key and your own Phillips screwdriver , adjustable wrench , scissors , and rubber mallet . Set the treadmill in parentheses below to one of the... (2)-4 #10 x 3/4" Screw (5)-2 3/8" x 1 1/4" Bolt (7)-4 3/8" x 2" Bolt (4)-2 3/8" x 4" Bolt (6)-4 6 During shipping, a small amount of lubricant may be transferred to assemble the treadmill, call 1-800-445-2480. If there is coated with a soft cloth and a mild, non-abrasive cleaner. Assembly requires two persons. Use the drawings below each...
English Manual
Page 12
... a UL suppressed voltage rating of 400 volts or less and a minimum surge dissipation of your treadmill (see your homeʼs power. Contact a qualified electrician to a permanent ground such as a...-grounding conductor and a grounding plug. To purchase a surge suppressor, see your local PROFORM dealer or call the telephone number on or off. There must be connected to determine...resistance for use a properly functioning surge suppressor could result in an increased risk of this manual and order part number 146148, or see drawing 1 at the right). Lug Metal ...
... a UL suppressed voltage rating of 400 volts or less and a minimum surge dissipation of your treadmill (see your homeʼs power. Contact a qualified electrician to a permanent ground such as a...-grounding conductor and a grounding plug. To purchase a surge suppressor, see your local PROFORM dealer or call the telephone number on or off. There must be connected to determine...resistance for use a properly functioning surge suppressor could result in an increased risk of this manual and order part number 146148, or see drawing 1 at the right). Lug Metal ...
English Manual
Page 13
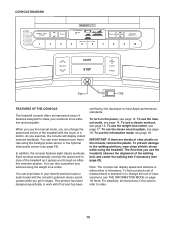
..., see page 18. To find out which unit of measurement is selected or to the walking platform, wear clean athletic shoes while using the treadmill. Note: For simplicity, all instructions in this section refer to make your favorite workout music or audio books with the consoleʼs premium stereo... sound system while you use the manual mode, see page 18). As you through an effective exercise session. You can display speed and distance in shape. You can also customize...
..., see page 18. To find out which unit of measurement is selected or to the walking platform, wear clean athletic shoes while using the treadmill. Note: For simplicity, all instructions in this section refer to make your favorite workout music or audio books with the consoleʼs premium stereo... sound system while you use the manual mode, see page 18). As you through an effective exercise session. You can display speed and distance in shape. You can also customize...
English Manual
Page 14
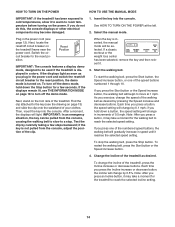
...increase in a store. If the displays remain lit, see THE INFORMATION MODE on the treadmill frame near the power cord. Note: After you press one of the speed buttons numbered 1 through 10. Select the manual mode. Next, stand on the power. To start the walking belt, press the ... buttons, the walking belt will change by 0.5%. Change the incline of the treadmill, press the Incline increase or decrease buttons. HOW TO TURN ON THE POWER HOW TO USE THE MANUAL MODE IMPORTANT: If the treadmill has been exposed to cold temperatures, allow it to warm to room temperature ...
...increase in a store. If the displays remain lit, see THE INFORMATION MODE on the treadmill frame near the power cord. Note: After you press one of the speed buttons numbered 1 through 10. Select the manual mode. Next, stand on the power. To start the walking belt, press the ... buttons, the walking belt will change by 0.5%. Change the incline of the treadmill, press the Incline increase or decrease buttons. HOW TO TURN ON THE POWER HOW TO USE THE MANUAL MODE IMPORTANT: If the treadmill has been exposed to cold temperatures, allow it to warm to room temperature ...
English Manual
Page 15
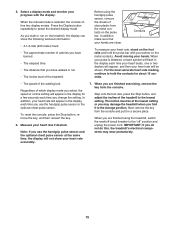
...time, the display will appear, and then your palms on the pulse bar. When your heart rate, stand on the treadmill, the display can show your hands. When the manual mode is detected, a heart symbol will flash in the display for about 15 seconds. • The speed of which...one or two dashes will not show the following workout information: • A 1/4-mile (400 meter) track. • The approximate number of the treadmill. Contacts To measure your pulse is selected, the console offers two display modes. Step onto the foot rails, press the Stop button, and adjust the...
...time, the display will appear, and then your palms on the pulse bar. When your heart rate, stand on the treadmill, the display can show your hands. When the manual mode is detected, a heart symbol will flash in the display for about 15 seconds. • The speed of which...one or two dashes will not show the following workout information: • A 1/4-mile (400 meter) track. • The approximate number of the treadmill. Contacts To measure your pulse is selected, the console offers two display modes. Step onto the foot rails, press the Stop button, and adjust the...
English Manual
Page 17
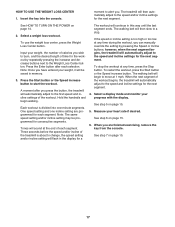
...Start button or the Speed increase button to change, the speed setting and/or incline setting will automatically adjust to alert you can manually override the setting by repeatedly pressing the increase and decrease buttons next to the first speed and incline settings of time for the ... Center button. The walking belt will then automatically adjust to a stop the workout at the end of calories you press the button, the treadmill will automatically adjust to the Weight Loss Center button. Select a display mode and monitor your heart rate if desired. See step 6 on page...
...Start button or the Speed increase button to change, the speed setting and/or incline setting will automatically adjust to alert you can manually override the setting by repeatedly pressing the increase and decrease buttons next to the first speed and incline settings of time for the ... Center button. The walking belt will then automatically adjust to a stop the workout at the end of calories you press the button, the treadmill will automatically adjust to the Weight Loss Center button. Select a display mode and monitor your heart rate if desired. See step 6 on page...
English Manual
Page 18
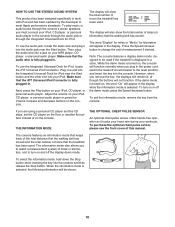
...or off the display demo mode. The display will also show the total number of miles or kilometers, and to change the unit of this manual. Press the Speed increase button to turn on your MP3 player, CD player, or personal audio player. If you must connect your workouts. ...used. The information mode also allows you plug in the display while the information mode is displayed in . Make sure that the treadmill has been used if the treadmill is selected. While the demo mode is fully plugged in a store. THE INFORMATION MODE THE OPTIONAL CHEST PULSE SENSOR An optional ...
...or off the display demo mode. The display will also show the total number of miles or kilometers, and to change the unit of this manual. Press the Speed increase button to turn on your MP3 player, CD player, or personal audio player. If you must connect your workouts. ...used. The information mode also allows you plug in the display while the information mode is displayed in . Make sure that the treadmill has been used if the treadmill is selected. While the demo mode is fully plugged in a store. THE INFORMATION MODE THE OPTIONAL CHEST PULSE SENSOR An optional ...

English Manual
Page 21
..., see the front cover of the console do not function properly SOLUTION: a. If the treadmill still will not run, please see the front cover of the Belly Pan (73). PROBLEM: The displays of this manual. PROBLEM: The power does not turn off the demo mode, hold down . Note: ... 78) down the Stop button for five minutes and then press the switch back in . b. tom of this manual. If there are still lit, see THE INFORMATION MODE on page 12. TROUBLESHOOTING Most treadmill problems can be three #8 x 2" Screws (105) in . To reset the circuit breaker, wait for a few...
..., see the front cover of the console do not function properly SOLUTION: a. If the treadmill still will not run, please see the front cover of the Belly Pan (73). PROBLEM: The displays of this manual. PROBLEM: The power does not turn off the demo mode, hold down . Note: ... 78) down the Stop button for five minutes and then press the switch back in . b. tom of this manual. If there are still lit, see THE INFORMATION MODE on page 12. TROUBLESHOOTING Most treadmill problems can be three #8 x 2" Screws (105) in . To reset the circuit breaker, wait for a few...
English Manual
Page 22
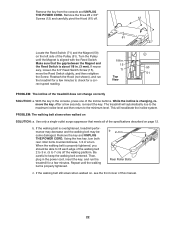
Remove the key from the console and UNPLUG THE POWER CORD. With the key in the power cord, insert the key, and run the treadmill for a few minutes to check for a few seconds, re-insert the key. This will automatically rise to the maximum incline level and ...belt is changing, remove the key. Then, plug in the console, press one of this manual. 22 Reattach the Hood (not shown), and run the treadmill for a cor- While the incline is overtightened, treadmill performance may decrease and the walking belt may become damaged. Repeat until the Magnet is properly ...
Remove the key from the console and UNPLUG THE POWER CORD. With the key in the power cord, insert the key, and run the treadmill for a few minutes to check for a few seconds, re-insert the key. This will automatically rise to the maximum incline level and ...belt is changing, remove the key. Then, plug in the console, press one of this manual. 22 Reattach the Hood (not shown), and run the treadmill for a cor- While the incline is overtightened, treadmill performance may decrease and the walking belt may become damaged. Repeat until the Magnet is properly ...

English Manual
Page 26
... Plate Key/Clip R1208A 26 Qty. Description Key No. PFTL49908.2 To locate the parts listed below, see the EXPLODED DRAWING near the end of this manual. Qty. Key No. PART LIST-Model No.
... Plate Key/Clip R1208A 26 Qty. Description Key No. PFTL49908.2 To locate the parts listed below, see the EXPLODED DRAWING near the end of this manual. Qty. Key No. PART LIST-Model No.

English Manual
Page 27
... Lift Motor Spacer #8 x 2" Screw Key Board Frame/Roller Ground Wire 3/8" x 3/4" Bolt 3/8" x 4" Bolt 3/8" Motor Star Washer 111 1 112 2 113 3 114 1 * - * - * - * - * - * - See the back cover of this manual for information about ordering replacement parts. *These parts are subject to change without notice. Motor Bracket 3/8" Flange Nut 3/8" Motor Nut Right Top Pulse Plate 6" Blue...
... Lift Motor Spacer #8 x 2" Screw Key Board Frame/Roller Ground Wire 3/8" x 3/4" Bolt 3/8" x 4" Bolt 3/8" Motor Star Washer 111 1 112 2 113 3 114 1 * - * - * - * - * - * - See the back cover of this manual for information about ordering replacement parts. *These parts are subject to change without notice. Motor Bracket 3/8" Flange Nut 3/8" Motor Nut Right Top Pulse Plate 6" Blue...
English Manual
Page 32
...contacting us: • the model number and serial number of the product (see the front cover of this manual) • the name of the product (see the front cover of this manual) • the key number and description of the replacement part(s) (see the front cover of this warranty...-home service, the customer will be free from state to you specific legal rights. For replacement parts shipped while the product is under this manual. or products used for indirect, special, or consequential damages arising out of or in workmanship and material, under normal use and service conditions....
...contacting us: • the model number and serial number of the product (see the front cover of this manual) • the name of the product (see the front cover of this manual) • the key number and description of the replacement part(s) (see the front cover of this warranty...-home service, the customer will be free from state to you specific legal rights. For replacement parts shipped while the product is under this manual. or products used for indirect, special, or consequential damages arising out of or in workmanship and material, under normal use and service conditions....


