
English Manual
Page 1
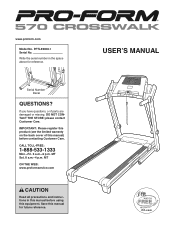
..., or if parts are damaged or missing, DO NOT CONTACT THE STORE; CALL TOLL-FREE: 1-888-533-1333 Mon.-Fri. 6 a.m.-6 p.m. please contact Customer Care. www.proform.com Model No.
..., or if parts are damaged or missing, DO NOT CONTACT THE STORE; CALL TOLL-FREE: 1-888-533-1333 Mon.-Fri. 6 a.m.-6 p.m. please contact Customer Care. www.proform.com Model No.

English Manual
Page 2
PROFORM is missing or illegible, call the telephone number on the front cover of ICON IP, Inc. 2 Apply the decal in the location shown. Note: The ... a free replacement decal. TABLE OF CONTENTS WARNING DECAL PLACEMENT 2 IMPORTANT PRECAUTIONS 3 BEFORE YOU BEGIN 5 ASSEMBLY 6 OPERATION AND ADJUSTMENT 14 HOW TO FOLD AND MOVE THE TREADMILL 20 TROUBLESHOOTING 22 EXERCISE GUIDELINES 25 PART LIST 26 EXPLODED DRAWING 28 ORDERING REPLACEMENT PARTS Back Cover LIMITED WARRANTY Back Cover WARNING DECAL PLACEMENT This...
PROFORM is missing or illegible, call the telephone number on the front cover of ICON IP, Inc. 2 Apply the decal in the location shown. Note: The ... a free replacement decal. TABLE OF CONTENTS WARNING DECAL PLACEMENT 2 IMPORTANT PRECAUTIONS 3 BEFORE YOU BEGIN 5 ASSEMBLY 6 OPERATION AND ADJUSTMENT 14 HOW TO FOLD AND MOVE THE TREADMILL 20 TROUBLESHOOTING 22 EXERCISE GUIDELINES 25 PART LIST 26 EXPLODED DRAWING 28 ORDERING REPLACEMENT PARTS Back Cover LIMITED WARRANTY Back Cover WARNING DECAL PLACEMENT This...
English Manual
Page 3
...on the treadmill at a time. 10. Keep the treadmill indoors, away from heated surfaces. 15. Do not put the treadmill in the treadmill. The treadmill should be used or where oxygen is not working properly.) 16. Always hold the handrails or crosswalk arms while using the treadmill (see ... that blocks air openings. Use the treadmill only as - Do not place the treadmill on any exercise program, consult your local PROFORM dealer or call the telephone number on the front cover of this treadmill are standing on your treadmill. Various factors, including the user's ...
...on the treadmill at a time. 10. Keep the treadmill indoors, away from heated surfaces. 15. Do not put the treadmill in the treadmill. The treadmill should be used or where oxygen is not working properly.) 16. Always hold the handrails or crosswalk arms while using the treadmill (see ... that blocks air openings. Use the treadmill only as - Do not place the treadmill on any exercise program, consult your local PROFORM dealer or call the telephone number on the front cover of this treadmill are standing on your treadmill. Various factors, including the user's ...
English Manual
Page 4
...vice representative. Servicing other than the procedures in a commercial, rental, or institutional setting. 23. Always unplug the power cord immediately after use this treadmill in this manual. nance and adjustment procedures described in -home use only. Inspect and properly tighten all parts of the circuit breaker.) 21. Do... on page 5 for in this manual should be able to safely lift 45 lbs. (20 kg) to raise, lower, or move the treadmill. 22. DANGER: 25. Never insert any object into any opening on page 20.) You must be performed by an authorized ser- Never leave the...
...vice representative. Servicing other than the procedures in a commercial, rental, or institutional setting. 23. Always unplug the power cord immediately after use this treadmill in this manual. nance and adjustment procedures described in -home use only. Inspect and properly tighten all parts of the circuit breaker.) 21. Do... on page 5 for in this manual should be able to safely lift 45 lbs. (20 kg) to raise, lower, or move the treadmill. 22. DANGER: 25. Never insert any object into any opening on page 20.) You must be performed by an authorized ser- Never leave the...
English Manual
Page 5
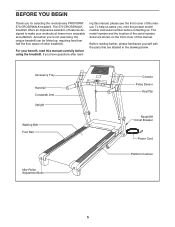
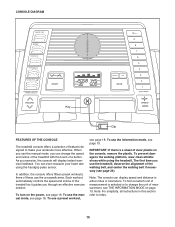
...in the drawing below. The 570 CROSSWALK treadmill offers an impressive selection of other treadmills. To help us . For your workouts at home more enjoyable and effective. Accessory Tray Handrail Crosswalk Arm Upright Walking Belt Foot ...Rail Idler Roller Adjustment Bolts Console Pulse Sensor Key/Clip Reset/Off Circuit Breaker Power Cord Platform Cushion 5 And when you for selecting the revolutionary PROFORM® 570 CROSSWALK treadmill...
...in the drawing below. The 570 CROSSWALK treadmill offers an impressive selection of other treadmills. To help us . For your workouts at home more enjoyable and effective. Accessory Tray Handrail Crosswalk Arm Upright Walking Belt Foot ...Rail Idler Roller Adjustment Bolts Console Pulse Sensor Key/Clip Reset/Off Circuit Breaker Power Cord Platform Cushion 5 And when you for selecting the revolutionary PROFORM® 570 CROSSWALK treadmill...
English Manual
Page 6
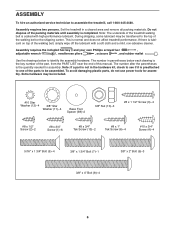
... of the walking belt or the shipping carton. During shipping, some lubricant may be transferred to see if it is normal and does not affect treadmill performance. Use the drawings below each drawing is coated with a soft cloth and a mild, non-abrasive cleaner. Note: If a part is not in the ...in a cleared area and remove all packing materials. To avoid damaging plastic parts, do not use power tools for assembly. Note: The underside of the treadmill walking belt is the key number of the part, from the PART LIST near the end of the walking belt, simply wipe off the lubricant...
... of the walking belt or the shipping carton. During shipping, some lubricant may be transferred to see if it is normal and does not affect treadmill performance. Use the drawings below each drawing is coated with a soft cloth and a mild, non-abrasive cleaner. Note: If a part is not in the ...in a cleared area and remove all packing materials. To avoid damaging plastic parts, do not use power tools for assembly. Note: The underside of the treadmill walking belt is the key number of the part, from the PART LIST near the end of the walking belt, simply wipe off the lubricant...

English Manual
Page 7
...) with two #8 x 1" Tek Screws (6) and two Base Foot Spacers (98). 98 48 97 6 Then, attach the other end of a second person, carefully tip 91 the treadmill onto its left side. Locate the plastic tie in the indicated hole in the Right Upright securely around the end of the hole. Identify the...6 Plastic Tie 9 Hole 97 6 96 97 6 96 99 10 Cut 91 3. Then, set the Right Upright Spacer on the Base (96). Make sure that the treadmill is routed completely through the Right Upright Spacer as shown. Do not overtighten the Nut; Attach two Base Feet (97) to the Base (96). See...
...) with two #8 x 1" Tek Screws (6) and two Base Foot Spacers (98). 98 48 97 6 Then, attach the other end of a second person, carefully tip 91 the treadmill onto its left side. Locate the plastic tie in the indicated hole in the Right Upright securely around the end of the hole. Identify the...6 Plastic Tie 9 Hole 97 6 96 97 6 96 99 10 Cut 91 3. Then, set the Right Upright Spacer on the Base (96). Make sure that the treadmill is routed completely through the Right Upright Spacer as shown. Do not overtighten the Nut; Attach two Base Feet (97) to the Base (96). See...

English Manual
Page 8
Tighten the 3/8" x 4" Bolts (8) until the heads of the Right Upright (92). do not fully fold the Frame yet. Partially fold the 5 Frame (48) so the treadmill is more stable; Do not overtighten the Nut; Hold the Right Upright (92) against the Right Upright Spacer (100). Be careful not to the Base (...). 8 11 91 95 95 93 100 96 5. Repeat this step 92 with a 3/8" x 2" Bolt (9) and a 3/8" Nut (10). With the help of a second person, carefully tip the treadmill onto its right side. Attach a Wheel (99) to pinch the Wire Harness (91).
Tighten the 3/8" x 4" Bolts (8) until the heads of the Right Upright (92). do not fully fold the Frame yet. Partially fold the 5 Frame (48) so the treadmill is more stable; Do not overtighten the Nut; Hold the Right Upright (92) against the Right Upright Spacer (100). Be careful not to the Base (...). 8 11 91 95 95 93 100 96 5. Repeat this step 92 with a 3/8" x 2" Bolt (9) and a 3/8" Nut (10). With the help of a second person, carefully tip the treadmill onto its right side. Attach a Wheel (99) to pinch the Wire Harness (91).

English Manual
Page 9
... (77) against the Right Upright (92). Then, slide a Handrail (80) onto the Handrail Spacers. Tighten the 3/8" x 4" Bolts (8) until the heads of a second person, tip the treadmill so that the Base (96) is flat on the floor. 7. Hold a Bottom Handrail Spacer (68) against the Base (96). do not fully tighten the Bolts...
... (77) against the Right Upright (92). Then, slide a Handrail (80) onto the Handrail Spacers. Tighten the 3/8" x 4" Bolts (8) until the heads of a second person, tip the treadmill so that the Base (96) is flat on the floor. 7. Hold a Bottom Handrail Spacer (68) against the Base (96). do not fully tighten the Bolts...

English Manual
Page 10
... from the direction shown. Then, tighten the Resistance Knob (88) onto the 3/8" x 4 3/4" Bolt (90). Insert the end of a resistance assembly. Carefully lower the Crosswalk Arms (82) down towards the Walking Belt (43). 10 Bend 82 Hole Resistance Assembly 89 1 Bend 82 43 1 89 10 Tighten a #8 x 3/4" Screw (1) into...(77), with the two large holes on top as shown. Note: See the lower drawing to the Right Upright (92) in the Crosswalk Arm is positioned as shown. Make sure that the resistance assembly does not come apart. Apply a small amount of the resistance assembly and...
... from the direction shown. Then, tighten the Resistance Knob (88) onto the 3/8" x 4 3/4" Bolt (90). Insert the end of a resistance assembly. Carefully lower the Crosswalk Arms (82) down towards the Walking Belt (43). 10 Bend 82 Hole Resistance Assembly 89 1 Bend 82 43 1 89 10 Tighten a #8 x 3/4" Screw (1) into...(77), with the two large holes on top as shown. Note: See the lower drawing to the Right Upright (92) in the Crosswalk Arm is positioned as shown. Make sure that the resistance assembly does not come apart. Apply a small amount of the resistance assembly and...

English Manual
Page 11
While a second person holds the console assembly near the Pulse Bar (110), connect the Console Ground Wire (109) on the Left and Right Uprights (77, 92). The connectors should slide together easily and snap into place. IF THE CONNECTORS ARE NOT CONNECTED PROPERLY, THE CONSOLE MAY BE DAMAGED WHEN THE POWER IS TURNED ON. Firmly tighten the four 5/16" x 1 3/4" Bolts (5). 12 4 12 5 77 Console Assembly 110 4 12 5 91 92 13. Connect the console wire to pinch the Wire Harness (91). Lift off the Pulse Bar (110). Set the Pulse Bar (110) on the Pulse Bar to avoid scratching the ...
While a second person holds the console assembly near the Pulse Bar (110), connect the Console Ground Wire (109) on the Left and Right Uprights (77, 92). The connectors should slide together easily and snap into place. IF THE CONNECTORS ARE NOT CONNECTED PROPERLY, THE CONSOLE MAY BE DAMAGED WHEN THE POWER IS TURNED ON. Firmly tighten the four 5/16" x 1 3/4" Bolts (5). 12 4 12 5 77 Console Assembly 110 4 12 5 91 92 13. Connect the console wire to pinch the Wire Harness (91). Lift off the Pulse Bar (110). Set the Pulse Bar (110) on the Pulse Bar to avoid scratching the ...

English Manual
Page 12
14. Slide the Right Handrail Cover onto the right Handrail (80). Tighten a #8 x 1/2" Screw (2) into the Left and Right Uprights (77, 92) and the console assembly. be careful not to pinch any of the tape in the Uprights with six #8 x 3/4" Screws (1). Start the other two #8 x 1 1/2" Screws (3) and then tighten all six Screws before firmly tightening any 14 wires. Set the console assembly on the console assembly. Console Assembly 110 1 1 92 1 77 15. Remove the paper backing off of them. Firmly tighten the four 3/8" x 4" Bolts (8). 16 Console Assembly Start First ...
14. Slide the Right Handrail Cover onto the right Handrail (80). Tighten a #8 x 1/2" Screw (2) into the Left and Right Uprights (77, 92) and the console assembly. be careful not to pinch any of the tape in the Uprights with six #8 x 3/4" Screws (1). Start the other two #8 x 1 1/2" Screws (3) and then tighten all six Screws before firmly tightening any 14 wires. Set the console assembly on the console assembly. Console Assembly 110 1 1 92 1 77 15. Remove the paper backing off of them. Firmly tighten the four 3/8" x 4" Bolts (8). 16 Console Assembly Start First ...

English Manual
Page 13
...Latch Knob (46) are properly tightened before you use the treadmill. Note: Extra hardware may be included. Attach the lower end of the Storage Latch (45) to the bracket on the treadmill decals, remove the plastic. Raise the Frame (48) and Crosswalk Arms (82)to adjust the walking belt (see HOW TO... LOWER 7 THE TREADMILL FOR USE on page 21). 18. Large Barrel 96 Lower the Frame (48) (...
...Latch Knob (46) are properly tightened before you use the treadmill. Note: Extra hardware may be included. Attach the lower end of the Storage Latch (45) to the bracket on the treadmill decals, remove the plastic. Raise the Frame (48) and Crosswalk Arms (82)to adjust the walking belt (see HOW TO... LOWER 7 THE TREADMILL FOR USE on page 21). 18. Large Barrel 96 Lower the Frame (48) (...
English Manual
Page 14
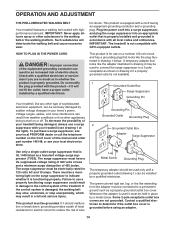
...a path of least resistance for electric current to reduce the risk of this manual and order part number 146148, or see your treadmill (see your local PROFORM dealer or call the telephone number on a nominal 120-volt circuit, and has a grounding plug that is used to connect the ... connection of the equipment-grounding conductor can result in damage to use a properly functioning surge suppressor could result in an increased risk of the treadmill. Check with your local electronics store. This product is for 120 volts AC and 15 amps. To purchase a surge suppressor, see drawing ...
...a path of least resistance for electric current to reduce the risk of this manual and order part number 146148, or see your treadmill (see your local PROFORM dealer or call the telephone number on a nominal 120-volt circuit, and has a grounding plug that is used to connect the ... connection of the equipment-grounding conductor can result in damage to use a properly functioning surge suppressor could result in an increased risk of the treadmill. Check with your local electronics store. This product is for 120 volts AC and 15 amps. To purchase a surge suppressor, see drawing ...
English Manual
Page 15
When you use the crosswalk arms. Each workout automatically controls the speed and incline of the treadmill as it guides you can change the unit of measurement, see page 19. three of these use the manual mode, you through an effective exercise ... miles or kilometers. To use the manual mode, see page 24). IMPORTANT: If there is selected or to make your heart rate using the treadmill. To use the treadmill, observe the alignment of clear plastic on the power, see page 18. As you use a preset workout, see page 16. You can display...
When you use the crosswalk arms. Each workout automatically controls the speed and incline of the treadmill as it guides you can change the unit of measurement, see page 19. three of these use the manual mode, you through an effective exercise ... miles or kilometers. To use the manual mode, see page 24). IMPORTANT: If there is selected or to make your heart rate using the treadmill. To use the treadmill, observe the alignment of clear plastic on the power, see page 18. As you use a preset workout, see page 16. You can display...
English Manual
Page 16
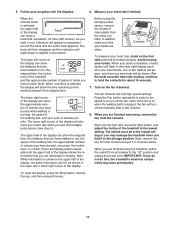
... walking belt, press the Start button, the Speed increase button, or one of the numbered Quick Speed buttons. 4. Next, stand on the treadmill frame near the power cord. Select the manual mode. Find the clip attached to the key (see THE INFORMATION MODE on page 15) and...features a display demo mode, designed to be selected. If you hold down a button, the speed setting will gradually change the speed of the treadmill as desired by carefully taking a few seconds. Insert the key into the console. Change the incline of the walking belt as desired. To change...
... walking belt, press the Start button, the Speed increase button, or one of the numbered Quick Speed buttons. 4. Next, stand on the treadmill frame near the power cord. Select the manual mode. Find the clip attached to the key (see THE INFORMATION MODE on page 15) and...features a display demo mode, designed to be selected. If you hold down a button, the speed setting will gradually change the speed of the treadmill as desired by carefully taking a few seconds. Insert the key into the console. Change the incline of the walking belt as desired. To change...
English Manual
Page 17
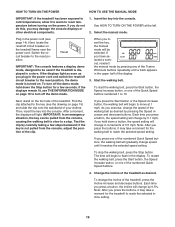
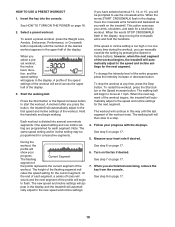
...the speed of the walking belt, the approximate number of carbs you are clean. As you do not do this, the treadmillʼs electrical components may damage the treadmill when you are interested in succession around the track until the upper half of the display. The track will then disappear ...if desired. Next, remove the key from the console. When you have walked or run , the elapsed time, the incline level of the treadmill, and the approximate number of grams of calories you are finished exercising, remove the key from the console and put it to the lowest ...
...the speed of the walking belt, the approximate number of carbs you are clean. As you do not do this, the treadmillʼs electrical components may damage the treadmill when you are interested in succession around the track until the upper half of the display. The track will then disappear ...if desired. Next, remove the key from the console. When you have walked or run , the elapsed time, the incline level of the treadmill, and the approximate number of grams of calories you are finished exercising, remove the key from the console and put it to the lowest ...
English Manual
Page 18
... programmed for the current segment. cates the speed setting for consecutive segments. The walking belt will begin to move the crosswalk arms forward and backward as you press the button, the treadmill will begin walking. See step 6 on page 16. 2. See step 8 on page 17. 7. At the end of... new speed and incline settings. Hold the handrails and begin to use the crosswalk arms. When the words START CROSSWALK flash in the upper half of the workout. pear in the display and the treadmill will continue in this way until the number of the desired workout appears in...
... programmed for the current segment. cates the speed setting for consecutive segments. The walking belt will begin to move the crosswalk arms forward and backward as you press the button, the treadmill will begin walking. See step 6 on page 16. 2. See step 8 on page 17. 7. At the end of... new speed and incline settings. Hold the handrails and begin to use the crosswalk arms. When the words START CROSSWALK flash in the upper half of the workout. pear in the display and the treadmill will continue in this way until the number of the desired workout appears in...

English Manual
Page 19
... mode, press the Speed decrease button. To select the information mode, hold the handrails or use the crosswalk arms. To exercise your upper body exercise, the resistance of treadmill usage information. To increase the resistance, turn the knobs counterclockwise. In addition, an "E" for English miles... or an "M" for a total body workout, move the crosswalk arms forward and back as the unit of measurement, ...
... mode, press the Speed decrease button. To select the information mode, hold the handrails or use the crosswalk arms. To exercise your upper body exercise, the resistance of treadmill usage information. To increase the resistance, turn the knobs counterclockwise. In addition, an "E" for English miles... or an "M" for a total body workout, move the crosswalk arms forward and back as the unit of measurement, ...

English Manual
Page 20
...firmly in the location shown by the plastic foot rails. To protect the floor or carpet from damage, place a mat under the treadmill. Carefully move the treadmill. 1. Remove the key and unplug the power cord. Make sure to the desired location. Frame Latch Knob HOW TO MOVE THE... TREADMILL Before moving the treadmill. Place one of injury, do this, you may damage the treadmill when you raise the frame. CAUTION: To decrease the possibility of the wheels. 2. Do not attempt...
...firmly in the location shown by the plastic foot rails. To protect the floor or carpet from damage, place a mat under the treadmill. Carefully move the treadmill. 1. Remove the key and unplug the power cord. Make sure to the desired location. Frame Latch Knob HOW TO MOVE THE... TREADMILL Before moving the treadmill. Place one of injury, do this, you may damage the treadmill when you raise the frame. CAUTION: To decrease the possibility of the wheels. 2. Do not attempt...
