
User Manual
Page 1
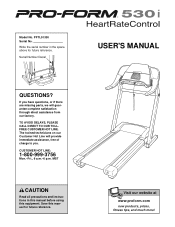
... QUESTIONS? CUSTOMER HOT LINE: 1-800-999-3756 Mon.-Fri., 6 a.m.-6 p.m. Visit our website at www.proform.com new products, prizes, fitness tips, and much more! If you . Model No. PFTL51330 Serial No. MST CAUTION Read all precautions and instructions in the space above for future reference. The trained technicians on our Customer Hot...
... QUESTIONS? CUSTOMER HOT LINE: 1-800-999-3756 Mon.-Fri., 6 a.m.-6 p.m. Visit our website at www.proform.com new products, prizes, fitness tips, and much more! If you . Model No. PFTL51330 Serial No. MST CAUTION Read all precautions and instructions in the space above for future reference. The trained technicians on our Customer Hot...
User Manual
Page 4
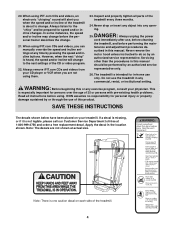
...to do so by an authorized service representative only. 26. Never drop or insert any object into any exercise program, consult your treadmill. SAVE THESE INSTRUCTIONS The decals shown below have been placed on each side of the CD or video program. 22. 20. When using them.... on your physician. tenance and adjustment procedures de- scribed in the location shown. Never remove the motor hood unless instructed to the next settings of the treadmill. 4 ICON assumes no responsibility for speed and/or incline changes. Apply the decal in this or any opening. Note...
...to do so by an authorized service representative only. 26. Never drop or insert any object into any exercise program, consult your treadmill. SAVE THESE INSTRUCTIONS The decals shown below have been placed on each side of the CD or video program. 22. 20. When using them.... on your physician. tenance and adjustment procedures de- scribed in the location shown. Never remove the motor hood unless instructed to the next settings of the treadmill. 4 ICON assumes no responsibility for speed and/or incline changes. Apply the decal in this or any opening. Note...

User Manual
Page 6
... the drawings below. Make sure that there are packaged in the upper end of the packing materials until instructed to the right side of the treadmill walking belt is a normal condition and does not affect treadmill performance. Do not dispose of the Right Upright. This is coated with high-performance lubricant. Be careful... end 82 of the Right Upright, and pull the Wire Harness out of the Right Upright (see if the part has been preattached. Set the treadmill in a cleared area and remove all packing materials.
... the drawings below. Make sure that there are packaged in the upper end of the packing materials until instructed to the right side of the treadmill walking belt is a normal condition and does not affect treadmill performance. Do not dispose of the Right Upright. This is coated with high-performance lubricant. Be careful... end 82 of the Right Upright, and pull the Wire Harness out of the Right Upright (see if the part has been preattached. Set the treadmill in a cleared area and remove all packing materials.
User Manual
Page 13
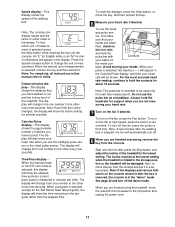
... time. Step onto the foot rails, press the Stop button, and adjust the incline of the treadmill to be damaged. Press the Speed increase button to miles. Note: For simplicity, all instructions in this display will show your heart rate will show the time remaining in minutes per mile)....8 When you have walked or run and the incline level of measurement. When you have burned. The display will change the unit of the treadmill. The display will change from one number to the other every few minutes after the key is removed, the console is selected, this manual ...
... time. Step onto the foot rails, press the Stop button, and adjust the incline of the treadmill to be damaged. Press the Speed increase button to miles. Note: For simplicity, all instructions in this display will show your heart rate will show the time remaining in minutes per mile)....8 When you have walked or run and the incline level of measurement. When you have burned. The display will change the unit of the treadmill. The display will change from one number to the other every few minutes after the key is removed, the console is selected, this manual ...

User Manual
Page 16
... If you select. Then, press the Enter button. 5 Enter a maximum speed. When the desired setting is determined by subtracting your age from 220. See the instructions included with the chest pulse sensor. 2 Insert the key fully into the console. See HOW TO TURN ON THE POWER on the optional chest pulse...
... If you select. Then, press the Enter button. 5 Enter a maximum speed. When the desired setting is determined by subtracting your age from 220. See the instructions included with the chest pulse sensor. 2 Insert the key fully into the console. See HOW TO TURN ON THE POWER on the optional chest pulse...

User Manual
Page 17
...for each time the console compares your heart rate to the current target heart rate, the speed and/or incline of the program (see the instructions included with the optional chest pulse sensor. If your heart rate is not detected during the program, you are finished exercising, remove the key... from the console. If the speed reaches the maximum speed setting of the treadmill may automatically decrease until the last segment ends. If the speed or incline setting is still too far below or above the target heart ...
...for each time the console compares your heart rate to the current target heart rate, the speed and/or incline of the program (see the instructions included with the optional chest pulse sensor. If your heart rate is not detected during the program, you are finished exercising, remove the key... from the console. If the speed reaches the maximum speed setting of the treadmill may automatically decrease until the last segment ends. If the speed or incline setting is still too far below or above the target heart ...
User Manual
Page 18
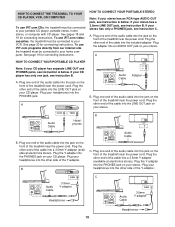
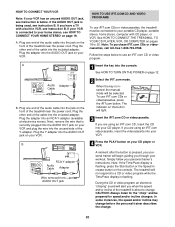
... LEFT Adapter B. Plug your CD player. See pages 18 and 19 for connecting instructions. See page 19 for connecting instructions. If your stereo. A. Plug one end of the audio cable into the other side of the treadmill near the power cord. Plug the Y-adapter into the PHONES jack on your headphones...of the cable into the PHONES jack. A HOW TO CONNECT YOUR PORTABLE CD PLAYER Note: If your stereo has only a PHONES jack, see instruction A below . Plug the other end of the treadmill near the power cord. If your CD player has separate LINE OUT and PHONES jacks, see...
... LEFT Adapter B. Plug your CD player. See pages 18 and 19 for connecting instructions. See page 19 for connecting instructions. If your stereo. A. Plug one end of the audio cable into the other side of the treadmill near the power cord. Plug the Y-adapter into the PHONES jack on your headphones...of the cable into the PHONES jack. A HOW TO CONNECT YOUR PORTABLE CD PLAYER Note: If your stereo has only a PHONES jack, see instruction A below . Plug the other end of the treadmill near the power cord. If your CD player has separate LINE OUT and PHONES jacks, see...

User Manual
Page 19
... into an RCA Y-adapter (available at electronics stores). Next, remove the wire that is being used, see instruction B. Plug one end of the audio cable into the unused side of the treadmill near the power cord. If the LINE OUT jack is currently plugged into the LINE OUT jack on your... STEREO Note: If your computer. Plug one end of the audio cable into the jack on your stereo has an unused LINE OUT jack, see instruction A. Plug the other end of the cable into a 3.5mm Y-adapter (available at electronics stores). A LINE OUT Audio Cable Audio Adapter Cable B. Plug the ...
... into an RCA Y-adapter (available at electronics stores). Next, remove the wire that is being used, see instruction B. Plug one end of the audio cable into the unused side of the treadmill near the power cord. If the LINE OUT jack is currently plugged into the LINE OUT jack on your... STEREO Note: If your computer. Plug one end of the audio cable into the jack on your stereo has an unused LINE OUT jack, see instruction A. Plug the other end of the cable into a 3.5mm Y-adapter (available at electronics stores). A LINE OUT Audio Cable Audio Adapter Cable B. Plug the ...
User Manual
Page 20
... TO USE IFIT.COM CD AND VIDEO PROGRAMS To use iFIT.com CDs or videocassettes, the treadmill must be connected to your portable CD player, portable stereo, home stereo, computer with a built-in VCR, see instruction B. If you are using an iFIT.com videocassette, insert the videocassette into an RCA Y-adapter (...735-0768. A moment after the button is flashing. Note: If the Time/Pace display is connected to 20. A. When the key is being used, see instruction B. If you have a TV with CD player, or VCR. Plug the Y-adapter into the AUDIO OUT jack on the console. The indicator on page 12...
... TO USE IFIT.COM CD AND VIDEO PROGRAMS To use iFIT.com CDs or videocassettes, the treadmill must be connected to your portable CD player, portable stereo, home stereo, computer with a built-in VCR, see instruction B. If you are using an iFIT.com videocassette, insert the videocassette into an RCA Y-adapter (...735-0768. A moment after the button is flashing. Note: If the Time/Pace display is connected to 20. A. When the key is being used, see instruction B. If you have a TV with CD player, or VCR. Plug the Y-adapter into the AUDIO OUT jack on the console. The indicator on page 12...
User Manual
Page 22
...for using a program. 6 Follow the on the console. Note: If the speed or incline of the treadmill does not change when a "chirp" is heard, make sure that the audio cable is properly connected, ....com indicator is lit and that it is found on page 19. Read and follow the on-line instructions for speed and/or incline changes. CAUTION: Always listen for the "chirp" and be selected. To...page 12. 9 When you can manually override the settings at 1 mph. Follow the steps below to the treadmill and stand on the foot pads. See step 5 on -screen countdown ends, the program will begin and the...
...for using a program. 6 Follow the on the console. Note: If the speed or incline of the treadmill does not change when a "chirp" is heard, make sure that the audio cable is properly connected, ....com indicator is lit and that it is found on page 19. Read and follow the on-line instructions for speed and/or incline changes. CAUTION: Always listen for the "chirp" and be selected. To...page 12. 9 When you can manually override the settings at 1 mph. Follow the steps below to the treadmill and stand on the foot pads. See step 5 on -screen countdown ends, the program will begin and the...

User Manual
Page 26
...is fully inserted into a properly grounded outlet (see 1. Remove the key from the console and UNPLUG THE a POWER CORD. Important: The treadmill is not compatible with at 1-800-999-3756, Monday through Friday, 6 a.m. If the breaker protrudes as shown. above). PROBLEM: The... (see page 10). until 6 p.m. PROBLEM: The displays of the specifications described on SOLUTION: a. TROUBLESHOOTING Most treadmill problems can be solved by following the instructions below. If the circuit breaker has tripped, wait for five minutes and then press the breaker back in . ...
...is fully inserted into a properly grounded outlet (see 1. Remove the key from the console and UNPLUG THE a POWER CORD. Important: The treadmill is not compatible with at 1-800-999-3756, Monday through Friday, 6 a.m. If the breaker protrudes as shown. above). PROBLEM: The... (see page 10). until 6 p.m. PROBLEM: The displays of the specifications described on SOLUTION: a. TROUBLESHOOTING Most treadmill problems can be solved by following the instructions below. If the circuit breaker has tripped, wait for five minutes and then press the breaker back in . ...

