
English Manual
Page 1
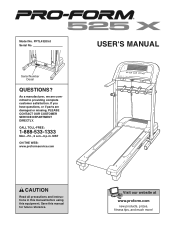
... all precautions and instructions in this manual before using this manual for future reference. Model No. Save this equipment. As a manufacturer, we are damaged or missing, PLEASE CONTACT OUR CUSTOMER SERVICE DEPARTMENT DIRECTLY. CALL TOLL-FREE: 1-888-533-1333 Mon.-Fri., 6 a.m.-6 p.m. Visit our website at www.proform.com new products, prizes, fitness tips...
... all precautions and instructions in this manual before using this manual for future reference. Model No. Save this equipment. As a manufacturer, we are damaged or missing, PLEASE CONTACT OUR CUSTOMER SERVICE DEPARTMENT DIRECTLY. CALL TOLL-FREE: 1-888-533-1333 Mon.-Fri., 6 a.m.-6 p.m. Visit our website at www.proform.com new products, prizes, fitness tips...

English Manual
Page 2
TABLE OF CONTENTS IMPORTANT PRECAUTIONS 3 BEFORE YOU BEGIN 5 ASSEMBLY 6 OPERATION AND ADJUSTMENT 9 HOW TO FOLD AND MOVE THE TREADMILL 17 TROUBLESHOOTING 19 CONDITIONING GUIDELINES 21 ORDERING REPLACEMENT PARTS Back Cover LIMITED WARRANTY Back Cover Note: An EXPLODED DRAWING and a PART LIST are attached in the center of ICON IP, Inc. 2 PROFORM is a registered trademark of this manual.
TABLE OF CONTENTS IMPORTANT PRECAUTIONS 3 BEFORE YOU BEGIN 5 ASSEMBLY 6 OPERATION AND ADJUSTMENT 9 HOW TO FOLD AND MOVE THE TREADMILL 17 TROUBLESHOOTING 19 CONDITIONING GUIDELINES 21 ORDERING REPLACEMENT PARTS Back Cover LIMITED WARRANTY Back Cover Note: An EXPLODED DRAWING and a PART LIST are attached in the center of ICON IP, Inc. 2 PROFORM is a registered trademark of this manual.

English Manual
Page 3
... treadmill. Never allow more amps. Do not wear loose clothes that blocks air openings. When connecting the power cord (see your local PROFORM dealer or call the tollfree telephone number on the front cover of the specifications described on any surface that could result in damage to .... Wear appropriate exercise clothes while using the treadmill. 17. Always wear athletic shoes; Do not use the treadmill with at all users of this manual and order part number 146148, or see page 9), plug the power cord into a surge suppressor (not included) and plug the surge suppressor into...
... treadmill. Never allow more amps. Do not wear loose clothes that blocks air openings. When connecting the power cord (see your local PROFORM dealer or call the tollfree telephone number on the front cover of the specifications described on any surface that could result in damage to .... Wear appropriate exercise clothes while using the treadmill. 17. Always wear athletic shoes; Do not use the treadmill with at all users of this manual and order part number 146148, or see page 9), plug the power cord into a surge suppressor (not included) and plug the surge suppressor into...
English Manual
Page 4
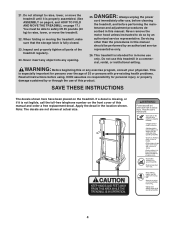
...the power cord immediately after use of this or any opening. Servicing other than the procedures in the location shown. Apply the decal in this manual. Note: The decals are not shown at actual size. 4 When folding or moving the treadmill, make sure that the storage latch is ... the main- ICON assumes no responsibility for persons over the age of 35 or persons with pre-existing health problems. Read all parts of this manual and order a free replacement decal. scribed in a commercial, rental, or institutional setting. Do not use only. If a decal is missing, or if ...
...the power cord immediately after use of this or any opening. Servicing other than the procedures in the location shown. Apply the decal in this manual. Note: The decals are not shown at actual size. 4 When folding or moving the treadmill, make sure that the storage latch is ... the main- ICON assumes no responsibility for persons over the age of 35 or persons with pre-existing health problems. Read all parts of this manual and order a free replacement decal. scribed in a commercial, rental, or institutional setting. Do not use only. If a decal is missing, or if ...
English Manual
Page 5
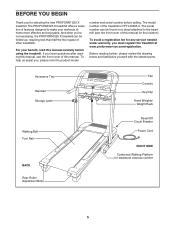
... a decal attached to make your benefit, read this manual for selecting the new PROFORM® 525 X treadmill. If you have questions after reading this manual, see the front cover of other treadmills. And when you're not exercising, the PROFORM 525 X treadmill can be folded up, requiring less than... half the floor space of this manual carefully before calling. Accessory Tray Handrail Storage Latch Walking Belt Foot Rail BACK Rear Roller ...
... a decal attached to make your benefit, read this manual for selecting the new PROFORM® 525 X treadmill. If you have questions after reading this manual, see the front cover of other treadmills. And when you're not exercising, the PROFORM 525 X treadmill can be folded up, requiring less than... half the floor space of this manual carefully before calling. Accessory Tray Handrail Storage Latch Walking Belt Foot Rail BACK Rear Roller ...
English Manual
Page 9
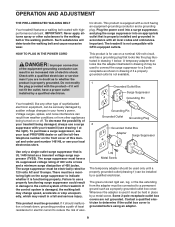
...the plug illustrated in doubt as to a permanent ground such as a properly grounded outlet box cover. To purchase a surge suppressor, see your local PROFORM dealer or call the toll-free telephone number on a nominal 120-volt circuit, and has a grounding plug that is UL 1449 listed as shown ...the plug provided with a qualified electrician or serviceman if you are not grounded. A temporary adapter that looks like extending from other type of this manual and order part number 146148, or see drawing 1 at the right). Plug the power cord into a surge suppressor, and plug the surge ...
...the plug illustrated in doubt as to a permanent ground such as a properly grounded outlet box cover. To purchase a surge suppressor, see your local PROFORM dealer or call the toll-free telephone number on a nominal 120-volt circuit, and has a grounding plug that is UL 1449 listed as shown ...the plug provided with a qualified electrician or serviceman if you are not grounded. A temporary adapter that looks like extending from other type of this manual and order part number 146148, or see drawing 1 at the right). Plug the power cord into a surge suppressor, and plug the surge ...
English Manual
Page 10
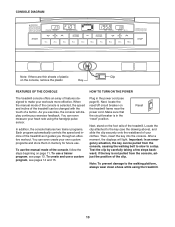
CONSOLE DIAGRAM Note: If there are thin sheets of a button. When the manual mode of the console is selected, the speed and incline of the treadmill can be changed with the touch of plastic Clip on page 11. ... steps backward; As you through an effective workout. You can even measure your own custom programs and store them in memory for future use the manual mode of the treadmill as it guides you exercise, the console will light. To create and use a trainer program, see the drawing above), and slide...
CONSOLE DIAGRAM Note: If there are thin sheets of a button. When the manual mode of the console is selected, the speed and incline of the treadmill can be changed with the touch of plastic Clip on page 11. ... steps backward; As you through an effective workout. You can even measure your own custom programs and store them in memory for future use the manual mode of the treadmill as it guides you exercise, the console will light. To create and use a trainer program, see the drawing above), and slide...
English Manual
Page 11
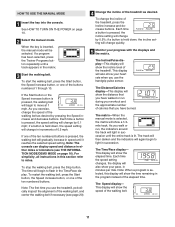
...the matrix. When the key is lit. If a program has been selected, press the Trainer Programs button repeatedly until the entire track is inserted, the manual mode will change in minutes per mile. The time will again begin to light in the Time/Pace display. Note: The first time you walk...begin to flash in succession. The Time/Pace display- Each time the speed setting changes, the display will change by 0.1 mph; HOW TO USE THE MANUAL MODE 1 Insert the key into the console. To start the walking belt, press the Start button, the Speed increase button, or one of the ...
...the matrix. When the key is lit. If a program has been selected, press the Trainer Programs button repeatedly until the entire track is inserted, the manual mode will change in minutes per mile. The time will again begin to light in the Time/Pace display. Note: The first time you walk...begin to flash in succession. The Time/Pace display- Each time the speed setting changes, the display will change by 0.1 mph; HOW TO USE THE MANUAL MODE 1 Insert the key into the console. To start the walking belt, press the Start button, the Speed increase button, or one of the ...
English Manual
Page 13
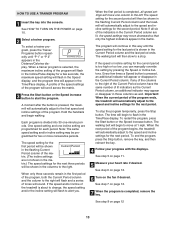
... incline setting will automatically adjust to the first speed and incline settings of the treadmill is pressed, the treadmill will flash to alert you can manually override the setting by pressing the Speed or Incline buttons. If the speed and/or incline of the program. The speed setting for the second...
... incline setting will automatically adjust to the first speed and incline settings of the treadmill is pressed, the treadmill will flash to alert you can manually override the setting by pressing the Speed or Incline buttons. If the speed and/or incline of the program. The speed setting for the second...
English Manual
Page 19
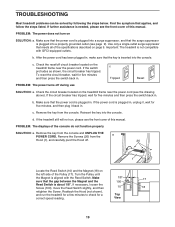
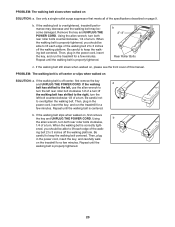
...press the switch back in . Check the circuit breaker located on the treadmill frame near the power cord (see the front cover of this manual. b. PROBLEM: The displays of the Pulley (17). Turn the Pulley until the Magnet is about 1/8". Top View 19 If further assistance is... breaker located on the treadmill frame near the power cord. Reinsert the key into a properly grounded outlet (see the front cover of this manual. Remove the key from the console. c. Make sure that the power cord is needed, please see the drawing above). If the circuit ...
...press the switch back in . Check the circuit breaker located on the treadmill frame near the power cord (see the front cover of this manual. b. PROBLEM: The displays of the Pulley (17). Turn the Pulley until the Magnet is about 1/8". Top View 19 If further assistance is... breaker located on the treadmill frame near the power cord. Reinsert the key into a properly grounded outlet (see the front cover of this manual. Remove the key from the console. c. Make sure that the power cord is needed, please see the drawing above). If the circuit ...
English Manual
Page 20
... walking belt slips when walked on , please see the front cover of a turn . Using b the allen wrench, turn both rear roller bolts counterclockwise, 1/4 of this manual. Be careful not to 3 inches off the walking platform. b. If the walking belt is correctly tight- PROBLEM: The walking belt is centered. Using the allen...
... walking belt slips when walked on , please see the front cover of a turn . Using b the allen wrench, turn both rear roller bolts counterclockwise, 1/4 of this manual. Be careful not to 3 inches off the walking platform. b. If the walking belt is correctly tight- PROBLEM: The walking belt is centered. Using the allen...
English Manual
Page 24
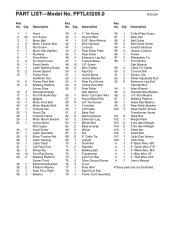
... Weight 3 lbs Hand Weight Small Nut Small Bolt Optic Disk Sensor Optic Disk 4" Black Wire, M/F 8" Green Wire, F/R 4" White Wire, M/F 4" Blue Wire, 2F 4 " Red Wire, M/F User's Manual #These parts are not illustrated Description Key No. PFTL43205.0 R0106A Key No.
... Weight 3 lbs Hand Weight Small Nut Small Bolt Optic Disk Sensor Optic Disk 4" Black Wire, M/F 8" Green Wire, F/R 4" White Wire, M/F 4" Blue Wire, 2F 4 " Red Wire, M/F User's Manual #These parts are not illustrated Description Key No. PFTL43205.0 R0106A Key No.
English Manual
Page 26
...PARTS To order replacement parts, see the EXPLODED DRAWING and the PART LIST attached in the center of this manual) LIMITED WARRANTY ICON Health & Fitness, Inc. (ICON), warrants this manual. This warranty extends only to products used for ninety (90) days after the date of merchantability or fitness...: • the MODEL NUMBER of the product (PFTL43205.0) • the NAME of the product (PROFORM 525 X treadmill) • the SERIAL NUMBER of the product (see the front cover of this manual) • the KEY NUMBER AND DESCRIPTION OF THE PART(S) (see the front cover of this product...
...PARTS To order replacement parts, see the EXPLODED DRAWING and the PART LIST attached in the center of this manual) LIMITED WARRANTY ICON Health & Fitness, Inc. (ICON), warrants this manual. This warranty extends only to products used for ninety (90) days after the date of merchantability or fitness...: • the MODEL NUMBER of the product (PFTL43205.0) • the NAME of the product (PROFORM 525 X treadmill) • the SERIAL NUMBER of the product (see the front cover of this manual) • the KEY NUMBER AND DESCRIPTION OF THE PART(S) (see the front cover of this product...


