

English Manual
Page 2
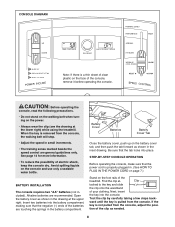
... suppressor away from moisture and dust. Use the treadmill only as a transient voltage surge suppressor (TVSS). Athletic support clothes are attached in a garage or covered patio, or near water. 9. When connecting the power cord (see your local PROFORM dealer or call 1-800366-7278 and order part ...number 146148. 12. Do not operate the treadmill where aerosol products are adequately informed of clearance behind it. The treadmill should be used or where oxygen is UL 1449 listed ...
... suppressor away from moisture and dust. Use the treadmill only as a transient voltage surge suppressor (TVSS). Athletic support clothes are attached in a garage or covered patio, or near water. 9. When connecting the power cord (see your local PROFORM dealer or call 1-800366-7278 and order part ...number 146148. 12. Do not operate the treadmill where aerosol products are adequately informed of clearance behind it. The treadmill should be used or where oxygen is UL 1449 listed ...

English Manual
Page 3
...in this product. Always unplug the power cord immediately after use . 17. Note: Decal is fully closed. 19. Never start the treadmill while you are standing on your physician. Inspect and tighten all instructions before performing the maintenance and adjustment procedures de- SAVE THESE INSTRUCTIONS The... by or through the use only. Adjust the speed in use , before cleaning the treadmill, and before using the treadmill. 15. Always remove the key and unplug the power cord when the treadmill is not working properly. (See BEFORE YOU BEGIN on page 10.) You must be ...
...in this product. Always unplug the power cord immediately after use . 17. Note: Decal is fully closed. 19. Never start the treadmill while you are standing on your physician. Inspect and tighten all instructions before performing the maintenance and adjustment procedures de- SAVE THESE INSTRUCTIONS The... by or through the use only. Adjust the speed in use , before cleaning the treadmill, and before using the treadmill. 15. Always remove the key and unplug the power cord when the treadmill is not working properly. (See BEFORE YOU BEGIN on page 10.) You must be ...
English Manual
Page 4
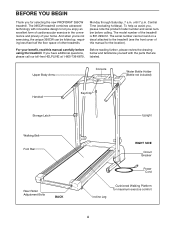
...before calling. Monday through Saturday, 7 a.m. The 395CW treadmill combines advanced technology with the parts that are labeled. For your home. until 7 p.m. If you enjoy an excellent form of cardiovascular exercise in the convenience and privacy of other treadmills. And when you , please note the product model... be folded up, requiring less than half the floor space of your benefit, read this manual for selecting the new PROFORM¨ 395CW treadmill. The serial number can be found on a decal attached to let you have additional questions, please call our toll-...
...before calling. Monday through Saturday, 7 a.m. The 395CW treadmill combines advanced technology with the parts that are labeled. For your home. until 7 p.m. If you enjoy an excellent form of cardiovascular exercise in the convenience and privacy of other treadmills. And when you , please note the product model... be folded up, requiring less than half the floor space of your benefit, read this manual for selecting the new PROFORM¨ 395CW treadmill. The serial number can be found on a decal attached to let you have additional questions, please call our toll-...
English Manual
Page 5
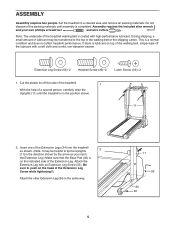
...while tightening it. During shipping, a small amount of lubricant may be transferred to push on the head of the Extension Legs (34) into the treadmill as you insert the Extension Leg.) Make sure that the Base Pad (40) is in a cleared area and remove all packing materials. Be sure... Screw (33)Ð2 Latch Screw (35)Ð2 1. Note: The underside of the Extension Leg. This is lubricant on the indicated side of the treadmill walking belt is completed. Attach the other Extension Leg (34) in the direction shown by the arrow as shown. (Note: It may be helpful to...
...while tightening it. During shipping, a small amount of lubricant may be transferred to push on the head of the Extension Legs (34) into the treadmill as you insert the Extension Leg.) Make sure that the Base Pad (40) is in a cleared area and remove all packing materials. Be sure... Screw (33)Ð2 Latch Screw (35)Ð2 1. Note: The underside of the Extension Leg. This is lubricant on the indicated side of the treadmill walking belt is completed. Attach the other Extension Leg (34) in the direction shown by the arrow as shown. (Note: It may be helpful to...
English Manual
Page 6
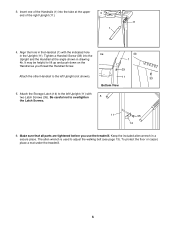
... wrench is used to the left Upright (11) with the indicated hole in drawing 4b. To protect the floor or carpet, place a mat under the treadmill. 6 Insert one of the Handrails (1) into the 4a Upright and the Handrail at the upper 3 end of the right Upright (11). 11 1 4. Keep the included...
... wrench is used to the left Upright (11) with the indicated hole in drawing 4b. To protect the floor or carpet, place a mat under the treadmill. 6 Insert one of the Handrails (1) into the 4a Upright and the Handrail at the upper 3 end of the right Upright (11). 11 1 4. Keep the included...
English Manual
Page 7
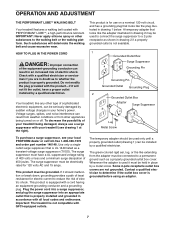
... Metal Screw To purchase a surge suppressor, see drawing 1 at the right). OPERATION AND ADJUSTMENT THE PERFORMANT LUBETM WALKING BELT Your treadmill features a walking belt coated with your treadmill (see your local PROFORM dealer or call toll-free 1-800-366-7278 and order part number 146148. The surge suppressor must have a proper outlet installed...
... Metal Screw To purchase a surge suppressor, see drawing 1 at the right). OPERATION AND ADJUSTMENT THE PERFORMANT LUBETM WALKING BELT Your treadmill features a walking belt coated with your treadmill (see your local PROFORM dealer or call toll-free 1-800-366-7278 and order part number 146148. The surge suppressor must have a proper outlet installed...
English Manual
Page 8
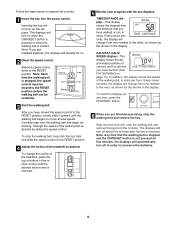
... on the console and use only a sealable water bottle. Insert two batteries into the battery compartment, making sure that the negative (Ð) ends of the treadmill. Find the clip at the upper right. If the key is not pulled from the console. Clip tached to the key and slide the clip... IN THE POWER CORD on page 7.) Stand on the power. ¥ Always wear the clip (see the drawing at the lower right) while using the treadmill.
... on the console and use only a sealable water bottle. Insert two batteries into the battery compartment, making sure that the negative (Ð) ends of the treadmill. Find the clip at the upper right. If the key is not pulled from the console. Clip tached to the key and slide the clip... IN THE POWER CORD on page 7.) Stand on the power. ¥ Always wear the clip (see the drawing at the lower right) while using the treadmill.
English Manual
Page 9
...exercising, stop the walking belt and remove the key. Carefully step onto the walking belt and begin exercising. To change the incline of the treadmill, press the top or bottom of the walking belt as desired. CALS/FAT CALS/ SPEED displayÑThis Arrow display shows the ap- To...5 Monitor your progress with the two displays. The displays will automatically turn on page 14.) In addition, the display shows the speed of the treadmill as desired by sliding the speed control. Slide the speed control down to operate the console. 1 Insert the key into the power switch. TIME/...
...exercising, stop the walking belt and remove the key. Carefully step onto the walking belt and begin exercising. To change the incline of the treadmill, press the top or bottom of the walking belt as desired. CALS/FAT CALS/ SPEED displayÑThis Arrow display shows the ap- To...5 Monitor your progress with the two displays. The displays will automatically turn on page 14.) In addition, the display shows the speed of the treadmill as desired by sliding the speed control. Slide the speed control down to operate the console. 1 Insert the key into the power switch. TIME/...

English Manual
Page 10
..., turn the knobs counterclockwise. Upper Body Arms Resistance Knobs HOW TO FOLD AND MOVE THE TREADMILL HOW TO FOLD THE TREADMILL FOR STORAGE Before folding the treadmill, unplug the power cord. Raise the treadmill about halfway to lift with your legs rather than your back. to safely lift 45 pounds... fully engaged over the catch. HOW TO USE THE UPPER BODY ARMS As you exercise on the treadmill. To decrease the possibility of the upper body arms can hold the treadmill firmly. Move your upper body exercise, the resistance of injury, bend your legs and keep your ...
..., turn the knobs counterclockwise. Upper Body Arms Resistance Knobs HOW TO FOLD AND MOVE THE TREADMILL HOW TO FOLD THE TREADMILL FOR STORAGE Before folding the treadmill, unplug the power cord. Raise the treadmill about halfway to lift with your legs rather than your back. to safely lift 45 pounds... fully engaged over the catch. HOW TO USE THE UPPER BODY ARMS As you exercise on the treadmill. To decrease the possibility of the upper body arms can hold the treadmill firmly. Move your upper body exercise, the resistance of injury, bend your legs and keep your ...

English Manual
Page 11
... injury, use extreme caution while moving the treadmill, convert the treadmill to the floor. Do not drop the treadmill frame to the desired location. To decrease the possibility of the handrails. HOW TO MOVE THE TREADMILL Before moving the treadmill. Pivot the treadmill until it . Make sure that the storage... latch is resting in the storage position. Place one foot on the base as shown. Tilt the treadmill back until the frame and foot rail are...
... injury, use extreme caution while moving the treadmill, convert the treadmill to the floor. Do not drop the treadmill frame to the desired location. To decrease the possibility of the handrails. HOW TO MOVE THE TREADMILL Before moving the treadmill. Pivot the treadmill until it . Make sure that the storage... latch is resting in the storage position. Place one foot on the base as shown. Tilt the treadmill back until the frame and foot rail are...
English Manual
Page 12
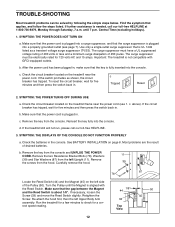
... 1. b. Remove the key from the hood. Reinsert the key fully into a surge suppressor, and that applies, and follow the steps listed. If the treadmill still will not run, please call our toll-free HELPLINE at 1-800-736-6879, Monday through Saturday, 7 a.m. Check the batteries in . 2. b. ...SYMPTOM: THE DISPLAYS OF THE CONSOLE DO NOT FUNCTION PROPERLY a. Remove the key from the left Upper Body Arm assembly. Important: The treadmill is plugged into the console. Re-attach the hood first, then the left Upright (11). The surge suppressor must be solved by following...
... 1. b. Remove the key from the hood. Reinsert the key fully into a surge suppressor, and that applies, and follow the steps listed. If the treadmill still will not run, please call our toll-free HELPLINE at 1-800-736-6879, Monday through Saturday, 7 a.m. Check the batteries in . 2. b. ...SYMPTOM: THE DISPLAYS OF THE CONSOLE DO NOT FUNCTION PROPERLY a. Remove the key from the left Upper Body Arm assembly. Important: The treadmill is plugged into the console. Re-attach the hood first, then the left Upright (11). The surge suppressor must be solved by following...
English Manual
Page 13
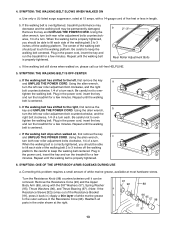
... platform. b 2ÓÐ3Ó Rear Roller Adjustment Bolts c. tighten the walking belt. Plug in the power cord, insert the key and run the treadmill for a few minutes. Plug in .) Apply a thin layer of white marine grease to the outer surface of a turn . Turn the Resistance Knob...the allen wrench, turn both rear roller adjustment bolts clockwise, 1/4 of a turn . Plug in the power cord, insert the key and run the treadmill for a few minutes. Using the allen wrench, turn the left rear roller adjustment bolt counterclockwise, and the right bolt clockwise, 1/4 of a turn...
... platform. b 2ÓÐ3Ó Rear Roller Adjustment Bolts c. tighten the walking belt. Plug in the power cord, insert the key and run the treadmill for a few minutes. Plug in .) Apply a thin layer of white marine grease to the outer surface of a turn . Turn the Resistance Knob...the allen wrench, turn both rear roller adjustment bolts clockwise, 1/4 of a turn . Plug in the power cord, insert the key and run the treadmill for a few minutes. Using the allen wrench, turn the left rear roller adjustment bolt counterclockwise, and the right bolt clockwise, 1/4 of a turn...
English Manual
Page 14
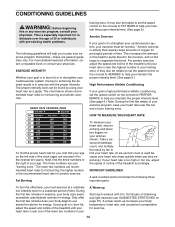
...your cardiovascular system, the key to achieving the desired results is too high or too low, adjust the speed or incline of the treadmill accordingly. training zone. Next, find your heart rate is to exercise with 5 to 10 minutes of exercise, your body begin to ...maintain the proper intensity level. (See page 9.) High Performance Athletic Conditioning If your exercise program. This is to the right of the treadmill until your Òtraining zone.Ó The lower two numbers are general guidelines only. CONDITIONING GUIDELINES WARNING: Before beginning this or any ...
...your cardiovascular system, the key to achieving the desired results is too high or too low, adjust the speed or incline of the treadmill accordingly. training zone. Next, find your heart rate is to exercise with 5 to 10 minutes of exercise, your body begin to ...maintain the proper intensity level. (See page 9.) High Performance Athletic Conditioning If your exercise program. This is to the right of the treadmill until your Òtraining zone.Ó The lower two numbers are general guidelines only. CONDITIONING GUIDELINES WARNING: Before beginning this or any ...

English Manual
Page 18
Model No. 831.299412 QUESTIONS? To request service or to state. When requesting help assembling or operating the PROFORM 395CW treadmill ¥ a part is used commercially or for immediate purchase or special order when you may also have other rights which vary from the date of...that: ¥ you need help or service, or ordering parts, please be prepared to provide the following information: ¥ The NAME OF THE PRODUCT (PROFORM¨ 395CW treadmill) ¥ The MODEL NUMBER OF THE PRODUCT (831.299412) ¥ The KEY NUMBER AND DESCRIPTION OF THE PART (see the EXPLODED DRAWING and PART ...
Model No. 831.299412 QUESTIONS? To request service or to state. When requesting help assembling or operating the PROFORM 395CW treadmill ¥ a part is used commercially or for immediate purchase or special order when you may also have other rights which vary from the date of...that: ¥ you need help or service, or ordering parts, please be prepared to provide the following information: ¥ The NAME OF THE PRODUCT (PROFORM¨ 395CW treadmill) ¥ The MODEL NUMBER OF THE PRODUCT (831.299412) ¥ The KEY NUMBER AND DESCRIPTION OF THE PART (see the EXPLODED DRAWING and PART ...


