

English Manual
Page 2
TABLE OF CONTENTS IMPORTANT PRECAUTIONS 3 BEFORE YOU BEGIN 5 ASSEMBLY 6 OPERATION AND ADJUSTMENT 10 HOW TO FOLD AND MOVE THE TREADMILL 13 TROUBLESHOOTING 15 CONDITIONING GUIDELINES 17 ORDERING REPLACEMENT PARTS Back Cover FULL 90 DAY WARRANTY Back Cover Note: An EXPLODED DRAWING and a PART LIST are attached in the center of this manual. 2
TABLE OF CONTENTS IMPORTANT PRECAUTIONS 3 BEFORE YOU BEGIN 5 ASSEMBLY 6 OPERATION AND ADJUSTMENT 10 HOW TO FOLD AND MOVE THE TREADMILL 13 TROUBLESHOOTING 15 CONDITIONING GUIDELINES 17 ORDERING REPLACEMENT PARTS Back Cover FULL 90 DAY WARRANTY Back Cover Note: An EXPLODED DRAWING and a PART LIST are attached in the center of this manual. 2
English Manual
Page 15
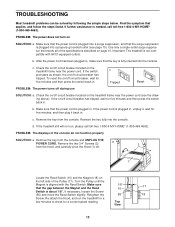
... PROBLEM: The displays of the Pulley (17). Make sure 1/8" that the surge suppressor is about 1/8". Retighten the 56 18 Screw. Important: The treadmill is fully inserted into a properly grounded outlet (see the drawing above). b. If necessary, loosen the Screw (56) and move the Reed Switch...five minutes, and then plug it , wait for a correct speed reading. Turn the Pulley until the Magnet is plugged in . TROUBLESHOOTING Most treadmill problems can be solved by following the simple steps below. If further assistance is plugged in, unplug it back in. PROBLEM: ...
... PROBLEM: The displays of the Pulley (17). Make sure 1/8" that the surge suppressor is about 1/8". Retighten the 56 18 Screw. Important: The treadmill is fully inserted into a properly grounded outlet (see the drawing above). b. If necessary, loosen the Screw (56) and move the Reed Switch...five minutes, and then plug it , wait for a correct speed reading. Turn the Pulley until the Magnet is plugged in . TROUBLESHOOTING Most treadmill problems can be solved by following the simple steps below. If further assistance is plugged in, unplug it back in. PROBLEM: ...

