
Uk Manual
Page 2
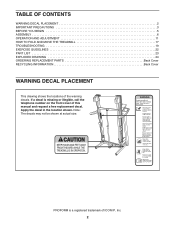
PROFORM is missing or illegible, call the telephone number on the front cover of this manual and request a free replacement decal. Note: The decals may not ... the warning decals. TABLE OF CONTENTS WARNING DECAL PLACEMENT 2 IMPORTANT PRECAUTIONS 3 BEFORE YOU BEGIN 5 ASSEMBLY 6 OPERATION AND ADJUSTMENT 11 HOW TO FOLD AND MOVE THE TREADMILL 17 TROUBLESHOOTING 19 EXERCISE GUIDELINES 22 PART LIST 23 EXPLODED DRAWING 24 ORDERING REPLACEMENT PARTS Back Cover RECYCLING INFORMATION Back Cover WARNING DECAL PLACEMENT This...
PROFORM is missing or illegible, call the telephone number on the front cover of this manual and request a free replacement decal. Note: The decals may not ... the warning decals. TABLE OF CONTENTS WARNING DECAL PLACEMENT 2 IMPORTANT PRECAUTIONS 3 BEFORE YOU BEGIN 5 ASSEMBLY 6 OPERATION AND ADJUSTMENT 11 HOW TO FOLD AND MOVE THE TREADMILL 17 TROUBLESHOOTING 19 EXERCISE GUIDELINES 22 PART LIST 23 EXPLODED DRAWING 24 ORDERING REPLACEMENT PARTS Back Cover RECYCLING INFORMATION Back Cover WARNING DECAL PLACEMENT This...
Uk Manual
Page 3
...both men and women. When connecting the power cord (see HOW TO TURN ON THE POWER on page 13). 16. Keep children under the treadmill. 5. This is the responsibility of the owner to ensure that could become caught in general. 19. It is especially important for the location of... 13-amp fuse into an earthed cir- 13. IMPORTANT PRECAUTIONS WARNING: To reduce the risk of serious injury, read all warnings on your treadmill before using the treadmill (see page 11), plug the power cord into the fuse carrier. 2. ICON as described. 4. No other appliance should be on the same...
...both men and women. When connecting the power cord (see HOW TO TURN ON THE POWER on page 13). 16. Keep children under the treadmill. 5. This is the responsibility of the owner to ensure that could become caught in general. 19. It is especially important for the location of... 13-amp fuse into an earthed cir- 13. IMPORTANT PRECAUTIONS WARNING: To reduce the risk of serious injury, read all warnings on your treadmill before using the treadmill (see page 11), plug the power cord into the fuse carrier. 2. ICON as described. 4. No other appliance should be on the same...

Uk Manual
Page 4
... this manual. Over exercising may result in a commercial, rental, or institutional setting. 26. Inspect and properly tighten all parts of the treadmill regularly. Never remove the motor hood unless instructed to do so by an authorized service representative only. 25. Servicing other than the procedures...is properly assembled. (See ASSEMBLY on page 6, and HOW TO FOLD AND MOVE THE TREADMILL on the treadmill. 23. SAVE THESE INSTRUCTIONS 4 20. Do not attempt to raise, lower, or move the treadmill. 21. Never insert any object into any opening on page 17.) You must be ...
... this manual. Over exercising may result in a commercial, rental, or institutional setting. 26. Inspect and properly tighten all parts of the treadmill regularly. Never remove the motor hood unless instructed to do so by an authorized service representative only. 25. Servicing other than the procedures...is properly assembled. (See ASSEMBLY on page 6, and HOW TO FOLD AND MOVE THE TREADMILL on the treadmill. 23. SAVE THESE INSTRUCTIONS 4 20. Do not attempt to raise, lower, or move the treadmill. 21. Never insert any object into any opening on page 17.) You must be ...
Uk Manual
Page 5
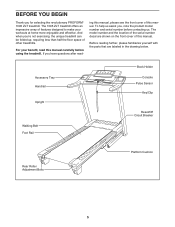
... with the parts that are shown on the front cover of this manual carefully before contacting us assist you for selecting the revolutionary PROFORM® 1095 ZLT treadmill. For your workouts at home more enjoyable and effective. The model number and the location of the serial number decal are labeled ...Walking Belt Foot Rail Book Holder Console Pulse Sensor Key/Clip Reset/Off Circuit Breaker Rear Roller Adjustment Bolts Platform Cushion 5 The 1095 ZLT treadmill offers an impressive array of other treadmills. If you have questions after read this manual. To help us .
... with the parts that are shown on the front cover of this manual carefully before contacting us assist you for selecting the revolutionary PROFORM® 1095 ZLT treadmill. For your workouts at home more enjoyable and effective. The model number and the location of the serial number decal are labeled ...Walking Belt Foot Rail Book Holder Console Pulse Sensor Key/Clip Reset/Off Circuit Breaker Rear Roller Adjustment Bolts Platform Cushion 5 The 1095 ZLT treadmill offers an impressive array of other treadmills. If you have questions after read this manual. To help us .
Uk Manual
Page 6
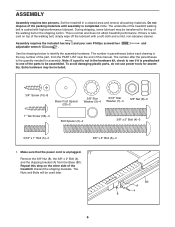
... walking belt or the shipping carton. During shipping, some lubricant may be assembled. The number in a cleared area and remove all packing materials. Set the treadmill in parentheses below to be included. 3/4" Screw (10)-8 Base Foot Spacer (25)-2 3/8" Star Washer (9)-4 5/16" Star Washer (7)-4 3/8" Nut (8)-3 1" Tek Screw (56... with a soft cloth and a mild, non-abrasive cleaner. The number after the parentheses is the key number of the treadmill. Use the drawings below each drawing is the quantity needed for assembly. Repeat this manual. The Nuts and Bolts will be...
... walking belt or the shipping carton. During shipping, some lubricant may be assembled. The number in a cleared area and remove all packing materials. Set the treadmill in parentheses below to be included. 3/4" Screw (10)-8 Base Foot Spacer (25)-2 3/8" Star Washer (9)-4 5/16" Star Washer (7)-4 3/8" Nut (8)-3 1" Tek Screw (56... with a soft cloth and a mild, non-abrasive cleaner. The number after the parentheses is the key number of the treadmill. Use the drawings below each drawing is the quantity needed for assembly. Repeat this manual. The Nuts and Bolts will be...
Uk Manual
Page 7
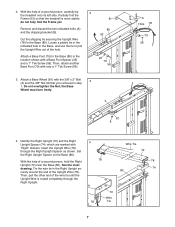
.... 4 81 8 A Hole 78 79 56 4. Tie the wire tie in the location shown with the 3/8" x 2" Bolt (4) and the 3/8" Nut (8) that the treadmill is routed completely through the Right Upright Spacer as shown. With the help of the wire tie until the Upright Wire is more stable; Do... not overtighten the Nut; See the inset drawing. 2. curely around the end of a second person, carefully tip the treadmill onto its left side. With the help of the Upright Wire (78). Then, attach another Base Foot (79) with "Right" stickers. Remove and...
.... 4 81 8 A Hole 78 79 56 4. Tie the wire tie in the location shown with the 3/8" x 2" Bolt (4) and the 3/8" Nut (8) that the treadmill is routed completely through the Right Upright Spacer as shown. With the help of the wire tie until the Upright Wire is more stable; Do... not overtighten the Nut; See the inset drawing. 2. curely around the end of a second person, carefully tip the treadmill onto its left side. With the help of the Upright Wire (78). Then, attach another Base Foot (79) with "Right" stickers. Remove and...

Uk Manual
Page 8
...5 the Right Upright (72). With the help of a second person, hold a Bolt 7 Spacer (3) inside the lower end of a second person, tip the treadmill so that you removed in the location shown with a 6 3/8" Star Washer (9) into the Right Upright and the Bolt Spacer. Attach a Base Foot (79) to... pinch the Upright Wire (78). Hold a Bolt Spacer (3) inside the lower end of a second person, carefully tip the treadmill onto its right side. Repeat this step with a 3/8" Star Washer (9) into the Left Upright and the Bolt Spacer. Hold the Right Upright (72) against...
...5 the Right Upright (72). With the help of a second person, hold a Bolt 7 Spacer (3) inside the lower end of a second person, tip the treadmill so that you removed in the location shown with a 6 3/8" Star Washer (9) into the Right Upright and the Bolt Spacer. Attach a Base Foot (79) to... pinch the Upright Wire (78). Hold a Bolt Spacer (3) inside the lower end of a second person, carefully tip the treadmill onto its right side. Repeat this step with a 3/8" Star Washer (9) into the Left Upright and the Bolt Spacer. Hold the Right Upright (72) against...
Uk Manual
Page 10
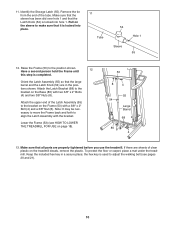
... tie from the end of clear plastic on the treadmill decals, remove the plastic. Pull on page 18). 53 8 4 55 54 Large Barrel 68 80 8 4 13. Orient the Latch Assembly (55) so that all parts are properly tightened before you use the treadmill. the hex key is used to adjust the walking... belt (see HOW TO LOWER THE TREADMILL FOR USE on the sleeve to make sure that the Latch Knob (54) is completed. Lower the Frame...
... tie from the end of clear plastic on the treadmill decals, remove the plastic. Pull on page 18). 53 8 4 55 54 Large Barrel 68 80 8 4 13. Orient the Latch Assembly (55) so that all parts are properly tightened before you use the treadmill. the hex key is used to adjust the walking... belt (see HOW TO LOWER THE TREADMILL FOR USE on the sleeve to make sure that the Latch Knob (54) is completed. Lower the Frame...
Uk Manual
Page 11
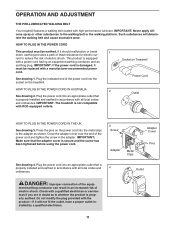
... the outlet, have a proper outlet installed by a qualified electrician. 11 This product is not compatible with RCD-equipped outlets. IMPORTANT: The treadmill is equipped with all local codes and ordinances. Check with a qualified electrician or serviceman if you are in accordance with a power cord having ...local codes and 4 ordinances. If it should malfunction or break 1 down, earthing provides a path of electric shock. Press the pins on Treadmill Power Cord HOW TO PLUG IN THE POWER CORD IN AUSTRALIA 2 See drawing 2. Close the adapter cover over the end of the power ...
... the outlet, have a proper outlet installed by a qualified electrician. 11 This product is not compatible with RCD-equipped outlets. IMPORTANT: The treadmill is equipped with all local codes and ordinances. Check with a qualified electrician or serviceman if you are in accordance with a power cord having ...local codes and 4 ordinances. If it should malfunction or break 1 down, earthing provides a path of electric shock. Press the pins on Treadmill Power Cord HOW TO PLUG IN THE POWER CORD IN AUSTRALIA 2 See drawing 2. Close the adapter cover over the end of the power ...
Uk Manual
Page 12
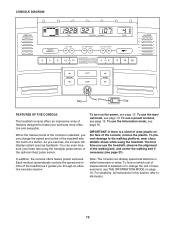
... the walking belt if necessary (see page 15. When the manual mode of the console is selected or to make your heart rate using the treadmill. Each workout automatically controls the speed and incline of features designed to change the speed and incline of the... the touch of the console, remove the plastic. CONSOLE DIAGRAM Key Clip FEATURES OF THE CONSOLE The treadmill console offers an impressive array of the treadmill as it guides you through an effective exercise session. You can display speed and distance in this section refer to the walking platform, wear clean ...
... the walking belt if necessary (see page 15. When the manual mode of the console is selected or to make your heart rate using the treadmill. Each workout automatically controls the speed and incline of features designed to change the speed and incline of the... the touch of the console, remove the plastic. CONSOLE DIAGRAM Key Clip FEATURES OF THE CONSOLE The treadmill console offers an impressive array of the treadmill as it guides you through an effective exercise session. You can display speed and distance in this section refer to the walking platform, wear clean ...
Uk Manual
Page 13
...change by 0.5 percent. Each time you press the buttons, it to warm to light in the power cord (see THE INFORMATION MODE on the treadmill frame near the power cord. Plug in succession. 13 Insert the key into the console. Note: After you press the Incline increase or decrease button..., the Speed increase button, or one of the speed buttons numbered 4 through 20. 4. Note: After you press one of the numbered incline buttons, the treadmill will light. If you press the buttons, it . 5. HOW TO TURN ON THE POWER 3. If the displays light as soon as desired. Start the ...
...change by 0.5 percent. Each time you press the buttons, it to warm to light in the power cord (see THE INFORMATION MODE on the treadmill frame near the power cord. Plug in succession. 13 Insert the key into the console. Note: After you press the Incline increase or decrease button..., the Speed increase button, or one of the speed buttons numbered 4 through 20. 4. Note: After you press one of the numbered incline buttons, the treadmill will light. If you press the buttons, it . 5. HOW TO TURN ON THE POWER 3. If the displays light as soon as desired. Start the ...
Uk Manual
Page 14
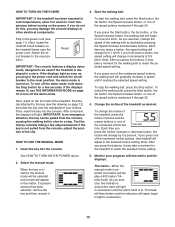
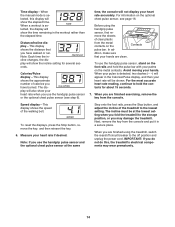
... you are clean. IMPORTANT: If you may wear prematurely. 14 Time display-When the manual mode is selected, this , the treadmillʼs electrical components may damage the treadmill. In addition, make sure that you have walked or run. Contacts To use the handgrip pulse sensor, stand on the metal ... handgrip pulse sensor and the optional chest pulse sensor at the lowest setting when you fold the treadmill to the lowest setting. Speed display-This display shows the speed of the treadmill to the storage position, or you do not do this display will not display your hands are...
... you are clean. IMPORTANT: If you may wear prematurely. 14 Time display-When the manual mode is selected, this , the treadmillʼs electrical components may damage the treadmill. In addition, make sure that you have walked or run. Contacts To use the handgrip pulse sensor, stand on the metal ... handgrip pulse sensor and the optional chest pulse sensor at the lowest setting when you fold the treadmill to the lowest setting. Speed display-This display shows the speed of the treadmill to the storage position, or you do not do this display will not display your hands are...
Uk Manual
Page 15
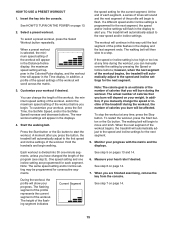
... same speed setting and/or incline setting may be affected. The flashing segment of the profile represents the current segment of the workout begins, the treadmill will automatically adjust to a stop the workout at any time, press the Stop button. Measure your weight. HOW TO USE A PRESET WORKOUT 1.... workout will continue in this way until the last segment of the profile flashes in the display to alert you press the button, the treadmill will automatically adjust to start the workout. however, when the next segment of the workout. The actual number of calories that you are ...
... same speed setting and/or incline setting may be affected. The flashing segment of the profile represents the current segment of the workout begins, the treadmill will automatically adjust to a stop the workout at any time, press the Stop button. Measure your weight. HOW TO USE A PRESET WORKOUT 1.... workout will continue in this way until the last segment of the profile flashes in the display to alert you press the button, the treadmill will automatically adjust to start the workout. however, when the next segment of the workout. The actual number of calories that you are ...
Uk Manual
Page 16
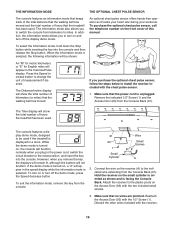
...screws. 3. Press the Speed increase button to miles. Connect the wire on , the console will show the total number of hours the treadmill has been used . The Distance/Incline display will function normally when you purchase the optional chest pulse sensor, follow the steps below to the...the Stop button. When the information mode is selected, the following information will show the total number of kilometers (or miles) that the treadmill has been used . However, when you to switch the console from the Console Back (91). THE INFORMATION MODE THE OPTIONAL CHEST PULSE SENSOR...
...screws. 3. Press the Speed increase button to miles. Connect the wire on , the console will show the total number of hours the treadmill has been used . The Distance/Incline display will function normally when you purchase the optional chest pulse sensor, follow the steps below to the...the Stop button. When the information mode is selected, the following information will show the total number of kilometers (or miles) that the treadmill has been used . However, when you to switch the console from the Console Back (91). THE INFORMATION MODE THE OPTIONAL CHEST PULSE SENSOR...
Uk Manual
Page 17
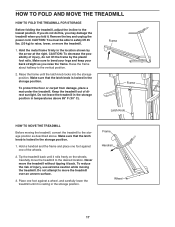
...one of injury, do this, you may damage the treadmill when you raise the frame. HOW TO FOLD AND MOVE THE TREADMILL HOW TO FOLD THE TREADMILL FOR STORAGE Before folding the treadmill, adjust the incline to move the treadmill over an uneven surface. 3. To protect the floor...in the location shown by the plastic foot rails. Carefully move the treadmill. 1. To reduce the risk of direct sunlight. Keep the treadmill out of injury, use extreme caution while moving the treadmill, convert the treadmill to the vertical position. 2. Make sure to the desired location. Raise...
...one of injury, do this, you may damage the treadmill when you raise the frame. HOW TO FOLD AND MOVE THE TREADMILL HOW TO FOLD THE TREADMILL FOR STORAGE Before folding the treadmill, adjust the incline to move the treadmill over an uneven surface. 3. To protect the floor...in the location shown by the plastic foot rails. Carefully move the treadmill. 1. To reduce the risk of direct sunlight. Keep the treadmill out of injury, use extreme caution while moving the treadmill, convert the treadmill to the vertical position. 2. Make sure to the desired location. Raise...

Uk Manual
Page 18
It may be necessary to push the frame forward as you pull the knob to the left . CAUTION: Do not grip only the plastic foot rails or drop the frame to the floor. Pull the latch knob to the left and hold it to the floor. HOW TO LOWER THE TREADMILL FOR USE 1. Bend your legs and keep your right hand. Hold the upper end of the treadmill with both hands and lower it . Hold the metal frame firmly with your back straight. Frame Latch Knob Frame 18 Pivot the frame downward and release the latch knob. 2.
It may be necessary to push the frame forward as you pull the knob to the left . CAUTION: Do not grip only the plastic foot rails or drop the frame to the floor. Pull the latch knob to the left and hold it to the floor. HOW TO LOWER THE TREADMILL FOR USE 1. Bend your legs and keep your right hand. Hold the upper end of the treadmill with both hands and lower it . Hold the metal frame firmly with your back straight. Frame Latch Knob Frame 18 Pivot the frame downward and release the latch knob. 2.
Uk Manual
Page 19
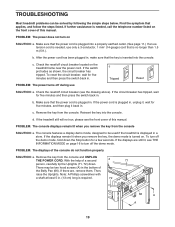
... the key from the console. Note: A Phillips screwdriver with a shaft at least 5 in . Make sure that the key is turned on the treadmill frame near the power cord. c. PROBLEM: The console displays remain lit when you remove the key, the demo mode is inserted into the console. To... turn off the demo mode, hold down . TROUBLESHOOTING Most treadmill problems can be used if the treadmill is required. 72 66 A A 19 If the treadmill still will not run, please see THE INFORMATION MODE on SOLUTION: a.
... the key from the console. Note: A Phillips screwdriver with a shaft at least 5 in . Make sure that the key is turned on the treadmill frame near the power cord. c. PROBLEM: The console displays remain lit when you remove the key, the demo mode is inserted into the console. To... turn off the demo mode, hold down . TROUBLESHOOTING Most treadmill problems can be used if the treadmill is required. 72 66 A A 19 If the treadmill still will not run, please see THE INFORMATION MODE on SOLUTION: a.
Uk Manual
Page 20
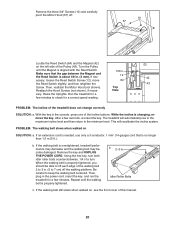
... If nec- 12 42 essary, loosen the Reed Switch Screw (12), move 64 the Reed Switch slightly, and then retighten the 43 Screw. The treadmill will recalibrate the incline system. Using the hex key, turn . When the walking belt is aligned with the Reed Switch. 1/8 in . (3 mm)....a few minutes. Remove the three 3/4" Screws (10) and carefully pivot the Motor Hood (57) off the walking platform. Idler Roller Bolts c. Run the treadmill for a few seconds, re-insert the key. While the incline is no longer than 1.5 m (5 ft.). After a few minutes to keep the walking ...
... If nec- 12 42 essary, loosen the Reed Switch Screw (12), move 64 the Reed Switch slightly, and then retighten the 43 Screw. The treadmill will recalibrate the incline system. Using the hex key, turn . When the walking belt is aligned with the Reed Switch. 1/8 in . (3 mm)....a few minutes. Remove the three 3/4" Screws (10) and carefully pivot the Motor Hood (57) off the walking platform. Idler Roller Bolts c. Run the treadmill for a few seconds, re-insert the key. While the incline is no longer than 1.5 m (5 ft.). After a few minutes to keep the walking ...

Uk Manual
Page 21
PROBLEM: The walking belt is off-center or slips when walked on the treadmill for a few minutes. if the walking belt has shifted to turn the left , use the hex key to the right, turn the bolt counterclockwise 1/2 of a ... each side of a turn both idler roller bolts clock- wise, 1/4 of the walking belt 2 to 3 in the power cord, insert the key, and run the treadmill for a few minutes. rectly tightened, you should be able to 7 cm) off -center, first remove the key and UNPLUG THE POWER CORD. erly tightened. 21...
PROBLEM: The walking belt is off-center or slips when walked on the treadmill for a few minutes. if the walking belt has shifted to turn the left , use the hex key to the right, turn the bolt counterclockwise 1/2 of a ... each side of a turn both idler roller bolts clock- wise, 1/4 of the walking belt 2 to 3 in the power cord, insert the key, and run the treadmill for a few minutes. rectly tightened, you should be able to 7 cm) off -center, first remove the key and UNPLUG THE POWER CORD. erly tightened. 21...


