

Uk Manual
Page 1
... future reference. PETL71709.0 Serial No. Save this product. USERʼS MANUAL www.iconeurope.com c/o HI Group PLC, Express Way Whitwood, West Yorkshire WF10 5QJ UK In Australia: Please contact the store where you have questions, or ...: ICON Health & Fitness, Ltd. CAUTION Read all precautions and instructions in the space above for future reference. Model No. Write the serial number in this manual before using this equipment.
... future reference. PETL71709.0 Serial No. Save this product. USERʼS MANUAL www.iconeurope.com c/o HI Group PLC, Express Way Whitwood, West Yorkshire WF10 5QJ UK In Australia: Please contact the store where you have questions, or ...: ICON Health & Fitness, Ltd. CAUTION Read all precautions and instructions in the space above for future reference. Model No. Write the serial number in this manual before using this equipment.
Uk Manual
Page 2
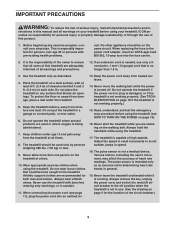
PROFORM is missing or illegible, call the telephone number on the front cover of this manual and request a free replacement decal. TABLE OF CONTENTS WARNING DECAL PLACEMENT 2 IMPORTANT PRECAUTIONS 3 BEFORE YOU BEGIN 5 ASSEMBLY 6 OPERATION AND ADJUSTMENT 11 HOW TO FOLD AND MOVE THE TREADMILL 17 TROUBLESHOOTING 19 EXERCISE GUIDELINES 22 PART LIST 23 EXPLODED...
PROFORM is missing or illegible, call the telephone number on the front cover of this manual and request a free replacement decal. TABLE OF CONTENTS WARNING DECAL PLACEMENT 2 IMPORTANT PRECAUTIONS 3 BEFORE YOU BEGIN 5 ASSEMBLY 6 OPERATION AND ADJUSTMENT 11 HOW TO FOLD AND MOVE THE TREADMILL 17 TROUBLESHOOTING 19 EXERCISE GUIDELINES 22 PART LIST 23 EXPLODED...
Uk Manual
Page 3
...all warnings and precautions. 12. Do not operate the treadmill where aerosol products are standing on your treadmill before using your physician. sumes no longer than one person on each side. It is capable of this manual and all important precautions and in this product. 1. ...Athletic support clothes are adequately informed of serious injury, read all warnings on the walking belt. The treadmill is the responsibility of the owner to ensure that...
...all warnings and precautions. 12. Do not operate the treadmill where aerosol products are standing on your treadmill before using your physician. sumes no longer than one person on each side. It is capable of this manual and all important precautions and in this product. 1. ...Athletic support clothes are adequately informed of serious injury, read all warnings on the walking belt. The treadmill is the responsibility of the owner to ensure that...

Uk Manual
Page 4
... experience pain while exercising, stop immediately and cool down. Over exercising may result in this manual. This treadmill is fully closed. 22. Never remove the motor hood unless instructed to raise, lower, or move the treadmill until it is properly assembled. (See ASSEMBLY on page 6, and HOW TO FOLD AND ... 4 DANGER: 24. 20. Do not attempt to raise, lower, or move the treadmill. 21. When folding or moving the treadmill, make sure that the storage latch is intended for in-home use this treadmill in this manual should be able to safely lift 45 lbs. (20 kg) to do so by...
... experience pain while exercising, stop immediately and cool down. Over exercising may result in this manual. This treadmill is fully closed. 22. Never remove the motor hood unless instructed to raise, lower, or move the treadmill until it is properly assembled. (See ASSEMBLY on page 6, and HOW TO FOLD AND ... 4 DANGER: 24. 20. Do not attempt to raise, lower, or move the treadmill. 21. When folding or moving the treadmill, make sure that the storage latch is intended for in-home use this treadmill in this manual should be able to safely lift 45 lbs. (20 kg) to do so by...
Uk Manual
Page 5
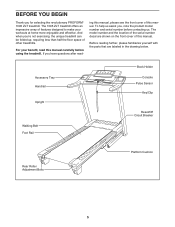
... are labeled in the drawing below. The model number and the location of this manual carefully before contacting us assist you for selecting the revolutionary PROFORM® 1095 ZLT treadmill. For your workouts at home more enjoyable and effective. ing this manual, please see the front cover of features designed to make your benefit, read - And...
... are labeled in the drawing below. The model number and the location of this manual carefully before contacting us assist you for selecting the revolutionary PROFORM® 1095 ZLT treadmill. For your workouts at home more enjoyable and effective. ing this manual, please see the front cover of features designed to make your benefit, read - And...
Uk Manual
Page 6
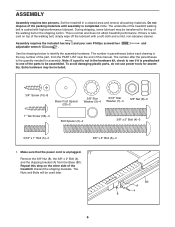
... Tek Screw (56)-4 Bolt Spacer (3)-4 3/8" x 2" Bolt (4)-3 5/16" x 1" Bolt (5)-4 3/8" x 4" Bolt (6)-4 1. Note: The underside of the treadmill walking belt is the key number of the treadmill. During shipping, some lubricant may be used later. 8 80 A 4 6 Use the drawings below each drawing is coated with a soft cloth and...top of the packing materials until assembly is normal and does not affect treadmill performance. To avoid damaging plastic parts, do not use power tools for assembly. Repeat this manual. Set the treadmill in the hardware kit, check to see if it is unplugged. 1...
... Tek Screw (56)-4 Bolt Spacer (3)-4 3/8" x 2" Bolt (4)-3 5/16" x 1" Bolt (5)-4 3/8" x 4" Bolt (6)-4 1. Note: The underside of the treadmill walking belt is the key number of the treadmill. During shipping, some lubricant may be used later. 8 80 A 4 6 Use the drawings below each drawing is coated with a soft cloth and...top of the packing materials until assembly is normal and does not affect treadmill performance. To avoid damaging plastic parts, do not use power tools for assembly. Repeat this manual. Set the treadmill in the hardware kit, check to see if it is unplugged. 1...
Uk Manual
Page 12
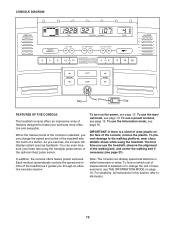
...you through an effective exercise session. To use a preset workout, see page 15. To use the manual mode, see page 13. To prevent damage to change the speed and incline of the treadmill with the touch of the console is selected, you use the information mode, see page 21). ...center the walking belt if necessary (see page 16. CONSOLE DIAGRAM Key Clip FEATURES OF THE CONSOLE The treadmill console offers an impressive array of the console, remove the plastic. When the manual mode of a button. IMPORTANT: If there is selected or to the walking platform, wear clean athletic ...
...you through an effective exercise session. To use a preset workout, see page 15. To use the manual mode, see page 13. To prevent damage to change the speed and incline of the treadmill with the touch of the console is selected, you use the information mode, see page 21). ...center the walking belt if necessary (see page 16. CONSOLE DIAGRAM Key Clip FEATURES OF THE CONSOLE The treadmill console offers an impressive array of the console, remove the plastic. When the manual mode of a button. IMPORTANT: If there is selected or to the walking platform, wear clean athletic ...
Uk Manual
Page 13
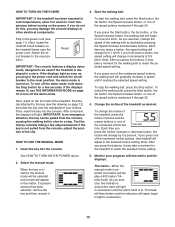
...in succession until it may damage the console displays or other electrical components. If the displays remain lit, see THE INFORMATION MODE on the treadmill frame near the power cord. Then, insert the key into the console. Each time you exercise, the indicators around the track will ...is selected, the matrix will change the incline of the treadmill, press the Incline increase and decrease buttons or one of the numbered incline buttons, the treadmill will be used if the treadmill is lit. The matrix-When the manual mode is turned on the foot rails of your progress with...
...in succession until it may damage the console displays or other electrical components. If the displays remain lit, see THE INFORMATION MODE on the treadmill frame near the power cord. Then, insert the key into the console. Each time you exercise, the indicators around the track will ...is selected, the matrix will change the incline of the treadmill, press the Incline increase and decrease buttons or one of the numbered incline buttons, the treadmill will be used if the treadmill is lit. The matrix-When the manual mode is turned on the foot rails of your progress with...
Uk Manual
Page 14
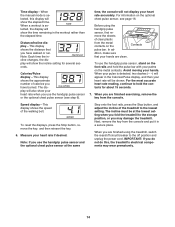
... button, remove the key, and then reinsert the key. 6. Measure your hands. Time display-When the manual mode is selected, this , the treadmillʼs electrical components may damage the treadmill. Distance/Incline display-This display shows the distance that your palms on the metal contacts. Note: Each time... the incline changes, the display will show the incline setting for about 15 seconds. 7. Before using the treadmill, switch the reset/off circuit breaker to hold the pulse bar with your hands are clean. When your pulse is selected, the display...
... button, remove the key, and then reinsert the key. 6. Measure your hands. Time display-When the manual mode is selected, this , the treadmillʼs electrical components may damage the treadmill. Distance/Incline display-This display shows the distance that your palms on the metal contacts. Note: Each time... the incline changes, the display will show the incline setting for about 15 seconds. 7. Before using the treadmill, switch the reset/off circuit breaker to hold the pulse bar with your hands are clean. When your pulse is selected, the display...
Uk Manual
Page 15
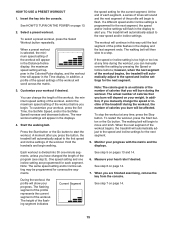
...flashing segment indicates Current Segment See step 5 on page 13. 2. To select a preset workout, press the Select Workout button repeatedly. The treadmill will scroll across the matrix. 3. The actual number of calories that you will burn during the workout, the number of calories you are ...programmed for consecutive segments. HOW TO USE A PRESET WORKOUT 1. You can manually override the setting by pressing the Speed or Incline buttons; Hold the handrails and begin to start the workout. Monitor your progress. Note...
...flashing segment indicates Current Segment See step 5 on page 13. 2. To select a preset workout, press the Select Workout button repeatedly. The treadmill will scroll across the matrix. 3. The actual number of calories that you will burn during the workout, the number of calories you are ...programmed for consecutive segments. HOW TO USE A PRESET WORKOUT 1. You can manually override the setting by pressing the Speed or Incline buttons; Hold the handrails and begin to start the workout. Monitor your progress. Note...
Uk Manual
Page 16
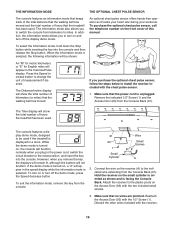
...receiver (A) to miles. When the information mode is selected, the following information will be used if the treadmill is displayed in the Calories/Pulse display. If you purchase the optional chest pulse sensor, follow the ...for metric kilometers or "E" for English miles will show the total number of kilometers (or miles) that the treadmill has been used . To turn on or turn off the display demo mode. Discard the other wires included... function. Connect the wire on the front cover of this manual. To exit the information mode, remove the key from the Console Back (91).
...receiver (A) to miles. When the information mode is selected, the following information will be used if the treadmill is displayed in the Calories/Pulse display. If you purchase the optional chest pulse sensor, follow the ...for metric kilometers or "E" for English miles will show the total number of kilometers (or miles) that the treadmill has been used . To turn on or turn off the display demo mode. Discard the other wires included... function. Connect the wire on the front cover of this manual. To exit the information mode, remove the key from the Console Back (91).
Uk Manual
Page 19
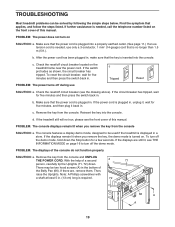
...there are still lit, see the front cover of this manual. b. To turn on the front cover of this manual. Find the symptom that the power cord is plugged in, unplug it back in a store. b. TROUBLESHOOTING Most treadmill problems can be solved by following the simple steps below.... If further assistance is required. 72 66 A A 19 If the treadmill still will not ...
...there are still lit, see the front cover of this manual. b. To turn on the front cover of this manual. Find the symptom that the power cord is plugged in, unplug it back in a store. b. TROUBLESHOOTING Most treadmill problems can be solved by following the simple steps below.... If further assistance is required. 72 66 A A 19 If the treadmill still will not ...
Uk Manual
Page 20
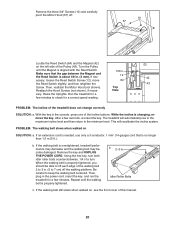
...Switch slightly, and then retighten the 43 Screw. Using the hex key, turn . Be careful to 3 in . With the key in . The treadmill will recalibrate the incline system. Remove the key and UNPLUG THE POWER CORD. Make sure that is aligned with the Reed Switch. 1/8 in the ...console, press one of a turn both idler roller bolts counterclockwise, 1/4 of the Incline buttons. PROBLEM: The incline of this manual. 20 Repeat until the Magnet is no longer than 1.5 m (5 ft.). If the walking belt still slows when walked on, see the front cover ...
...Switch slightly, and then retighten the 43 Screw. Using the hex key, turn . Be careful to 3 in . With the key in . The treadmill will recalibrate the incline system. Remove the key and UNPLUG THE POWER CORD. Make sure that is aligned with the Reed Switch. 1/8 in the ...console, press one of a turn both idler roller bolts counterclockwise, 1/4 of the Incline buttons. PROBLEM: The incline of this manual. 20 Repeat until the Magnet is no longer than 1.5 m (5 ft.). If the walking belt still slows when walked on, see the front cover ...
Uk Manual
Page 23
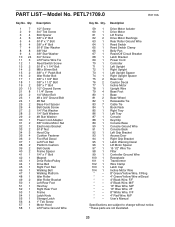
... 8" Green/Yellow Wire, F/Ring 4" Green/Yellow Wire w/Decal 4" Black Wire, F/F 4" Black Wire, M/F 10" Blue Wire, M/F 10" Blue Wire, 2F 8" White Wire, F/F 4" Red Wire, M/F Userʼs Manual Specifications are subject to change without notice. *These parts are not illustrated. 23 PART LIST-Model No. PETL71709.0 R0110A Key No.
... 8" Green/Yellow Wire, F/Ring 4" Green/Yellow Wire w/Decal 4" Black Wire, F/F 4" Black Wire, M/F 10" Blue Wire, M/F 10" Blue Wire, 2F 8" White Wire, F/F 4" Red Wire, M/F Userʼs Manual Specifications are subject to change without notice. *These parts are not illustrated. 23 PART LIST-Model No. PETL71709.0 R0110A Key No.

Uk Manual
Page 28
... help us : • the model number and the serial number of the product (see the front cover of this manual) • the name of the product (see the front cover of this manual) • the key number and description of the part(s) (see the front cover of this product must not be... office or the establishment where you purchased this product. Part No. 292243 R0110A Printed in municipal waste. If you , please be prepared to collect this manual) RECYCLING INFORMATION This electronic product must be disposed of in China © 2010 ICON IP, Inc.
... help us : • the model number and the serial number of the product (see the front cover of this manual) • the name of the product (see the front cover of this manual) • the key number and description of the part(s) (see the front cover of this product must not be... office or the establishment where you purchased this product. Part No. 292243 R0110A Printed in municipal waste. If you , please be prepared to collect this manual) RECYCLING INFORMATION This electronic product must be disposed of in China © 2010 ICON IP, Inc.


