
User Manual
Page 2
... 31 Stopping the Engine 32 Moving by Hand 33 Maintenance 34 Maintenance Schedule 34 Battery 36 Ignition System 37 Checking the Safety System 38 Checking the Engine's Cooling Air Intake ......... 39 Checking and Adjusting the Throttle Cable....... 39 Replacing the Air Filter 40 Replacing the Fuel Filter 41 Checking Tire Pressures 41 Checking the Parking Brake 41 Checking the V-belts 42 Deck belt 42 EZT belt 44 Checking the Blades 45 Adjusting the Mower Deck 46 Cleaning and Washing 50 Caster Wheels 50 Hardware 50...
... 31 Stopping the Engine 32 Moving by Hand 33 Maintenance 34 Maintenance Schedule 34 Battery 36 Ignition System 37 Checking the Safety System 38 Checking the Engine's Cooling Air Intake ......... 39 Checking and Adjusting the Throttle Cable....... 39 Replacing the Air Filter 40 Replacing the Fuel Filter 41 Checking Tire Pressures 41 Checking the Parking Brake 41 Checking the V-belts 42 Deck belt 42 EZT belt 44 Checking the Blades 45 Adjusting the Mower Deck 46 Cleaning and Washing 50 Caster Wheels 50 Hardware 50...
User Manual
Page 8
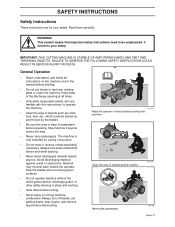
... the entire grass catcher, discharge guard, or other safety devices in place and working • Slow down and behind before and while backing. • Never direct discharged material toward the operator. Always turn off blades, set parking brake, stop engine, and remove keys before dismounting. 8011-512 Read the operator's manual before starting . • Do not put hands or feet near rotating parts or...
... the entire grass catcher, discharge guard, or other safety devices in place and working • Slow down and behind before and while backing. • Never direct discharged material toward the operator. Always turn off blades, set parking brake, stop engine, and remove keys before dismounting. 8011-512 Read the operator's manual before starting . • Do not put hands or feet near rotating parts or...
User Manual
Page 12
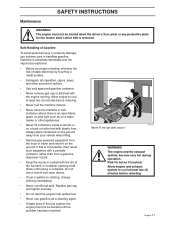
... damage, use a nozzle lock-open flame, spark, or pilot light such as a cleaning agent. • If leaks arise in handling gasoline. SAFETY INSTRUCTIONS Maintenance WARNING! Do not use extreme care in the fuel system, the engine must not be started when the driver's floor plate or any protective plate for burns if touched. Risk for the mower deck's drive belt is complete. Never fill the fuel tank indoors...
... damage, use a nozzle lock-open flame, spark, or pilot light such as a cleaning agent. • If leaks arise in handling gasoline. SAFETY INSTRUCTIONS Maintenance WARNING! Do not use extreme care in the fuel system, the engine must not be started when the driver's floor plate or any protective plate for burns if touched. Risk for the mower deck's drive belt is complete. Never fill the fuel tank indoors...
User Manual
Page 13
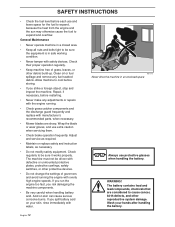
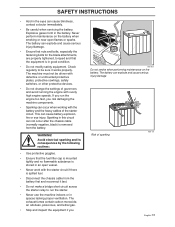
... your hands after handling the battery. Check their proper operation regularly. • Keep machine free of governors and avoid running . • Check grass catcher components and the discharge guard frequently and replace with overly high engine speeds. General Maintenance • Never operate machine in an enclosed space Always use protective glasses when handling the battery. WARNING! SAFETY INSTRUCTIONS • Check the fuel level before each use and leave space for the fuel to expand, because...
... your hands after handling the battery. Check their proper operation regularly. • Keep machine free of governors and avoid running . • Check grass catcher components and the discharge guard frequently and replace with overly high engine speeds. General Maintenance • Never operate machine in an enclosed space Always use protective glasses when handling the battery. WARNING! SAFETY INSTRUCTIONS • Check the fuel level before each use and leave space for the fuel to expand, because...
User Manual
Page 14
... not change the settings of governors and avoid running the engine with the battery and the heavy cables of sparking 8009-728 English-13 Sparking in this circuit can cause blindness, contact a doctor immediately. • Be careful when servicing the battery. If you risk damaging the machine components. • Sparking can explode and cause serious injury/damage. • Ensure that nuts and bolts...
... not change the settings of governors and avoid running the engine with the battery and the heavy cables of sparking 8009-728 English-13 Sparking in this circuit can cause blindness, contact a doctor immediately. • Be careful when servicing the battery. If you risk damaging the machine components. • Sparking can explode and cause serious injury/damage. • Ensure that nuts and bolts...
User Manual
Page 15
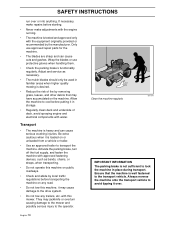
... heavy and can cause cuts and gashes. SAFETY INSTRUCTIONS run over . Adjust and service as bands, chains, or straps, when transporting. • Do not operate this machine on public roadways. • Check and abide by local traffic regulations before starting. • Never make repairs before transporting the machine on or unloaded from a vehicle or trailer. • Use an approved trailer to...
... heavy and can cause cuts and gashes. SAFETY INSTRUCTIONS run over . Adjust and service as bands, chains, or straps, when transporting. • Do not operate this machine on public roadways. • Check and abide by local traffic regulations before starting. • Never make repairs before transporting the machine on or unloaded from a vehicle or trailer. • Use an approved trailer to...
User Manual
Page 21
... weather starting. 6. Fill to cool at least two (2) minutes before storage of acids during operation. Wipe off any spilled oil or fuel. the mower blades are empty. See Storage Instructions for burns if touched. Do not store, spill or use fresh, clean winter grade gasoline to engage the mower deck, pull the knob out; The tank capacity is depressed. The engine will run until the fuel lines and carburetor are...
... weather starting. 6. Fill to cool at least two (2) minutes before storage of acids during operation. Wipe off any spilled oil or fuel. the mower blades are empty. See Storage Instructions for burns if touched. Do not store, spill or use fresh, clean winter grade gasoline to engage the mower deck, pull the knob out; The tank capacity is depressed. The engine will run until the fuel lines and carburetor are...
User Manual
Page 25
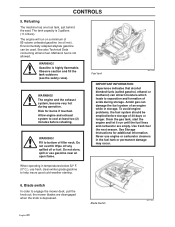
... movement of the control lever(s) on each side of the left wheel and cause the machine to start moving backwards. We suggest when first operating the mower, use a reduced throttle speed and reduced ground speed by . Pull back on control levers to the neutral position and mower should stop moving. To turn While moving in a forward direction, first pull both control levers forward slightly, this time, rotate control levers inward. To zero...
... movement of the control lever(s) on each side of the left wheel and cause the machine to start moving backwards. We suggest when first operating the mower, use a reduced throttle speed and reduced ground speed by . Pull back on control levers to the neutral position and mower should stop moving. To turn While moving in a forward direction, first pull both control levers forward slightly, this time, rotate control levers inward. To zero...
User Manual
Page 26
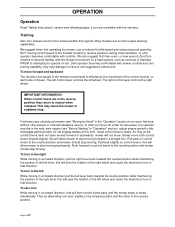
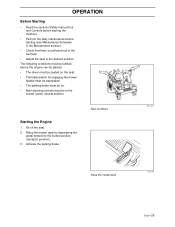
... conditions must be in the fuel tank. • Adjust the seat to the locked position (transport position). 3. Activate the parking brake. OPERATION Before Starting • Read the sections Safety Instructions and Controls before starting the machine. • Perform the daily maintenance before the engine can be started: • The driver must be seated on the seat. • The blade switch for engaging the mower blades must be depressed. • The...
... conditions must be in the fuel tank. • Adjust the seat to the locked position (transport position). 3. Activate the parking brake. OPERATION Before Starting • Read the sections Safety Instructions and Controls before starting the machine. • Perform the daily maintenance before the engine can be started: • The driver must be seated on the seat. • The blade switch for engaging the mower blades must be depressed. • The...
User Manual
Page 35
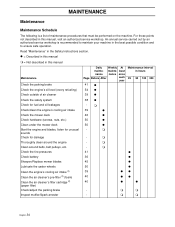
... authorized service workshop is a list of air cleaner Check the safety system Check for fuel and oil leakages Check/clean the engine's cooling air intake Check the mower deck Check hardware (screws, nuts, etc.) Clean under the mower deck Start the engine and blades, listen for unusual sounds Check for damage Thoroughly clean around the engine Clean around belts, belt pulleys, etc. least nance nance once Page Before After each year 41 z 54 z 39 z Maintenance interval in this manual Maintenance Check the parking brake Check the engine's oil level...
... authorized service workshop is a list of air cleaner Check the safety system Check for fuel and oil leakages Check/clean the engine's cooling air intake Check the mower deck Check hardware (screws, nuts, etc.) Clean under the mower deck Start the engine and blades, listen for unusual sounds Check for damage Thoroughly clean around the engine Clean around belts, belt pulleys, etc. least nance nance once Page Before After each year 41 z 54 z 39 z Maintenance interval in this manual Maintenance Check the parking brake Check the engine's oil level...
User Manual
Page 36
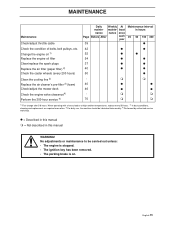
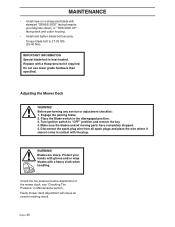
MAINTENANCE Maintenance Check/adjust throttle cable Check the condition of belts, belt pulleys, etc. Change the engine oil 1) Replace the engine oil filter Clean/replace the spark plugs Replace the air filter (paper filter) 2) Check the caster wheels (every 200 hours) Clean the cooling fins 2) Replace the air cleaner's pre-filter 2) (foam) Check/adjust the mower deck Check the engine valve clearance4) Perform the 300-hour service 4) Daily Weekly At mainte- When operating with a heavy load or at high ambient temperatures, replace every 50 hours. 2) In dusty conditions, cleaning and ...
MAINTENANCE Maintenance Check/adjust throttle cable Check the condition of belts, belt pulleys, etc. Change the engine oil 1) Replace the engine oil filter Clean/replace the spark plugs Replace the air filter (paper filter) 2) Check the caster wheels (every 200 hours) Clean the cooling fins 2) Replace the air cleaner's pre-filter 2) (foam) Check/adjust the mower deck Check the engine valve clearance4) Perform the 300-hour service 4) Daily Weekly At mainte- When operating with a heavy load or at high ambient temperatures, replace every 50 hours. 2) In dusty conditions, cleaning and ...
User Manual
Page 41
.... Saturate with a dirty air filter, the spark plug can become very hot during operation. IMPORTANT INFORMATION Do not use compressed air to cool at least two (2) minutes before starting the engine. For this area clean. Remove the foam filter (pre-cleaner). If the paper filter is still dirty, it is replaced as follows: 1. Check for build-up of air filter housing. 6. Squeeze dry in the air filter housing. 8. Remove the filter cartridge. 3. Tap...
.... Saturate with a dirty air filter, the spark plug can become very hot during operation. IMPORTANT INFORMATION Do not use compressed air to cool at least two (2) minutes before starting the engine. For this area clean. Remove the foam filter (pre-cleaner). If the paper filter is still dirty, it is replaced as follows: 1. Check for build-up of air filter housing. 6. Squeeze dry in the air filter housing. 8. Remove the filter cartridge. 3. Tap...
User Manual
Page 42
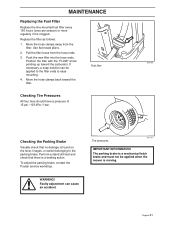
... the carburetor. WARNING! Fuel filter Checking Tire Pressures All four tires should have a pressure of 15 psi / 103 kPa /1 bar. 8009-405 Checking the Parking Brake Visually check that there is clogged. Position the filter with the "FLOW" arrow pointing up toward the filter. To adjust the parking brake, contact the Poulan service workshop. Faulty adjustment can be applied when the mower is found on the lever, linages, or switch belonging...
... the carburetor. WARNING! Fuel filter Checking Tire Pressures All four tires should have a pressure of 15 psi / 103 kPa /1 bar. 8009-405 Checking the Parking Brake Visually check that there is clogged. Position the filter with the "FLOW" arrow pointing up toward the filter. To adjust the parking brake, contact the Poulan service workshop. Faulty adjustment can be applied when the mower is found on the lever, linages, or switch belonging...

User Manual
Page 43
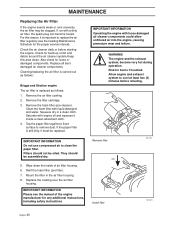
... placed in square drive hole on deck belt idler pulley by the belt guide. • Loosen screws from idler pulley. Replace belts if they begin to be removed. Idler arm is no longer felt. • Remove bolt from both left and right plastic belt shield above each mandrel housing. MAINTENANCE Checking the V-belts WARNING! Apply parking brake. • Lower the deck into the lowest cutting position • Disengage belt tension by pushing inward...
... placed in square drive hole on deck belt idler pulley by the belt guide. • Loosen screws from idler pulley. Replace belts if they begin to be removed. Idler arm is no longer felt. • Remove bolt from both left and right plastic belt shield above each mandrel housing. MAINTENANCE Checking the V-belts WARNING! Apply parking brake. • Lower the deck into the lowest cutting position • Disengage belt tension by pushing inward...
User Manual
Page 47
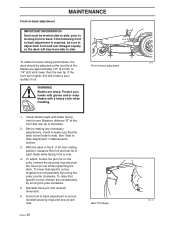
... any service or adjustment checklist: 1. Disconnect the spark plug wire from all moving parts have completely stopped. 5. Protect your hands with gloves and/or wrap blades with the plug. Engage the parking brake. 2. Blades are sharp. MAINTENANCE • Install new or re-sharpened blade with a Husqvarna bolt if required. Adjusting the Mower Deck WARNING! Place the Blade-switch in Maintenance section. Check the tire pressure before adjustment of the mower deck, see "Checking Tire Pressure" in the disengaged position. 3. Turn ignition switch...
... any service or adjustment checklist: 1. Disconnect the spark plug wire from all moving parts have completely stopped. 5. Protect your hands with gloves and/or wrap blades with the plug. Engage the parking brake. 2. Blades are sharp. MAINTENANCE • Install new or re-sharpened blade with a Husqvarna bolt if required. Adjusting the Mower Deck WARNING! Place the Blade-switch in Maintenance section. Check the tire pressure before adjustment of the mower deck, see "Checking Tire Pressure" in the disengaged position. 3. Turn ignition switch...
User Manual
Page 49
... jam nuts. Once front to back adjustment is level side-to make sure that specific corner, lengthen the rod assembly by turning the yoke clockwise. 5. If the following front to back adjustment is higher, this will stay level side to Side Adjustment" in the 4" (100 mm) cutting position, measure the front and rear tip of the blade. 2. Check blade height with a heavy cloth when handling...
... jam nuts. Once front to back adjustment is level side-to make sure that specific corner, lengthen the rod assembly by turning the yoke clockwise. 5. If the following front to back adjustment is higher, this will stay level side to Side Adjustment" in the 4" (100 mm) cutting position, measure the front and rear tip of the blade. 2. Check blade height with a heavy cloth when handling...
User Manual
Page 53
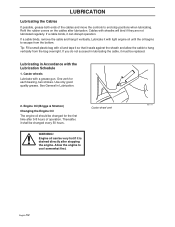
... quality grease. Engine oil can disrupt operation. If a cable binds, it shall be changed for each bearing, two strokes. Engine Oil (Briggs & Stratton) Changing the Engine Oil The engine oil should be replaced. Thereafter, it can be very hot if it must be changed every 50 hours. Castor wheel zerk 8011-717 English-52 Refit the rubber covers on the cables after 5-8 hours of the cables and move the controls...
... quality grease. Engine oil can disrupt operation. If a cable binds, it shall be changed for each bearing, two strokes. Engine Oil (Briggs & Stratton) Changing the Engine Oil The engine oil should be replaced. Thereafter, it can be very hot if it must be changed every 50 hours. Castor wheel zerk 8011-717 English-52 Refit the rubber covers on the cables after 5-8 hours of the cables and move the controls...
User Manual
Page 54
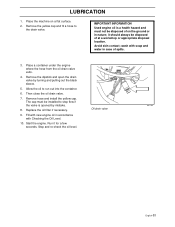
... surface. 2. Allow the oil to the drain valve. IMPORTANT INFORMATION Used engine oil is opened by turning and pulling out the black sleeve. 5. wash with Checking the Oil Level. 10. Run it should always be disposed of spills. 3. Remove hose and install the yellow cap. Start the engine. Fill with new engine oil in accordance with soap and water in nature; Replace the oil filter if necessary. 9. Stop and re-check the oil level. Place a container...
... surface. 2. Allow the oil to the drain valve. IMPORTANT INFORMATION Used engine oil is opened by turning and pulling out the black sleeve. 5. wash with Checking the Oil Level. 10. Run it should always be disposed of spills. 3. Remove hose and install the yellow cap. Start the engine. Fill with new engine oil in accordance with soap and water in nature; Replace the oil filter if necessary. 9. Stop and re-check the oil level. Place a container...

User Manual
Page 57
... blade switch is engaged. • The steering controls are loose. • Clogged fuel filter or jet. • Clogged ventilation valve on the battery terminal cable connections. • Fuse blown. • Ignition system faulty. • Fault in the starter motor safety circuit. The starter motor does not turn the engine over. • Dead battery. • Poor contacts on the fuel cap. • Fuel tank nearly empty. • Defective spark plug. • The spark plug is...
... blade switch is engaged. • The steering controls are loose. • Clogged fuel filter or jet. • Clogged ventilation valve on the battery terminal cable connections. • Fuse blown. • Ignition system faulty. • Fault in the starter motor safety circuit. The starter motor does not turn the engine over. • Dead battery. • Poor contacts on the fuel cap. • Fuel tank nearly empty. • Defective spark plug. • The spark plug is...

User Manual
Page 58
... battery terminal cable connectors. TROUBLE SHOOTING GUIDE • Wrong fuel type. • Water in the engine. • Defective spark plug. • Pre-ignition incorrect. The machine moves slowly, unevenly, or not at all. • Parking brake on. • Bypass valve on pump open. • Drive belt for the electromagnetic coupling has loosened. • The blade switch is faulty or has come off. The engine seems weak. • Clogged air filter...
... battery terminal cable connectors. TROUBLE SHOOTING GUIDE • Wrong fuel type. • Water in the engine. • Defective spark plug. • Pre-ignition incorrect. The machine moves slowly, unevenly, or not at all. • Parking brake on. • Bypass valve on pump open. • Drive belt for the electromagnetic coupling has loosened. • The blade switch is faulty or has come off. The engine seems weak. • Clogged air filter...


