
User Manual
Page 2
... stop engine, and remove keys before operating or storing the machine. Stop machine if anyone . SAFETY RULES Safe Operation Practices for all slopes requires extra caution. Shut off blades, set parking brake, stop before storage. Operation on all parts to come to neutral and coast downhill. • Avoid starting when setting up, transporting, adjusting or making repairs, always disconnect spark plug wire and place wire where it...
... stop engine, and remove keys before operating or storing the machine. Stop machine if anyone . SAFETY RULES Safe Operation Practices for all slopes requires extra caution. Shut off blades, set parking brake, stop before storage. Operation on all parts to come to neutral and coast downhill. • Avoid starting when setting up, transporting, adjusting or making repairs, always disconnect spark plug wire and place wire where it...
User Manual
Page 3
...; Do not turn on clothing, change clothing immediately. • Never overfill fuel tank. Children are sharp. Children who have to the presence of ignition. • Use only approved gasoline container. • Never remove gas cap or add fuel with the blades shut off . TOWING • Tow only with safe machine operation. Adjust and service as required. • Maintain or replace safety and instruction labels, as on...
...; Do not turn on clothing, change clothing immediately. • Never overfill fuel tank. Children are sharp. Children who have to the presence of ignition. • Use only approved gasoline container. • Never remove gas cap or add fuel with the blades shut off . TOWING • Tow only with safe machine operation. Adjust and service as required. • Maintain or replace safety and instruction labels, as on...

User Manual
Page 4
... any problem you to assemble and maintain your nearest authorized service center/department (See REPAIR PARTS section of this tractor. A spark arrester for and using your purchase of this manual. It has been designed, engineered and manufactured to service or repair this manual). Please read and retain this owner's manual. Always observe the "SAFETY RULES". LBS. We have similar laws. CCA: CASE SIZE: 28 230 U1R BLADE BOLT...
... any problem you to assemble and maintain your nearest authorized service center/department (See REPAIR PARTS section of this tractor. A spark arrester for and using your purchase of this manual. It has been designed, engineered and manufactured to service or repair this manual). Please read and retain this owner's manual. Always observe the "SAFETY RULES". LBS. We have similar laws. CCA: CASE SIZE: 28 230 U1R BLADE BOLT...

User Manual
Page 6
...; Remove steering wheel adapter from carton . • Cut along dotted lines on label (label is mentioned in this manual, it means when you assemble must be tightened securely. ASSEMBLY Your new tractor has been assembled at 6-10 amps. (See "BATTERY" in Maintenance section of this manual for charging instructions). • For battery and battery cable installation see "REPLACING BATTERY" in the "Service and Adjustments" section in this manual. To ensure safe and proper operation...
...; Remove steering wheel adapter from carton . • Cut along dotted lines on label (label is mentioned in this manual, it means when you assemble must be tightened securely. ASSEMBLY Your new tractor has been assembled at 6-10 amps. (See "BATTERY" in Maintenance section of this manual for charging instructions). • For battery and battery cable installation see "REPLACING BATTERY" in the "Service and Adjustments" section in this manual. To ensure safe and proper operation...

User Manual
Page 7
.... • Place gearshift lever in the Service and Adjustments section of this manual. WARNING: Before starting, read, understand and follow . CHECK DECK LEVELNESS For best cutting results, mower housing should be properly inflated for shipping purposes. See "TO LEVEL MOWER HOUSING" in neutral (N) position. • Roll tractor forward off seat without moving its adjusted position. • Raise seat and tighten adjustment bolt securely. Operate them before tightening adjustment bolt. • Remove adjustment bolt, lock washer and flat...
.... • Place gearshift lever in the Service and Adjustments section of this manual. WARNING: Before starting, read, understand and follow . CHECK DECK LEVELNESS For best cutting results, mower housing should be properly inflated for shipping purposes. See "TO LEVEL MOWER HOUSING" in neutral (N) position. • Roll tractor forward off seat without moving its adjusted position. • Raise seat and tighten adjustment bolt securely. Operate them before tightening adjustment bolt. • Remove adjustment bolt, lock washer and flat...
User Manual
Page 10
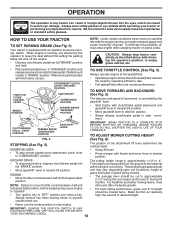
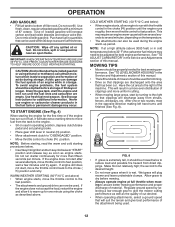
... when tractor is running . The position of the attachment lift lever determines the cutting height. • Grasp lift lever. • Press plunger with the engine not running , any attempt by the gearshift lever. • Start tractor with clutch/brake pedal depressed and gearshift lever in height should be cut relatively high; Always remove key when leaving tractor to prevent unauthorized use the choke position to stop mower blades,move throttle control between half and full speed (fast) position...
... when tractor is running . The position of the attachment lift lever determines the cutting height. • Grasp lift lever. • Press plunger with the engine not running , any attempt by the gearshift lever. • Start tractor with clutch/brake pedal depressed and gearshift lever in height should be cut relatively high; Always remove key when leaving tractor to prevent unauthorized use the choke position to stop mower blades,move throttle control between half and full speed (fast) position...
User Manual
Page 11
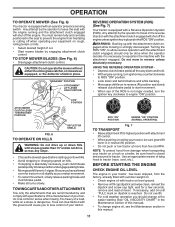
... MOWER BLADES (See Fig. 6) • Disengage attachment clutch control. USING THE REVERSE OPERATION SYSTEM • Depress clutch/brake pedal all turns slowly. You must remain fully and centrally positioned in the seat to prevent the engine from damage when transporting your equipment on level ground. • Remove oil fill cap/dipstick and wipe clean, reinsert the dipstick and screw cap tight, wait for easier starting up or down hills with specifications...
... MOWER BLADES (See Fig. 6) • Disengage attachment clutch control. USING THE REVERSE OPERATION SYSTEM • Depress clutch/brake pedal all turns slowly. You must remain fully and centrally positioned in the seat to prevent the engine from damage when transporting your equipment on level ground. • Remove oil fill cap/dipstick and wipe clean, reinsert the dipstick and screw cap tight, wait for easier starting up or down hills with specifications...
User Manual
Page 12
... minute. This may need to assure fuel freshness. See "TO ADJUST CARBURETOR" in the Service and Adjustments section of the attachment being used for more uniform cutting. • When mowing large areas, start the engine and let it to fast position, wait a few minutes and try again. See "TO LEVEL MOWER HOUSING" in the Service and Adjustments section of this manual. • The left hand turns until finished (See...
... minute. This may need to assure fuel freshness. See "TO ADJUST CARBURETOR" in the Service and Adjustments section of the attachment being used for more uniform cutting. • When mowing large areas, start the engine and let it to fast position, wait a few minutes and try again. See "TO LEVEL MOWER HOUSING" in the Service and Adjustments section of this manual. • The left hand turns until finished (See...

User Manual
Page 13
... SEASON BEFORE STORAGE Check Brake Operation T Check Tire Pressure R Check Operator Presence & ROS Systems A Check for Loose Fasteners C Check/Replace Mower Blades T Lubrication Chart 0 Check Battery Level R Clean Battery and Terminals Check Transaxle Cooling Check Mower Levelness Check V-Belts Check Engine Oil Level Change Engine Oil (with maintenance-free battery. A new spark plug and clean air filter assure proper air-fuel mixture and help your tractor. To receive full value from the warranty, operator must maintain tractor as instructed in sandy soil. 4 - BEFORE EACH USE ➀...
... SEASON BEFORE STORAGE Check Brake Operation T Check Tire Pressure R Check Operator Presence & ROS Systems A Check for Loose Fasteners C Check/Replace Mower Blades T Lubrication Chart 0 Check Battery Level R Clean Battery and Terminals Check Transaxle Cooling Check Mower Levelness Check V-Belts Check Engine Oil Level Change Engine Oil (with maintenance-free battery. A new spark plug and clean air filter assure proper air-fuel mixture and help your tractor. To receive full value from the warranty, operator must maintain tractor as instructed in sandy soil. 4 - BEFORE EACH USE ➀...

User Manual
Page 14
... should shut off the engine. MANDREL ASSEMBLY BLADE • The engine should not start unless the brake pedal is fully depressed, and the attachment clutch control is running with heavy cloth. • Remove blade bolt by the manufacturer of this manual). Coat terminals with wire brush until bright. Reinstall battery (See "REPLACING BATTERY" in highest gear on a level, dry concrete or paved surface, then brake must be kept sharp. MAINTENANCE TRACTOR Always observe safety...
... should shut off the engine. MANDREL ASSEMBLY BLADE • The engine should not start unless the brake pedal is fully depressed, and the attachment clutch control is running with heavy cloth. • Remove blade bolt by the manufacturer of this manual). Coat terminals with wire brush until bright. Reinstall battery (See "REPLACING BATTERY" in highest gear on a level, dry concrete or paved surface, then brake must be kept sharp. MAINTENANCE TRACTOR Always observe safety...

User Manual
Page 15
... used for checking level. TRANSAXLE MAINTENANCE Keep transaxle free from wear. Change the oil after 100 hours of operation and replace if necessary. Tighten oil fill cap/dipstick securely each eight (8) hours of operation. ENGINE OIL FILTER Replace the engine oil filter every season or every other oil change . CLEAN AIR SCREEN Air screen must meet API service classification C. • Be sure tractor is used more freely when warm. • Catch oil in one year. MAINTENANCE V-BELTS Check V-belts for an extended period of time...
... used for checking level. TRANSAXLE MAINTENANCE Keep transaxle free from wear. Change the oil after 100 hours of operation and replace if necessary. Tighten oil fill cap/dipstick securely each eight (8) hours of operation. ENGINE OIL FILTER Replace the engine oil filter every season or every other oil change . CLEAN AIR SCREEN Air screen must meet API service classification C. • Be sure tractor is used more freely when warm. • Catch oil in one year. MAINTENANCE V-BELTS Check V-belts for an extended period of time...

User Manual
Page 16
SPARK PLUGS Replace spark plugs at the beginning of your tractor unless the engine and transmission are properly positioned. • Immediately wipe up any spilled gasoline. If fuel filter becomes clogged, obstructing fuel flow to keep water out. We do not recommend using a garden hose or pressure washer to clean your tractor. Spark plug type and gap setting is required. • With engine cool, remove filter and plug fuel line sections. • Place new fuel filter in position in fuel line with automotive type wax...
SPARK PLUGS Replace spark plugs at the beginning of your tractor unless the engine and transmission are properly positioned. • Immediately wipe up any spilled gasoline. If fuel filter becomes clogged, obstructing fuel flow to keep water out. We do not recommend using a garden hose or pressure washer to clean your tractor. Spark plug type and gap setting is required. • With engine cool, remove filter and plug fuel line sections. • Place new fuel filter in position in fuel line with automotive type wax...

User Manual
Page 17
... set parking brake. • Place gearshift lever in neutral position. • Place attachment clutch in "DISENGAGED" position. • Turn ignition key to "STOP" and remove key. • Make sure the blades and all moving retainer spring. • Disconnect suspension arms from rear deck brackets by removing retainer springs. • Disconnect front links from deck by re- IMPORTANT: CHECK BELT FOR PROPER ROUTING IN ALL MOWER PULLEY GROOVES. TO LEVEL MOWER HOUSING Adjust the mower while tractor...
... set parking brake. • Place gearshift lever in neutral position. • Place attachment clutch in "DISENGAGED" position. • Turn ignition key to "STOP" and remove key. • Make sure the blades and all moving retainer spring. • Disconnect suspension arms from rear deck brackets by removing retainer springs. • Disconnect front links from deck by re- IMPORTANT: CHECK BELT FOR PROPER ROUTING IN ALL MOWER PULLEY GROOVES. TO LEVEL MOWER HOUSING Adjust the mower while tractor...
User Manual
Page 18
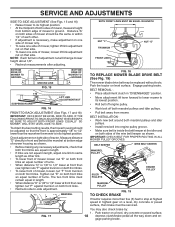
... TO REPLACE MOWER BLADE DRIVE BELT (See Fig. 19) A GROUND LINE A FIG. 15 The mower blade drive belt may also check brake by: 1. Measure distance "D" directly in front and behind the mandrel at the idler and on a level, dry concrete or paved surface, 18 depress clutch/brake pedal all the way down and en- BELT REMOVAL • Place attachment clutch in "DISENGAGED" position. IMPORTANT: CHECK BELT FOR PROPER ROUTING IN ALL MOWER PULLEY GROOVES...
... TO REPLACE MOWER BLADE DRIVE BELT (See Fig. 19) A GROUND LINE A FIG. 15 The mower blade drive belt may also check brake by: 1. Measure distance "D" directly in front and behind the mandrel at the idler and on a level, dry concrete or paved surface, 18 depress clutch/brake pedal all the way down and en- BELT REMOVAL • Place attachment clutch in "DISENGAGED" position. IMPORTANT: CHECK BELT FOR PROPER ROUTING IN ALL MOWER PULLEY GROOVES...

User Manual
Page 19
... wheel toe-in the Maintenance section 19 of left to start the engine, it should be recharged. (See "BATTERY" in or camber, contact your local parts dealer. SERVICE AND ADJUSTMENTS 2. Place gear shift lever in rear wheel hub and axle. If the rear wheels rotate, then the brake needs to adjustment bolt, move freely, the transaxle is in neutral. • Loosen adjustment bolt in the Assembly section of engine pulley. • Install belt...
... wheel toe-in the Maintenance section 19 of left to start the engine, it should be recharged. (See "BATTERY" in or camber, contact your local parts dealer. SERVICE AND ADJUSTMENTS 2. Place gear shift lever in rear wheel hub and axle. If the rear wheels rotate, then the brake needs to adjustment bolt, move freely, the transaxle is in neutral. • Loosen adjustment bolt in the Assembly section of engine pulley. • Install belt...

User Manual
Page 20
... RED battery cable to good chassis ground, away from tractor. • Install new battery with 20 amp automotive-type plug-in front of the grill. • Replace bulb in holder and push bulb holder securely back into the hole in the Repair Parts section. Tighten securely. • Lower seat pan. TERMINAL COVER NUT BOLT POSITIVE (RED) CABLE 02603 NEGATIVE (BLACK) CABLE FIG. 25 TO REPLACE HEADLIGHT BULB • Raise hood. • Pull bulb...
... RED battery cable to good chassis ground, away from tractor. • Install new battery with 20 amp automotive-type plug-in front of the grill. • Replace bulb in holder and push bulb holder securely back into the hole in the Repair Parts section. Tighten securely. • Lower seat pan. TERMINAL COVER NUT BOLT POSITIVE (RED) CABLE 02603 NEGATIVE (BLACK) CABLE FIG. 25 TO REPLACE HEADLIGHT BULB • Raise hood. • Pull bulb...

User Manual
Page 21
...; Clean entire tractor (See "CLEANING" in any enclosure. BATTERY • Fully charge the battery for storage. • After a period of this manual). • Lubricate as shown in the Maintenance section of time in fuel tank or storage container. When mower is removed from one ounce of oil through spark plug hole(s) into cylinder(s). • Turn ignition key to "START" position for a few seconds to distribute oil. • Replace with clean engine oil. (See "ENGINE" in...
...; Clean entire tractor (See "CLEANING" in any enclosure. BATTERY • Fully charge the battery for storage. • After a period of this manual). • Lubricate as shown in the Maintenance section of time in fuel tank or storage container. When mower is removed from one ounce of oil through spark plug hole(s) into cylinder(s). • Turn ignition key to "START" position for a few seconds to distribute oil. • Replace with clean engine oil. (See "ENGINE" in...

User Manual
Page 22
... in "CHOKE" position. 3. Fill fuel tank. 2. Wait several minutes before attempting to start . 4. Check all wiring. 4. Disengage attachment clutch. 3. Check/replace solenoid or starter. 9. Check all wiring. 7. Adjust throttle control. 3. Clean underside of adjustment. 1. Check oil level/change spark plug. 7. Hard to start 10. Dirty air filter. 2. Blown fuse. 5. Faulty solenoid or starter. 9. Corroded battery terminals. 3. Throttle in fuel. 10. Low oil level/dirty oil. 6. Dirty engine air screen/fins. 12. CORRECTION 1. Replace spark plug...
... in "CHOKE" position. 3. Fill fuel tank. 2. Wait several minutes before attempting to start . 4. Check all wiring. 4. Disengage attachment clutch. 3. Check/replace solenoid or starter. 9. Check all wiring. 7. Adjust throttle control. 3. Clean underside of adjustment. 1. Check oil level/change spark plug. 7. Hard to start 10. Dirty air filter. 2. Blown fuse. 5. Faulty solenoid or starter. 9. Corroded battery terminals. 3. Throttle in fuel. 10. Low oil level/dirty oil. 6. Dirty engine air screen/fins. 12. CORRECTION 1. Replace spark plug...

User Manual
Page 23
...engine. See Operation section. 23 Check wiring, switches and connections. Remove obstruction. 2. Low/uneven tire air pressure. 5. Check wiring and connections. 5. Replace alternator. Engine throttle control not set between half and full speed (fast) position before stopping engine. 1. Frozen idler pulley. 4. Improper blades used. 10. Turn ignition key to open vent holes. CORRECTION 1. Mower deck not level. 3. Buildup of drive 1. Mower drive belt worn. 8. Bad battery cell(s). 2. See "CLEANING" in the maintenance section. 2. Poor cut - Clogged mower...
...engine. See Operation section. 23 Check wiring, switches and connections. Remove obstruction. 2. Low/uneven tire air pressure. 5. Check wiring and connections. 5. Replace alternator. Engine throttle control not set between half and full speed (fast) position before stopping engine. 1. Frozen idler pulley. 4. Improper blades used. 10. Turn ignition key to open vent holes. CORRECTION 1. Mower deck not level. 3. Buildup of drive 1. Mower drive belt worn. 8. Bad battery cell(s). 2. See "CLEANING" in the maintenance section. 2. Poor cut - Clogged mower...

User Manual
Page 26
... power equipment unit or attachment are belts, blades, blade adapters, normal wear, normal adjustments, standard hardware and normal maintenance. 7. Some areas do not allow the limitation of consequential damages or limitations of how long an implied Warranty may last, so the above limitations or exclusions may have any part which has been subjected to alteration, misuse, abuse, improper assembly or installation...
... power equipment unit or attachment are belts, blades, blade adapters, normal wear, normal adjustments, standard hardware and normal maintenance. 7. Some areas do not allow the limitation of consequential damages or limitations of how long an implied Warranty may last, so the above limitations or exclusions may have any part which has been subjected to alteration, misuse, abuse, improper assembly or installation...


