
Owner Manual
Page 2
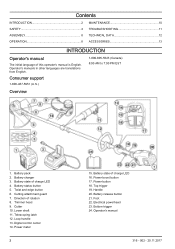
Cutting attachment guard 7. Loop handle 13. Power meter 2 15. Power button 18. Handle 20. Battery release button 21. Foot 22. Twist and edge button 6. Trimmer head 9. Cutter 10. Electrical powerhead 23. Consumer support 1-800-487-5951 (U.S.) 1-800-805-5523 (Canada) 8:00 AM to 7:00 PM EST Overview 1. Battery state of rotation 8. Lower shaft 11. Bottom trigger 24. Battery status button 5. Operator's manuals in other languages are translations from English...
Cutting attachment guard 7. Loop handle 13. Power meter 2 15. Power button 18. Handle 20. Battery release button 21. Foot 22. Twist and edge button 6. Trimmer head 9. Cutter 10. Electrical powerhead 23. Consumer support 1-800-487-5951 (U.S.) 1-800-805-5523 (Canada) 8:00 AM to 7:00 PM EST Overview 1. Battery state of rotation 8. Lower shaft 11. Bottom trigger 24. Battery status button 5. Operator's manuals in other languages are translations from English...
Owner Manual
Page 3
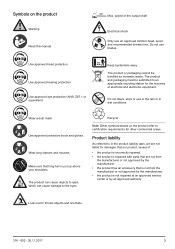
Do not leave, store or use blades. Use approved head protection Use approved hearing protection Use approved eye protection (ANSI Z87.1 or equivalent) Keep bystanders away The product or packaging cannot be submitted to an appropriate recycling station for the recovery of the output shaft Electrical shock Only use an approved trimmer head, spool and recommended trimmer line. Wear a dust mask Use approved protective boots and...
Do not leave, store or use blades. Use approved head protection Use approved hearing protection Use approved eye protection (ANSI Z87.1 or equivalent) Keep bystanders away The product or packaging cannot be submitted to an appropriate recycling station for the recovery of the output shaft Electrical shock Only use an approved trimmer head, spool and recommended trimmer line. Wear a dust mask Use approved protective boots and...
Owner Manual
Page 4
... mains-operated (corded) power tool or battery-operated (cordless) power tool. Damaged or entangled cords increase the risk of electric shock. • When operating a power tool outdoors, use a ground fault circuit interrupter (GFCI) protected supply. Do not use . Ensure the switch is earthed or grounded. • Do not expose power tools to a rotating part of the power tool may ignite the dust or fumes. • Keep children and bystanders away while operating a power tool. A wrench...
... mains-operated (corded) power tool or battery-operated (cordless) power tool. Damaged or entangled cords increase the risk of electric shock. • When operating a power tool outdoors, use a ground fault circuit interrupter (GFCI) protected supply. Do not use . Ensure the switch is earthed or grounded. • Do not expose power tools to a rotating part of the power tool may ignite the dust or fumes. • Keep children and bystanders away while operating a power tool. A wrench...
Owner Manual
Page 5
... not discard this manual. Be familiar with the controls and the correct use . Operation • Wear eye protection and stout shoes at all times while operating the machine. • Avoid using only identical replacement parts. Use the instructions for one terminal to feet and hands from the battery may affect the power tool's operation. Check for the tasks found in this manual. avoid contact. Grass trimmer safety warnings Training...
... not discard this manual. Be familiar with the controls and the correct use . Operation • Wear eye protection and stout shoes at all times while operating the machine. • Avoid using only identical replacement parts. Use the instructions for one terminal to feet and hands from the battery may affect the power tool's operation. Check for the tasks found in this manual. avoid contact. Grass trimmer safety warnings Training...

Owner Manual
Page 6
... of the instructions operate the product. • Make sure that you always monitor a person, with decreased physical capacity or mental capacity, that the cutting attachment does not turn with the motor on your waist. • Stop the motor before you are in the safety area. • Remove all situations that no persons or animals are at all times. • Lock the product...
... of the instructions operate the product. • Make sure that you always monitor a person, with decreased physical capacity or mental capacity, that the cutting attachment does not turn with the motor on your waist. • Stop the motor before you are in the safety area. • Remove all situations that no persons or animals are at all times. • Lock the product...
Owner Manual
Page 7
... product. For more motor power than what is not damaged. • Soak the grass trimmer line in operation. Keep battery packs away from the manufacturer. Damaged or changed or damaged. • Do not change or repair products or the battery pack. Shorting the battery pack terminals together can make sure of correct operation. • Do not use an approved cutting attachment guard. Examine the cutting attachment guard for damage and...
... product. For more motor power than what is not damaged. • Soak the grass trimmer line in operation. Keep battery packs away from the manufacturer. Damaged or changed or damaged. • Do not change or repair products or the battery pack. Shorting the battery pack terminals together can make sure of correct operation. • Do not use an approved cutting attachment guard. Examine the cutting attachment guard for damage and...
Owner Manual
Page 8
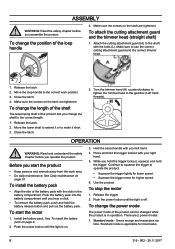
... latch. 2. Hold the assist handle with the bolts (L). To change the shaft to use the correct cutting attachment guard and the correct trimmer head. 1. Make sure the screws on the latch are 2 power modes: 1. Make sure the screws on . 3. Push the power button until you assemble the product. To change the power mode The power mode of the product lets you start the motor 1. Standard mode - Saves energy and maximizes run time.
... latch. 2. Hold the assist handle with the bolts (L). To change the shaft to use the correct cutting attachment guard and the correct trimmer head. 1. Make sure the screws on the latch are 2 power modes: 1. Make sure the screws on . 3. Push the power button until you assemble the product. To change the power mode The power mode of the product lets you start the motor 1. Standard mode - Saves energy and maximizes run time.
Owner Manual
Page 9
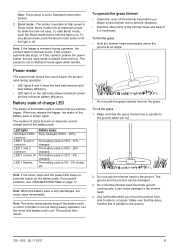
... status of the battery pack is shown until you pull the trigger. To trim the grass • Hold the trimmer head immediately above the ground at high speed in the last mode. Use full throttle when you attach a new trimmer line to Standard mode when started . To cut grass. Make sure that the grass trimmer line is 50% - 26% charged. Note: The motor automatically stops if the battery pack or motor controller is erased...
... status of the battery pack is shown until you pull the trigger. To trim the grass • Hold the trimmer head immediately above the ground at high speed in the last mode. Use full throttle when you attach a new trimmer line to Standard mode when started . To cut grass. Make sure that the grass trimmer line is 50% - 26% charged. Note: The motor automatically stops if the battery pack or motor controller is erased...
Owner Manual
Page 10
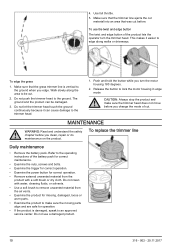
... the grass 1. MAINTENANCE WARNING: Read and understand the safety chapter before you turn the trimmer head. Refer to the operating instructions of the battery pack for correct maintenance. • Examine the nuts, screws and bolts. • Examine the trigger for correct operation. • Examine the power button for correct operation. 2. • Remove external unwanted material from the product with water, cleaning fluids, or solvents. • Use a soft brush to remove unwanted...
... the grass 1. MAINTENANCE WARNING: Read and understand the safety chapter before you turn the trimmer head. Refer to the operating instructions of the battery pack for correct maintenance. • Examine the nuts, screws and bolts. • Examine the trigger for correct operation. • Examine the power button for correct operation. 2. • Remove external unwanted material from the product with water, cleaning fluids, or solvents. • Use a soft brush to remove unwanted...
Owner Manual
Page 11
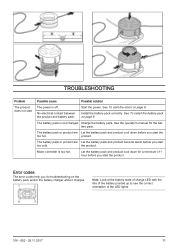
... see the correct orientation of 1 hour before you start Possible cause Possible solution The power is off. Charge the battery pack. No electrical contact between the product and battery pack. See To install the battery pack on page 8. TROUBLESHOOTING Problem The product does not start the too hot. product. Start the power. See the operator's manual for a minimum of the LED lights. 316 - 002...
... see the correct orientation of 1 hour before you start Possible cause Possible solution The power is off. Charge the battery pack. No electrical contact between the product and battery pack. See To install the battery pack on page 8. TROUBLESHOOTING Problem The product does not start the too hot. product. Start the power. See the operator's manual for a minimum of the LED lights. 316 - 002...
Owner Manual
Page 12
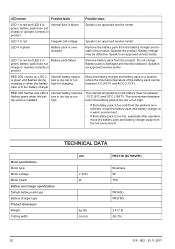
... LED flashes and LED 2 Internal battery tempera- TECHNICAL DATA Motor specifications Motor type Motor voltage Motor power Battery and charger specifications Default battery pack type Battery charger type Product dimensions Weight Cutting width unit V (DC) W kg (lb) cm (in the battery must be between flashes green when the bat- Speak to an approved service center. LED 1 is red and LED 2 is installed. Do not charge. tery pack is...
... LED flashes and LED 2 Internal battery tempera- TECHNICAL DATA Motor specifications Motor type Motor voltage Motor power Battery and charger specifications Default battery pack type Battery charger type Product dimensions Weight Cutting width unit V (DC) W kg (lb) cm (in the battery must be between flashes green when the bat- Speak to an approved service center. LED 1 is red and LED 2 is installed. Do not charge. tery pack is...

Owner Manual
Page 13
Approved accessories Threaded shaft (M10L) Trimmer head ACCESSORIES Type Cutting attachment guard Trimmer line Ø 2.4 mm (.095 in) 591 37 79-21 316 - 002 - 20.11.2017 13
Approved accessories Threaded shaft (M10L) Trimmer head ACCESSORIES Type Cutting attachment guard Trimmer line Ø 2.4 mm (.095 in) 591 37 79-21 316 - 002 - 20.11.2017 13
Parts Manual
Page 2
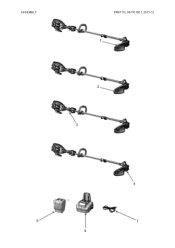
ASSEMBLY PRST15i, 967701901, 2017-12
ASSEMBLY PRST15i, 967701901, 2017-12

Parts Manual
Page 3
ASSEMBLY Ref Part No Description 1 591 37 79-21 SERVICE KIT 2 591 37 79-09 SERVICE KIT 3 591 37 79-10 SERVICE KIT 4 591 37 79-22 SERVICE KIT 5 590 92 38-04 BATTERY 6 590 91 51-05 CHARGER 7 582 60 76-01 WIRING ASSY PRST15i, 967701901, 2017-12 Remark "KIT, SHIELD AND LINE LIMITER" "KIT, LINE LIMITER AND SCREW" "KIT, TRIGGER LOCKOUT" EZ-LOAD TRIMMER HEAD BATTERY PR140Li CHARGER PR275Ci CHARGER CORD (NA) QTY KIT 1 1 1 1 1 1 1
ASSEMBLY Ref Part No Description 1 591 37 79-21 SERVICE KIT 2 591 37 79-09 SERVICE KIT 3 591 37 79-10 SERVICE KIT 4 591 37 79-22 SERVICE KIT 5 590 92 38-04 BATTERY 6 590 91 51-05 CHARGER 7 582 60 76-01 WIRING ASSY PRST15i, 967701901, 2017-12 Remark "KIT, SHIELD AND LINE LIMITER" "KIT, LINE LIMITER AND SCREW" "KIT, TRIGGER LOCKOUT" EZ-LOAD TRIMMER HEAD BATTERY PR140Li CHARGER PR275Ci CHARGER CORD (NA) QTY KIT 1 1 1 1 1 1 1


