Owner Manual
Page 2
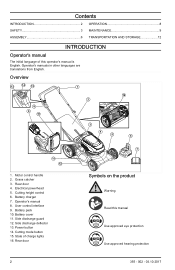
...10.2017 Battery charger 7. User control interface 9. Rear door 7 Symbols on the product Warning Read this operator's manual is English. Operator's manuals in other languages are translations from English. Operator's manual 8. Electrical powerhead 5. Side discharge guard 12. Power button 14. Rear door 4. Side discharge deflector 13. Grass catcher 3. Contents INTRODUCTION 2 OPERATION 8 SAFETY 3 MAINTENANCE 9 ASSEMBLY 6 TRANSPORTATION AND STORAGE 12 INTRODUCTION Operator's manual The initial language of charge lights 16. Motor control handle 2. Battery pack 10...
...10.2017 Battery charger 7. User control interface 9. Rear door 7 Symbols on the product Warning Read this operator's manual is English. Operator's manuals in other languages are translations from English. Operator's manual 8. Electrical powerhead 5. Side discharge guard 12. Power button 14. Rear door 4. Side discharge deflector 13. Grass catcher 3. Contents INTRODUCTION 2 OPERATION 8 SAFETY 3 MAINTENANCE 9 ASSEMBLY 6 TRANSPORTATION AND STORAGE 12 INTRODUCTION Operator's manual The initial language of charge lights 16. Motor control handle 2. Battery pack 10...
Owner Manual
Page 3
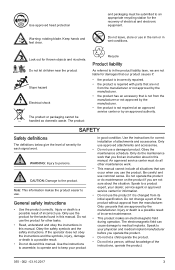
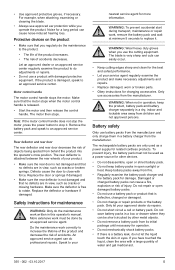
...; This product makes an electromagnetic field during operation. Do not change a part of the instructions, operate the product. 355 - 002 - 03.10.2017 3 Only use the product. The product SAFETY Safety definitions The definitions below give the level of electrical and electronic equipment. Obey the maintenance schedule. and packaging must do the maintenance work . • This manual cannot include all other tasks. •...
...; This product makes an electromagnetic field during operation. Do not change a part of the instructions, operate the product. 355 - 002 - 03.10.2017 3 Only use the product. The product SAFETY Safety definitions The definitions below give the level of electrical and electronic equipment. Obey the maintenance schedule. and packaging must do the maintenance work . • This manual cannot include all other tasks. •...
Owner Manual
Page 4
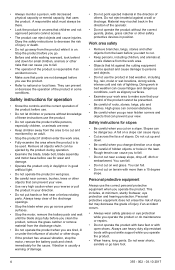
... can cause injury. • Cut across gravel surfaces. • Stop the motor, remove the battery pack and wait until the blade stops fully before use. • Do not let children or persons without the correct guards, plates, grass catcher or other drugs. • If the product has unusual vibration, stop the motor, remove the battery pack and check immediately for small children, animals...
... can cause injury. • Cut across gravel surfaces. • Stop the motor, remove the battery pack and wait until the blade stops fully before use. • Do not let children or persons without the correct guards, plates, grass catcher or other drugs. • If the product has unusual vibration, stop the motor, remove the battery pack and check immediately for small children, animals...
Owner Manual
Page 5
... necessary adjustments and repairs. • Replace damaged, worn or broken parts. • Obey instructions for other metal objects. • Do not remove a battery pack from the manufacturer. Let an approved dealer or an approved service center regularly examine the product to close with a large quantity of accidents. The blade is released. • Start the motor and then release the control handle. Do not repair...
... necessary adjustments and repairs. • Replace damaged, worn or broken parts. • Obey instructions for other metal objects. • Do not remove a battery pack from the manufacturer. Let an approved dealer or an approved service center regularly examine the product to close with a large quantity of accidents. The blade is released. • Start the motor and then release the control handle. Do not repair...
Owner Manual
Page 6
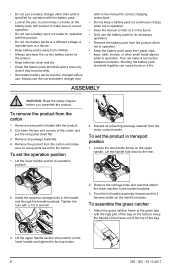
... the motor control handle. To set the product in the carton. Remove the carriage bolts and nuts that attach the lower handles to operation position. 4. Keep the handle of the frame out of the top of a different voltage or manufacturer in the handle and through the handle brackets. ASSEMBLY WARNING: Read the safety chapter before use the correct battery charger and refer to the manual for correct charging instructions. •...
... the motor control handle. To set the product in the carton. Remove the carriage bolts and nuts that attach the lower handles to operation position. 4. Keep the handle of the frame out of the top of a different voltage or manufacturer in the handle and through the handle brackets. ASSEMBLY WARNING: Read the safety chapter before use the correct battery charger and refer to the manual for correct charging instructions. •...
Owner Manual
Page 7
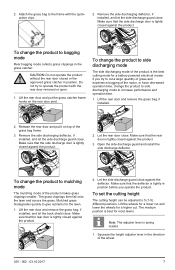
... cut a large quantity of grass and experience bogging of the motor, or have decreased operation time, change the product to 5 (1-5) different positions. Lift the wheels for a lower cut and lower the wheels for a battery powered electrical mower. Squeeze the height adjuster lever in position. 2. Attach the grass bag to give nutrients for most lawns. CAUTION: Do not operate the product without the rear door closed against the deflector. Make sure that the rear...
... cut a large quantity of grass and experience bogging of the motor, or have decreased operation time, change the product to 5 (1-5) different positions. Lift the wheels for a lower cut and lower the wheels for a battery powered electrical mower. Squeeze the height adjuster lever in position. 2. Attach the grass bag to give nutrients for most lawns. CAUTION: Do not operate the product without the rear door closed against the deflector. Make sure that the rear...
Owner Manual
Page 8
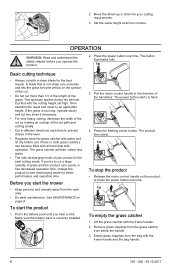
... daily maintenance. Before you try to prevent stripes in the battery pack until you operate the product. 2. Put in the lawn. • Regularly hose the grass catcher with a sharp blade for your product is not sharp cuts unevenly and lets the grass become filled with dirt and dust with the frame handle and the bag handle. 8 355 - 002 - 03.10.2017 Remove grass clippings from the grass catcher...
... daily maintenance. Before you try to prevent stripes in the battery pack until you operate the product. 2. Put in the lawn. • Regularly hose the grass catcher with a sharp blade for your product is not sharp cuts unevenly and lets the grass become filled with dirt and dust with the frame handle and the bag handle. 8 355 - 002 - 03.10.2017 Remove grass clippings from the grass catcher...
Owner Manual
Page 9
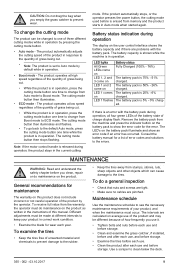
... on the user control interface shows the battery capacity and if there are pinched. LED lights Battery status All Green Fully Charged (100% - 76%) LEDs come on this manual. MAINTENANCE WARNING: Read and understand the safety chapter before you clean, repair or do maintenance on the battery pack illuminate and show the error code for the error. General recommendations for maintenance The warranty on charged. Battery status indication during operation, all...
... on the user control interface shows the battery capacity and if there are pinched. LED lights Battery status All Green Fully Charged (100% - 76%) LEDs come on this manual. MAINTENANCE WARNING: Read and understand the safety chapter before you clean, repair or do maintenance on the battery pack illuminate and show the error code for the error. General recommendations for maintenance The warranty on charged. Battery status indication during operation, all...
Owner Manual
Page 10
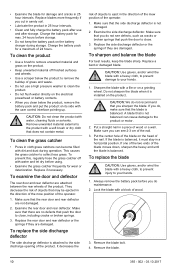
... push the door to remove unwanted material and grass on a grinding wheel. Replace blades more frequently if you do not see 2-3 cm of wood or a wall. Replace the rear door and rear deflector or the springs if they are attached between the rear wheels of the nail. If you cut in sandy soil. • Lubricate the product in a piece of the nail. 3. To replace the blade CAUTION: Use...
... push the door to remove unwanted material and grass on a grinding wheel. Replace blades more frequently if you do not see 2-3 cm of wood or a wall. Replace the rear door and rear deflector or the springs if they are attached between the rear wheels of the nail. If you cut in sandy soil. • Lubricate the product in a piece of the nail. 3. To replace the blade CAUTION: Use...
Owner Manual
Page 11
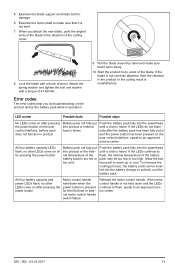
... the blade support and blade bolt for the first time or internal motor control handle switch failure Release the motor control handle. Attach the spring washer and tighten the bolt and washer with a block of 41-60 Nm. Error codes The error codes help you attach the new blade, point the angled ends of the blade in the product or the cutting result is unsatisfactory. Start the product to an approved service center. If the motor control handle is not...
... the blade support and blade bolt for the first time or internal motor control handle switch failure Release the motor control handle. Attach the spring washer and tighten the bolt and washer with a block of 41-60 Nm. Error codes The error codes help you attach the new blade, point the angled ends of the blade in the product or the cutting result is unsatisfactory. Start the product to an approved service center. If the motor control handle is not...
Owner Manual
Page 12
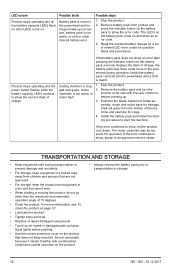
... 1. Install the battery pack and follow the starting procedure to an approved service center. If the error continues to show an error after pressing the indicator button on the battery pack and only displays the state of the ma- Read the included battery manual for a list of 15 degrees. • Clean the product. Cutting chamber is heard. ged with the user control in...
... 1. Install the battery pack and follow the starting procedure to an approved service center. If the error continues to show an error after pressing the indicator button on the battery pack and only displays the state of the ma- Read the included battery manual for a list of 15 degrees. • Clean the product. Cutting chamber is heard. ged with the user control in...


