Owner Manual
Page 2
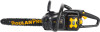
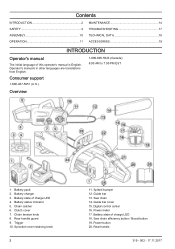
... charge LED 18. Rear handle guard 9. Saw chain 14. Digital control center 16. Guide bar 13. Battery state of charge LED 4. Sprocket cover retaining knob 2 11. Power meter 17. Clutch cover 7. Guide bar cover 15. Chain tension knob 8. Saw chain efficiency button / Boost button 19. Contents INTRODUCTION 2 MAINTENANCE 14 SAFETY 4 TROUBLESHOOTING 17 ASSEMBLY 10 TECHNICAL DATA 18 OPERATION 11 ACCESSORIES 19 INTRODUCTION Operator's manual The initial language of this operator's manual is English. Operator's manuals in other languages are translations...
... charge LED 18. Rear handle guard 9. Saw chain 14. Digital control center 16. Guide bar 13. Battery state of charge LED 4. Sprocket cover retaining knob 2 11. Power meter 17. Clutch cover 7. Guide bar cover 15. Chain tension knob 8. Saw chain efficiency button / Boost button 19. Contents INTRODUCTION 2 MAINTENANCE 14 SAFETY 4 TROUBLESHOOTING 17 ASSEMBLY 10 TECHNICAL DATA 18 OPERATION 11 ACCESSORIES 19 INTRODUCTION Operator's manual The initial language of this operator's manual is English. Operator's manuals in other languages are translations...
Owner Manual
Page 3
... of guide bar Recycle Note: Other symbols/decals on the product Warning Beware of electrical and electronic equipment. Do not leave, store or use the product with one hand Hold the product properly with both hands Avoid contact with parts that are not liable for other commercial areas. Chain brake and front handle guard 24. Chain oil tank 25. Battery release button 26. Operator's manual...
... of guide bar Recycle Note: Other symbols/decals on the product Warning Beware of electrical and electronic equipment. Do not leave, store or use the product with one hand Hold the product properly with both hands Avoid contact with parts that are not liable for other commercial areas. Chain brake and front handle guard 24. Chain oil tank 25. Battery release button 26. Operator's manual...
Owner Manual
Page 4
...; Prevent unintentional starting. Use of a GFCI reduces the risk of the power tool may result in unexpected situations. • Dress properly. A wrench or a key left attached to rain or wet conditions. This enables better control of electric shock. • If operating a power tool in a damp location is an increased risk of dust collection can cause you are doing and use any adjustments, changing accessories...
...; Prevent unintentional starting. Use of a GFCI reduces the risk of the power tool may result in unexpected situations. • Dress properly. A wrench or a key left attached to rain or wet conditions. This enables better control of electric shock. • If operating a power tool in a damp location is an increased risk of dust collection can cause you are doing and use any adjustments, changing accessories...
Owner Manual
Page 5
... of control. • Use extreme caution when cutting brush and saplings. Battery tool use chain saw for kickback. • Keep handles dry, clean, and free from the saw chain when the chain saw . • When cutting a limb that is maintained. Shorting the battery terminals together may cause burns or a fire. • Under abusive conditions, liquid may be whipped toward you or pull you start the chain saw, make exposed metal parts of parts and...
... of control. • Use extreme caution when cutting brush and saplings. Battery tool use chain saw for kickback. • Keep handles dry, clean, and free from the saw chain when the chain saw . • When cutting a limb that is maintained. Shorting the battery terminals together may cause burns or a fire. • Under abusive conditions, liquid may be whipped toward you or pull you start the chain saw, make exposed metal parts of parts and...
Owner Manual
Page 6
...; Remove the battery pack before you assemble the product, put the product into storage or do maintenance to the product if you are numb, stop work area. 6 319 - 002 - 17.11.2017 This helps prevent unintended tip contact and enables better control of the situation. Do not operate the product or do maintenance. • Do not use replacement bars and saw...
...; Remove the battery pack before you assemble the product, put the product into storage or do maintenance to the product if you are numb, stop work area. 6 319 - 002 - 17.11.2017 This helps prevent unintended tip contact and enables better control of the situation. Do not operate the product or do maintenance. • Do not use replacement bars and saw...

Owner Manual
Page 7
... start the product. • Do not turn with the motor on. • Before you remove unwanted materials from the product, stop the motor before you move the product. • Do not put down the product with the product before cuts are started. Tell others before you operate or start . Let the chain stop before you remove the cut material. • Do not operate...
... start the product. • Do not turn with the motor on. • Before you remove unwanted materials from the product, stop the motor before you move the product. • Do not put down the product with the product before cuts are started. Tell others before you operate or start . Let the chain stop before you remove the cut material. • Do not operate...
Owner Manual
Page 8
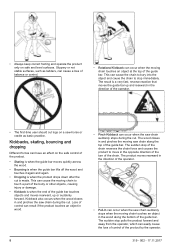
... of the guide bar touches objects and moves rearward, up and rearward in the direction of the operator. • The first-time user should cut is made. The sudden stop of the chain reverses the chain force and causes the product to stop pulls the product forward and away from the operator, which can cause the moving chain to touch a part of...
... of the guide bar touches objects and moves rearward, up and rearward in the direction of the operator. • The first-time user should cut is made. The sudden stop of the chain reverses the chain force and causes the product to stop pulls the product forward and away from the operator, which can cause the moving chain to touch a part of...

Owner Manual
Page 9
... period can move objects with chainsaw protection, steel toe-caps and nonslip soles. • Make sure that can come from the guide bar, saw chain or other blockages while you operate the product. • Cut at high motor speeds. • Do not overreach or cut is made. • Make sure that the guard is free from blockage. Push the trigger lockout and make sure that...
... period can move objects with chainsaw protection, steel toe-caps and nonslip soles. • Make sure that can come from the guide bar, saw chain or other blockages while you operate the product. • Cut at high motor speeds. • Do not overreach or cut is made. • Make sure that the guard is free from blockage. Push the trigger lockout and make sure that...
Owner Manual
Page 10
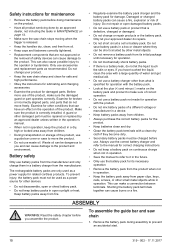
... saw chain 1. To assemble the guide bar and saw chain sharp and clean for safe and high performance. • Obey the instructions for lubricating and changing accessories. • Examine the product for damaged parts. Keep battery packs away from the manufacturer. Make sure the product is correctly installed. Battery safety Only use the battery pack for its initial package until necessary for operation. • Do not mechanically shock battery...
... saw chain 1. To assemble the guide bar and saw chain sharp and clean for safe and high performance. • Obey the instructions for lubricating and changing accessories. • Examine the product for damaged parts. Keep battery packs away from the manufacturer. Make sure the product is correctly installed. Battery safety Only use the battery pack for its initial package until necessary for operation. • Do not mechanically shock battery...

Owner Manual
Page 11
... power meter will be on the guide bar. Remove the cap of the saw chain oil. 5. If the saw chain efficiency. A saw 319 - 002 - 17.11.2017 11 Before you use the correct chain oil and obey the instructions. 1. Make sure that the drive links of the front handle to only use the product. • Add bar and chain oil to the hole in the battery compartment. Assemble the sprocket cover and steer the chain adjuster pin...
... power meter will be on the guide bar. Remove the cap of the saw chain oil. 5. If the saw chain efficiency. A saw 319 - 002 - 17.11.2017 11 Before you use the correct chain oil and obey the instructions. 1. Make sure that the drive links of the front handle to only use the product. • Add bar and chain oil to the hole in the battery compartment. Assemble the sprocket cover and steer the chain adjuster pin...

Owner Manual
Page 12
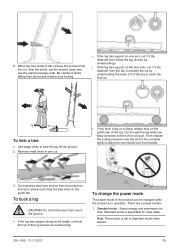
... examine the product and do the necessary maintenance. Make the lower horizontal notch cut and let the tree fall along the necessary line of wood, plastic or aluminum to prevent this. Note: Use the saw chain. Squeeze the trigger lightly for higher speed. 9. Saw more for lower speed. Push the power button until you cut is a pivot between the motor body and the guide bar. 1.
... examine the product and do the necessary maintenance. Make the lower horizontal notch cut and let the tree fall along the necessary line of wood, plastic or aluminum to prevent this. Note: Use the saw chain. Squeeze the trigger lightly for higher speed. 9. Saw more for lower speed. Push the power button until you cut is a pivot between the motor body and the guide bar. 1.
Owner Manual
Page 13
... bottom to the top to hold the log off the ground. 2. There are 2 power modes: 1. Standard mode - Note: The product is applicable for most tasks. Stop the motor, put the product down and use the planned escape path. To buck a log CAUTION: Do not let the saw chain or the guide bar. Remove small limbs in operation. Complete the cut .
... bottom to the top to hold the log off the ground. 2. There are 2 power modes: 1. Standard mode - Note: The product is applicable for most tasks. Stop the motor, put the product down and use the planned escape path. To buck a log CAUTION: Do not let the saw chain or the guide bar. Remove small limbs in operation. Complete the cut .
Owner Manual
Page 14
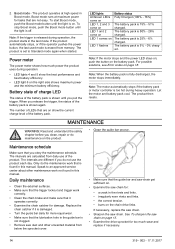
... power the product uses during operation. • LED lights 4 and 5 show the current charge level of the battery pack is released during heavy operation. To start Boost mode, push the Boost mode button until the light is 25% - 6% charged. The battery pack is on the product. • Clean the guide bar groove. Only do maintenance on . If necessary, replace the saw chain. • Sharpen the saw...
... power the product uses during operation. • LED lights 4 and 5 show the current charge level of the battery pack is released during heavy operation. To start Boost mode, push the Boost mode button until the light is 25% - 6% charged. The battery pack is on the product. • Clean the guide bar groove. Only do maintenance on . If necessary, replace the saw chain. • Sharpen the saw...
Owner Manual
Page 15
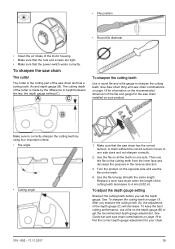
.... 3. Then use a file on the depth gauge (B) to find the correct depth gauge adjustment for the saw chain has the correct tension. To keep all the teeth on the recommended dimension of the motor housing. • Make sure that the nuts and screws are tight. • Make sure that the saw chain installed on the cutting teeth from the inner face and decrease the pressure in ).
.... 3. Then use a file on the depth gauge (B) to find the correct depth gauge adjustment for the saw chain has the correct tension. To keep all the teeth on the recommended dimension of the motor housing. • Make sure that the nuts and screws are tight. • Make sure that the saw chain installed on the cutting teeth from the inner face and decrease the pressure in ).

Owner Manual
Page 16
... depth gauge tool above the saw chain until it does not hang from the bottom of a new saw chain by turning the chain tension knob clockwise. The depth gauge is adjusted correctly when there is no resistance as the file is pulled along the depth gauge tool. Tighten the saw chain. Use a flat file and depth gauge tool to loosen the guide bar. 2. To add tension to the saw chain Note: Examine the tension of the guide bar...
... depth gauge tool above the saw chain until it does not hang from the bottom of a new saw chain by turning the chain tension knob clockwise. The depth gauge is adjusted correctly when there is no resistance as the file is pulled along the depth gauge tool. Tighten the saw chain. Use a flat file and depth gauge tool to loosen the guide bar. 2. To add tension to the saw chain Note: Examine the tension of the guide bar...
Owner Manual
Page 17
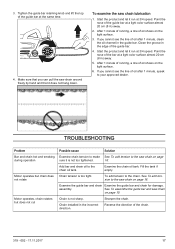
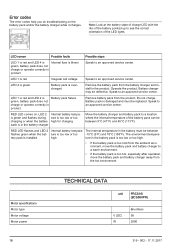
... run at the same time. 4. Point the nose of the bar at 3/4 speed. TROUBLESHOOTING Problem Bar and chain hot and smoking during operation Motor operates but chain does not rotate Motor operates, chain rotates but does not cut Possible cause Solution Examine chain tension to make See To add tension to the saw chain on page 10. Examine the guide bar and chain Examine the guide bar and chain for damage. See To assemble the guide bar and saw chain...
... run at the same time. 4. Point the nose of the bar at 3/4 speed. TROUBLESHOOTING Problem Bar and chain hot and smoking during operation Motor operates but chain does not rotate Motor operates, chain rotates but does not cut Possible cause Solution Examine chain tension to make See To add tension to the saw chain on page 10. Examine the guide bar and chain Examine the guide bar and chain for damage. See To assemble the guide bar and saw chain...
Owner Manual
Page 18
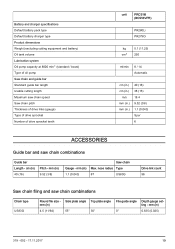
...- Motor specifications Motor type Motor voltage Motor power TECHNICAL DATA unit PRCS16i (BCS58VPR) V (DC) W Brushless 58 2000 18 319 - 002 - 17.11.2017 Speak to a warm environment. • If the battery pack is too hot, especially after operation, move the battery pack and battery charger to an approved service center. The internal temperature in the battery must be between flashes green when the bat- high...
...- Motor specifications Motor type Motor voltage Motor power TECHNICAL DATA unit PRCS16i (BCS58VPR) V (DC) W Brushless 58 2000 18 319 - 002 - 17.11.2017 Speak to a warm environment. • If the battery pack is too hot, especially after operation, move the battery pack and battery charger to an approved service center. The internal temperature in the battery must be between flashes green when the bat- high...
Owner Manual
Page 19
... mm (in ) Max. mm (in ) 9.52 (3/8) Saw chain Gauge - Battery and charger specifications Default battery pack type Default battery charger type Product dimensions Weight (excluding cutting equipment and battery) Oil tank volume Lubrication system Oil pump capacity at 8000 min-1 (standard / boost) Type of oil pump Saw chain and guide bar Standard guide bar length Usable cutting length Maximum saw chain speed Saw chain pitch Thickness of drive links (gauge) Type of drive sprocket Number of drive sprocket teeth unit PRCS16i (BCS58VPR) PR280Li PR275Ci kg 5.1 (11.25) cm3...
... mm (in ) Max. mm (in ) 9.52 (3/8) Saw chain Gauge - Battery and charger specifications Default battery pack type Default battery charger type Product dimensions Weight (excluding cutting equipment and battery) Oil tank volume Lubrication system Oil pump capacity at 8000 min-1 (standard / boost) Type of oil pump Saw chain and guide bar Standard guide bar length Usable cutting length Maximum saw chain speed Saw chain pitch Thickness of drive links (gauge) Type of drive sprocket Number of drive sprocket teeth unit PRCS16i (BCS58VPR) PR280Li PR275Ci kg 5.1 (11.25) cm3...

Parts Manual
Page 3
...-07 SERVICE KIT 5 591 37 79-20 SERVICE KIT 6 591 37 79-04 SERVICE KIT 7 589 19 83-07 BAR 8 591 11 93-02 CHAIN 9 590 92 38-01 BATTERY 10 590 91 51-05 CHARGER 11 582 60 76-01 WIRING ASSY PRCS16i, 967701101, 2017-12 Remark QTY KIT BAR TENSION KNOB 1 OIL CAP 1 FRONT HANDGUARD 1 FRONT HANDLE 1 "KIT, BAR COVER AND KNOB" 1 "KIT, SPROCKET" 1 "16"" POULAN PRO BAR 90 SERIES" 1 "16"" BAGGED CHAIN" 90 SERIES 1 BATTERY PR280Li...
...-07 SERVICE KIT 5 591 37 79-20 SERVICE KIT 6 591 37 79-04 SERVICE KIT 7 589 19 83-07 BAR 8 591 11 93-02 CHAIN 9 590 92 38-01 BATTERY 10 590 91 51-05 CHARGER 11 582 60 76-01 WIRING ASSY PRCS16i, 967701101, 2017-12 Remark QTY KIT BAR TENSION KNOB 1 OIL CAP 1 FRONT HANDGUARD 1 FRONT HANDLE 1 "KIT, BAR COVER AND KNOB" 1 "KIT, SPROCKET" 1 "16"" POULAN PRO BAR 90 SERIES" 1 "16"" BAGGED CHAIN" 90 SERIES 1 BATTERY PR280Li...


