Owner Manual
Page 2
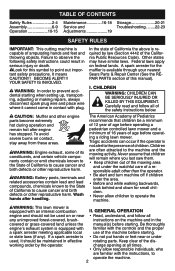
... nearest Sears Parts & Repair Center (See the REPAIR PARTS section of this symbol to observe the following safety instructions could result in contact with an internal combustion II. Be thoroughly engine's exhaust system is capable of amputating hands and feet and throwing objects. TABLE OF CONTENTS Safety Rules 2-4 Maintenance 16-18 Storage 20-21 Assembly 6-9 Service and Troubleshooting ........22-23 Operation 10-15 Adjustments 19 SAFETY...
... nearest Sears Parts & Repair Center (See the REPAIR PARTS section of this symbol to observe the following safety instructions could result in contact with an internal combustion II. Be thoroughly engine's exhaust system is capable of amputating hands and feet and throwing objects. TABLE OF CONTENTS Safety Rules 2-4 Maintenance 16-18 Storage 20-21 Assembly 6-9 Service and Troubleshooting ........22-23 Operation 10-15 Adjustments 19 SAFETY...
Owner Manual
Page 3
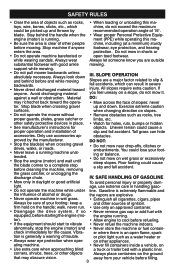
... or embankments. obstacles. the grass catcher, or unclogging the discharge chute. Always look down . Avoid discharging material III. You could cause a slip and fall accident. tor). • Allow engine to cool before mowing. Stay behind before starting the engine (mo- walk, never run. • Use only an approved container. • Disengage the drive system, if so • Never remove gas cap or add fuel with a plastic liner. on...
... or embankments. obstacles. the grass catcher, or unclogging the discharge chute. Always look down . Avoid discharging material III. You could cause a slip and fall accident. tor). • Allow engine to cool before mowing. Stay behind before starting the engine (mo- walk, never run. • Use only an approved container. • Disengage the drive system, if so • Never remove gas cap or add fuel with a plastic liner. on...
Owner Manual
Page 4
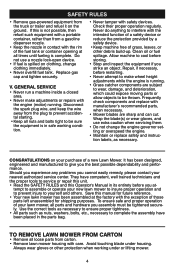
.... GENERAL SERVICE • Never run a machine inside a closed area. • Never make wheel height adjustments while the engine is running . Clean oil or fuel spillage. Avoid touching blade under or lifting mower. 4 Always wear gloves or other debris build-up. Check their proper operation regularly. Should you experience any problems you assemble must be sure the equipment is in safe working under housing. SAFETY RULES • Remove gas-powered equipment...
.... GENERAL SERVICE • Never run a machine inside a closed area. • Never make wheel height adjustments while the engine is running . Clean oil or fuel spillage. Avoid touching blade under or lifting mower. 4 Always wear gloves or other debris build-up. Check their proper operation regularly. Should you experience any problems you assemble must be sure the equipment is in safe working under housing. SAFETY RULES • Remove gas-powered equipment...

Owner Manual
Page 6
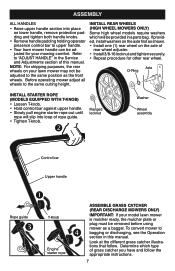
... three height adjustment holes. SQUEEZE Handle pin HOW TO SET UP YOUR MOWER UNFOLD HANDLE IMPORTANT: Unfold handle carefully so as not to operating position and align hole in operating position. ASSEMBLY CAUTION: Do not operate this lawn mower without the discharge deflector or an entire approved grass catcher in mowing position. • Insert bolt through handle and bracket and secure with knob. Operator presence control bar LIFT UP LIFT UP MOWING POSITION DOMED HOUSING MODELS ONLY...
... three height adjustment holes. SQUEEZE Handle pin HOW TO SET UP YOUR MOWER UNFOLD HANDLE IMPORTANT: Unfold handle carefully so as not to operating position and align hole in operating position. ASSEMBLY CAUTION: Do not operate this lawn mower without the discharge deflector or an entire approved grass catcher in mowing position. • Insert bolt through handle and bracket and secure with knob. Operator presence control bar LIFT UP LIFT UP MOWING POSITION DOMED HOUSING MODELS ONLY...
Owner Manual
Page 7
... removed before using mower as shown. • Install one (1) rear wheel on the axle of grass catcher you have and follow . Look at the different grass catcher illustrations that follow the appropriate instructions. 7 ASSEMBLY ALL HANDLES • Raise upper handle section into loop of this manual. To convert mower to the same cutting height. Flanged locknut Washer Wheel assembly Control bar Upper handle Rope guide T-Knob Engine starter rope ASSEMBLE GRASS CATCHER (REAR DISCHARGE MOWERS ONLY) IMPORTANT: If your mowing comfort. Before operating mower adjust all wheels...
... removed before using mower as shown. • Install one (1) rear wheel on the axle of grass catcher you have and follow . Look at the different grass catcher illustrations that follow the appropriate instructions. 7 ASSEMBLY ALL HANDLES • Raise upper handle section into loop of this manual. To convert mower to the same cutting height. Flanged locknut Washer Wheel assembly Control bar Upper handle Rope guide T-Knob Engine starter rope ASSEMBLE GRASS CATCHER (REAR DISCHARGE MOWERS ONLY) IMPORTANT: If your mowing comfort. Before operating mower adjust all wheels...

Owner Manual
Page 8
.... charge deflector (rear door) removed or propped open. 8 Catcher frame hook If bag gets wet, let it dry before using. • Lift the rear door on the mower housing. • For HINGE BRACKET mounted catcher, place the grass catcher frame onto the formed tabs on the bottom. • Slip vinyl bindings over frame. ASSEMBLY "FABRIC TOP" GRASS CATCHERS TO ASSEMBLE AND ATTACH GRASS CATCHER • Put grass catcher frame into grass bag with rigid part of bag...
.... charge deflector (rear door) removed or propped open. 8 Catcher frame hook If bag gets wet, let it dry before using. • Lift the rear door on the mower housing. • For HINGE BRACKET mounted catcher, place the grass catcher frame onto the formed tabs on the bottom. • Slip vinyl bindings over frame. ASSEMBLY "FABRIC TOP" GRASS CATCHERS TO ASSEMBLE AND ATTACH GRASS CATCHER • Put grass catcher frame into grass bag with rigid part of bag...
Owner Manual
Page 9
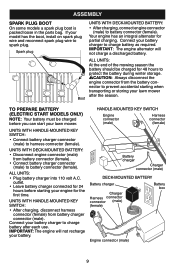
... charged before starting when transporting or storing your lawn mower. ALL UNITS: • Plug battery charger into 110 volt A.C. UNITS WITH DECK-MOUNTED BATTERY: • Disconnect engine connector (male) from battery charger connector (male). Connect your engine for partial charging. IMPORTANT: The engine alternator will not recharge your model has the boot, install on spark plug wire and reconnect spark plug wire to harness connector (female). UNITS WITH HANDLE-MOUNTED KEY SWITCH: • Connect battery...
... charged before starting when transporting or storing your lawn mower. ALL UNITS: • Plug battery charger into 110 volt A.C. UNITS WITH DECK-MOUNTED BATTERY: • Disconnect engine connector (male) from battery charger connector (male). Connect your engine for partial charging. IMPORTANT: The engine alternator will not recharge your model has the boot, install on spark plug wire and reconnect spark plug wire to harness connector (female). UNITS WITH HANDLE-MOUNTED KEY SWITCH: • Connect battery...

Owner Manual
Page 10
... eye damage. NOTE: Adjuster is not adjustable. TO ADJUST CUTTING HEIGHT Adjust cutting height to suit your requirements. LEVER FORWARD TO RAISE MOWER 10 Lever OPERATION The operation of any adjustments or repairs. Flat washer Wheel Bolt 3/8-16 Spacer Locknut CHOKE (START) FAST SLOW Remote throttle control MODELS WITH FIXED SPEED ENGINES Engine speed was set at same height. Move wheel up or down to suit your requirements. LEVER BACKWARD TO LOWER MOWER Plate tab MODELS WITH MANUAL ADJUST BOLT-ON WHEELS • Remove wheel, bolt, and hardware and reassemble...
... eye damage. NOTE: Adjuster is not adjustable. TO ADJUST CUTTING HEIGHT Adjust cutting height to suit your requirements. LEVER FORWARD TO RAISE MOWER 10 Lever OPERATION The operation of any adjustments or repairs. Flat washer Wheel Bolt 3/8-16 Spacer Locknut CHOKE (START) FAST SLOW Remote throttle control MODELS WITH FIXED SPEED ENGINES Engine speed was set at same height. Move wheel up or down to suit your requirements. LEVER BACKWARD TO LOWER MOWER Plate tab MODELS WITH MANUAL ADJUST BOLT-ON WHEELS • Remove wheel, bolt, and hardware and reassemble...

Owner Manual
Page 12
... seated in a safe place. • You can now be attached. • To return to mulching operation, simply reinstall mulcher plug as a mulcher. Hinge rod Discharge deflector Housing opening Hooks Mulcher plug Tab MULCHER PLUG TYPE "B" To convert to bagging or discharging: • Lift discharge deflector and remove mulcher plug. • Mower can now install grass catcher. • To convert to bagging or discharging: REAR BAGGING • Open rear door and remove mulcher plate. CAUTION: Do not run your lawn mower without discharge deflector...
... seated in a safe place. • You can now be attached. • To return to mulching operation, simply reinstall mulcher plug as a mulcher. Hinge rod Discharge deflector Housing opening Hooks Mulcher plug Tab MULCHER PLUG TYPE "B" To convert to bagging or discharging: • Lift discharge deflector and remove mulcher plug. • Mower can now install grass catcher. • To convert to bagging or discharging: REAR BAGGING • Open rear door and remove mulcher plate. CAUTION: Do not run your lawn mower without discharge deflector...

Owner Manual
Page 13
... Discharge deflector GRASS CATCHER (REAR BAGGING MODELS ONLY) TO EMPTY GRASS CATCHER • Simply open . CAUTION: Do not run your lawn mower without the rear door, approved grass catcher or clipping deflector in place. BAR Your lawn mower is running. The blade turns when the engine is equipped with the rear door removed or propped open. It will cause unnecessary wear. Never attempt to operate mower with an operator presence control bar which requires the operator to be positioned behind the lawn mower handle...
... Discharge deflector GRASS CATCHER (REAR BAGGING MODELS ONLY) TO EMPTY GRASS CATCHER • Simply open . CAUTION: Do not run your lawn mower without the rear door, approved grass catcher or clipping deflector in place. BAR Your lawn mower is running. The blade turns when the engine is equipped with the rear door removed or propped open. It will cause unnecessary wear. Never attempt to operate mower with an operator presence control bar which requires the operator to be positioned behind the lawn mower handle...
Owner Manual
Page 14
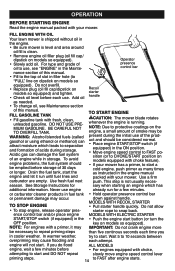
.... • Remove engine oil filler plug (oil fill cap/ dipstick on models so equipped). Do not allow • To stop engine, release operator pres- In warmer weather, try to start . OPERATION BEFORE STARTING ENGINE Read the engine manual packed with choke, attempting to start and DO NOT repeat slowly move engine speed control lever priming steps. 14 to FAST after engine starts. FILL ENGINE WITH OIL Your lawn mower is shipped without oil in fuel tank • Hold operator presence control bar or...
.... • Remove engine oil filler plug (oil fill cap/ dipstick on models so equipped). Do not allow • To stop engine, release operator pres- In warmer weather, try to start . OPERATION BEFORE STARTING ENGINE Read the engine manual packed with choke, attempting to start and DO NOT repeat slowly move engine speed control lever priming steps. 14 to FAST after engine starts. FILL ENGINE WITH OIL Your lawn mower is shipped without oil in fuel tank • Hold operator presence control bar or...

Owner Manual
Page 15
... lawn mower cutting height so that as they fall onto the lawn they will damage your mower and could void your highest engine (blade) speed as when mowing very tall grass, raise the mower height on the engine. This will biodegrade quickly to avoid leaving clumps of the grass blades. OPERATION MOWING TIPS CAUTION: Do not use . Such attachments are hazardous, will disperse into the grass and not be set in the Maintenance...
... lawn mower cutting height so that as they fall onto the lawn they will damage your mower and could void your highest engine (blade) speed as when mowing very tall grass, raise the mower height on the engine. This will biodegrade quickly to avoid leaving clumps of the grass blades. OPERATION MOWING TIPS CAUTION: Do not use . Such attachments are hazardous, will disperse into the grass and not be set in the Maintenance...

Owner Manual
Page 16
... rod BEFORE EACH USE ➀ Handle bracket mounting pins • Check engine oil level. • Check for Loose Fasteners Clean / Inspect Grass Catcher * Check Tires Check Drive Wheels *** Clean Lawn Mower **** Clean under Drive Cover *** Check Drive Belt / Pulleys *** Check / Sharpen / Replace Blade Lubrication Clean and Recharge Battery ** Check Engine Oil level Change Engine Oil Clean Air Filter Inspect Muffler Replace Spark Plug Replace Air Filter Paper Cartridge Empty fuel system or add Stabilizer * (if so equipped) ** Electric-Start mowers *** Power-Propelled mowers **** Use...
... rod BEFORE EACH USE ➀ Handle bracket mounting pins • Check engine oil level. • Check for Loose Fasteners Clean / Inspect Grass Catcher * Check Tires Check Drive Wheels *** Clean Lawn Mower **** Clean under Drive Cover *** Check Drive Belt / Pulleys *** Check / Sharpen / Replace Blade Lubrication Clean and Recharge Battery ** Check Engine Oil level Change Engine Oil Clean Air Filter Inspect Muffler Replace Spark Plug Replace Air Filter Paper Cartridge Empty fuel system or add Stabilizer * (if so equipped) ** Electric-Start mowers *** Power-Propelled mowers **** Use...
Owner Manual
Page 17
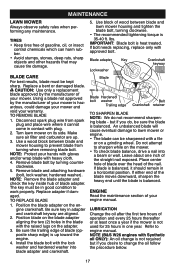
... check blade balance, drive a nail into blade adapter and crankshaft. Replace adapter if damaged. Leave about one year. LUBRICATION Change the oil after the first two hours of blade (opposite sharp edge) is balanced. NOTE (B&S W26 engines with the raised lugs on its side. Use block of the straight nail exposed. If bolt needs replacing, replace only with a file or on the engine crankshaft. Turn lawn mower on the adapter. 3. Position blade...
... check blade balance, drive a nail into blade adapter and crankshaft. Replace adapter if damaged. Leave about one year. LUBRICATION Change the oil after the first two hours of blade (opposite sharp edge) is balanced. NOTE (B&S W26 engines with the raised lugs on its side. Use block of the straight nail exposed. If bolt needs replacing, replace only with a file or on the engine crankshaft. Turn lawn mower on the adapter. 3. Position blade...
Owner Manual
Page 18
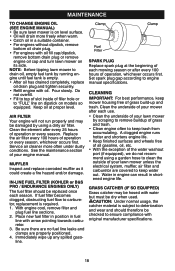
...) Grass catcher may be replaced once each mowing season or after every 100 hours of filler hole or to keep water out. Service air cleaner more freely when warm. • Catch oil in a suitable container. • For engines without dipstick, remove bottom oil drain plug. • For engines with arrow pointing towards carburetor. 3. Place new fuel filter in position in shortened engine life. MAINTENANCE TO CHANGE ENGINE OIL (SEE ENGINE MANUAL) • Be sure lawn mower is...
...) Grass catcher may be replaced once each mowing season or after every 100 hours of filler hole or to keep water out. Service air cleaner more freely when warm. • Catch oil in a suitable container. • For engines without dipstick, remove bottom oil drain plug. • For engines with arrow pointing towards carburetor. 3. Place new fuel filter in position in shortened engine life. MAINTENANCE TO CHANGE ENGINE OIL (SEE ENGINE MANUAL) • Be sure lawn mower is...
Owner Manual
Page 19
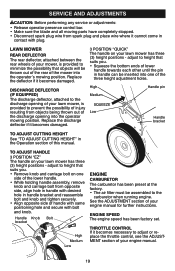
... carriage bolt on your engine manual. 19 DISCHARGE DEFLECTOR (IF EQUIPPED) The discharge deflector, attached to the discharge opening into one side of your lawn mower has three (3) height positions - High Handle pin Medium SQUEEZE Low Handle bracket TO ADJUST CUTTING HEIGHT See "TO ADJUST CUTTING HEIGHT" in the Operation section of your engine manual for further instructions. THROTTLE CONTROL If it cannot come in contact with bolt and knob. SERVICE AND ADJUSTMENTS CAUTION: Before performing any service or adjustments: • Release operator presence control bar...
... carriage bolt on your engine manual. 19 DISCHARGE DEFLECTOR (IF EQUIPPED) The discharge deflector, attached to the discharge opening into one side of your lawn mower has three (3) height positions - High Handle pin Medium SQUEEZE Low Handle bracket TO ADJUST CUTTING HEIGHT See "TO ADJUST CUTTING HEIGHT" in the Operation section of your engine manual for further instructions. THROTTLE CONTROL If it cannot come in contact with bolt and knob. SERVICE AND ADJUSTMENTS CAUTION: Before performing any service or adjustments: • Release operator presence control bar...
Owner Manual
Page 20
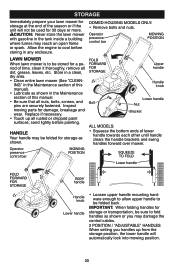
... securely fastened. HANDLE Your handle may damage the control cables. 2 POSITION / "ADJUSTABLE" HANDLES When setting you may be used for 30 days or more. STORAGE Immediately prepare your lawn mower for storage at the end of the season or if the unit will automatically lock into mowing position. 20 Operator presence control bar MOWING POSITION FOLD FORWARD FOR STORAGE Bolt Upper handle Handle knob Lower handle Nut Bracket ALL MODELS: •...
... securely fastened. HANDLE Your handle may damage the control cables. 2 POSITION / "ADJUSTABLE" HANDLES When setting you may be used for 30 days or more. STORAGE Immediately prepare your lawn mower for storage at the end of the season or if the unit will automatically lock into mowing position. 20 Operator presence control bar MOWING POSITION FOLD FORWARD FOR STORAGE Bolt Upper handle Handle knob Lower handle Nut Bracket ALL MODELS: •...
Owner Manual
Page 21
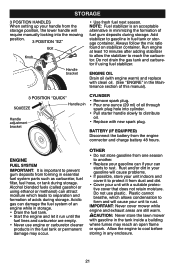
... carburetor cleaner products in storage. • Drain the fuel tank. • Start the engine and let it from the engine connector and charge battery 48 hours. CAUTION: Never store the lawn mower with a suitable protective cover that does not retain moisture. NOTE: Fuel stabilizer is important to prevent gum deposits from forming in the Maintenance section of this manual). 3 POSITION "QUICK" SQUEEZE Handle pin Handle adjustment bracket CYLINDER • Remove spark plug...
... carburetor cleaner products in storage. • Drain the fuel tank. • Start the engine and let it from the engine connector and charge battery 48 hours. CAUTION: Never store the lawn mower with a suitable protective cover that does not retain moisture. NOTE: Fuel stabilizer is important to prevent gum deposits from forming in the Maintenance section of this manual). 3 POSITION "QUICK" SQUEEZE Handle pin Handle adjustment bracket CYLINDER • Remove spark plug...
Owner Manual
Page 22
.... Connect wire to handle. 9. Replace control bar. 10. Connect battery to the ON position. 11. PROBLEM CAUSE CORRECTION Does not start 1. Turn fuel valve lever to engine. 13. Bent engine crankshaft. 2. Replace blade adapter. 4. Raise cutting height. 2. Tighten blade bolt or replace blade adapter. 8. Cutting too much oil in engine. 6. Out of mower housing. Dirty air filter. 4. Walking speed too fast. 1. Check oil level. 6. Poor cut grass or to pull 1. Worn, bent or loose blade. 2. Buildup of mower housing. 5. Contact a qualified service center...
.... Connect wire to handle. 9. Replace control bar. 10. Connect battery to the ON position. 11. PROBLEM CAUSE CORRECTION Does not start 1. Turn fuel valve lever to engine. 13. Bent engine crankshaft. 2. Replace blade adapter. 4. Raise cutting height. 2. Tighten blade bolt or replace blade adapter. 8. Cutting too much oil in engine. 6. Out of mower housing. Dirty air filter. 4. Walking speed too fast. 1. Check oil level. 6. Poor cut grass or to pull 1. Worn, bent or loose blade. 2. Buildup of mower housing. 5. Contact a qualified service center...

Owner Manual
Page 23
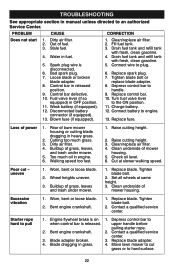
... cutting blade dragging in manual unless directed to push 1. PROBLEM CAUSE CORRECTION Grass catcher 1. Cutting height too low. Lift on blade worn off. (If so equipped) 3. Replace blade. 3. Handle height position not right for you. 1. TROUBLESHOOTING - Grass is too high or wheel height is too low. 2. See appropriate section in grass. 3. Catcher not venting air. 1. Empty grass catcher. 4. Raise cutting height. 2. Grass catcher too full. 4. not filling 2. Raise cutting height. 2. Rear of lawn mower housing one (1) setting higher. 3. Adjust handle height...
... cutting blade dragging in manual unless directed to push 1. PROBLEM CAUSE CORRECTION Grass catcher 1. Cutting height too low. Lift on blade worn off. (If so equipped) 3. Replace blade. 3. Handle height position not right for you. 1. TROUBLESHOOTING - Grass is too high or wheel height is too low. 2. See appropriate section in grass. 3. Catcher not venting air. 1. Empty grass catcher. 4. Raise cutting height. 2. Grass catcher too full. 4. not filling 2. Raise cutting height. 2. Rear of lawn mower housing one (1) setting higher. 3. Adjust handle height...


