
Owner Manual
Page 2
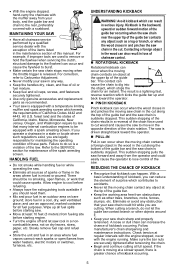
...machine refer to special certification requirements for which may cause serious injury. The engine is stopped by any object must be avoided. Bar and chain oil fill. Lock chain brake. Maintenance, replacement, or repair of the operator′s hands must be used to ...8226; Approved hearing protection • Protective goggles or a visor Both of the emission control devices and system may cause XX the guide bar to operate the chainsaw. Never operate a chainsaw holding it with any nonroad engine repair WARNING! WARNING! Tip establishment or individual. Please read...
...machine refer to special certification requirements for which may cause serious injury. The engine is stopped by any object must be avoided. Bar and chain oil fill. Lock chain brake. Maintenance, replacement, or repair of the operator′s hands must be used to ...8226; Approved hearing protection • Protective goggles or a visor Both of the emission control devices and system may cause XX the guide bar to operate the chainsaw. Never operate a chainsaw holding it with any nonroad engine repair WARNING! WARNING! Tip establishment or individual. Please read...
Owner Manual
Page 3
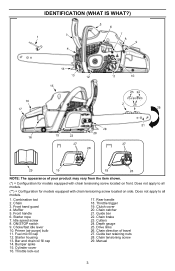
... chain tensioning screw located on front. Front handle 6. Choke/fast idle lever 10. Primer (air purge) bulb 11. Bar and chain oil fill cap 14. Cylinder cover 16. Guide bar 22. Drive links 26. Guide bar retaining nuts 28. Manual 3 Starter rope 7. ON/STOP switch 9. Starter housing 13. Chain brake 23. Idle speed...
... chain tensioning screw located on front. Front handle 6. Choke/fast idle lever 10. Primer (air purge) bulb 11. Bar and chain oil fill cap 14. Cylinder cover 16. Guide bar 22. Drive links 26. Guide bar retaining nuts 28. Manual 3 Starter rope 7. ON/STOP switch 9. Starter housing 13. Chain brake 23. Idle speed...
Owner Manual
Page 4
...of this manual, use . • Operate the chainsaw only in a well‐ventilated outdoor area. • Do not operate saw when the guide bar is damaged, improperly adjusted, or not completely and securely assembled. A chainsaw is intended for Gasoline-Powered Chain Saws - heavy‐duty, non‐... such as numbness, pain, loss of strength, change in skin color or texture, or loss of feeling in otherwise healthy people. Always replace bar, chain, hand guard, or chain brake immediately if it cannot contact spark plug to start cutting until you have taken alcohol, drugs, or ...
...of this manual, use . • Operate the chainsaw only in a well‐ventilated outdoor area. • Do not operate saw when the guide bar is damaged, improperly adjusted, or not completely and securely assembled. A chainsaw is intended for Gasoline-Powered Chain Saws - heavy‐duty, non‐... such as numbness, pain, loss of strength, change in skin color or texture, or loss of feeling in otherwise healthy people. Always replace bar, chain, hand guard, or chain brake immediately if it cannot contact spark plug to start cutting until you have taken alcohol, drugs, or ...
Owner Manual
Page 5
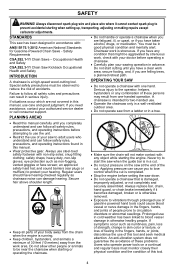
...modify your saw chain sharp and properly tensioned. and use an approved, marked container for maintaining the operating condition of the guide bar contacts any obstruction that kickback can occur when the moving chain contacts an object at full speed. UNDERSTANDING KICKBACK WARNING! Contacting a...to remove or hold the flywheel when servicing the clutch, structural damage to dig into the object, which kicks the guide bar up all chainsaw service performed by law that could cause sparks. Follow manufacturer's chain sharpening and maintenance instructions. PULL-IN...
...modify your saw chain sharp and properly tensioned. and use an approved, marked container for maintaining the operating condition of the guide bar contacts any obstruction that kickback can occur when the moving chain contacts an object at full speed. UNDERSTANDING KICKBACK WARNING! Contacting a...to remove or hold the flywheel when servicing the clutch, structural damage to dig into the object, which kicks the guide bar up all chainsaw service performed by law that could cause sparks. Follow manufacturer's chain sharpening and maintenance instructions. PULL-IN...
Owner Manual
Page 6
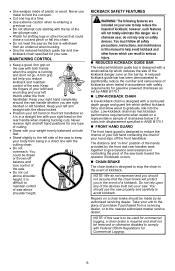
...You must follow all safety precautions, instructions, and maintenance in this manual to help reduce the hazard of kickback; A reducedkickback guide bar has been demonstrated to significantly reduce the number and seriousness of kickbacks when tested in accordance with your right hand on your unit to...As a chainsaw user, do not represent and you should not assume that could be drawn or thrown off the front handlebar. Repairs on the bar tip. KICKBACK SAFETY FEATURES WARNING! Do not rely upon any type of cutting. • Stand with your left handed. MAINTAINING CONTROL •...
...You must follow all safety precautions, instructions, and maintenance in this manual to help reduce the hazard of kickback; A reducedkickback guide bar has been demonstrated to significantly reduce the number and seriousness of kickbacks when tested in accordance with your right hand on your unit to...As a chainsaw user, do not represent and you should not assume that could be drawn or thrown off the front handlebar. Repairs on the bar tip. KICKBACK SAFETY FEATURES WARNING! Do not rely upon any type of cutting. • Stand with your left handed. MAINTAINING CONTROL •...
Owner Manual
Page 7
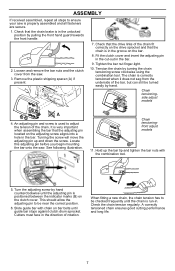
... by pulling the front hand guard towards the front handle. 2. Cutters must face in the unlocked position by hand counterclockwise until guide bar stops against clutch drum sprocket. Remove the plastic shipping spacer (A) if present. 7. Check the chain tension regularly. Check that the drive...correct position. 6. Chain tensioningfront adjust models 11. ASSEMBLY If received assembled, repeat all fasteners are secure. 1. Loosen and remove the bar nuts and the clutch cover from the underside of the chain. An adjusting pin and screw is correctly tensioned when it does not...
... by pulling the front hand guard towards the front handle. 2. Cutters must face in the unlocked position by hand counterclockwise until guide bar stops against clutch drum sprocket. Remove the plastic shipping spacer (A) if present. 7. Check the chain tension regularly. Check that the drive...correct position. 6. Chain tensioningfront adjust models 11. ASSEMBLY If received assembled, repeat all fasteners are secure. 1. Loosen and remove the bar nuts and the clutch cover from the underside of the chain. An adjusting pin and screw is correctly tensioned when it does not...
Owner Manual
Page 8
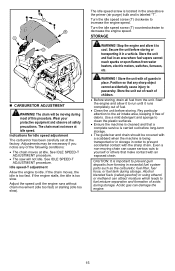
...surface. We recommend that you refer chain sharpening to a professional chain sharpener. • Check chain tension • Inspect and clean the guide bar • Check for damaged parts • Check for loose caps • Check for loose fasteners • Check for loose parts •... AND STOPPING PRE-OPERATION INSPECTION Perform the following steps before every use of the machine: • Check fuel mixture level • Check bar lubrication • Check chain sharpness NOTE: Chain sharpening is designed to operate on unleaded gasoline with a minimum 87 octane (R+M/2 method), with...
...surface. We recommend that you refer chain sharpening to a professional chain sharpener. • Check chain tension • Inspect and clean the guide bar • Check for damaged parts • Check for loose caps • Check for loose fasteners • Check for loose parts •... AND STOPPING PRE-OPERATION INSPECTION Perform the following steps before every use of the machine: • Check fuel mixture level • Check bar lubrication • Check chain sharpness NOTE: Chain sharpening is designed to operate on unleaded gasoline with a minimum 87 octane (R+M/2 method), with...
Owner Manual
Page 9
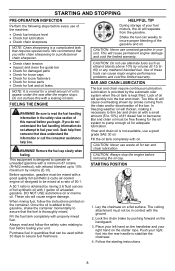
... in serious injury to the operator and/or damage the chain, making it has not started after 10 pulls. Starting could jump off the guide bar and result in . The primer (air purge) bulb does not need to be completely filled. Using your chainsaw. NOTE: In temperatures above 90°F (32...
... in serious injury to the operator and/or damage the chain, making it has not started after 10 pulls. Starting could jump off the guide bar and result in . The primer (air purge) bulb does not need to be completely filled. Using your chainsaw. NOTE: In temperatures above 90°F (32...

Owner Manual
Page 10
...Place the saw down after it can occur to let the tip of the tree. The chainsaw operator should be apparent due to the guide bar, chain, or engine can have secure footing. Check for decay and rot. Note the danger zone (1), retreat path (2), and felling direction... (3) in a particular direction include: • The wind direction and speed. • The lean of the guide bar fall in advance. The engine must be notified immediately. WORKING TECHNIQUES PRACTICING YOUR CUTS Practice cutting a few small logs using the following diagram. ...
...Place the saw down after it can occur to let the tip of the tree. The chainsaw operator should be apparent due to the guide bar, chain, or engine can have secure footing. Check for decay and rot. Note the danger zone (1), retreat path (2), and felling direction... (3) in a particular direction include: • The wind direction and speed. • The lean of the guide bar fall in advance. The engine must be notified immediately. WORKING TECHNIQUES PRACTICING YOUR CUTS Practice cutting a few small logs using the following diagram. ...

Owner Manual
Page 12
... log over and finish with the bottom of the saw when the tension in any other branches or objects at the nose of the guide bar when limbing or pruning. Do not stand on ladders, platforms, a log, or in the wood fibers is concentrated. 2 1 1 2 2 1 1 2 BUCKING WITHOUT A SUPPORT 1. Use extreme caution when...
... log over and finish with the bottom of the saw when the tension in any other branches or objects at the nose of the guide bar when limbing or pruning. Do not stand on ladders, platforms, a log, or in the wood fibers is concentrated. 2 1 1 2 2 1 1 2 BUCKING WITHOUT A SUPPORT 1. Use extreme caution when...
Owner Manual
Page 13
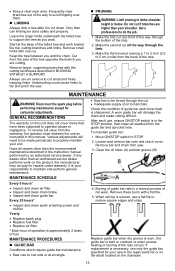
... 13 PRUNING WARNING! Disconnect the spark plug before performing maintenance except for your shoulder. MAINTENANCE SCHEDULE • Saw has to bar/chain. Check the condition of oil to be forced through the cut if branches are cutting. Frequently clear branches out of ...or burring of the tree. 2 1 3 MAINTENANCE WARNING! Various adjustments will damage the chain and make cutting difficult. To maintain guide bar: 1. Loosen and remove bar nuts and clutch cover. LIMBING Always limb a tree after it is in BUCKING WITHOUT A SUPPORT. Remove small limbs with a flat ...
... 13 PRUNING WARNING! Disconnect the spark plug before performing maintenance except for your shoulder. MAINTENANCE SCHEDULE • Saw has to bar/chain. Check the condition of oil to be forced through the cut if branches are cutting. Frequently clear branches out of ...or burring of the tree. 2 1 3 MAINTENANCE WARNING! Various adjustments will damage the chain and make cutting difficult. To maintain guide bar: 1. Loosen and remove bar nuts and clutch cover. LIMBING Always limb a tree after it is in BUCKING WITHOUT A SUPPORT. Remove small limbs with a flat ...
Owner Manual
Page 15
... in order to fuel mixture separation and formation of acids during most of fuel. • Clean the unit before long-term storage. • The guide bar and chain should be moving chain can damage the engine. 15 Idle speed-T adjustment Allow the engine to increase the engine speed. If the engine...
... in order to fuel mixture separation and formation of acids during most of fuel. • Clean the unit before long-term storage. • The guide bar and chain should be moving chain can damage the engine. 15 Idle speed-T adjustment Allow the engine to increase the engine speed. If the engine...
Owner Manual
Page 17
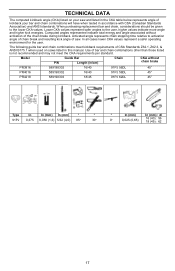
Computed angles represented indicate total energy and angle associated without chain brake PR3816 589198302 16/40 91PJ 56DL 45° PR4016 589198302 16/40 91PJ 56DL 45° PR4218 589198303 18/45 91PJ 62DL 45° Type In In (mm) In (mm) ° ° 91PJ ... have when tested in /cm) Chain CKA without activation of CSA Standards Z62.1, Z62.3, & ANSI B175.1 when used on your saw . Use of bar and chain combinations other than those listed is not recommended and may not meet kickback requirements of the chain brake during kickback. Activated angle represents...
Computed angles represented indicate total energy and angle associated without chain brake PR3816 589198302 16/40 91PJ 56DL 45° PR4016 589198302 16/40 91PJ 56DL 45° PR4218 589198303 18/45 91PJ 62DL 45° Type In In (mm) In (mm) ° ° 91PJ ... have when tested in /cm) Chain CKA without activation of CSA Standards Z62.1, Z62.3, & ANSI B175.1 when used on your saw . Use of bar and chain combinations other than those listed is not recommended and may not meet kickback requirements of the chain brake during kickback. Activated angle represents...

Parts List
Page 7
...-44 SAW CHAIN 11 589 19 83-02 BAR 12 530 07 18-91 KIT 13 545 22 71-01 SCREW 14 530 05 79-31 OIL PUMP ASSY 15 530 03 78-20 PISTON 16 530 05 79-24 ASSEMBLY PR4016, 967084601, 2016-05 Remark QTY KIT CLUTCH ...WASHER KIT (INCL. 3) 1 CLUTCH DRUM ASSEMBLY 1 CLUTCH WASHER KIT (INCL. 1) 1 SCREW 4 CHAIN BRAKE KIT 1 CLUTCH ASSY 1 LARGE CLUTCH WASHER 1 BAR MOUNTING PLATE 1 HANDGUARD 1 "CHAIN 91PJ 16"" 3/8"" 56DL (POULAN/POULAN 1 PRO)" "BAR, POULAN PRO 16 IN" 1 OIL PUMP KIT 1 SCREW...
...-44 SAW CHAIN 11 589 19 83-02 BAR 12 530 07 18-91 KIT 13 545 22 71-01 SCREW 14 530 05 79-31 OIL PUMP ASSY 15 530 03 78-20 PISTON 16 530 05 79-24 ASSEMBLY PR4016, 967084601, 2016-05 Remark QTY KIT CLUTCH ...WASHER KIT (INCL. 3) 1 CLUTCH DRUM ASSEMBLY 1 CLUTCH WASHER KIT (INCL. 1) 1 SCREW 4 CHAIN BRAKE KIT 1 CLUTCH ASSY 1 LARGE CLUTCH WASHER 1 BAR MOUNTING PLATE 1 HANDGUARD 1 "CHAIN 91PJ 16"" 3/8"" 56DL (POULAN/POULAN 1 PRO)" "BAR, POULAN PRO 16 IN" 1 OIL PUMP KIT 1 SCREW...

Parts List
Page 9
CLUTCH COVER Ref Part No Description 1 585 36 91-03 COVER 2 530 01 59-17 NUT - 582 02 31-02 SERVICE KIT PR4016, 967084601, 2016-05 Remark CLUTCH COVER ASSY (INCL. 3) BAR NUT SIDE ADJUST SCREW AND GEARS KIT QTY KIT 1 2 1
CLUTCH COVER Ref Part No Description 1 585 36 91-03 COVER 2 530 01 59-17 NUT - 582 02 31-02 SERVICE KIT PR4016, 967084601, 2016-05 Remark CLUTCH COVER ASSY (INCL. 3) BAR NUT SIDE ADJUST SCREW AND GEARS KIT QTY KIT 1 2 1


