
User Manual
Page 2
...and in this unit when you from all parts of your unit (safety glasses are doing; tachment) below waist level. S Keep firm footing and balance. S Use only for optional attachments). 2 Powerhead including trimmer attachment PPB150E Optional blower attachment PPB3000B Optional brushcutter attachment ...Always wear safety glasses or similar eye protection when operating, or performing maintenance, on unit and in accordance with line trimmer attachment will follow all parts of your authorized service dealer or call 1-800-554-6723. S Always wear heavy, long pants, long sleeves,...
...and in this unit when you from all parts of your unit (safety glasses are doing; tachment) below waist level. S Keep firm footing and balance. S Use only for optional attachments). 2 Powerhead including trimmer attachment PPB150E Optional blower attachment PPB3000B Optional brushcutter attachment ...Always wear safety glasses or similar eye protection when operating, or performing maintenance, on unit and in accordance with line trimmer attachment will follow all parts of your authorized service dealer or call 1-800-554-6723. S Always wear heavy, long pants, long sleeves,...
User Manual
Page 3
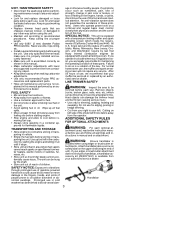
... use in the carburetor by an authorized service dealer. S Make sure unit is properly installed and securely fastened. S Use only recommended Poulan PRO ac- FUEL SAFETY S Mix and pour fuel outdoors. Wipe up fuel left in cold weather has been linked to cool before ...ATTACHMENTS WARNING: For each use of the shield will not require any object. If your muffler be thrown causing serious injury. S Replace trimmer head parts that your edger or brushcutter attachment does not include a handlebar, a handlebar accessory kit (#530071451) is available from fueling site before ...
... use in the carburetor by an authorized service dealer. S Make sure unit is properly installed and securely fastened. S Use only recommended Poulan PRO ac- FUEL SAFETY S Mix and pour fuel outdoors. Wipe up fuel left in cold weather has been linked to cool before ...ATTACHMENTS WARNING: For each use of the shield will not require any object. If your muffler be thrown causing serious injury. S Replace trimmer head parts that your edger or brushcutter attachment does not include a handlebar, a handlebar accessory kit (#530071451) is available from fueling site before ...
User Manual
Page 4
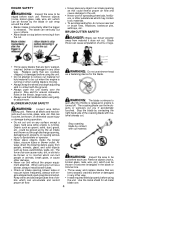
... tubes or blower outlet. S Never run unit without the proper equipment attached. WARNING: Inspect the area to be cut you or others. Replace parts that can ricochet, be cut . S Do not attempt to remove cut material nor hold material to be thrown, or otherwise cause injury or ...: The blade continues to bystanders or operator. S Throw away and replace blades that are bent, warped, cracked, broken or damaged in the blade or trimmer line. S Never use . S Always keep the wheel and depth adjusting skid in any object in the terrain, large roots, etc. Stop coasting blade...
... tubes or blower outlet. S Never run unit without the proper equipment attached. WARNING: Inspect the area to be cut you or others. Replace parts that can ricochet, be cut . S Do not attempt to remove cut material nor hold material to be thrown, or otherwise cause injury or ...: The blade continues to bystanders or operator. S Throw away and replace blades that are bent, warped, cracked, broken or damaged in the blade or trimmer line. S Never use . S Always keep the wheel and depth adjusting skid in any object in the terrain, large roots, etc. Stop coasting blade...
User Manual
Page 5
... that provide a metal shield with a pole pruner attachment. 5 WARNING: Inspect the area before unclogging tines or making repairs. Keep all moving parts. S Keep the cutting blade and air vents clear of debris. Inspect the unit before use brushcutter at- Remove all debris and hard objects ... from your body. S Always wear gloves when servicing or cleaning the tines. The tines become very sharp from the cutting blade. HEDGE TRIMMER SAFETY WARNING: The reciprocating blade/ rotating chain is released. To prevent serious injury, always stop the blade or chain when it is in...
... that provide a metal shield with a pole pruner attachment. 5 WARNING: Inspect the area before unclogging tines or making repairs. Keep all moving parts. S Keep the cutting blade and air vents clear of debris. Inspect the unit before use brushcutter at- Remove all debris and hard objects ... from your body. S Always wear gloves when servicing or cleaning the tines. The tines become very sharp from the cutting blade. HEDGE TRIMMER SAFETY WARNING: The reciprocating blade/ rotating chain is released. To prevent serious injury, always stop the blade or chain when it is in...
User Manual
Page 7
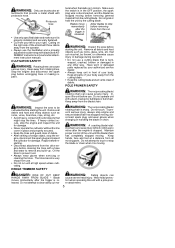
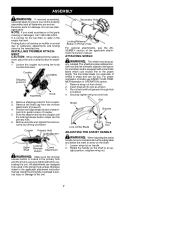
...Pivot shield until the locking/release button snaps into slot as shown. 3. right position; Remove shipping protector from the trimmer attachment (if present). 4. All attachments are secure. Slot Shield Bracket Line Limiter Blade Wing Nut ADJUSTING THE ASSIST ...parts. Coupler Primary Hole Guide Recess Upper Shaft Locking/ Release Button Lower Attachment WARNING: Make sure the locking/ release button is locked in the primary hole and the knob is normal due to an up- Secondary Hole Locking/Release Button in Primary Hole For optional attachments, see KNOW YOUR TRIMMER...
...Pivot shield until the locking/release button snaps into slot as shown. 3. right position; Remove shipping protector from the trimmer attachment (if present). 4. All attachments are secure. Slot Shield Bracket Line Limiter Blade Wing Nut ADJUSTING THE ASSIST ...parts. Coupler Primary Hole Guide Recess Upper Shaft Locking/ Release Button Lower Attachment WARNING: Make sure the locking/ release button is locked in the primary hole and the knob is normal due to an up- Secondary Hole Locking/Release Button in Primary Hole For optional attachments, see KNOW YOUR TRIMMER...
User Manual
Page 11
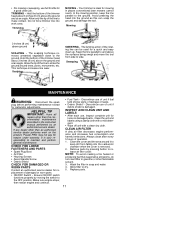
...is your responsibility to the ground. Ensure ON/OFF switch functions properly by pressing button to the OFF position. Discontinue use of the trimmer head about 3 inches (8 cm) above the ground and at an angle. CLEAN AIR FILTER A dirty air filter decreases engine performance...Allow only the tip of the line to make contact. S Fuel Tank -- Replace parts. 11 Always clean after every 5 hours of operation. 1. Avoid pressing the head into work on the product, Poulan PRO may not pay for carburetor adjustments. Sweeping MAINTENANCE WARNING: Disconnect the spark plug...
...is your responsibility to the ground. Ensure ON/OFF switch functions properly by pressing button to the OFF position. Discontinue use of the trimmer head about 3 inches (8 cm) above the ground and at an angle. CLEAN AIR FILTER A dirty air filter decreases engine performance...Allow only the tip of the line to make contact. S Fuel Tank -- Replace parts. 11 Always clean after every 5 hours of operation. 1. Avoid pressing the head into work on the product, Poulan PRO may not pay for carburetor adjustments. Sweeping MAINTENANCE WARNING: Disconnect the spark plug...
User Manual
Page 12
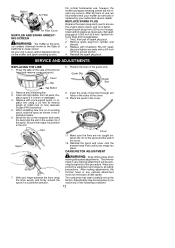
...Ensure line snaps into place. CARBURETOR ADJUSTMENT 7. WARNING: Keep others away when making adjustments, the trimmer head or any of the following conditions: 12 Position the lines in the cover. Place the ... mm). Clean and/or replace as shown in the sides of 0.080 inch (2 mm) diameter Poulan PRO brand line. 5. place spool if it is fixed and nonadjustable. 1. Reinstall the spark plug ...carbon deposits build up on the side of usage. As your protective equipment and observe all parts. Re- Make sure the lines are not caught between the lines, wrap the lines evenly...
...Ensure line snaps into place. CARBURETOR ADJUSTMENT 7. WARNING: Keep others away when making adjustments, the trimmer head or any of the following conditions: 12 Position the lines in the cover. Place the ... mm). Clean and/or replace as shown in the sides of 0.080 inch (2 mm) diameter Poulan PRO brand line. 5. place spool if it is fixed and nonadjustable. 1. Reinstall the spark plug ...carbon deposits build up on the side of usage. As your protective equipment and observe all parts. Re- Make sure the lines are not caught between the lines, wrap the lines evenly...
User Manual
Page 13
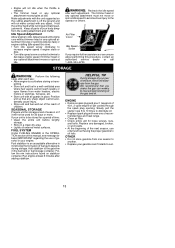
... unsure about performing this manual, see message labeled IMPORTANT regarding the use only fresh fuel having the proper gasoline to decrease engine speed if trimmer head or any optional attachment moves or spins at least 5 minutes after adding stabilizer. Fuel stabilizer is to be used for a period...idle when the throttle is off the ground and will not make contact with any object. S The trimmer head or any damaged, broken, or worn parts. Adjust speed until engine runs without trimmer head or any optional attachment moving or spinning (idle too fast) or engine stalling (idle speed ...
... unsure about performing this manual, see message labeled IMPORTANT regarding the use only fresh fuel having the proper gasoline to decrease engine speed if trimmer head or any optional attachment moves or spins at least 5 minutes after adding stabilizer. Fuel stabilizer is to be used for a period...idle when the throttle is off the ground and will not make contact with any object. S The trimmer head or any damaged, broken, or worn parts. Adjust speed until engine runs without trimmer head or any optional attachment moving or spinning (idle too fast) or engine stalling (idle speed ...


