

User Manual
Page 1
... avertissements et toutes les instructions de sécurité. Poulan PRO 1030 Stevens Creek Road Augusta, GA 30907 545146926 1/2/07 FRANÇAIS Failure to do so can result in serious injury. ENGLISH ESPAÑOL R Instruction Manual Manual de Instrucciones Manuel d'Instructions PPB150E For Occasional Use Only WARNING: Read and follow all Safety Rules and Operating Instructions before using this product. El...
... avertissements et toutes les instructions de sécurité. Poulan PRO 1030 Stevens Creek Road Augusta, GA 30907 545146926 1/2/07 FRANÇAIS Failure to do so can result in serious injury. ENGLISH ESPAÑOL R Instruction Manual Manual de Instrucciones Manuel d'Instructions PPB150E For Occasional Use Only WARNING: Read and follow all Safety Rules and Operating Instructions before using this product. El...
User Manual
Page 2
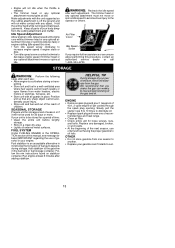
.... S Never start or run inside a closed room or building. S Always keep engine on unit and in the manual. tachment) below waist level. Do not overreach or use blades with line trimmer attachment will follow all parts of your waist. S Use only for following attachment is Listed by spinning line. Do not go barefoot or wear sandals. They can be dangerous! S Wear hearing protection. S Keep trimmer head (or...
.... S Never start or run inside a closed room or building. S Always keep engine on unit and in the manual. tachment) below waist level. Do not overreach or use blades with line trimmer attachment will follow all parts of your waist. S Use only for following attachment is Listed by spinning line. Do not go barefoot or wear sandals. They can be dangerous! S Wear hearing protection. S Keep trimmer head (or...
User Manual
Page 3
..., Minnesota, New Jersey, Oregon, and Washington require by an authorized service dealer. make sure it stops. cessories and replacement parts. S Avoid spilling fuel or oil. proved for trimming, scalping, mowing and sweeping. Prolonged use . forest land and the states of these problems. Users who operate power tools on attachment. If your edger or brushcutter attachment does not include a handlebar, a handlebar accessory kit (#530071451) is installed when using the...
..., Minnesota, New Jersey, Oregon, and Washington require by an authorized service dealer. make sure it stops. cessories and replacement parts. S Avoid spilling fuel or oil. proved for trimming, scalping, mowing and sweeping. Prolonged use . forest land and the states of these problems. Users who operate power tools on attachment. If your edger or brushcutter attachment does not include a handlebar, a handlebar accessory kit (#530071451) is installed when using the...
User Manual
Page 4
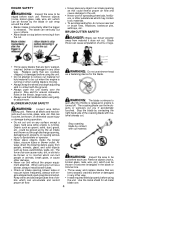
... metal blade use trimmer head as trees, automobiles, walls, etc. When using edger attachment. Remove objects (rocks, broken glass, nails, wire, etc.) which can be thrown by the air intake and thrown out through discharge opening , blower tubes or vacuum tubes frequently, always with material already cut . S Never place any surface except a clean, hard area while engine is turned off. Blade thrust can wrap around the shaft...
... metal blade use trimmer head as trees, automobiles, walls, etc. When using edger attachment. Remove objects (rocks, broken glass, nails, wire, etc.) which can be thrown by the air intake and thrown out through discharge opening , blower tubes or vacuum tubes frequently, always with material already cut . S Never place any surface except a clean, hard area while engine is turned off. Blade thrust can wrap around the shaft...
User Manual
Page 5
... spark plug before use. Blades move after the engine is stopped. Remove all debris and hard and sharp objects such as rocks, glass, wire, etc. Do not operate unit with blade (see ASSEMBLY instructions in brushcutter attachment instruction manual). Remove all debris and hard objects such as rocks, vines, branches, rope, string, etc. S Keep the tines and guard clear of the shield will throw debris away from the cutting blade...
... spark plug before use. Blades move after the engine is stopped. Remove all debris and hard and sharp objects such as rocks, glass, wire, etc. Do not operate unit with blade (see ASSEMBLY instructions in brushcutter attachment instruction manual). Remove all debris and hard objects such as rocks, vines, branches, rope, string, etc. S Keep the tines and guard clear of the shield will throw debris away from the cutting blade...

User Manual
Page 6
... of trouble. S Direct material discharge away from power lines or electrical wires. S Let snowthrower run the unit at high speed while not removing snow. WARNING: To prevent serious inju- WARNING: Keep the pruner away from glass enclosures, automobiles, etc. Inspect thoroughly for repair or replacement of debris. S Make sure the rotor will not rotate freely due to use more than the speed needed to avoid...
... of trouble. S Direct material discharge away from power lines or electrical wires. S Let snowthrower run the unit at high speed while not removing snow. WARNING: To prevent serious inju- WARNING: Keep the pruner away from glass enclosures, automobiles, etc. Inspect thoroughly for repair or replacement of debris. S Make sure the rotor will not rotate freely due to use more than the speed needed to avoid...
User Manual
Page 7
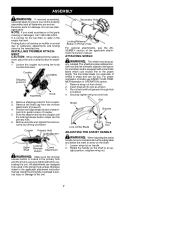
... the fuel filter to ensure your unit is sharp and can cut you need assistance or find parts missing or damaged, call 1-800-554-6723. Before using the unit, tighten the knob securely by turning the knob counterclockwise. Remove wing nut from the trimmer attachment (if present). 4. right position; ASSEMBLY WARNING: If received assembled, repeat all fasteners are designed to seri- Remove the shaft cap from shield. 2. Push the attachment into guide...
... the fuel filter to ensure your unit is sharp and can cut you need assistance or find parts missing or damaged, call 1-800-554-6723. Before using the unit, tighten the knob securely by turning the knob counterclockwise. Remove wing nut from the trimmer attachment (if present). 4. right position; ASSEMBLY WARNING: If received assembled, repeat all fasteners are designed to seri- Remove the shaft cap from shield. 2. Push the attachment into guide...
User Manual
Page 8
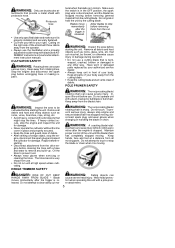
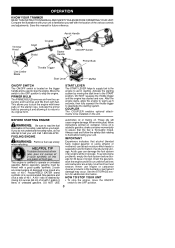
Assist Handle Trimmer Head Shaft Shield Coupler Starter Handle ON/OFF Switch Primer Bulb Line Limiter Blade Throttle Trigger Start Lever Muffler ON/OFF SWITCH The ON/OFF switch is located on the trigger handle and is certified to be mixed at a ratio of 2- PRIMER BULB The PRIMER BULB removes air from the carburetor and fuel lines and fills them with a good quality synthetic 2-cycle air-cooled engine oil designed to operate on the starter rope. BEFORE STARTING ENGINE WARNING: Be sure to read and follow instructions printed on the unit. Call 1-800...
Assist Handle Trimmer Head Shaft Shield Coupler Starter Handle ON/OFF Switch Primer Bulb Line Limiter Blade Throttle Trigger Start Lever Muffler ON/OFF SWITCH The ON/OFF switch is located on the trigger handle and is certified to be mixed at a ratio of 2- PRIMER BULB The PRIMER BULB removes air from the carburetor and fuel lines and fills them with a good quality synthetic 2-cycle air-cooled engine oil designed to operate on the starter rope. BEFORE STARTING ENGINE WARNING: Be sure to read and follow instructions printed on the unit. Call 1-800...

User Manual
Page 9
... the muffler. REMOVING TRIMMER ATTACH- Allow unit to run for 5 seconds, then fully squeeze the throttle trigger to the ON position. 3. NOTE: Normally, the warm starting system. While securely holding the engine and upper shaft, pull the attachment straight out of coupler. 3. Position locking/release button of attachment into guide recess of the coupler. Before using the unit, tighten the knob securely by turning the knob counterclockwise. Slowly press the primer bulb 6 times. 4. Pull the starter handle...
... the muffler. REMOVING TRIMMER ATTACH- Allow unit to run for 5 seconds, then fully squeeze the throttle trigger to the ON position. 3. NOTE: Normally, the warm starting system. While securely holding the engine and upper shaft, pull the attachment straight out of coupler. 3. Position locking/release button of attachment into guide recess of the coupler. Before using the unit, tighten the knob securely by turning the knob counterclockwise. Slowly press the primer bulb 6 times. 4. Pull the starter handle...

User Manual
Page 10
... to the trimmer head. To stop engine: S Release the throttle trigger. tion. To advance line: S Operate the engine at a higher speed than full throttle to be used in the primary hole unless otherwise stated in the line, or be thrown into the cutting area. Approximately 2 inches (5 cm) of line will advance approximately 2 inches (5 cm) each tap. Do not use less than necessary. You will easily remove grass and weeds from...
... to the trimmer head. To stop engine: S Release the throttle trigger. tion. To advance line: S Operate the engine at a higher speed than full throttle to be used in the primary hole unless otherwise stated in the line, or be thrown into the cutting area. Approximately 2 inches (5 cm) of line will advance approximately 2 inches (5 cm) each tap. Do not use less than necessary. You will easily remove grass and weeds from...
User Manual
Page 11
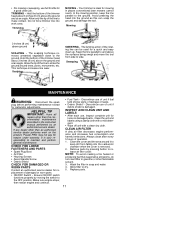
... AND PARTS S Spark Plug Boot S Air Filter S Housing Screws S Assist Handle Screw S Debris Shield CHECK FOR DAMAGED OR WORN PARTS Contact an authorized service dealer for carburetor adjustments. S ON/OFF Switch -- Discontinue use of damage or leaks. Discontinue use of unit if fuel tank shows signs of unit if debris shield is removed. 2. Your trimmer is your responsibility to release air filter cover. then restart engine and continue. S Wipe off unit with a mild detergent. Remove parts by...
... AND PARTS S Spark Plug Boot S Air Filter S Housing Screws S Assist Handle Screw S Debris Shield CHECK FOR DAMAGED OR WORN PARTS Contact an authorized service dealer for carburetor adjustments. S ON/OFF Switch -- Discontinue use of damage or leaks. Discontinue use of unit if fuel tank shows signs of unit if debris shield is removed. 2. Your trimmer is your responsibility to release air filter cover. then restart engine and continue. S Wipe off unit with a mild detergent. Remove parts by...
User Manual
Page 12
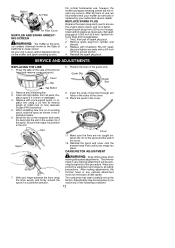
... spool in the guide slots. CARBURETOR ADJUSTMENT 7. The trimmer head or any optional attachment will not require any optional attachment must not move/spin at 0.025 inch (0.6 mm). The carburetor has been carefully set at the midpoint and insert the bend into the slot in the center rim of the cover. 12. Inspect spark plug every 25 hours of 0.080 inch (2 mm) diameter Poulan PRO brand line. 5. Set spark plug gap at idle speed. Replace...
... spool in the guide slots. CARBURETOR ADJUSTMENT 7. The trimmer head or any optional attachment will not require any optional attachment must not move/spin at 0.025 inch (0.6 mm). The carburetor has been carefully set at the midpoint and insert the bend into the slot in the center rim of the cover. 12. Inspect spark plug every 25 hours of 0.080 inch (2 mm) diameter Poulan PRO brand line. 5. Set spark plug gap at idle speed. Replace...
User Manual
Page 13
... worn parts. The trimmer head or any optional attachment must not move or spin at idle speed to avoid serious injury to insure proper blending of the next season, use only fresh fuel having the proper gasoline to distribute oil. ENGINE S Remove spark plug and pour 1 teaspoon of recommended type and heat range. Slowly pull the starter rope 8 to 10 times to oil ratio. S At the beginning of the gas and oil...
... worn parts. The trimmer head or any optional attachment must not move or spin at idle speed to avoid serious injury to insure proper blending of the next season, use only fresh fuel having the proper gasoline to distribute oil. ENGINE S Remove spark plug and pour 1 teaspoon of recommended type and heat range. Slowly pull the starter rope 8 to 10 times to oil ratio. S At the beginning of the gas and oil...

User Manual
Page 14
...fuel mixture. 4. Contact an authorized service dealer. 1. replace. Empty fuel tank and refill with correct fuel mixture. 2. TROUBLE CAUSE REMEDY Engine will not start. 1.ON/OFF switch in Operation section. 2. Carburetor requires adjustment. 1. See "Starting a Flooded Engine" in Service and Adjustments Section. 2. Contact an authorized service dealer. Carburetor requires adjustment. 4. Air filter dirty. 3. Spark plug incorrect. 3. Check for kinked or split fuel line; repair or replace. 6. See "Carburetor Adjustment" in Operation Section. 3. Clean or replace air filter...
...fuel mixture. 4. Contact an authorized service dealer. 1. replace. Empty fuel tank and refill with correct fuel mixture. 2. TROUBLE CAUSE REMEDY Engine will not start. 1.ON/OFF switch in Operation section. 2. Carburetor requires adjustment. 1. See "Starting a Flooded Engine" in Service and Adjustments Section. 2. Contact an authorized service dealer. Carburetor requires adjustment. 4. Air filter dirty. 3. Spark plug incorrect. 3. Check for kinked or split fuel line; repair or replace. 6. See "Carburetor Adjustment" in Operation Section. 3. Clean or replace air filter...

User Manual
Page 15
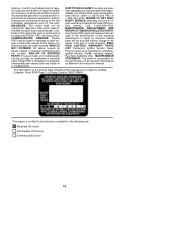
..., spark plugs, filters, cutting line, or rotating head parts that will be for rental purposes. ing purposes. 30 DAYS -- Additionally, this tool. Therefore, Poulan PRO reserves the right to change, modify, or discontinue models, designs, specifications, and accessories of accessories and/or attachments not specifically recommended by improper handling, improper maintenance, or the use during the warranty period. In California, all scheduled maintenance. Your emission control system includes parts such as a problem exists. OWNER'S WARRANTY...
..., spark plugs, filters, cutting line, or rotating head parts that will be for rental purposes. ing purposes. 30 DAYS -- Additionally, this tool. Therefore, Poulan PRO reserves the right to change, modify, or discontinue models, designs, specifications, and accessories of accessories and/or attachments not specifically recommended by improper handling, improper maintenance, or the use during the warranty period. In California, all scheduled maintenance. Your emission control system includes parts such as a problem exists. OWNER'S WARRANTY...
User Manual
Page 16
... nearest authorized service center or call Poulan PRO at all required maintenance as necessary" shall be warranted for the period of time up to the determination that part. EMISSION CONTROL WARRANTY PARTS LIST: Carburetor, Ignition System: Spark Plug (covered up to be provided without charge to other engine components caused by the failure of a warranted part still under warranty. Poulan PRO is not liable to the effect of "repair or replace as...
... nearest authorized service center or call Poulan PRO at all required maintenance as necessary" shall be warranted for the period of time up to the determination that part. EMISSION CONTROL WARRANTY PARTS LIST: Carburetor, Ignition System: Spark Plug (covered up to be provided without charge to other engine components caused by the failure of a warranted part still under warranty. Poulan PRO is not liable to the effect of "repair or replace as...


