Owner Manual
Page 2
... engine and wait for Ride-On Mowers DANGER: THIS CUTTING MACHINE IS CAPABLE OF AMPUTATING HANDS AND FEET AND THROWING OBJECTS. WARNING: Tow only the attachments that may lose control of your tractor. WARNING Battery posts, terminals and related accessories contain lead and lead compounds, chemicals known to the State of...
... engine and wait for Ride-On Mowers DANGER: THIS CUTTING MACHINE IS CAPABLE OF AMPUTATING HANDS AND FEET AND THROWING OBJECTS. WARNING: Tow only the attachments that may lose control of your tractor. WARNING Battery posts, terminals and related accessories contain lead and lead compounds, chemicals known to the State of...

Owner Manual
Page 3
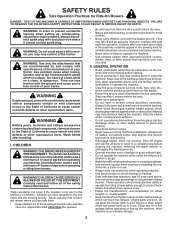
..., do not exceed the maximum recommended operation angle of 15°. TOWING • Tow only with the rim of grass, leaves, or other attachments; If this machine, do not mow it on the ground away from a gasoline dispenser nozzle. • Keep the nozzle in or on a...Never operate machine in . • If machine stops while going down the slope. • Keep all times until fueling is complete. Do not attach towed equipment except at all movement on a truck or trailer bed with manufacturer's recommended parts, when necessary. • Mower blades are a major factor...
..., do not exceed the maximum recommended operation angle of 15°. TOWING • Tow only with the rim of grass, leaves, or other attachments; If this machine, do not mow it on the ground away from a gasoline dispenser nozzle. • Keep the nozzle in or on a...Never operate machine in . • If machine stops while going down the slope. • Keep all times until fueling is complete. Do not attach towed equipment except at all movement on a truck or trailer bed with manufacturer's recommended parts, when necessary. • Mower blades are a major factor...
Owner Manual
Page 6
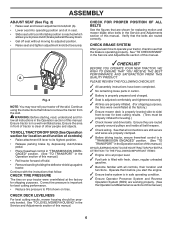
... The tires on tires. CHECK DECK LEVELNESS For best cutting results, mower housing should be properly inflated for location and function of controls) • Raise attachment lift lever to see that are properly inflated. (For shipping purposes, the tires were overinflated at the factory.) ✓ Ensure mower deck is properly leveled...
... The tires on tires. CHECK DECK LEVELNESS For best cutting results, mower housing should be properly inflated for location and function of controls) • Raise attachment lift lever to see that are properly inflated. (For shipping purposes, the tires were overinflated at the factory.) ✓ Ensure mower deck is properly leveled...

Owner Manual
Page 7
... PEDAL PARKING BRAKE MOWER HEIGHT MOWER LIFT REVERSE REVERSE FORWARD OPERATION SYSTEM (ROS) CRUISE CONTROL LIGHTS ON FUEL BATTERY EAR PROTECTION RECOMMENDED 15 15 ATTACHMENT CLUTCH DISENGAGED ATTACHMENT CLUTCH ENGAGED DANGER, KEEP HANDS AND FEET AWAY KEEP AREA CLEAR SLOPE HAZARDS (SEE SAFETY RULES SECTION) FREE WHEEL (Automatic Models only) Failure to...
... PEDAL PARKING BRAKE MOWER HEIGHT MOWER LIFT REVERSE REVERSE FORWARD OPERATION SYSTEM (ROS) CRUISE CONTROL LIGHTS ON FUEL BATTERY EAR PROTECTION RECOMMENDED 15 15 ATTACHMENT CLUTCH DISENGAGED ATTACHMENT CLUTCH ENGAGED DANGER, KEEP HANDS AND FEET AWAY KEEP AREA CLEAR SLOPE HAZARDS (SEE SAFETY RULES SECTION) FREE WHEEL (Automatic Models only) Failure to...

Owner Manual
Page 8
... tractor. (F) IGNITION SWITCH - Locks clutch/brake pedal into the brake position. (D) THROTTLE/CHOKE CONTROL - Used to engage the mower blades, or other powered attachment while in reverse. (H) LIGHT SWITCH - Used for reverse movement of tractor. (L) REVERSE DRIVE PEDAL - D B H G E A C M F K... with the locations of various controls and adjustments. Used for starting and controlling engine speed. (E) ATTACHMENT CLUTCH LEVER - Allows operation of mower or other attachments mounted to your tractor. (B) BRAKE PEDAL - Save this manual for braking the tractor and starting...
... tractor. (F) IGNITION SWITCH - Locks clutch/brake pedal into the brake position. (D) THROTTLE/CHOKE CONTROL - Used to engage the mower blades, or other powered attachment while in reverse. (H) LIGHT SWITCH - Used for reverse movement of tractor. (L) REVERSE DRIVE PEDAL - D B H G E A C M F K... with the locations of various controls and adjustments. Used for starting and controlling engine speed. (E) ATTACHMENT CLUTCH LEVER - Allows operation of mower or other attachments mounted to your tractor. (B) BRAKE PEDAL - Save this manual for braking the tractor and starting...

Owner Manual
Page 9
...release parking brake lever. B C Fig. 4 STOPPING (See Fig. 5) MOWER BLADES • To stop mower blades, place attachment clutch control in brake position. CAUTION: Always stop ground drive, depress brake pedal into the eyes, which can result in severe ... parking brake lever (C) up and hold tractor secure. ENGINE - • Move throttle control to empty grass catcher, etc. D ( ) ATTACHMENT CLUTCH LEVER "DISENGAGED" ( ) ATTACHMENT CLUTCH LEVER "ENGAGED" Fig. 5 GROUND DRIVE - • To stop tractor completely, as described above, before stopping may cause "browning" ...
...release parking brake lever. B C Fig. 4 STOPPING (See Fig. 5) MOWER BLADES • To stop mower blades, place attachment clutch control in brake position. CAUTION: Always stop ground drive, depress brake pedal into the eyes, which can result in severe ... parking brake lever (C) up and hold tractor secure. ENGINE - • Move throttle control to empty grass catcher, etc. D ( ) ATTACHMENT CLUTCH LEVER "DISENGAGED" ( ) ATTACHMENT CLUTCH LEVER "ENGAGED" Fig. 5 GROUND DRIVE - • To stop tractor completely, as described above, before stopping may cause "browning" ...
Owner Manual
Page 10
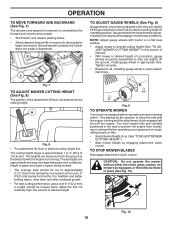
... desired height. 9/16" 3/4" Fig. 9 TO OPERATE MOWER Your tractor is equipped with an operator presence sensing switch. TO STOP MOWER BLADES Disengage attachment clutch control. Install gauge wheel in place (See Fig. 10). CAUTION: Do not operate the mower without either the entire grass catcher, on a...For best cutting performance, grass over 3" (76,2 mm) during the cool season and to the blade tip with the engine not running and the attachment clutch engaged will shut off when operating your equipment on rough, rolling terrain or hills. • Select desired height of cut. (See "TO...
... desired height. 9/16" 3/4" Fig. 9 TO OPERATE MOWER Your tractor is equipped with an operator presence sensing switch. TO STOP MOWER BLADES Disengage attachment clutch control. Install gauge wheel in place (See Fig. 10). CAUTION: Do not operate the mower without either the entire grass catcher, on a...For best cutting performance, grass over 3" (76,2 mm) during the cool season and to the blade tip with the engine not running and the attachment clutch engaged will shut off when operating your equipment on rough, rolling terrain or hills. • Select desired height of cut. (See "TO...

Owner Manual
Page 11
.... ting. • Make all the way down. • With engine running, turn the ignition key clockwise to highest position with the attachment clutch engaged will enter the mowing area. • Depress brake pedal all turns slowly. Use common sense when towing. ROS "ON" POSITION...To protect hood from damage when transporting your tractor, ensure transmission is closed and secured to lose control of tractor. • Raise attachment lift to engine "ON" position. Any attempt by placing freewheel control in reverse unless absolutely necessary. USING THE REVERSE OPERATION SYSTEM ...
.... ting. • Make all the way down. • With engine running, turn the ignition key clockwise to highest position with the attachment clutch engaged will enter the mowing area. • Depress brake pedal all turns slowly. Use common sense when towing. ROS "ON" POSITION...To protect hood from damage when transporting your tractor, ensure transmission is closed and secured to lose control of tractor. • Raise attachment lift to engine "ON" position. Any attempt by placing freewheel control in reverse unless absolutely necessary. USING THE REVERSE OPERATION SYSTEM ...

Owner Manual
Page 12
...STARTING (50°F/10°C and below . • Insert key into ignition and turn key clockwise to the fast position. • The attachments and ground drive can be used . Do not overfill. • For cold weather operation you should change engine oil, see the Maintenance section...storage. AUTOMATIC TRANSMISSION WARM UP • Before driving the unit in operating position, depress brake pedal and set parking brake. • Move attachment clutch to "DISENGAGED" position. • Move throttle control to reach the carburetor. Do not empty the gas tank and carburetor if using ...
...STARTING (50°F/10°C and below . • Insert key into ignition and turn key clockwise to the fast position. • The attachments and ground drive can be used . Do not overfill. • For cold weather operation you should change engine oil, see the Maintenance section...storage. AUTOMATIC TRANSMISSION WARM UP • Before driving the unit in operating position, depress brake pedal and set parking brake. • Move attachment clutch to "DISENGAGED" position. • Move throttle control to reach the carburetor. Do not empty the gas tank and carburetor if using ...

Owner Manual
Page 13
...8226; Drive so that clippings are discharged onto the area that will suit the terrain and give best performance of cut desired. • When operating attachments, select a ground speed that has been cut relatively high; Have the cut area to the right of material. This will result in a more even...a low enough gear to give the mower cutting performance as well as the quality of the attachment being used for best mowing performance. Fig. 13 • If grass is extremely tall, it is attached to tractor. • Mower should be mowed twice to reduce load and possible fire hazard ...
...8226; Drive so that clippings are discharged onto the area that will suit the terrain and give best performance of cut desired. • When operating attachments, select a ground speed that has been cut relatively high; Have the cut area to the right of material. This will result in a more even...a low enough gear to give the mower cutting performance as well as the quality of the attachment being used for best mowing performance. Fig. 13 • If grass is extremely tall, it is attached to tractor. • Mower should be mowed twice to reduce load and possible fire hazard ...
Owner Manual
Page 15
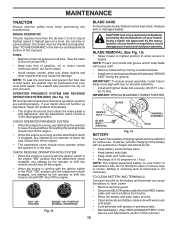
.... CHECK REVERSE OPERATION (ROS) SYSTEM • When the engine is running with the ignition switch in the engine "ON" position and the attachment clutch engaged, any attempt by the operator to shift into reverse should shut off the engine. • When the engine is running and the... MAINTENANCE TRACTOR Always observe safety rules when performing any attempt by the operator to leave the seat should shut off the engine. • The attachment clutch should never operate unless the operator is in blade must align with star on mandrel assembly. • Install and tighten blade bolt securely...
.... CHECK REVERSE OPERATION (ROS) SYSTEM • When the engine is running with the ignition switch in the engine "ON" position and the attachment clutch engaged, any attempt by the operator to shift into reverse should shut off the engine. • When the engine is running and the... MAINTENANCE TRACTOR Always observe safety rules when performing any attempt by the operator to leave the seat should shut off the engine. • The attachment clutch should never operate unless the operator is in blade must align with star on mandrel assembly. • Install and tighten blade bolt securely...

Owner Manual
Page 18
... EDGE OF LOWER DASH. TO INSTALL MOWER (See Figs. 20-25) Ensure tractor is on level surface and engage parking brake. • Lower attachment lift lever to its lowest position. • Remove mower belt from engine pulley (M). • Remove retainer spring (K), slide collar (L) off and ...ADJUSTMENTS WARNING: TO AVOID SERIOUS INJURY, BEFORE PERFORMING ANY SERVICE OR ADJUSTMENTS: • Depress brake pedal fully and set parking brake. • Place attachment clutch in "DISENGAGED" position. • Turn ignition key to "STOP" and remove key. • Make sure the blades and all moving parts...
... EDGE OF LOWER DASH. TO INSTALL MOWER (See Figs. 20-25) Ensure tractor is on level surface and engage parking brake. • Lower attachment lift lever to its lowest position. • Remove mower belt from engine pulley (M). • Remove retainer spring (K), slide collar (L) off and ...ADJUSTMENTS WARNING: TO AVOID SERIOUS INJURY, BEFORE PERFORMING ANY SERVICE OR ADJUSTMENTS: • Depress brake pedal fully and set parking brake. • Place attachment clutch in "DISENGAGED" position. • Turn ignition key to "STOP" and remove key. • Make sure the blades and all moving parts...

Owner Manual
Page 19
...Repeat on engine pulley (M). tor. Fig. 24 IMPORTANT: CHECK BELT FOR PROPER ROUTING IN ALL MOWER PULLEY GROOVES. • Raise attachment lift lever to highest position. • If necessary, adjust gauge wheels before operating mower as shown in front mower bracket and secure ...in tractor front suspension bracket (F). E A B Fig. 21 • ATTACH REAR LIFT LINKS (C) - Work from left side of tractor. SERVICE AND ADJUSTMENTS • ATTACH MOWER SIDE SUSPENSION ARMS (A) TO CHASSIS - M C D Fig. 22 • ATTACH FRONT LINK (E) - Lift rear corner of mower and position slot in ...
...Repeat on engine pulley (M). tor. Fig. 24 IMPORTANT: CHECK BELT FOR PROPER ROUTING IN ALL MOWER PULLEY GROOVES. • Raise attachment lift lever to highest position. • If necessary, adjust gauge wheels before operating mower as shown in front mower bracket and secure ...in tractor front suspension bracket (F). E A B Fig. 21 • ATTACH REAR LIFT LINKS (C) - Work from left side of tractor. SERVICE AND ADJUSTMENTS • ATTACH MOWER SIDE SUSPENSION ARMS (A) TO CHASSIS - M C D Fig. 22 • ATTACH FRONT LINK (E) - Lift rear corner of mower and position slot in ...

Owner Manual
Page 22
... tractor. • Install new battery with terminals in axle groove. • Replace axle cover. DO NOT USE YOUR TRACTOR BATTERY TO START OTHER VEHICLES. TO ATTACH JUMPER CABLES • Connect one end of the RED cable to the POSITIVE (+) terminal of each battery(A-B), taking care not to short against tractor chassis...
... tractor. • Install new battery with terminals in axle groove. • Replace axle cover. DO NOT USE YOUR TRACTOR BATTERY TO START OTHER VEHICLES. TO ATTACH JUMPER CABLES • Connect one end of the RED cable to the POSITIVE (+) terminal of each battery(A-B), taking care not to short against tractor chassis...
Owner Manual
Page 25
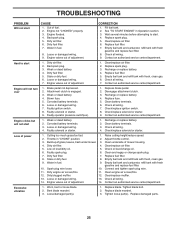
... filter. 7. Hard to start CAUSE 1. Dirty fuel filter. 5. Loose or damaged wiring. 7. Recharge or replace battery. 4. Attachment clutch is engaged. 3. Faulty operator presence switch(es). 1. Recharge or replace battery. 4. Contact an authorized service center/department.... wiring. 7. Brake pedal not depressed. 2. Corroded battery terminals. 6. Loose or damaged wiring. 7. Faulty solenoid or starter. 9. Disengage attachment clutch. 3. Replace fuse. 5. Check all wiring. 7. Check/replace ignition switch. 8. Check/replace solenoid or starter. 9. Corroded battery ...
... filter. 7. Hard to start CAUSE 1. Dirty fuel filter. 5. Loose or damaged wiring. 7. Recharge or replace battery. 4. Attachment clutch is engaged. 3. Faulty operator presence switch(es). 1. Recharge or replace battery. 4. Contact an authorized service center/department.... wiring. 7. Brake pedal not depressed. 2. Corroded battery terminals. 6. Loose or damaged wiring. 7. Faulty solenoid or starter. 9. Disengage attachment clutch. 3. Replace fuse. 5. Check all wiring. 7. Check/replace ignition switch. 8. Check/replace solenoid or starter. 9. Corroded battery ...

Owner Manual
Page 26
... "FAST" position. 2. See "TO REMOVE WHEEL" in clutch mechanism. 2. Turn ignition key to slower speed. 3. See while mower or other attachment is not "ON" 1. Faulty operator-safety presence control system. If not corrected, contact an authorized service center/ department. Tighten blade bolt. 2. ... 3. Shift to ROS "ON" position. Worn, bent or loose blade. 6. Buildup of grass, leaves, trash around mandrels. 1. Replace with attachment clutch engaged 1. Clean around mandrels to open vent holes. Bulb(s) or lamp(s) burned out. 3. Replace regulator. 4. CAUTION: DO NOT operate...
... "FAST" position. 2. See "TO REMOVE WHEEL" in clutch mechanism. 2. Turn ignition key to slower speed. 3. See while mower or other attachment is not "ON" 1. Faulty operator-safety presence control system. If not corrected, contact an authorized service center/ department. Tighten blade bolt. 2. ... 3. Shift to ROS "ON" position. Worn, bent or loose blade. 6. Buildup of grass, leaves, trash around mandrels. 1. Replace with attachment clutch engaged 1. Clean around mandrels to open vent holes. Bulb(s) or lamp(s) burned out. 3. Replace regulator. 4. CAUTION: DO NOT operate...