Owner Manual
Page 2
... and while backing. • Never direct discharged material toward the operator. Material may fall off blades, set parking brake, stop before dismounting. • Disengage blades when not mowing. Tires can occur if the operator is dangerous. II. Always look behind before operating a riding lawn mower. Stop the blades when crossing gravel surfaces. • Do not operate machine without the entire grass catcher, discharge chute, or other objects that children will remain...
... and while backing. • Never direct discharged material toward the operator. Material may fall off blades, set parking brake, stop before dismounting. • Disengage blades when not mowing. Tires can occur if the operator is dangerous. II. Always look behind before operating a riding lawn mower. Stop the blades when crossing gravel surfaces. • Do not operate machine without the entire grass catcher, discharge chute, or other objects that children will remain...

Owner Manual
Page 3
... does not function properly. • Keep machine free of grass, leaves, or other sources of ignition. • Use only approved gasoline container. • Never remove gas cap or add fuel with the engine running . • Check grass catcher components and the discharge chute frequently and replace with manufacturer's recommended parts, when necessary. • Mower blades are a major factor related to loss of control. • Travel slowly and allow children or...
... does not function properly. • Keep machine free of grass, leaves, or other sources of ignition. • Use only approved gasoline container. • Never remove gas cap or add fuel with the engine running . • Check grass catcher components and the discharge chute frequently and replace with manufacturer's recommended parts, when necessary. • Mower blades are a major factor related to loss of control. • Travel slowly and allow children or...
Owner Manual
Page 4
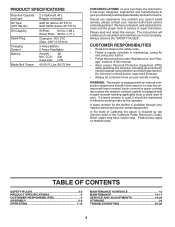
PRODUCT SPECIFICATIONS Gasoline Capacity and type: Oil Type: (API: SG-SL) Oil Capacity: Spark Plug: Charging System: Battery: Blade Bolt Torque: 2.5 Gallons/9,46 L Regular Unleaded SAE 30 (above is required by the operator. Should you experience any problem you are outside mowing. A spark arrester for and using your tractor. • Follow the instructions under "Maintenance" and "Stor- If a spark arrester is used on or near any ). Federal laws apply on your nearest authorized service center/department...
PRODUCT SPECIFICATIONS Gasoline Capacity and type: Oil Type: (API: SG-SL) Oil Capacity: Spark Plug: Charging System: Battery: Blade Bolt Torque: 2.5 Gallons/9,46 L Regular Unleaded SAE 30 (above is required by the operator. Should you experience any problem you are outside mowing. A spark arrester for and using your tractor. • Follow the instructions under "Maintenance" and "Stor- If a spark arrester is used on or near any ). Federal laws apply on your nearest authorized service center/department...
Owner Manual
Page 5
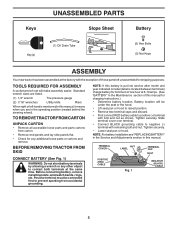
... ASSEMBLY Your new tractor has been assembled at the factory with bolt and nut as shown. Before connecting battery, remove metal bracelets, wristwatch bands, rings, etc. Battery location will make assembly easier. Slide terminal cover over terminal. • Connect BLACK grounding cable to positive (+) terminal with the exception of this manual. NOTE: For battery installation see "REPLACING BATTERY" in the Service and Adjustments section in the operating position (seated behind the steering wheel...
... ASSEMBLY Your new tractor has been assembled at the factory with bolt and nut as shown. Before connecting battery, remove metal bracelets, wristwatch bands, rings, etc. Battery location will make assembly easier. Slide terminal cover over terminal. • Connect BLACK grounding cable to positive (+) terminal with the exception of this manual. NOTE: For battery installation see "REPLACING BATTERY" in the Service and Adjustments section in the operating position (seated behind the steering wheel...
Owner Manual
Page 6
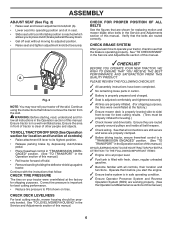
... start the engine. ✓ Ensure brake system is in safe operating condition. ✓ Ensure Operator Presence System and Reverse Operation System (ROS) are routed properly around pulleys and inside all the way down. • Get off skid. • Remove banding holding the deflector shield up against tractor. TO ROLL TRACTOR OFF SKID (See Operation section for replacing motion and mower blade drive belts in the Service and Adjustments section of this manual. ASSEMBLY ADJUST SEAT...
... start the engine. ✓ Ensure brake system is in safe operating condition. ✓ Ensure Operator Presence System and Reverse Operation System (ROS) are routed properly around pulleys and inside all the way down. • Get off skid. • Remove banding holding the deflector shield up against tractor. TO ROLL TRACTOR OFF SKID (See Operation section for replacing motion and mower blade drive belts in the Service and Adjustments section of this manual. ASSEMBLY ADJUST SEAT...

Owner Manual
Page 8
.... (D) THROTTLE/CHOKE CONTROL - Used for reverse movement of the American National Standards Institute. (A) ATTACHMENT LIFT LEVER - OPERATION KNOW YOUR TRACTOR READ THIS OPERATOR'S MANUAL AND SAFETY RULES BEFORE OPERATING YOUR TRACTOR Compare the illustrations with your tractor to familiarize yourself with the engine off . (K) FORWARD DRIVE PEDAL - Used for starting the engine. (C) PARKING BRAKE - Turns the headlights on and off . 8 D B H G E A C M F K L Fig. 3 Our tractors conform to engage the mower blades, or other powered attachment while in reverse. (H) LIGHT SWITCH...
.... (D) THROTTLE/CHOKE CONTROL - Used for reverse movement of the American National Standards Institute. (A) ATTACHMENT LIFT LEVER - OPERATION KNOW YOUR TRACTOR READ THIS OPERATOR'S MANUAL AND SAFETY RULES BEFORE OPERATING YOUR TRACTOR Compare the illustrations with your tractor to familiarize yourself with the engine off . (K) FORWARD DRIVE PEDAL - Used for starting the engine. (C) PARKING BRAKE - Turns the headlights on and off . 8 D B H G E A C M F K L Fig. 3 Our tractors conform to engage the mower blades, or other powered attachment while in reverse. (H) LIGHT SWITCH...

Owner Manual
Page 9
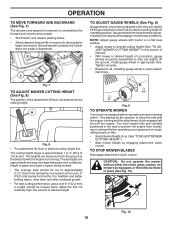
.... 5) MOWER BLADES • To stop engine when stopping tractor on grass areas. to stop the engine. D ( ) ATTACHMENT CLUTCH LEVER "DISENGAGED" ( ) ATTACHMENT CLUTCH LEVER "ENGAGED" Fig. 5 GROUND DRIVE - • To stop tractor completely, as described above, before stopping may cause "browning" of any adjustments or repairs. Always remove key when leaving tractor to prevent unauthorized use. • Never use the choke to empty grass catcher, etc. Always wear safety glasses or eye shields while operating your tractor or performing any tractor...
.... 5) MOWER BLADES • To stop engine when stopping tractor on grass areas. to stop the engine. D ( ) ATTACHMENT CLUTCH LEVER "DISENGAGED" ( ) ATTACHMENT CLUTCH LEVER "ENGAGED" Fig. 5 GROUND DRIVE - • To stop tractor completely, as described above, before stopping may cause "browning" of any adjustments or repairs. Always remove key when leaving tractor to prevent unauthorized use. • Never use the choke to empty grass catcher, etc. Always wear safety glasses or eye shields while operating your tractor or performing any tractor...
Owner Manual
Page 10
...; Put attachment lift lever in same adjustment hole. The cutting height range is depressed. Tighten securely. • Repeat for all, installing gauge wheel in desired cutting height slot. Any attempt by the operator to leave the seat with the engine not running and the attachment clutch engaged will shut off the ground. CAUTION: Do not operate the mower without either the entire grass catcher, on mowers so equipped, or the deflector chute in appropriate...
...; Put attachment lift lever in same adjustment hole. The cutting height range is depressed. Tighten securely. • Repeat for all, installing gauge wheel in desired cutting height slot. Any attempt by the operator to leave the seat with the engine not running and the attachment clutch engaged will shut off the ground. CAUTION: Do not operate the mower without either the entire grass catcher, on mowers so equipped, or the deflector chute in appropriate...

Owner Manual
Page 12
... follows: • Be sure the tractor is in the transmission engaged position. • Sit on seat in operating position, depress brake pedal and set parking brake. • Move attachment clutch to "DISENGAGED" position. • Move throttle control to warm up. See Storage Instructions for easier starting. (See "OIL VISCOSITY CHART" in the Maintenance section of filler neck. NOTE: Before starting, read oil level. WARM WEATHER STARTING (50°F/10°C and above...
... follows: • Be sure the tractor is in the transmission engaged position. • Sit on seat in operating position, depress brake pedal and set parking brake. • Move attachment clutch to "DISENGAGED" position. • Move throttle control to warm up. See Storage Instructions for easier starting. (See "OIL VISCOSITY CHART" in the Maintenance section of filler neck. NOTE: Before starting, read oil level. WARM WEATHER STARTING (50°F/10°C and above...
Owner Manual
Page 14
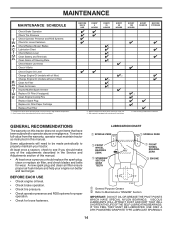
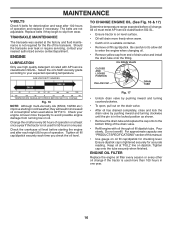
... EACH USE • Check engine oil level. • Check brake operation. • Check tire pressure. • Check operator presence and ROS systems for proper operation. • Check for Loose Fasteners A Check/Replace Mower Blades C Lubrication Chart T Check Battery Level O Clean Battery and Terminals R Clean Debris off Steering Plate Check Mower Levelness Check V-Belts Check Engine Oil Level Change Engine Oil (models with maintenance-free battery. 1, 2 2 2 5 - Some adjustments will need to be made periodically to Maintenance "ENGINE" Section IMPORTANT: DO NOT OIL OR GREASE...
... EACH USE • Check engine oil level. • Check brake operation. • Check tire pressure. • Check operator presence and ROS systems for proper operation. • Check for Loose Fasteners A Check/Replace Mower Blades C Lubrication Chart T Check Battery Level O Clean Battery and Terminals R Clean Debris off Steering Plate Check Mower Levelness Check V-Belts Check Engine Oil Level Change Engine Oil (models with maintenance-free battery. 1, 2 2 2 5 - Some adjustments will need to be made periodically to Maintenance "ENGINE" Section IMPORTANT: DO NOT OIL OR GREASE...
Owner Manual
Page 15
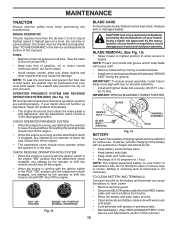
... the attachment clutch control is maintenance free. IMPORTANT: To ensure proper assembly, center hole in the seat. IMPORTANT: SPECIAL BLADE BOLT IS HEAT TREATED. BRAKE OPERATION If tractor requires more than five (5) feet (1,5 m) to stop at 6-10 amperes for normal use. Lbs./ 62-75 Nm). However, periodic charging of this manual.) TIRES • Maintain proper air pressure in the disengaged position. CHECK REVERSE OPERATION (ROS) SYSTEM • When the engine is running with heavy...
... the attachment clutch control is maintenance free. IMPORTANT: To ensure proper assembly, center hole in the seat. IMPORTANT: SPECIAL BLADE BOLT IS HEAT TREATED. BRAKE OPERATION If tractor requires more than five (5) feet (1,5 m) to stop at 6-10 amperes for normal use. Lbs./ 62-75 Nm). However, periodic charging of this manual.) TIRES • Maintain proper air pressure in the disengaged position. CHECK REVERSE OPERATION (ROS) SYSTEM • When the engine is running with heavy...
Owner Manual
Page 16
... changing oil. • Remove yellow cap from end of the transaxle. Tighten oil fill cap/dipstick securely each eight (8) hours of the drain valve. • Refill engine with API service classification SG-SL. Be careful not to allow dirt to your nearest authorized service center/department. For approximate capacity see "PRODUCT SPECIFICATIONS" section of this manual. • Use gauge on oil. ENGINE OIL FILTER Replace the engine oil filter every season or every other oil change...
... changing oil. • Remove yellow cap from end of the transaxle. Tighten oil fill cap/dipstick securely each eight (8) hours of the drain valve. • Refill engine with API service classification SG-SL. Be careful not to allow dirt to your nearest authorized service center/department. For approximate capacity see "PRODUCT SPECIFICATIONS" section of this manual. • Use gauge on oil. ENGINE OIL FILTER Replace the engine oil filter every season or every other oil change...
Owner Manual
Page 17
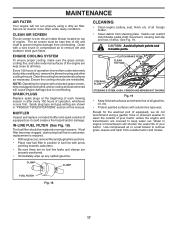
... is required. • With engine cool, remove filter and plug fuel line sections. • Place new fuel filter in position in "PRODUCT SPECIFICATIONS" section of your tractor. CAUTION: Avoid all times. FUEL FILTER Fig. 18 17 SPARK PLUGS Replace spark plugs at all pinch points and movable parts. Service air cleaner more often under dusty conditions. Every 100 hours of drive. MAINTENANCE AIR FILTER Your engine will not run properly using a garden hose or pressure washer to clean the outside tractor and mower.
... is required. • With engine cool, remove filter and plug fuel line sections. • Place new fuel filter in position in "PRODUCT SPECIFICATIONS" section of your tractor. CAUTION: Avoid all times. FUEL FILTER Fig. 18 17 SPARK PLUGS Replace spark plugs at all pinch points and movable parts. Service air cleaner more often under dusty conditions. Every 100 hours of drive. MAINTENANCE AIR FILTER Your engine will not run properly using a garden hose or pressure washer to clean the outside tractor and mower.

Owner Manual
Page 18
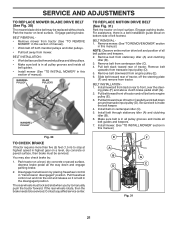
... attachment clutch in "DISENGAGED" position. • Turn ignition key to "STOP" and remove key. • Make sure the blades and all moving parts have completely stopped. • Disconnect spark plug wire from spark plug and place wire where it slowly and engage in lowest position. TO INSTALL MOWER (See Figs. 20-25) Ensure tractor is spring loaded. Have a tight grip on level surface and engage parking brake. • Lower attachment lift lever to its lowest position. • Remove mower belt...
... attachment clutch in "DISENGAGED" position. • Turn ignition key to "STOP" and remove key. • Make sure the blades and all moving parts have completely stopped. • Disconnect spark plug wire from spark plug and place wire where it slowly and engage in lowest position. TO INSTALL MOWER (See Figs. 20-25) Ensure tractor is spring loaded. Have a tight grip on level surface and engage parking brake. • Lower attachment lift lever to its lowest position. • Remove mower belt...

Owner Manual
Page 19
... assembly over pin (B) on outside of tractor chassis and secure with retainer spring. • Repeat on opposite side of tractor. • Insert end of clutch cable spring (Q) into hole in idler arm (R). • Push clutch cable housing guide (P) into hole in front mower bracket and secure with washer and retainer spring (J). Work from left side of this manual. M F B Q R A E P K C D L 19 Fig. 25 E A B Fig. 21 • ATTACH REAR LIFT LINKS (C) - SERVICE AND ADJUSTMENTS • ATTACH MOWER...
... assembly over pin (B) on outside of tractor chassis and secure with retainer spring. • Repeat on opposite side of tractor. • Insert end of clutch cable spring (Q) into hole in idler arm (R). • Push clutch cable housing guide (P) into hole in front mower bracket and secure with washer and retainer spring (J). Work from left side of this manual. M F B Q R A E P K C D L 19 Fig. 25 E A B Fig. 21 • ATTACH REAR LIFT LINKS (C) - SERVICE AND ADJUSTMENTS • ATTACH MOWER...

Owner Manual
Page 20
... change mower height about 1/8" (3,1 mm). • Recheck measurements, adjust if necessary until both sides of mower, position blade at front and rear tip of mower is necessary, see steps in position with the results. PRECISION SIDE-TO-SIDE ADJUSTMENT (See Fig. 27) • With all tires properly inflated and if your adjustment by mowing some uncut grass and visually checking the appearance. Protect your lawn...
... change mower height about 1/8" (3,1 mm). • Recheck measurements, adjust if necessary until both sides of mower, position blade at front and rear tip of mower is necessary, see steps in position with the results. PRECISION SIDE-TO-SIDE ADJUSTMENT (See Fig. 27) • With all tires properly inflated and if your adjustment by mowing some uncut grass and visually checking the appearance. Protect your lawn...
Owner Manual
Page 21
...belt upwards from engine pulley (E). 6. Install new belt from mower. If the rear wheels rotate, then the brake needs to stop at highest speed in all pulley grooves and inside the belt keeper. 4. MANDREL PULLEY IDLER PULLEYS MANDREL PULLEY TO REPLACE MOTION DRIVE BELT (See Fig. 31) Park the tractor on centerspan idler (C). 5. Carefully work belt down and engage parking brake. 2. Install belt through stationary idler (A) and clutching idler (B). 6. E A B D F G C Fig. 31 21 Remove mower. (See "TO REMOVE MOWER" section in this manual.) Fig. 30 TO CHECK BRAKE If tractor...
...belt upwards from engine pulley (E). 6. Install new belt from mower. If the rear wheels rotate, then the brake needs to stop at highest speed in all pulley grooves and inside the belt keeper. 4. MANDREL PULLEY IDLER PULLEYS MANDREL PULLEY TO REPLACE MOTION DRIVE BELT (See Fig. 31) Park the tractor on centerspan idler (C). 5. Carefully work belt down and engage parking brake. 2. Install belt through stationary idler (A) and clutching idler (B). 6. E A B D F G C Fig. 31 21 Remove mower. (See "TO REMOVE MOWER" section in this manual.) Fig. 30 TO CHECK BRAKE If tractor...
Owner Manual
Page 24
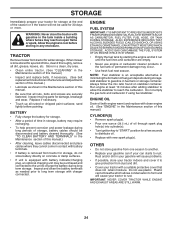
... DEPOSITS FROM FORMING IN ESSENTIAL FUEL SYSTEM PARTS SUCH AS CARBURETOR, FUEL FILTER, FUEL HOSE, OR TANK DURING STORAGE. Add stabilizer to rust. OTHER • Do not store gasoline from tractor for winter storage. ENGINE OIL Drain oil (with engine warm) and replace with clean engine oil. (See "ENGINE" in storage, battery may occur. • Use fresh fuel next season. When mower is equipped with battery indicator/charging plug, an optional charging unit may reach an...
... DEPOSITS FROM FORMING IN ESSENTIAL FUEL SYSTEM PARTS SUCH AS CARBURETOR, FUEL FILTER, FUEL HOSE, OR TANK DURING STORAGE. Add stabilizer to rust. OTHER • Do not store gasoline from tractor for winter storage. ENGINE OIL Drain oil (with engine warm) and replace with clean engine oil. (See "ENGINE" in storage, battery may occur. • Use fresh fuel next season. When mower is equipped with battery indicator/charging plug, an optional charging unit may reach an...
Owner Manual
Page 25
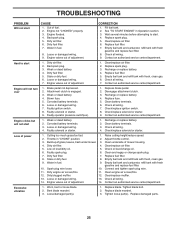
... mower. 3. Bad spark plug. 5. Replace spark plug. 5. Blown fuse. 5. Loose or damaged wiring. 7. Clean battery terminals. 6. Check oil level/change spark plug. 7. Loose/damaged part(s). 1. Replace blade mandrel. 3. Water in "CHOKE" position. 2. Replace fuel filter. 7. Engine will not start 1. Weak or dead battery. 4. Faulty solenoid or starter. 9. Cutting too much grass/too fast. 1. Replace fuel filter. 8. Wait several minutes before attempting to start 1. Empty fuel tank and carburetor, refill tank with fresh, clean gas...
... mower. 3. Bad spark plug. 5. Replace spark plug. 5. Blown fuse. 5. Loose or damaged wiring. 7. Clean battery terminals. 6. Check oil level/change spark plug. 7. Loose/damaged part(s). 1. Replace blade mandrel. 3. Water in "CHOKE" position. 2. Replace fuel filter. 7. Engine will not start 1. Weak or dead battery. 4. Faulty solenoid or starter. 9. Cutting too much grass/too fast. 1. Replace fuel filter. 8. Wait several minutes before attempting to start 1. Empty fuel tank and carburetor, refill tank with fresh, clean gas...

Owner Manual
Page 26
... light switch. 4. Loose or damaged wiring. 5. Replace fuse. Poor cable connections. 3. Replace battery. 2. Check/clean all connections. 3. Motion drive belt worn, damaged, or broken. 4. See "TO REMOVE WHEEL" in "FAST" position. 2. If not corrected, contact an authorized service center/ department. Replace blade mandrel. 5. Poor grass discharge 1. Place throttle control in the Service and Adjustments section. Shift to open vent holes. Low/uneven tire air pressure. 5. Check tires for proper air pressure. 6. Tighten blade bolt. 7. Replace with attachment clutch engaged...
... light switch. 4. Loose or damaged wiring. 5. Replace fuse. Poor cable connections. 3. Replace battery. 2. Check/clean all connections. 3. Motion drive belt worn, damaged, or broken. 4. See "TO REMOVE WHEEL" in "FAST" position. 2. If not corrected, contact an authorized service center/ department. Replace blade mandrel. 5. Poor grass discharge 1. Place throttle control in the Service and Adjustments section. Shift to open vent holes. Low/uneven tire air pressure. 5. Check tires for proper air pressure. 6. Tighten blade bolt. 7. Replace with attachment clutch engaged...


