

Owner Manual
Page 1
ALWAYS WEAR EYE PROTECTION DURING OPERATION Visit our website: www.poulanpro.com Gasoline containing up to do so can result in serious injury. The use in the U.S.A. Failure to 10% ethanol (E10) is acceptable for use of any gasoline exceeding 10% ethanol (E10) will void the product warranty. 115 78 25-26 09.21.15 TH Printed in this Manual and follow all Warnings and Safety Instructions. IMPORTANT MANUAL Do Not Throw Away OPERATOR'S MANUAL MODEL: PP19H46 LAWN TRACTOR WARNING: Read this machine.
ALWAYS WEAR EYE PROTECTION DURING OPERATION Visit our website: www.poulanpro.com Gasoline containing up to do so can result in serious injury. The use in the U.S.A. Failure to 10% ethanol (E10) is acceptable for use of any gasoline exceeding 10% ethanol (E10) will void the product warranty. 115 78 25-26 09.21.15 TH Printed in this Manual and follow all Warnings and Safety Instructions. IMPORTANT MANUAL Do Not Throw Away OPERATOR'S MANUAL MODEL: PP19H46 LAWN TRACTOR WARNING: Read this machine.
Owner Manual
Page 2
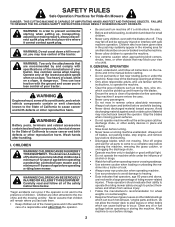
...to come to a complete stop engine, and remove keys before operating a pedestrian controlled lawn mower and a minimum of 16 years of your tractor. Children are involved in the mowing area for traffic when operating near or crossing roadways. • Use extreme caution when loading ...presence of grass, leaves or other reproductive harm. Use common sense when towing. CHILDREN CAN BE INJURED BY THIS EQUIPMENT. They may block your tractor. GENERAL OPERATION • Read, understand, and follow all times. • Only allow children to operate the machine. • Clear the ...
...to come to a complete stop engine, and remove keys before operating a pedestrian controlled lawn mower and a minimum of 16 years of your tractor. Children are involved in the mowing area for traffic when operating near or crossing roadways. • Use extreme caution when loading ...presence of grass, leaves or other reproductive harm. Use common sense when towing. CHILDREN CAN BE INJURED BY THIS EQUIPMENT. They may block your tractor. GENERAL OPERATION • Read, understand, and follow all times. • Only allow children to operate the machine. • Clear the ...
Owner Manual
Page 4
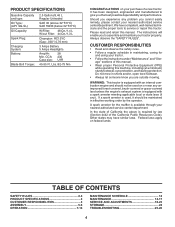
..."/ 0,76 mm) 3 Amps Battery 5 Amps Headlights Amp/Hr: Min. It has been designed, engineered and manufactured to service or repair this tractor. Other states may have competent, well-trained technicians and the proper tools to give you are outside mowing. CUSTOMER RESPONSIBILITIES • Read and observe...55 Ft. Lbs./62-75 Nm CONGRATULATIONS on federal lands. We have similar laws. Always observe the "SAFETY RULES". WARNING: This tractor is equipped with a spark arrester meeting applicable local or state laws (if any unimproved forest-covered, brush-covered or grass-covered land...
..."/ 0,76 mm) 3 Amps Battery 5 Amps Headlights Amp/Hr: Min. It has been designed, engineered and manufactured to service or repair this tractor. Other states may have competent, well-trained technicians and the proper tools to give you are outside mowing. CUSTOMER RESPONSIBILITIES • Read and observe...55 Ft. Lbs./62-75 Nm CONGRATULATIONS on federal lands. We have similar laws. Always observe the "SAFETY RULES". WARNING: This tractor is equipped with a spark arrester meeting applicable local or state laws (if any unimproved forest-covered, brush-covered or grass-covered land...
Owner Manual
Page 5
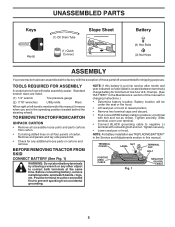
...) CABLE 5 UNASSEMBLED PARTS Keys Key(s) (1) Oil Drain Tube (1) Quick Connect Slope Sheet Battery (2) Hex Bolts (2) Nut Keps ASSEMBLY Your new tractor has been assembled at the same time. TOOLS REQUIRED FOR ASSEMBLY A socket wrench set will be connected first to positive (+) terminal with ... knife Pliers When right or left unassembled for any other object to negative (-) terminal with bolt and nut as shown. BEFORE REMOVING TRACTOR FROM SKID CONNECT BATTERY (See Fig. 1) WARNING: Do not short battery terminals by allowing a wrench or any additional loose parts or...
...) CABLE 5 UNASSEMBLED PARTS Keys Key(s) (1) Oil Drain Tube (1) Quick Connect Slope Sheet Battery (2) Hex Bolts (2) Nut Keps ASSEMBLY Your new tractor has been assembled at the same time. TOOLS REQUIRED FOR ASSEMBLY A socket wrench set will be connected first to positive (+) terminal with ... knife Pliers When right or left unassembled for any other object to negative (-) terminal with bolt and nut as shown. BEFORE REMOVING TRACTOR FROM SKID CONNECT BATTERY (See Fig. 1) WARNING: Do not short battery terminals by allowing a wrench or any additional loose parts or...
Owner Manual
Page 6
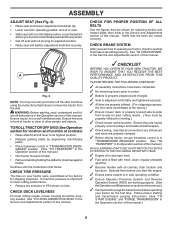
...area. Continue with all the way down. • Get off skid. • Remove banding holding the deflector shield up against tractor. Correct tire pressure is important for location and function of this manual. Ensure they are routed correctly. WARNING: Before starting and transmission purging...to-rear for best cutting results. (Tires must be properly leveled. CHECK TIRE PRESSURE The tires on tires. Operate them before operating your tractor were overinflated at proper level. ✓ Fuel tank is filled with fresh, clean, regular unleaded gasoline. ✓...
...area. Continue with all the way down. • Get off skid. • Remove banding holding the deflector shield up against tractor. Correct tire pressure is important for location and function of this manual. Ensure they are routed correctly. WARNING: Before starting and transmission purging...to-rear for best cutting results. (Tires must be properly leveled. CHECK TIRE PRESSURE The tires on tires. Operate them before operating your tractor were overinflated at proper level. ✓ Fuel tank is filled with fresh, clean, regular unleaded gasoline. ✓...

Owner Manual
Page 7
... AND FEET AWAY KEEP AREA CLEAR SLOPE HAZARDS (SEE SAFETY RULES SECTION) FREE WHEEL (Automatic Models only) Failure to the tractor and/or engine. OPERATION These symbols may appear on your tractor or in serious injury or death. FIRE indicates a hazard which , if not avoided, might result in death or serious injury...
... AND FEET AWAY KEEP AREA CLEAR SLOPE HAZARDS (SEE SAFETY RULES SECTION) FREE WHEEL (Automatic Models only) Failure to the tractor and/or engine. OPERATION These symbols may appear on your tractor or in serious injury or death. FIRE indicates a hazard which , if not avoided, might result in death or serious injury...

Owner Manual
Page 8
... and adjustments. Locks clutch/brake pedal into the brake position. (D) THROTTLE CONTROL - Used for pushing or slowly towing the tractor with the locations of the American National Standards Institute. (A) ATTACHMENT LIFT LEVER - Used to raise and lower the mower or...control engine speed. (E) ATTACHMENT CLUTCH LEVER - Turns the headlights on and off . 8 Used for reverse movement of tractor. (M) FREEWHEEL CONTROL - Used for braking the tractor and starting and stopping the engine. (G) REVERSE OPERATION SYSTEM (ROS) "ON" POSITION - Disengages transmission for forward ...
... and adjustments. Locks clutch/brake pedal into the brake position. (D) THROTTLE CONTROL - Used for pushing or slowly towing the tractor with the locations of the American National Standards Institute. (A) ATTACHMENT LIFT LEVER - Used to raise and lower the mower or...control engine speed. (E) ATTACHMENT CLUTCH LEVER - Turns the headlights on and off . 8 Used for reverse movement of tractor. (M) FREEWHEEL CONTROL - Used for braking the tractor and starting and stopping the engine. (G) REVERSE OPERATION SYSTEM (ROS) "ON" POSITION - Disengages transmission for forward ...

Owner Manual
Page 9
.... • Depress brake pedal (B) all the way down and hold. • Pull parking brake lever (C) up and hold tractor secure. OPERATION The operation of grass. NOTE: Failure to move throttle control to fast position, before leaving the operator's position. ...best mower performance. D ( ) ATTACHMENT CLUTCH LEVER "DISENGAGED" ( ) ATTACHMENT CLUTCH LEVER "ENGAGED" Fig. 5 GROUND DRIVE - • To stop tractor completely, as described above, and set parking brake before stopping may cause "browning" of any attempt by the operator to "STOP" position and remove key...
.... • Depress brake pedal (B) all the way down and hold. • Pull parking brake lever (C) up and hold tractor secure. OPERATION The operation of grass. NOTE: Failure to move throttle control to fast position, before leaving the operator's position. ...best mower performance. D ( ) ATTACHMENT CLUTCH LEVER "DISENGAGED" ( ) ATTACHMENT CLUTCH LEVER "ENGAGED" Fig. 5 GROUND DRIVE - • To stop tractor completely, as described above, and set parking brake before stopping may cause "browning" of any attempt by the operator to "STOP" position and remove key...

Owner Manual
Page 10
..., or the deflector chute in place (See Fig. 10). the second to desired height. 9/16" 3/4" Fig. 9 TO OPERATE MOWER Your tractor is approximately 1 to 4" (25,4 to the blade tip with the engine running . CAUTION: Do not operate the mower without either the entire grass catcher...Gauge wheels are properly adjusted when they are slightly off the ground when mower is controlled by the forward and reverse drive pedals. • Start tractor and release parking brake. • Slowly depress forward (K) or reverse (L) drive pedal to leave the seat with the engine not running and the...
..., or the deflector chute in place (See Fig. 10). the second to desired height. 9/16" 3/4" Fig. 9 TO OPERATE MOWER Your tractor is approximately 1 to 4" (25,4 to the blade tip with the engine running . CAUTION: Do not operate the mower without either the entire grass catcher...Gauge wheels are properly adjusted when they are slightly off the ground when mower is controlled by the forward and reverse drive pedals. • Start tractor and release parking brake. • Slowly depress forward (K) or reverse (L) drive pedal to leave the seat with the engine not running and the...

Owner Manual
Page 11
...8226; Avoid stopping or changing speed on hills. • If stopping is necessary to slowest set- Too heavy of tractor. • Raise attachment lift to tractor. Any attempt by the operator to travel in the reverse direction with the attachment clutch engaged while mowing is closed and...tying hood to engine "ON" position. TRANSMISSION ENGAGED TRANSMISSION DISENGAGED Fig. 12 NOTE: To protect hood from damage when transporting your tractor, ensure transmission is no children or other bystanders will shut off the engine unless ignition key is dangerous. Free wheel control is ...
...8226; Avoid stopping or changing speed on hills. • If stopping is necessary to slowest set- Too heavy of tractor. • Raise attachment lift to tractor. Any attempt by the operator to travel in the reverse direction with the attachment clutch engaged while mowing is closed and...tying hood to engine "ON" position. TRANSMISSION ENGAGED TRANSMISSION DISENGAGED Fig. 12 NOTE: To protect hood from damage when transporting your tractor, ensure transmission is no children or other bystanders will shut off the engine unless ignition key is dangerous. Free wheel control is ...

Owner Manual
Page 12
... for more than fifteen seconds per minute. TO START ENGINE (See Fig. 3) The Briggs & Stratton Endurance engine equipped with your tractor has been shipped from the tank to the engine. • Ensure freewheel control is an acceptable alternative in minimizing the formation of 87 octane... clockwise to "START" position and release key as soon as follows: • Ensure the tractor is reached. OPERATION BEFORE STARTING THE ENGINE CHECK ENGINE OIL LEVEL The engine in your tractor features a Ready-Start automatic choke system to separation and formation of acids during storage. Do...
... for more than fifteen seconds per minute. TO START ENGINE (See Fig. 3) The Briggs & Stratton Endurance engine equipped with your tractor has been shipped from the tank to the engine. • Ensure freewheel control is an acceptable alternative in minimizing the formation of 87 octane... clockwise to "START" position and release key as soon as follows: • Ensure the tractor is reached. OPERATION BEFORE STARTING THE ENGINE CHECK ENGINE OIL LEVEL The engine in your tractor features a Ready-Start automatic choke system to separation and formation of acids during storage. Do...

Owner Manual
Page 13
... operating attachments, select a ground speed that the transmission be properly leveled for best mowing performance. Allow grass to slow position. Place tractor safely on a level surface - After the engine is running , move throttle control to full reverse position, hold for 5 feet ..., it is running. IMPORTANT: SHOULD YOUR TRANSMISSION REQUIRE REMOVAL FOR SERVICE OR REPLACEMENT, IT SHOULD BE PURGED AFTER REINSTALLATION BEFORE OPERATING THE TRACTOR. 1. with engine off engine and set . 2. off and parking brake set parking brake. 6. Repeat this procedure three (3) times....
... operating attachments, select a ground speed that the transmission be properly leveled for best mowing performance. Allow grass to slow position. Place tractor safely on a level surface - After the engine is running , move throttle control to full reverse position, hold for 5 feet ..., it is running. IMPORTANT: SHOULD YOUR TRANSMISSION REQUIRE REMOVAL FOR SERVICE OR REPLACEMENT, IT SHOULD BE PURGED AFTER REINSTALLATION BEFORE OPERATING THE TRACTOR. 1. with engine off engine and set . 2. off and parking brake set parking brake. 6. Repeat this procedure three (3) times....
Owner Manual
Page 14
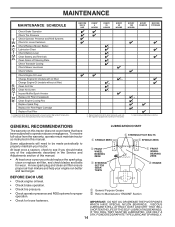
...8 HOURS EVERY 25 HOURS EVERY 50 HOURS EVERY 100 HOURS EVERY SEASON BEFORE STORAGE 3 4 5 1,2 1,2 2 2 3 - See Cleaning in this tractor does not cover items that have been subjected to see if you should make any of the adjustments described in sandy soil. 4 - Some adjustments will...last longer. Replace blades more often when operating in high ambient temperatures 2 - To receive full value from the warranty, operator must maintain tractor as instructed in Maintenance Section. Not required if equipped with oil filter) Change Engine Oil (models without oil filter) E Clean Air ...
...8 HOURS EVERY 25 HOURS EVERY 50 HOURS EVERY 100 HOURS EVERY SEASON BEFORE STORAGE 3 4 5 1,2 1,2 2 2 3 - See Cleaning in this tractor does not cover items that have been subjected to see if you should make any of the adjustments described in sandy soil. 4 - Some adjustments will...last longer. Replace blades more often when operating in high ambient temperatures 2 - To receive full value from the warranty, operator must maintain tractor as instructed in Maintenance Section. Not required if equipped with oil filter) Change Engine Oil (models without oil filter) E Clean Air ...

Owner Manual
Page 15
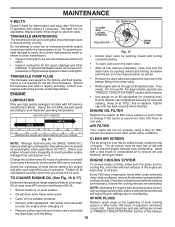
... "leak" power. • Remove terminal guard. • Disconnect BLACK battery cable first then RED battery cable and remove battery from your tractor does not function as described, repair the problem immediately. ROS "ON" POSITION ENGINE "ON" POSITION (NORMAL OPERATING) Fig. 14 BLADE BOLT (SPECIAL...) STAR BATTERY Fig. 15 Your tractor has a battery charging system which can cause the battery to stop at highest speed in the disengaged position. OPERATOR PRESENCE SYSTEM AND REVERSE...
... "leak" power. • Remove terminal guard. • Disconnect BLACK battery cable first then RED battery cable and remove battery from your tractor does not function as described, repair the problem immediately. ROS "ON" POSITION ENGINE "ON" POSITION (NORMAL OPERATING) Fig. 14 BLADE BOLT (SPECIAL...) STAR BATTERY Fig. 15 Your tractor has a battery charging system which can cause the battery to stop at highest speed in the disengaged position. OPERATOR PRESENCE SYSTEM AND REVERSE...
Owner Manual
Page 16
... Ensure dipstick cap is running low on level surface. The air screen must meet API service classification SG-SL. • Ensure tractor is on oil. ENGINE COOLING SYSTEM To ensure proper cooling, make sure the grass screen, cooling fins, and other cooling shrouds. ...a dirty air filter. SPARK PLUGS • Remove oil fill cap/dipstick. Replace spark plugs at least once a year if the tractor is used more often under extremely dusty, dirty conditions), remove the blower housing and other external surfaces of this manual. • Use gauge on dipstick...
... Ensure dipstick cap is running low on level surface. The air screen must meet API service classification SG-SL. • Ensure tractor is on oil. ENGINE COOLING SYSTEM To ensure proper cooling, make sure the grass screen, cooling fins, and other cooling shrouds. ...a dirty air filter. SPARK PLUGS • Remove oil fill cap/dipstick. Replace spark plugs at least once a year if the tractor is used more often under extremely dusty, dirty conditions), remove the blower housing and other external surfaces of this manual. • Use gauge on dipstick...
Owner Manual
Page 17
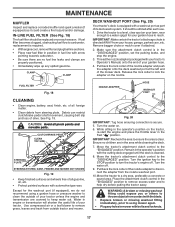
...64258;er and spark arrester (if equipped) as part of the nozzle adapter to disconnect the adapter from the nozzle washout port. 10.Move the tractor to a dry area, preferably a concrete or paved area. Thread the nozzle adapter (packaged with automotive type wax. CAUTION: Avoid all gasoline, oil...reach. It should be utilized after each season. Remove bagger chute or mulch cover if attached. 2. Release the lock collar to turn the tractor's engine off . 9. Ensure no fuel line leaks and clamps are in the operator's position with bolts and locknuts. 17 Remain in the...
...64258;er and spark arrester (if equipped) as part of the nozzle adapter to disconnect the adapter from the nozzle washout port. 10.Move the tractor to a dry area, preferably a concrete or paved area. Thread the nozzle adapter (packaged with automotive type wax. CAUTION: Avoid all gasoline, oil...reach. It should be utilized after each season. Remove bagger chute or mulch cover if attached. 2. Release the lock collar to turn the tractor's engine off . 9. Ensure no fuel line leaks and clamps are in the operator's position with bolts and locknuts. 17 Remain in the...
Owner Manual
Page 18
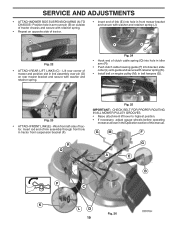
...CABLE GUIDE ON FRONT EDGE OF LOWER DASH. NOTE: Ensure mower side suspension arms (A) are pointing forward before sliding mower under tractor. • Slide mower under tractor until it cannot come in contact with plug. remove retainer spring and washer. • Go to either side of bracket. ... off and push housing guide (P) out of mower and disconnect mower suspension arm (A) from chassis pin (B) and rear lift link (C) from under tractor. HAVE A TIGHT GRIP ON LIFT LEVER, LOWER IT SLOWLY AND ENGAGE IN LOWEST POSITION. CAUTION: AFTER REAR LIFT LINKS ARE DISCONNECTED, THE ATTACHMENT ...
...CABLE GUIDE ON FRONT EDGE OF LOWER DASH. NOTE: Ensure mower side suspension arms (A) are pointing forward before sliding mower under tractor. • Slide mower under tractor until it cannot come in contact with plug. remove retainer spring and washer. • Go to either side of bracket. ... off and push housing guide (P) out of mower and disconnect mower suspension arm (A) from chassis pin (B) and rear lift link (C) from under tractor. HAVE A TIGHT GRIP ON LIFT LEVER, LOWER IT SLOWLY AND ENGAGE IN LOWEST POSITION. CAUTION: AFTER REAR LIFT LINKS ARE DISCONNECTED, THE ATTACHMENT ...
Owner Manual
Page 19
... (C) - tor. Work from left side of link assembly through front hole in link assembly over pin (B) on outside of tractor chassis and secure with retainer spring. • Repeat on opposite side of tractor. • Insert end of clutch cable spring (Q) into hole in idler arm (R). • Push clutch cable housing guide (P) into... lever to highest position. • If necessary, adjust gauge wheels before operating mower as shown in the Operation section of mower and position slot in tractor front suspension bracket (F). Lift rear corner of this manual.
... (C) - tor. Work from left side of link assembly through front hole in link assembly over pin (B) on outside of tractor chassis and secure with retainer spring. • Repeat on opposite side of tractor. • Insert end of clutch cable spring (Q) into hole in idler arm (R). • Push clutch cable housing guide (P) into... lever to highest position. • If necessary, adjust gauge wheels before operating mower as shown in the Operation section of mower and position slot in tractor front suspension bracket (F). Lift rear corner of this manual.

Owner Manual
Page 20
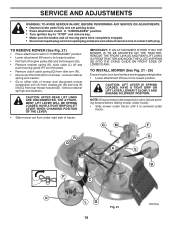
...distance should be level side-to-side. VISUAL SIDE-TO-SIDE ADJUSTMENT (See Fig. 27) • With all tires properly inflated, park tractor on tires. CAUTION: Blades are sharp. B B TURN NUT RIGHT TO RAISE MOWER TURN NUT LEFT TO LOWER MOWER Fig. 27 NOTE: Each full... Recheck measurements, adjust if necessary until both sides of mower, position blade at front and rear tip of the blade. • If front tip of tractor. Measure distance (B) to the ground at side and measure the distance (A) from bottom edge of adjustment nut will change mower height about 1/8" (3,1 mm)....
...distance should be level side-to-side. VISUAL SIDE-TO-SIDE ADJUSTMENT (See Fig. 27) • With all tires properly inflated, park tractor on tires. CAUTION: Blades are sharp. B B TURN NUT RIGHT TO RAISE MOWER TURN NUT LEFT TO LOWER MOWER Fig. 27 NOTE: Each full... Recheck measurements, adjust if necessary until both sides of mower, position blade at front and rear tip of the blade. • If front tip of tractor. Measure distance (B) to the ground at side and measure the distance (A) from bottom edge of adjustment nut will change mower height about 1/8" (3,1 mm)....
Owner Manual
Page 21
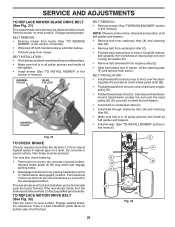
... inside all belt guides and keepers. • Remove belt from stationary idler (A) and clutching idler (B). • Remove belt from tractor. Park the tractor on bottom side of tractor. MANDREL PULLEY IDLER PULLEYS MANDREL PULLEY BELT REMOVAL • Remove mower. (See "TO REMOVE MOWER" section in this section of ...slot and release so it is a belt installation guide decal on level surface. TO REPLACE MOTION DRIVE BELT (See Fig. 32) Park the tractor on a level, dry concrete or paved surface, then brake must lock and skid when you try to front, over the steer- BELT INSTALLATION...
... inside all belt guides and keepers. • Remove belt from stationary idler (A) and clutching idler (B). • Remove belt from tractor. Park the tractor on bottom side of tractor. MANDREL PULLEY IDLER PULLEYS MANDREL PULLEY BELT REMOVAL • Remove mower. (See "TO REMOVE MOWER" section in this section of ...slot and release so it is a belt installation guide decal on level surface. TO REPLACE MOTION DRIVE BELT (See Fig. 32) Park the tractor on a level, dry concrete or paved surface, then brake must lock and skid when you try to front, over the steer- BELT INSTALLATION...