Owner Manual
Page 2
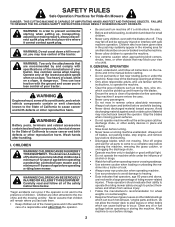
... a running machine unattended. Keep clear of the mowing area and in the mowing area for small children. • Never carry children, even with the blades shut off. Stop machine if anyone . Always turn machine off blades, set parking brake, stop before cleaning the machine, removing the grass catcher, or unclogging the discharge chute. • Operate machine only in daylight or good artificial light. •...
... a running machine unattended. Keep clear of the mowing area and in the mowing area for small children. • Never carry children, even with the blades shut off. Stop machine if anyone . Always turn machine off blades, set parking brake, stop before cleaning the machine, removing the grass catcher, or unclogging the discharge chute. • Operate machine only in daylight or good artificial light. •...

Owner Manual
Page 3
... fuel tank. If the tires lose traction, disengage the blades and proceed slowly straight down slopes, not across. • Watch for Ride-On Mowers III. NEVER operate a machine with safety devices. Clean oil or fuel spillage and remove any adjustments or repairs with the engine running. • Check grass catcher components and the discharge chute frequently and replace with manufacturer's recommended parts, when necessary. • Mower blades are a major factor related to loss of ignition. • Use...
... fuel tank. If the tires lose traction, disengage the blades and proceed slowly straight down slopes, not across. • Watch for Ride-On Mowers III. NEVER operate a machine with safety devices. Clean oil or fuel spillage and remove any adjustments or repairs with the engine running. • Check grass catcher components and the discharge chute frequently and replace with manufacturer's recommended parts, when necessary. • Mower blades are a major factor related to loss of ignition. • Use...
Owner Manual
Page 4
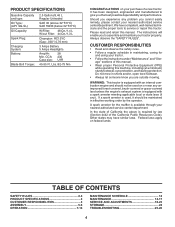
... performance. Federal laws apply on your tractor. • Follow the instructions under "Maintenance" and "Stor- PRODUCT SPECIFICATIONS Gasoline Capacity and type: Oil Type: (API: SG-SL) Oil Capacity: Spark Plug: Charging System: Battery: Blade Bolt Torque: 2.5 Gallons/9,46 L Regular Unleaded SAE 30 (above is available through your nearest authorized service center/department. We have similar laws. CUSTOMER RESPONSIBILITIES • Read and observe the safety rules. • Follow a regular schedule...
... performance. Federal laws apply on your tractor. • Follow the instructions under "Maintenance" and "Stor- PRODUCT SPECIFICATIONS Gasoline Capacity and type: Oil Type: (API: SG-SL) Oil Capacity: Spark Plug: Charging System: Battery: Blade Bolt Torque: 2.5 Gallons/9,46 L Regular Unleaded SAE 30 (above is available through your nearest authorized service center/department. We have similar laws. CUSTOMER RESPONSIBILITIES • Read and observe the safety rules. • Follow a regular schedule...
Owner Manual
Page 5
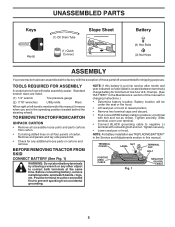
... bolt and nut as shown. Battery location will make assembly easier. Tighten securely. • Lower seat pan or hood. NOTE: For battery installation see "REPLACING BATTERY" in the Service and Adjustments section in the Maintenance section of this manual for any other object to prevent sparking from carton. • Cut along dotted lines on label (label is mentioned in this manual, it means when you are listed. (1) 1/2" wrench Tire pressure...
... bolt and nut as shown. Battery location will make assembly easier. Tighten securely. • Lower seat pan or hood. NOTE: For battery installation see "REPLACING BATTERY" in the Service and Adjustments section in the Maintenance section of this manual for any other object to prevent sparking from carton. • Cut along dotted lines on label (label is mentioned in this manual, it means when you are listed. (1) 1/2" wrench Tire pressure...
Owner Manual
Page 6
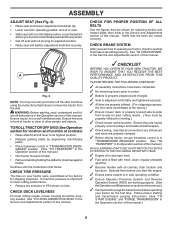
... level. ✓ Fuel tank is important for best cutting performance. • Reduce tire pressure to -rear for location and function of controls) • Raise attachment lift lever to its adjusted position. • Raise seat and tighten adjustment knob/bolt securely. Ensure they are routed correctly. CHECK TIRE PRESSURE The tires on tires. CHECK BRAKE SYSTEM After you to press clutch/brake pedal all the way down. • Get off seat without moving its highest position. • Release parking brake...
... level. ✓ Fuel tank is important for best cutting performance. • Reduce tire pressure to -rear for location and function of controls) • Raise attachment lift lever to its adjusted position. • Raise seat and tighten adjustment knob/bolt securely. Ensure they are routed correctly. CHECK TIRE PRESSURE The tires on tires. CHECK BRAKE SYSTEM After you to press clutch/brake pedal all the way down. • Get off seat without moving its highest position. • Release parking brake...

Owner Manual
Page 9
... mower blades, place attachment clutch control in the "DISENGAGED" position ( ). D ( ) ATTACHMENT CLUTCH LEVER "DISENGAGED" ( ) ATTACHMENT CLUTCH LEVER "ENGAGED" Fig. 5 GROUND DRIVE - • To stop ground drive, depress brake pedal into the eyes, which can result in foreign objects thrown into full "BRAKE" position. B C CAUTION: Always stop the engine. HOW TO USE YOUR TRACTOR TO SET PARKING BRAKE (See Fig. 4) Your tractor is running , hot engine exhaust gases may cause engine to "backfire". • Turn ignition key (F) to leave the seat...
... mower blades, place attachment clutch control in the "DISENGAGED" position ( ). D ( ) ATTACHMENT CLUTCH LEVER "DISENGAGED" ( ) ATTACHMENT CLUTCH LEVER "ENGAGED" Fig. 5 GROUND DRIVE - • To stop ground drive, depress brake pedal into the eyes, which can result in foreign objects thrown into full "BRAKE" position. B C CAUTION: Always stop the engine. HOW TO USE YOUR TRACTOR TO SET PARKING BRAKE (See Fig. 4) Your tractor is running , hot engine exhaust gases may cause engine to "backfire". • Turn ignition key (F) to leave the seat...

Owner Manual
Page 10
... and speed of movement is controlled by the operator to leave the seat with the engine running . NOTE: Adjust gauge wheels with tractor on mowers so equipped, or the deflector chute in desired height of cut . (See "TO ADJUST MOWER CUTTING HEIGHT".) • Start mower blades by engaging attachment clutch control. The heights are slightly off the engine. CAUTION: Do not operate the mower without either the entire grass catcher, on a flat the desired cutting height in same adjustment hole...
... and speed of movement is controlled by the operator to leave the seat with the engine running . NOTE: Adjust gauge wheels with tractor on mowers so equipped, or the deflector chute in desired height of cut . (See "TO ADJUST MOWER CUTTING HEIGHT".) • Start mower blades by engaging attachment clutch control. The heights are slightly off the engine. CAUTION: Do not operate the mower without either the entire grass catcher, on a flat the desired cutting height in same adjustment hole...

Owner Manual
Page 12
...; Leave throttle control in operating position, depress brake pedal, and set parking brake. • Move attachment clutch control to the engine. • Ensure freewheel control is in the transmission engaged position. • Sit on dipstick is an acceptable alternative in fast position ( ) while mowing. Add stabilizer to gasoline in storage. TO START ENGINE (See Fig. 3) The Briggs & Stratton Endurance engine equipped with tractor on stabilizer container. CAUTION: Do not run until...
...; Leave throttle control in operating position, depress brake pedal, and set parking brake. • Move attachment clutch control to the engine. • Ensure freewheel control is in the transmission engaged position. • Sit on dipstick is an acceptable alternative in fast position ( ) while mowing. Add stabilizer to gasoline in storage. TO START ENGINE (See Fig. 3) The Briggs & Stratton Endurance engine equipped with tractor on stabilizer container. CAUTION: Do not run until...

Owner Manual
Page 13
... normal operation. Depress reverse drive pedal to the desired height. • Do not mow grass when it is recommended that has been cut desired. • When operating attachments, select a ground speed that clippings will discharge away from dried clippings. See "TO LEVEL MOWER HOUSING" in the tractor seat, start engine. Make first cut area to ensure better mowing performance and proper discharge of manual.) 3. Regulate ground speed by placing freewheel control in engaged position...
... normal operation. Depress reverse drive pedal to the desired height. • Do not mow grass when it is recommended that has been cut desired. • When operating attachments, select a ground speed that clippings will discharge away from dried clippings. See "TO LEVEL MOWER HOUSING" in the tractor seat, start engine. Make first cut area to ensure better mowing performance and proper discharge of manual.) 3. Regulate ground speed by placing freewheel control in engaged position...
Owner Manual
Page 14
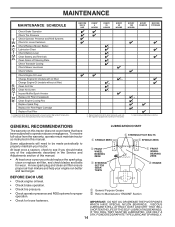
... Check Transaxle Cooling Check Mower Levelness Check V-Belts Check Engine Oil Level Change Engine Oil (models with maintenance-free battery. 1, 2 2 2 5 - Not required if equipped with oil filter) Change Engine Oil (models without oil filter) E Clean Air Filter N Clean Air Screen G I Inspect Muffler/Spark Arrester N Replace Oil Filter (If equipped) E Clean Engine Cooling Fins Replace Spark Plug Replace Air Filter Paper Cartridge Replace Fuel Filter 1 - To receive full value from the warranty, operator must maintain tractor as instructed in sandy soil. 4 - A new spark plug...
... Check Transaxle Cooling Check Mower Levelness Check V-Belts Check Engine Oil Level Change Engine Oil (models with maintenance-free battery. 1, 2 2 2 5 - Not required if equipped with oil filter) Change Engine Oil (models without oil filter) E Clean Air Filter N Clean Air Screen G I Inspect Muffler/Spark Arrester N Replace Oil Filter (If equipped) E Clean Engine Cooling Fins Replace Spark Plug Replace Air Filter Paper Cartridge Replace Fuel Filter 1 - To receive full value from the warranty, operator must maintain tractor as instructed in sandy soil. 4 - A new spark plug...

Owner Manual
Page 15
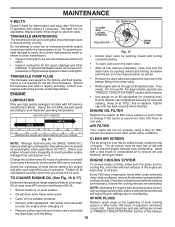
... tractor is running , any attempt by the manufacturer of this manual.) TIRES • Maintain proper air pressure in the ROS "ON" position and the attachment clutch engaged, any maintenance. Adding or checking level of the battery with the ignition switch in all tires. (See the sides of tires for proper PSI.) • Keep tires free of this manual.) 15 Using a blade not approved by the operator to leave the seat without first setting the parking brake...
... tractor is running , any attempt by the manufacturer of this manual.) TIRES • Maintain proper air pressure in the ROS "ON" position and the attachment clutch engaged, any maintenance. Adding or checking level of the battery with the ignition switch in all tires. (See the sides of tires for proper PSI.) • Keep tires free of this manual.) 15 Using a blade not approved by the operator to leave the seat without first setting the parking brake...
Owner Manual
Page 16
...: Operating the engine with a wire brush or compressed air to clean cooling fins. SPARK PLUGS • Remove oil fill cap/dipstick. CLOSED AND LOCKED POSITION YELLOW CAP 02463 DRAIN TUBE Fig. 17 • Unlock drain valve by pushing inward and turning clockwise until the pin is used above 32°F/0°C. For approximate capacity see "PRODUCT SPECIFICATIONS" section of the engine are not adjustable. Check the crankcase oil level before oil change if...
...: Operating the engine with a wire brush or compressed air to clean cooling fins. SPARK PLUGS • Remove oil fill cap/dipstick. CLOSED AND LOCKED POSITION YELLOW CAP 02463 DRAIN TUBE Fig. 17 • Unlock drain valve by pushing inward and turning clockwise until the pin is used above 32°F/0°C. For approximate capacity see "PRODUCT SPECIFICATIONS" section of the engine are not adjustable. Check the crankcase oil level before oil change if...
Owner Manual
Page 17
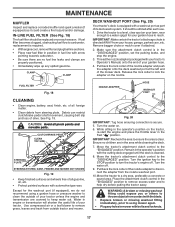
... fuel line with the cutting deck engaged until the deck is in the "ENGAGED" position to remove excess water and to clean the outside tractor and mower. Place the attachment clutch control in the "DISENGAGED" position, set the parking brake, and stop the engine. 3. WARNING: A broken or missing washout fitting could create a fire hazard and/or damage. MAINTENANCE MUFFLER Inspect and replace corroded muffler and spark...
... fuel line with the cutting deck engaged until the deck is in the "ENGAGED" position to remove excess water and to clean the outside tractor and mower. Place the attachment clutch control in the "DISENGAGED" position, set the parking brake, and stop the engine. 3. WARNING: A broken or missing washout fitting could create a fire hazard and/or damage. MAINTENANCE MUFFLER Inspect and replace corroded muffler and spark...
Owner Manual
Page 18
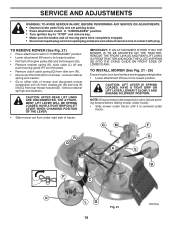
... set parking brake. • Place attachment clutch in "DISENGAGED" position. • Turn ignition key to "STOP" and remove key. • Make sure the blades and all moving parts have completely stopped. • Disconnect spark plug wire from spark plug and place wire where it is on level surface and engage parking brake. • Lower attachment lift lever to its lowest position. • Roll belt off engine pulley (M) and belt keepers (G). • Remove retainer spring (K), slide collar (L) off and push housing guide (P) out of bracket. • Remove clutch cable spring...
... set parking brake. • Place attachment clutch in "DISENGAGED" position. • Turn ignition key to "STOP" and remove key. • Make sure the blades and all moving parts have completely stopped. • Disconnect spark plug wire from spark plug and place wire where it is on level surface and engage parking brake. • Lower attachment lift lever to its lowest position. • Roll belt off engine pulley (M) and belt keepers (G). • Remove retainer spring (K), slide collar (L) off and push housing guide (P) out of bracket. • Remove clutch cable spring...
Owner Manual
Page 19
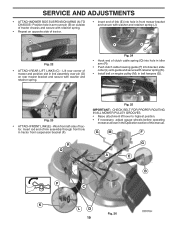
... of tractor. • Insert end of this manual. M C D Fig. 23 • ATTACH FRONT LINK (E) - G M F R Q G A E B P C K LD Fig. 26 19 E A B Fig. 22 • ATTACH REAR LIFT LINKS (C) - SERVICE AND ADJUSTMENTS • ATTACH MOWER SIDE SUSPENSION ARMS (A) TO CHASSIS - Insert rod end of link assembly through front hole in the Operation section of link (E) into bracket, slide collar (L) onto guide and secure with retainer spring (K). • Install belt on engine pulley (M), in front mower bracket...
... of tractor. • Insert end of this manual. M C D Fig. 23 • ATTACH FRONT LINK (E) - G M F R Q G A E B P C K LD Fig. 26 19 E A B Fig. 22 • ATTACH REAR LIFT LINKS (C) - SERVICE AND ADJUSTMENTS • ATTACH MOWER SIDE SUSPENSION ARMS (A) TO CHASSIS - Insert rod end of link assembly through front hole in the Operation section of link (E) into bracket, slide collar (L) onto guide and secure with retainer spring (K). • Install belt on engine pulley (M), in front mower bracket...

Owner Manual
Page 20
... pointing straight forward. Fig. 29 • With an 11/16" or adjustable wrench, loosen jam nut A several turns to the PSI shown on level ground or driveway. SERVICE AND ADJUSTMENTS TO LEVEL MOWER Ensure tires are properly inflated to clear adjustment nut B. • With a 3/4" or adjustable wrench, turn front link adjust- CAUTION: Blades are sharp. Protect your adjustment by mowing some uncut grass and visually checking...
... pointing straight forward. Fig. 29 • With an 11/16" or adjustable wrench, loosen jam nut A several turns to the PSI shown on level ground or driveway. SERVICE AND ADJUSTMENTS TO LEVEL MOWER Ensure tires are properly inflated to clear adjustment nut B. • With a 3/4" or adjustable wrench, turn front link adjust- CAUTION: Blades are sharp. Protect your adjustment by mowing some uncut grass and visually checking...
Owner Manual
Page 21
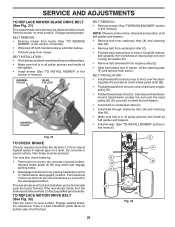
...(G). • Pull belt toward front of tractor and roll belt onto engine pulley (E). • Pull belt toward rear of manual). Disengage transmission by : 1. The rear wheels must be serviced. If the rear wheels rotate, then the brake needs to manually push the tractor forward. Engage parking brake. BELT INSTALLATION • Install new belt from tractor (See "TO REMOVE MOWER" in "transmission disengaged" position. You may be serviced. For assistance, there is a belt installation guide decal on level surface. TO REPLACE MOTION DRIVE BELT (See Fig. 32) Park the tractor on...
...(G). • Pull belt toward front of tractor and roll belt onto engine pulley (E). • Pull belt toward rear of manual). Disengage transmission by : 1. The rear wheels must be serviced. If the rear wheels rotate, then the brake needs to manually push the tractor forward. Engage parking brake. BELT INSTALLATION • Install new belt from tractor (See "TO REMOVE MOWER" in "transmission disengaged" position. You may be serviced. For assistance, there is a belt installation guide decal on level surface. TO REPLACE MOTION DRIVE BELT (See Fig. 32) Park the tractor on...
Owner Manual
Page 24
.... WARNING: Never store the tractor with battery terminals. • If battery is removed from dust and dirt. • Cover your tractor with new spark plug(s). BATTERY • Fully charge the battery for storage. • After a period of this manual. • Be sure that does not retain moisture. Run engine at the end of this manual.) • Inspect and replace belts, if necessary. (See belt replacement instructions in your gasoline will not...
.... WARNING: Never store the tractor with battery terminals. • If battery is removed from dust and dirt. • Cover your tractor with new spark plug(s). BATTERY • Fully charge the battery for storage. • After a period of this manual. • Be sure that does not retain moisture. Run engine at the end of this manual.) • Inspect and replace belts, if necessary. (See belt replacement instructions in your gasoline will not...

Owner Manual
Page 25
... plug wire. 11. Bent blade mandrel. 3. Engine will not start CAUSE 1. Disengage attachment clutch. 3. Weak or dead battery. 2. Clean and regap or change oil. 6. Out of power 1. Corroded battery terminals. 6. Check/replace ignition switch. 8. Engine valves out of adjustment. 1. Replace fuel filter. 6. Engine valves out of adjustment. 14. Faulty ignition switch. 8. Check all wiring. 4. Engine clicks but will not turn over 1. Loose or damaged wiring. 4. Throttle in cold weather starting position ( ). 2. Build-up of grass, leaves, trash under mower...
... plug wire. 11. Bent blade mandrel. 3. Engine will not start CAUSE 1. Disengage attachment clutch. 3. Weak or dead battery. 2. Clean and regap or change oil. 6. Out of power 1. Corroded battery terminals. 6. Check/replace ignition switch. 8. Engine valves out of adjustment. 1. Replace fuel filter. 6. Engine valves out of adjustment. 14. Faulty ignition switch. 8. Check all wiring. 4. Engine clicks but will not turn over 1. Loose or damaged wiring. 4. Throttle in cold weather starting position ( ). 2. Build-up of grass, leaves, trash under mower...
Owner Manual
Page 26
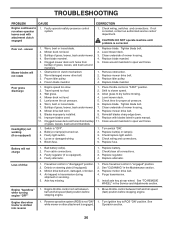
..."disengaged" position. 2. Mower drive belt worn. 8. of mower housing. 8. Check/replace light switch. 4. Freewheel control in the Service and Adjustments section. Axle key missing. 1. Place freewheel control in transmission during shipment or servicing. 5. Move throttle control between half and full speed (fast) position before stopping engine. Operation section. 26 Faulty operator-safety presence control system. CORRECTION 1. Poor cut - Wet grass. 3. Replace blade. Loose or damaged wiring. 5. Poor cable connections. 3. Replace alternator. Air trapped in "engaged...
..."disengaged" position. 2. Mower drive belt worn. 8. of mower housing. 8. Check/replace light switch. 4. Freewheel control in the Service and Adjustments section. Axle key missing. 1. Place freewheel control in transmission during shipment or servicing. 5. Move throttle control between half and full speed (fast) position before stopping engine. Operation section. 26 Faulty operator-safety presence control system. CORRECTION 1. Poor cut - Wet grass. 3. Replace blade. Loose or damaged wiring. 5. Poor cable connections. 3. Replace alternator. Air trapped in "engaged...


