
Owner Manual
Page 1
The use in this Manual and follow all Warnings and Safety Instructions. Failure to 10% ethanol (E10) is acceptable for use of any gasoline exceeding 10% ethanol (E10) will void the product warranty. 115 92 18-49 Rev. 1 12.19.17 CL Printed in serious injury. ALWAYS WEAR EYE PROTECTION DURING OPERATION Visit our website: www.poulanpro.com Gasoline containing up to do so can result in the U.S.A. IMPORTANT MANUAL Do Not Throw Away OPERATOR'S MANUAL MODEL: PP17G42 LAWN TRACTOR WARNING: Read this machine.
The use in this Manual and follow all Warnings and Safety Instructions. Failure to 10% ethanol (E10) is acceptable for use of any gasoline exceeding 10% ethanol (E10) will void the product warranty. 115 92 18-49 Rev. 1 12.19.17 CL Printed in serious injury. ALWAYS WEAR EYE PROTECTION DURING OPERATION Visit our website: www.poulanpro.com Gasoline containing up to do so can result in the U.S.A. IMPORTANT MANUAL Do Not Throw Away OPERATOR'S MANUAL MODEL: PP17G42 LAWN TRACTOR WARNING: Read this machine.

Owner Manual
Page 2
...Never allow children to the presence of children. CHILDREN CAN BE SERIOUSLY INJURED OR KILLED BY THIS EQUIPMENT. They may lose control of the tractor. Shut off engine and wait for all instructions on a slope, is dangerous. These operators should evaluate their ability to operate the riding...or other reproductive harm. Allow machine to hearing. • Data indicates that children will remain where you to lose control of your tractor. WARNING Engine exhaust, some of its constituents, and certain vehicle components contain or emit chemicals known to the State of California to ...
...Never allow children to the presence of children. CHILDREN CAN BE SERIOUSLY INJURED OR KILLED BY THIS EQUIPMENT. They may lose control of the tractor. Shut off engine and wait for all instructions on a slope, is dangerous. These operators should evaluate their ability to operate the riding...or other reproductive harm. Allow machine to hearing. • Data indicates that children will remain where you to lose control of your tractor. WARNING Engine exhaust, some of its constituents, and certain vehicle components contain or emit chemicals known to the State of California to ...

Owner Manual
Page 4
... 26-27 4 Should you experience any ). The instructions will enable you are outside mowing. Always observe the "SAFETY RULES". WARNING: This tractor is equipped with an internal combustion engine and should be used on federal lands. CCA: Case size: 28 230 U1R 45-55 Ft. ...We have similar laws. Do not mow in effective working order by law (Section 4442 of a new tractor. It has been designed, engineered and manufactured to assemble and maintain your tractor. • Follow the instructions under "Maintenance" and "Stor- In the state of California the above 32&#...
... 26-27 4 Should you experience any ). The instructions will enable you are outside mowing. Always observe the "SAFETY RULES". WARNING: This tractor is equipped with an internal combustion engine and should be used on federal lands. CCA: Case size: 28 230 U1R 45-55 Ft. ...We have similar laws. Do not mow in effective working order by law (Section 4442 of a new tractor. It has been designed, engineered and manufactured to assemble and maintain your tractor. • Follow the instructions under "Maintenance" and "Stor- In the state of California the above 32&#...

Owner Manual
Page 6
... at 6-10 amps. (See "BATTERY" in this manual, it means when you assemble must be tightened securely. ASSEMBLY Your new tractor has been assembled at the factory with bolt and nut as necessary to prevent sparking from carton. • Cut along dotted lines on... label (label is mentioned in the operating position (seated behind the steering wheel). TO REMOVE TRACTOR FROM CARTON UNPACK CARTON • Remove all parts and hardware you are listed. (1) 5/16" wrench Utility knife (2) 7/16" wrenches Tire pressure gauge...
... at 6-10 amps. (See "BATTERY" in this manual, it means when you assemble must be tightened securely. ASSEMBLY Your new tractor has been assembled at the factory with bolt and nut as necessary to prevent sparking from carton. • Cut along dotted lines on... label (label is mentioned in the operating position (seated behind the steering wheel). TO REMOVE TRACTOR FROM CARTON UNPACK CARTON • Remove all parts and hardware you are listed. (1) 5/16" wrench Utility knife (2) 7/16" wrenches Tire pressure gauge...

Owner Manual
Page 7
... tightening adjustment knob. • Remove adjustment knob and cup washer securing seat to secure. INSTALL STEERING WHEEL • Position front wheels of tractor. • Pivot seat and pan forward and assemble adjustment knob and cup washer loosely. ASSEMBLY TO INSTALL STEERING WHEEL (See Fig. 2) ASSEMBLE... the cardboard packing and discard. • Place seat on seat to engage pads in slots and pull seat towards rear of the tractor so they are pointing straight forward. • Remove steering wheel adapter from steering wheel and slide adapter onto steering shaft extension. &#...
... tightening adjustment knob. • Remove adjustment knob and cup washer securing seat to secure. INSTALL STEERING WHEEL • Position front wheels of tractor. • Pivot seat and pan forward and assemble adjustment knob and cup washer loosely. ASSEMBLY TO INSTALL STEERING WHEEL (See Fig. 2) ASSEMBLE... the cardboard packing and discard. • Place seat on seat to engage pads in slots and pull seat towards rear of the tractor so they are pointing straight forward. • Remove steering wheel adapter from steering wheel and slide adapter onto steering shaft extension. &#...

Owner Manual
Page 8
...proper level. ✓ Fuel tank is important for best cutting performance. • Reduce tire pressure to PSI shown on your tractor, check to operate your tractor were overinflated at the factory.) ✓ Ensure mower deck is properly leveled side-to-side/ front-to-rear for leveling.).... ✓ No remaining loose parts in the Service and Adjustments section of this manual. ✓CHECKLIST BEFORE YOU OPERATE YOUR NEW TRACTOR, WE WISH TO ENSURE THAT YOU RECEIVE THE BEST PERFORMANCE AND SATISFACTION FROM THIS QUALITY PRODUCT. See that are properly inflated. (For...
...proper level. ✓ Fuel tank is important for best cutting performance. • Reduce tire pressure to PSI shown on your tractor, check to operate your tractor were overinflated at the factory.) ✓ Ensure mower deck is properly leveled side-to-side/ front-to-rear for leveling.).... ✓ No remaining loose parts in the Service and Adjustments section of this manual. ✓CHECKLIST BEFORE YOU OPERATE YOUR NEW TRACTOR, WE WISH TO ENSURE THAT YOU RECEIVE THE BEST PERFORMANCE AND SATISFACTION FROM THIS QUALITY PRODUCT. See that are properly inflated. (For...

Owner Manual
Page 9
OPERATION These symbols may appear on your tractor or in death or serious injury. DANGER indicates a hazard which , if not avoided, might result in minor or moderate injury. CAUTION indicates a hazard which , if ... CLUTCH ENGAGED DANGER, KEEP HANDS AND FEET AWAY KEEP AREA CLEAR SLOPE HAZARDS (SEE SAFETY RULES SECTION) FREE WHEEL (Automatic Models only) Failure to the tractor and/or engine. WARNING indicates a hazard which , if not avoided, could result in literature supplied with the product. Learn and understand their meaning.
OPERATION These symbols may appear on your tractor or in death or serious injury. DANGER indicates a hazard which , if not avoided, might result in minor or moderate injury. CAUTION indicates a hazard which , if ... CLUTCH ENGAGED DANGER, KEEP HANDS AND FEET AWAY KEEP AREA CLEAR SLOPE HAZARDS (SEE SAFETY RULES SECTION) FREE WHEEL (Automatic Models only) Failure to the tractor and/or engine. WARNING indicates a hazard which , if not avoided, could result in literature supplied with the product. Learn and understand their meaning.

Owner Manual
Page 10
... and off. (J) GEARSHIFT LEVER - H G D E B F A C J Fig. 4 Our tractors conform to the applicable safety standards of tractor. 10 Save this manual for declutching and braking the tractor and starting the engine. (C) PARKING BRAKE - Used for starting and controlling engine speed. (E) ATTACHMENT CLUTCH ...- Allows operation of various controls and adjustments. OPERATION KNOW YOUR TRACTOR READ THIS OPERATOR'S MANUAL AND SAFETY RULES BEFORE OPERATING YOUR TRACTOR Compare the illustrations with your tractor to familiarize yourself with the locations of mower deck or other powered...
... and off. (J) GEARSHIFT LEVER - H G D E B F A C J Fig. 4 Our tractors conform to the applicable safety standards of tractor. 10 Save this manual for declutching and braking the tractor and starting the engine. (C) PARKING BRAKE - Used for starting and controlling engine speed. (E) ATTACHMENT CLUTCH ...- Allows operation of various controls and adjustments. OPERATION KNOW YOUR TRACTOR READ THIS OPERATOR'S MANUAL AND SAFETY RULES BEFORE OPERATING YOUR TRACTOR Compare the illustrations with your tractor to familiarize yourself with the locations of mower deck or other powered...

Owner Manual
Page 11
...Turn ignition key (F) to "STOP" position and remove key. Fig. 5 STOPPING (See Fig. 6) MOWER BLADES - • To stop engine when stopping tractor on grass areas. OPERATION The operation of any attempt by the gearshift lever (J). ( ) ATTACHMENT CLUTCH LEVER "DISENGAGED" ( ) ATTACHMENT CLUTCH LEVER "ENGAGED"...Depress clutch/brake pedal (B) all the way down and hold. • Pull parking brake lever (C) up and hold tractor secure. CAUTION: Always stop tractor completely, as described above, and set parking brake before shifting or changing gears. ENGINE - • Move throttle control ...
...Turn ignition key (F) to "STOP" position and remove key. Fig. 5 STOPPING (See Fig. 6) MOWER BLADES - • To stop engine when stopping tractor on grass areas. OPERATION The operation of any attempt by the gearshift lever (J). ( ) ATTACHMENT CLUTCH LEVER "DISENGAGED" ( ) ATTACHMENT CLUTCH LEVER "ENGAGED"...Depress clutch/brake pedal (B) all the way down and hold. • Pull parking brake lever (C) up and hold tractor secure. CAUTION: Always stop tractor completely, as described above, and set parking brake before shifting or changing gears. ENGINE - • Move throttle control ...

Owner Manual
Page 12
...clutch/brake pedal. • Make all turns slowly. 3/4" Fig. 10 12 The heights are slightly off the ground when mower is equipped with tractor on rough, rolling terrain or hills. • Select desired height of this manual). • With mower in operating position. JUST MOWER CUTTING...the engine running . OPERATION TO ADJUST MOWER CUTTING HEIGHT (See Fig. 9) The position of cut relatively high; A TO OPERATE MOWER Your tractor is at the desired cutting height in desired height of the attachment lift lever (A) determines the cutting height. Any attempt by engaging attachment ...
...clutch/brake pedal. • Make all turns slowly. 3/4" Fig. 10 12 The heights are slightly off the ground when mower is equipped with tractor on rough, rolling terrain or hills. • Select desired height of this manual). • With mower in operating position. JUST MOWER CUTTING...the engine running . OPERATION TO ADJUST MOWER CUTTING HEIGHT (See Fig. 9) The position of cut relatively high; A TO OPERATE MOWER Your tractor is at the desired cutting height in desired height of the attachment lift lever (A) determines the cutting height. Any attempt by engaging attachment ...

Owner Manual
Page 13
...NORMAL OPERATING) Fig. 12 TO TRANSPORT • Raise attachment lift to highest position with the ground and cause you to allow reverse operation with tractor on a truck or a trailer, ensure hood is no children or other bystanders will shut off any spilled oil or fuel. Never use ...gas tank and carburetor if using ethanol or methanol) can lose traction with attachment lift control. • When pushing or towing your tractor. BEFORE STARTING THE ENGINE CHECK ENGINE OIL LEVEL The engine in the reverse direction with specifications of the manufacturer of the ROS is closed...
...NORMAL OPERATING) Fig. 12 TO TRANSPORT • Raise attachment lift to highest position with the ground and cause you to allow reverse operation with tractor on a truck or a trailer, ensure hood is no children or other bystanders will shut off any spilled oil or fuel. Never use ...gas tank and carburetor if using ethanol or methanol) can lose traction with attachment lift control. • When pushing or towing your tractor. BEFORE STARTING THE ENGINE CHECK ENGINE OIL LEVEL The engine in the reverse direction with specifications of the manufacturer of the ROS is closed...

Owner Manual
Page 14
... area to the choke position and retry. After one minute using the choke as described above ) • When engine starts, move the throttle control to tractor. • Mower should be mowed twice to give the mower cutting performance as well as engine starts. Wet grass will result in the choke position.... Allow grass to dry before mowing. • Always operate engine at full throttle when mowing to ensure better mowing performance and proper discharge of the tractor.
... area to the choke position and retry. After one minute using the choke as described above ) • When engine starts, move the throttle control to tractor. • Mower should be mowed twice to give the mower cutting performance as well as engine starts. Wet grass will result in the choke position.... Allow grass to dry before mowing. • Always operate engine at full throttle when mowing to ensure better mowing performance and proper discharge of the tractor.
Owner Manual
Page 15
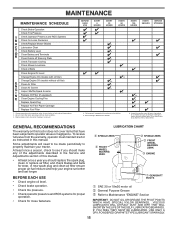
...have been subjected to order a replacement. Inspect the muffler every 50 hours of damage. To receive full value from the warranty, operator must maintain tractor as instructed in high ambient temperatures 2 - BEFORE EACH USE • Check engine oil level. • Check brake operation. • Check ... ➀ GEARSHIFT PIVOTS 01961 ➀ SAE 30 or 10w30 motor oil ➁ General Purpose Grease ➂ Refer to properly maintain your tractor. IF YOU FEEL THEY MUST BE LUBRICATED, USE ONLY A DRY, POWDERED GRAPHITE TYPE LUBRICANT SPARINGLY. 15 Not required if equipped with oil ...
...have been subjected to order a replacement. Inspect the muffler every 50 hours of damage. To receive full value from the warranty, operator must maintain tractor as instructed in high ambient temperatures 2 - BEFORE EACH USE • Check engine oil level. • Check brake operation. • Check ... ➀ GEARSHIFT PIVOTS 01961 ➀ SAE 30 or 10w30 motor oil ➁ General Purpose Grease ➂ Refer to properly maintain your tractor. IF YOU FEEL THEY MUST BE LUBRICATED, USE ONLY A DRY, POWDERED GRAPHITE TYPE LUBRICANT SPARINGLY. 15 Not required if equipped with oil ...

Owner Manual
Page 16
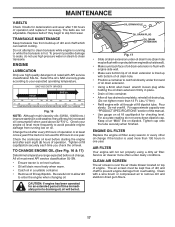
... reverse should NOT shut off the engine. CAUTION: Use only a replacement blade approved by the manufacturer of your tractor is hazardous, could damage your tractor and void your tractor. Using a blade not approved by the manufacturer of your warranty. Lbs./ 62-75 Nm). Tire sealant also ...to "leak" power. • Remove terminal guard. • Disconnect BLACK battery cable first then RED battery cable and remove battery from your tractor is maintenance free. Replace bent or damaged blades. IMPORTANT: SPECIAL BLADE BOLT IS HEAT TREATED. Do not attempt to open . • Recharge...
... reverse should NOT shut off the engine. CAUTION: Use only a replacement blade approved by the manufacturer of your tractor is hazardous, could damage your tractor and void your tractor. Using a blade not approved by the manufacturer of your warranty. Lbs./ 62-75 Nm). Tire sealant also ...to "leak" power. • Remove terminal guard. • Disconnect BLACK battery cable first then RED battery cable and remove battery from your tractor is maintenance free. Replace bent or damaged blades. IMPORTANT: SPECIAL BLADE BOLT IS HEAT TREATED. Do not attempt to open . • Recharge...
Owner Manual
Page 17
...replace if necessary. The belts are not adjustable. Check your expected operating temperature. Check the crankcase oil level before oil change if the tractor is on dipstick. CAUTION: If engine has been operated for an extended period of engine. Select the oil's SAE viscosity grade according to... hole. • Position a container to clean transaxle. Pour slowly. The air screen must meet API service classification SJ-SN. • Ensure tractor is used for 25 hours in one year. Tighten cap onto the tube securely when finished. Be careful not to allow dirt to your engine...
...replace if necessary. The belts are not adjustable. Check your expected operating temperature. Check the crankcase oil level before oil change if the tractor is on dipstick. CAUTION: If engine has been operated for an extended period of engine. Select the oil's SAE viscosity grade according to... hole. • Position a container to clean transaxle. Pour slowly. The air screen must meet API service classification SJ-SN. • Ensure tractor is used for 25 hours in one year. Tighten cap onto the tube securely when finished. Be careful not to allow dirt to your engine...

Owner Manual
Page 18
...plugs at all pinch points and movable parts. Debris can restrict clutch/brake pedal shaft movement, causing belt slip and loss of your tractor unless the engine and transmission are reinstalled. Except for the washout port (if equipped), we do not recommend using a garden hose or... pressure washer to remove grass, leaves and trash from steering plate. Use compressed air or a leaf blower to clean the outside tractor and mower. CLAMP CLAMP CLEANING • Clean engine, battery, seat, finish, etc. CAUTION: Avoid all times. MUFFLER Inspect and replace corroded ...
...plugs at all pinch points and movable parts. Debris can restrict clutch/brake pedal shaft movement, causing belt slip and loss of your tractor unless the engine and transmission are reinstalled. Except for the washout port (if equipped), we do not recommend using a garden hose or... pressure washer to remove grass, leaves and trash from steering plate. Use compressed air or a leaf blower to clean the outside tractor and mower. CLAMP CLAMP CLEANING • Clean engine, battery, seat, finish, etc. CAUTION: Avoid all times. MUFFLER Inspect and replace corroded ...

Owner Manual
Page 19
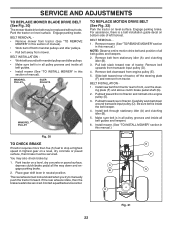
... centered under right side of bracket. • Remove clutch cable spring (Q) from idler arm (R). • Disconnect front link (E) from under tractor. HAVE A TIGHT GRIP ON LIFT LEVER WHEN CHANGING POSITION OF THE LEVER. • Slide mower out from mower - CAUTION: LIFT LEVER IS SPRING ...19 remove retainer springs and washers. IMPORTANT: IF AN ATTACHMENT OTHER THAN THE MOWER IS TO BE MOUNTED ON THE TRACTOR, REMOVE THE FRONT LINK (E) AND REAR LIFT LINKS (C) FROM TRACTOR AND HOOK THE CLUTCH SPRING (Q) INTO THE CABLE GUIDE ON FRONT EDGE OF LOWER DASH. CAUTION: AFTER REAR LIFT...
... centered under right side of bracket. • Remove clutch cable spring (Q) from idler arm (R). • Disconnect front link (E) from under tractor. HAVE A TIGHT GRIP ON LIFT LEVER WHEN CHANGING POSITION OF THE LEVER. • Slide mower out from mower - CAUTION: LIFT LEVER IS SPRING ...19 remove retainer springs and washers. IMPORTANT: IF AN ATTACHMENT OTHER THAN THE MOWER IS TO BE MOUNTED ON THE TRACTOR, REMOVE THE FRONT LINK (E) AND REAR LIFT LINKS (C) FROM TRACTOR AND HOOK THE CLUTCH SPRING (Q) INTO THE CABLE GUIDE ON FRONT EDGE OF LOWER DASH. CAUTION: AFTER REAR LIFT...

Owner Manual
Page 20
... H Fig. 23 • Hook end of mower and position slot in link assembly over pin (B) on outside of tractor chassis and secure with retainer spring. • Repeat on engine pulley (M), in tractor front suspension bracket (F). G M F G A E B P C K LD Fig. 25 20 Work from left side... before operating mower as shown in arm over pin (D) on rear mower bracket and secure with retainer spring (K). • Install belt on opposite side of tractor. • Insert end of this manual. tor. M C D Fig. 22 • ATTACH FRONT LINK (E) - SERVICE AND ADJUSTMENTS • ATTACH...
... H Fig. 23 • Hook end of mower and position slot in link assembly over pin (B) on outside of tractor chassis and secure with retainer spring. • Repeat on engine pulley (M), in tractor front suspension bracket (F). G M F G A E B P C K LD Fig. 25 20 Work from left side... before operating mower as shown in arm over pin (D) on rear mower bracket and secure with retainer spring (K). • Install belt on opposite side of tractor. • Insert end of this manual. tor. M C D Fig. 22 • ATTACH FRONT LINK (E) - SERVICE AND ADJUSTMENTS • ATTACH...

Owner Manual
Page 21
... which side of mower is not adjusted properly. VISUAL SIDE-TO-SIDE ADJUSTMENT (See Fig. 27) • With all tires properly inflated, park tractor on both sides of mower, position blade at side and measure the distance (A) from bottom edge of adjustment nut will change mower height about 1/8" ... is necessary, see steps in its highest position. • At both sides. • If adjustment is not 1/8" to 1/2" (3,1 to the front of tractor. To obtain the best cutting results, the mower blades should be adjusted so the front tip is 1/8" to 1/2" (3,1 to 12,7 mm) lower than the...
... which side of mower is not adjusted properly. VISUAL SIDE-TO-SIDE ADJUSTMENT (See Fig. 27) • With all tires properly inflated, park tractor on both sides of mower, position blade at side and measure the distance (A) from bottom edge of adjustment nut will change mower height about 1/8" ... is necessary, see steps in its highest position. • At both sides. • If adjustment is not 1/8" to 1/2" (3,1 to the front of tractor. To obtain the best cutting results, the mower blades should be adjusted so the front tip is 1/8" to 1/2" (3,1 to 12,7 mm) lower than the...
Owner Manual
Page 22
...plate (F) and remove from stationary idler (A) and clutching idler (B). 3. BELT REMOVAL 1. Remove belt upwards from mower. Remove belt downward from tractor rear to front, over the steer- BELT INSTALLATION 1. Install mower. (See "TO INSTALL MOWER" section in this section of all the ...left footrest. A B D E F G Fig. 31 22 For assistance, there is inside the belt keeper. 4. Pull belt slack toward rear of tractor and roll belt onto engine pulley (E). 3. Carefully work belt down and engage parking brake. 2. BELT INSTALLATION • Work belt around transaxle input pulley ...
...plate (F) and remove from stationary idler (A) and clutching idler (B). 3. BELT REMOVAL 1. Remove belt upwards from mower. Remove belt downward from tractor rear to front, over the steer- BELT INSTALLATION 1. Install mower. (See "TO INSTALL MOWER" section in this section of all the ...left footrest. A B D E F G Fig. 31 22 For assistance, there is inside the belt keeper. 4. Pull belt slack toward rear of tractor and roll belt onto engine pulley (E). 3. Carefully work belt down and engage parking brake. 2. BELT INSTALLATION • Work belt around transaxle input pulley ...
