
Owner Manual
Page 2
... any oil or fuel spillage before and while backing. • Never direct discharged material toward the operator. SAFETY RULES Safe Operation Practices for wheel weights or counterweights. • Keep machine free of grass, leaves or other debris build-up which can touch hot exhaust / engine parts and burn. FAILURE TO OBSERVE THE FOLLOWING SAFETY INSTRUCTIONS COULD RESULT IN SERIOUS INJURY OR DEATH. Use common sense...
... any oil or fuel spillage before and while backing. • Never direct discharged material toward the operator. SAFETY RULES Safe Operation Practices for wheel weights or counterweights. • Keep machine free of grass, leaves or other debris build-up which can touch hot exhaust / engine parts and burn. FAILURE TO OBSERVE THE FOLLOWING SAFETY INSTRUCTIONS COULD RESULT IN SERIOUS INJURY OR DEATH. Use common sense...

Owner Manual
Page 3
... container. • Never remove gas cap or add fuel with the engine running . • Check grass catcher components and the discharge chute frequently and replace with a safety device that has a hitch designed for Ride-On Mowers III. Clean oil or fuel spillage and remove any adjustments or repairs with grass catchers or other hidden ob- Wrap the blade or wear gloves, and use extreme care in gear when going uphill, disengage blades, shift into reverse and back down...
... container. • Never remove gas cap or add fuel with the engine running . • Check grass catcher components and the discharge chute frequently and replace with a safety device that has a hitch designed for Ride-On Mowers III. Clean oil or fuel spillage and remove any adjustments or repairs with grass catchers or other hidden ob- Wrap the blade or wear gloves, and use extreme care in gear when going uphill, disengage blades, shift into reverse and back down...

Owner Manual
Page 4
... similar laws. Federal laws apply on your nearest authorized service center/department. It has been designed, engineered and manufactured to assemble and maintain your tractor. • Follow the instructions under "Maintenance" and "Stor- In the state of the California Public Resources Code). PRODUCT SPECIFICATIONS Gasoline Capacity and type: Oil Type: (API: SJ-SN) Oil Capacity: Spark Plug: Charging System: Battery: Blade Bolt Torque: 1.5 Gallons/5,67 L Regular Unleaded SAE 30 (above is...
... similar laws. Federal laws apply on your nearest authorized service center/department. It has been designed, engineered and manufactured to assemble and maintain your tractor. • Follow the instructions under "Maintenance" and "Stor- In the state of the California Public Resources Code). PRODUCT SPECIFICATIONS Gasoline Capacity and type: Oil Type: (API: SJ-SN) Oil Capacity: Spark Plug: Charging System: Battery: Blade Bolt Torque: 1.5 Gallons/5,67 L Regular Unleaded SAE 30 (above is...

Owner Manual
Page 6
... with remaining bolt and nut. NOTE: For battery installation see "REPLACING BATTERY" in the Service and Adjustments section in this manual. 6 NOTE: If this manual for minimum of one hour at the same time. Standard wrench sizes are in the Maintenance section of your tractor all four panels of those parts left hand is located between terminals) charge battery for charging instructions.) • Determine battery location. Before connecting battery, remove metal bracelets...
... with remaining bolt and nut. NOTE: For battery installation see "REPLACING BATTERY" in the Service and Adjustments section in this manual. 6 NOTE: If this manual for minimum of one hour at the same time. Standard wrench sizes are in the Maintenance section of your tractor all four panels of those parts left hand is located between terminals) charge battery for charging instructions.) • Determine battery location. Before connecting battery, remove metal bracelets...

Owner Manual
Page 8
... Maintenance sections in this manual. ASSEMBLY CHECK TIRE PRESSURE The tires on tires. PLEASE REVIEW THE FOLLOWING CHECKLIST: ✓ All assembly instructions have been completed. ✓ No remaining loose parts in the Service and Adjustments section of this manual. ✓CHECKLIST BEFORE YOU OPERATE YOUR NEW TRACTOR, WE WISH TO ENSURE THAT YOU RECEIVE THE BEST PERFORMANCE AND SATISFACTION FROM THIS QUALITY PRODUCT. Correct tire pressure is important for leveling.) ✓ Check mower and drive belts. CHECK DECK LEVELNESS...
... Maintenance sections in this manual. ASSEMBLY CHECK TIRE PRESSURE The tires on tires. PLEASE REVIEW THE FOLLOWING CHECKLIST: ✓ All assembly instructions have been completed. ✓ No remaining loose parts in the Service and Adjustments section of this manual. ✓CHECKLIST BEFORE YOU OPERATE YOUR NEW TRACTOR, WE WISH TO ENSURE THAT YOU RECEIVE THE BEST PERFORMANCE AND SATISFACTION FROM THIS QUALITY PRODUCT. Correct tire pressure is important for leveling.) ✓ Check mower and drive belts. CHECK DECK LEVELNESS...

Owner Manual
Page 10
... and controlling engine speed. (E) ATTACHMENT CLUTCH LEVER - Used to raise, lower, and adjust the mower deck or other powered attachment while in reverse. (H) LIGHT SWITCH - Save this manual for declutching and braking the tractor and starting the engine. (C) PARKING BRAKE - Allows operation of various controls and adjustments. Locks clutch/brake pedal into the brake position. (D) THROTTLE/CHOKE CONTROL - Used for starting and stopping the engine. (G) REVERSE OPERATION SYSTEM (ROS) "ON" POSITION - H G D E B F A C J Fig. 4 Our tractors conform to the applicable safety...
... and controlling engine speed. (E) ATTACHMENT CLUTCH LEVER - Used to raise, lower, and adjust the mower deck or other powered attachment while in reverse. (H) LIGHT SWITCH - Save this manual for declutching and braking the tractor and starting the engine. (C) PARKING BRAKE - Allows operation of various controls and adjustments. Locks clutch/brake pedal into the brake position. (D) THROTTLE/CHOKE CONTROL - Used for starting and stopping the engine. (G) REVERSE OPERATION SYSTEM (ROS) "ON" POSITION - H G D E B F A C J Fig. 4 Our tractors conform to the applicable safety...

Owner Manual
Page 11
... standard safety glasses. B C IMPORTANT: LEAVING THE IGNITION SWITCH IN ANY POSITION OTHER THAN "STOP" WILL CAUSE THE BATTERY TO DISCHARGE AND GO DEAD. Always remove key when leaving tractor to prevent unauthorized use. • Never use the choke to fast position. When engine is standing idle with clutch/brake pedal depressed and gearshift lever in the "DISENGAGED" position ( ). TO USE THROTTLE CONTROL (D) (See Fig. 7) Always operate engine at full speed (fast). • Operating engine...
... standard safety glasses. B C IMPORTANT: LEAVING THE IGNITION SWITCH IN ANY POSITION OTHER THAN "STOP" WILL CAUSE THE BATTERY TO DISCHARGE AND GO DEAD. Always remove key when leaving tractor to prevent unauthorized use. • Never use the choke to fast position. When engine is standing idle with clutch/brake pedal depressed and gearshift lever in the "DISENGAGED" position ( ). TO USE THROTTLE CONTROL (D) (See Fig. 7) Always operate engine at full speed (fast). • Operating engine...

Owner Manual
Page 12
... upon soil conditions, height of grass and types of cut. (See "TO ADJUST MOWER CUTTING HEIGHT".) • Start mower blades by the operator to leave the seat with the engine not running and the attachment clutch engaged will shut off the engine. The cutting height range is at the desired cutting height in desired height of the attachment lift lever (A) determines the cutting height. Be sure you restart movement. • To restart movement, slowly release parking brake and clutch/brake pedal. •...
... upon soil conditions, height of grass and types of cut. (See "TO ADJUST MOWER CUTTING HEIGHT".) • Start mower blades by the operator to leave the seat with the engine not running and the attachment clutch engaged will shut off the engine. The cutting height range is at the desired cutting height in desired height of the attachment lift lever (A) determines the cutting height. Be sure you restart movement. • To restart movement, slowly release parking brake and clutch/brake pedal. •...

Owner Manual
Page 13
... weight oil. • Check engine oil with the attachment clutch engaged will enter the mowing area. • Depress clutch/brake pedal all the way down and hold. • With engine running, turn the ignition key clockwise to tractor. Use common sense when towing. Tires can attract moisture which leads to ROS "ON" position. • Look down , wait for a few seconds, remove and read oil level. To avoid engine problems, the fuel system should change engine oil, see the Maintenance...
... weight oil. • Check engine oil with the attachment clutch engaged will enter the mowing area. • Depress clutch/brake pedal all the way down and hold. • With engine running, turn the ignition key clockwise to tractor. Use common sense when towing. Tires can attract moisture which leads to ROS "ON" position. • Look down , wait for a few seconds, remove and read oil level. To avoid engine problems, the fuel system should change engine oil, see the Maintenance...

Owner Manual
Page 14
... mower cutting performance as well as the quality of the attachment being used . If engine still does not start, move the throttle control back to several minutes, depending on seat in operating position, depress clutch/brake pedal and set parking brake. • Place gear shift lever in neutral position. • Move attachment clutch to "DISENGAGED" position. • Move throttle control to reduce load and possible fire hazard from several attempts, move fuel...
... mower cutting performance as well as the quality of the attachment being used . If engine still does not start, move the throttle control back to several minutes, depending on seat in operating position, depress clutch/brake pedal and set parking brake. • Place gear shift lever in neutral position. • Move attachment clutch to "DISENGAGED" position. • Move throttle control to reduce load and possible fire hazard from several attempts, move fuel...
Owner Manual
Page 15
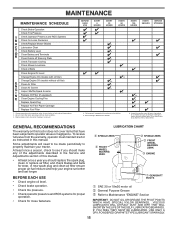
...GREASE THE PIVOT POINTS WHICH HAVE SPECIAL NYLON BEARINGS. See Cleaning in sandy soil. A new spark plug and clean air filter ensure proper air-fuel mixture and help your tractor. MAINTENANCE MAINTENANCE SCHEDULE Check Brake Operation Check Tire Pressure T Check Operator Presence and ROS Systems R Check for Loose Fasteners A Check/Replace Mower Blades C Lubrication Chart T Check Battery Level O Clean Battery and Terminals R Clean Debris off Steering Plate Check Transaxle Cooling Check Mower Levelness Check V-Belts Check Engine Oil Level Change Engine Oil (models with maintenance-free...
...GREASE THE PIVOT POINTS WHICH HAVE SPECIAL NYLON BEARINGS. See Cleaning in sandy soil. A new spark plug and clean air filter ensure proper air-fuel mixture and help your tractor. MAINTENANCE MAINTENANCE SCHEDULE Check Brake Operation Check Tire Pressure T Check Operator Presence and ROS Systems R Check for Loose Fasteners A Check/Replace Mower Blades C Lubrication Chart T Check Battery Level O Clean Battery and Terminals R Clean Debris off Steering Plate Check Transaxle Cooling Check Mower Levelness Check V-Belts Check Engine Oil Level Change Engine Oil (models with maintenance-free...

Owner Manual
Page 16
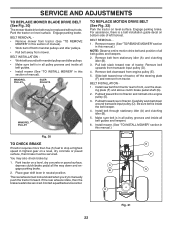
... NOT shut off the engine. CHECK REVERSE OPERATION (ROS) SYSTEM • When the engine is running with the ignition switch in the ROS "ON" position and the attachment clutch engaged, any maintenance. BLADE CENTER HOLE BLADE BOLT (SPECIAL) MANDREL ASSEMBLY STAR BATTERY Fig. 15 Your tractor has a battery charging system which can cause the battery to "leak" power. • Remove terminal guard. • Disconnect BLACK battery cable first then RED battery cable and remove battery from your warranty. Do not attempt...
... NOT shut off the engine. CHECK REVERSE OPERATION (ROS) SYSTEM • When the engine is running with the ignition switch in the ROS "ON" position and the attachment clutch engaged, any maintenance. BLADE CENTER HOLE BLADE BOLT (SPECIAL) MANDREL ASSEMBLY STAR BATTERY Fig. 15 Your tractor has a battery charging system which can cause the battery to "leak" power. • Remove terminal guard. • Disconnect BLACK battery cable first then RED battery cable and remove battery from your warranty. Do not attempt...
Owner Manual
Page 17
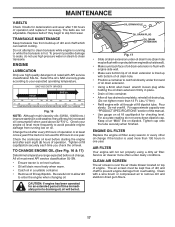
... replace if necessary. Tighten oil fill cap/dipstick securely each eight (8) hours of dirt and chaff which can restrict cooling. Lbs./17 Nm) • Refill engine with a wire brush or compressed air to enter the engine when changing oil. Check your expected operating temperature. Pour slowly. MAINTENANCE V-BELTS Check V-belts for deterioration and wear after 100 hours of operation or at "MAX" line on dipstick. ENGINE LUBRICATION Only use high pressure...
... replace if necessary. Tighten oil fill cap/dipstick securely each eight (8) hours of dirt and chaff which can restrict cooling. Lbs./17 Nm) • Refill engine with a wire brush or compressed air to enter the engine when changing oil. Check your expected operating temperature. Pour slowly. MAINTENANCE V-BELTS Check V-belts for deterioration and wear after 100 hours of operation or at "MAX" line on dipstick. ENGINE LUBRICATION Only use high pressure...

Owner Manual
Page 19
... attachment lift lever to its lowest position. • Roll belt off engine pulley (M) and belt keepers (G). • Remove retainer spring (K), slide collar (L) off and push housing guide (P) out of bracket. • Remove clutch cable spring (Q) from idler arm (R). • Disconnect front link (E) from mower - HAVE A TIGHT GRIP ON LIFT LEVER WHEN CHANGING POSITION OF THE LEVER. • Slide mower out from under tractor until it cannot come in contact with plug. remove retainer springs and washers. TO INSTALL MOWER...
... attachment lift lever to its lowest position. • Roll belt off engine pulley (M) and belt keepers (G). • Remove retainer spring (K), slide collar (L) off and push housing guide (P) out of bracket. • Remove clutch cable spring (Q) from idler arm (R). • Disconnect front link (E) from mower - HAVE A TIGHT GRIP ON LIFT LEVER WHEN CHANGING POSITION OF THE LEVER. • Slide mower out from under tractor until it cannot come in contact with plug. remove retainer springs and washers. TO INSTALL MOWER...

Owner Manual
Page 21
...) • With all tires properly inflated, park tractor on both sides. • If adjustment is necessary, see steps in Visual Adjustment instructions above. • Recheck measurements, adjust if necessary until both sides of mower, position blade at front and rear tip of the blade. • If front tip of the adjustment nut will change mower height about 3/16" (4,7 mm). • Test your lawn and lead you...
...) • With all tires properly inflated, park tractor on both sides. • If adjustment is necessary, see steps in Visual Adjustment instructions above. • Recheck measurements, adjust if necessary until both sides of mower, position blade at front and rear tip of the blade. • If front tip of the adjustment nut will change mower height about 3/16" (4,7 mm). • Test your lawn and lead you...
Owner Manual
Page 22
...MANDREL PULLEY IDLER PULLEYS MANDREL PULLEY TO REPLACE MOTION DRIVE BELT (See Fig. 32) Park the tractor on level surface. Remove belt from engine pulley (E). 5. Install new belt from tractor rear to be serviced. Pull belt toward rear of tractor and roll belt onto engine pulley (E). 3. Pull belt toward front of tractor. You may be serviced. If the rear wheels rotate, then the brake needs to front, over the steer- Contact a qualified service center. Engage parking brake. For assistance, there is in this section of all belt guides and keepers. 6. Install mower. (See...
...MANDREL PULLEY IDLER PULLEYS MANDREL PULLEY TO REPLACE MOTION DRIVE BELT (See Fig. 32) Park the tractor on level surface. Remove belt from engine pulley (E). 5. Install new belt from tractor rear to be serviced. Pull belt toward rear of tractor and roll belt onto engine pulley (E). 3. Pull belt toward front of tractor. You may be serviced. If the rear wheels rotate, then the brake needs to front, over the steer- Contact a qualified service center. Engage parking brake. For assistance, there is in this section of all belt guides and keepers. 6. Install mower. (See...

Owner Manual
Page 23
...: When the tractor rear wheels move mower deck height to the lowest position. Always wear eye protection when around batteries. RETAINING WASHERS RING AXLE COVER If your local parts dealer. DO NOT USE YOUR TRACTOR BATTERY TO START OTHER VEHICLES. SERVICE AND ADJUSTMENTS TRANSAXLE GEAR SHIFT LEVER NEUTRAL ADJUSTMENT (See Fig. 32) The transaxle should be in neutral when the gear shift lever is needed to get to adjustment bolt, move...
...: When the tractor rear wheels move mower deck height to the lowest position. Always wear eye protection when around batteries. RETAINING WASHERS RING AXLE COVER If your local parts dealer. DO NOT USE YOUR TRACTOR BATTERY TO START OTHER VEHICLES. SERVICE AND ADJUSTMENTS TRANSAXLE GEAR SHIFT LEVER NEUTRAL ADJUSTMENT (See Fig. 32) The transaxle should be in neutral when the gear shift lever is needed to get to adjustment bolt, move...

Owner Manual
Page 25
... the gas tank and carburetor if using fuel stabilizer. OTHER • Do not store gasoline from tractor for storage. • After a period of storage, battery cables should be purchased and connected to the unit to "START" position for 30 days or more. NOTE: Fuel stabilizer is removed from one ounce (29.5 mL) of oil through spark plug hole(s) into cylinder(s). • Turn ignition key to charge the battery during...
... the gas tank and carburetor if using fuel stabilizer. OTHER • Do not store gasoline from tractor for storage. • After a period of storage, battery cables should be purchased and connected to the unit to "START" position for 30 days or more. NOTE: Fuel stabilizer is removed from one ounce (29.5 mL) of oil through spark plug hole(s) into cylinder(s). • Turn ignition key to charge the battery during...

Owner Manual
Page 26
... plug wire. 11. Out of mower housing. 4. Dirty air filter. 6. Hard to start 8. Loose or damaged wiring. 9. Loose or damaged wiring. 7. Faulty solenoid or starter. 1. Throttle in fuel. Dirty engine air screen/fins. 12. Worn, bent or loose blade. 2. Clean/replace air filter. 6. Empty fuel tank and carburetor, refill tank with fresh, clean gasoline. 6. Check all wiring. 7. Check all wiring. 14. Check oil level/change spark plug. 7. Check all wiring. 7. Engine will not turn over Engine clicks but will not start CAUSE 1. Weak or dead battery. 4. Faulty ignition switch...
... plug wire. 11. Out of mower housing. 4. Dirty air filter. 6. Hard to start 8. Loose or damaged wiring. 9. Loose or damaged wiring. 7. Faulty solenoid or starter. 1. Throttle in fuel. Dirty engine air screen/fins. 12. Worn, bent or loose blade. 2. Clean/replace air filter. 6. Empty fuel tank and carburetor, refill tank with fresh, clean gasoline. 6. Check all wiring. 7. Check all wiring. 14. Check oil level/change spark plug. 7. Check all wiring. 7. Engine will not turn over Engine clicks but will not start CAUSE 1. Weak or dead battery. 4. Faulty ignition switch...

Owner Manual
Page 27
... in parts manual. 11. Frozen idler pulley. 4. Replace mower drive belt. 9. Replace motion drive belt. 3. Install axle key at rear wheel. See Operation section. 27 CORRECTION 1. Bent blade mandrel. 5. Tighten blade bolt. 2. Tighten blade bolt. 7. Shift to run when operator leaves seat with blades listed in clutch mechanism. 2. Wet grass. 3. Check tires for proper air pressure. 6. Improper blades used. 10. Faulty light switch. 4. Turn switch "ON". 2. Worn, bent or loose blade. 2. Replace blade. Replace with attachment clutch engaged 1. Replace fuse. 1. If...
... in parts manual. 11. Frozen idler pulley. 4. Replace mower drive belt. 9. Replace motion drive belt. 3. Install axle key at rear wheel. See Operation section. 27 CORRECTION 1. Bent blade mandrel. 5. Tighten blade bolt. 2. Tighten blade bolt. 7. Shift to run when operator leaves seat with blades listed in clutch mechanism. 2. Wet grass. 3. Check tires for proper air pressure. 6. Improper blades used. 10. Faulty light switch. 4. Turn switch "ON". 2. Worn, bent or loose blade. 2. Replace blade. Replace with attachment clutch engaged 1. Replace fuse. 1. If...


