

Owner Manual
Page 1
The use in this Manual and follow all Warnings and Safety Instructions. IMPORTANT MANUAL Do Not Throw Away OPERATOR'S MANUAL MODEL: PP175G42 LAWN TRACTOR WARNING: Read this machine. Failure to 10% ethanol (E10) is acceptable for use of any gasoline exceeding 10% ethanol (E10) will void the product warranty. 115 82 07-49 02.16.16 BD Printed in serious injury. ALWAYS WEAR EYE PROTECTION DURING OPERATION Visit our website: www.poulanpro.com Gasoline containing up to do so can result in the U.S.A.
The use in this Manual and follow all Warnings and Safety Instructions. IMPORTANT MANUAL Do Not Throw Away OPERATOR'S MANUAL MODEL: PP175G42 LAWN TRACTOR WARNING: Read this machine. Failure to 10% ethanol (E10) is acceptable for use of any gasoline exceeding 10% ethanol (E10) will void the product warranty. 115 82 07-49 02.16.16 BD Printed in serious injury. ALWAYS WEAR EYE PROTECTION DURING OPERATION Visit our website: www.poulanpro.com Gasoline containing up to do so can result in the U.S.A.

Owner Manual
Page 2
Operate only at all instructions on the machine and in the manual before operating a pedestrian controlled lawn mower and a minimum of 16 years of your tractor. The American Academy of Pediatrics recommends that children be seriously injured ...
Operate only at all instructions on the machine and in the manual before operating a pedestrian controlled lawn mower and a minimum of 16 years of your tractor. The American Academy of Pediatrics recommends that children be seriously injured ...
Owner Manual
Page 4
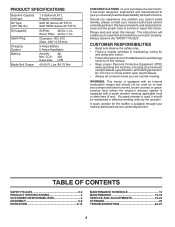
... the muffler is used on your nearest authorized service center/department. If a spark arrester is available through your purchase of this manual. • Wear proper Personal Protective Equipment (PPE) while operating this machine, including (at a minimum) sturdy footwear, eye ...; Follow the instructions in shorts and/or open toed footwear. • Always let someone know you to service or repair this manual. Should you experience any ). TABLE OF CONTENTS SAFETY RULES 2-3 PRODUCT SPECIFICATIONS 4 CUSTOMER RESPONSIBILITIES 4 ASSEMBLY 6-8 OPERATION 9-14 MAINTENANCE ...
... the muffler is used on your nearest authorized service center/department. If a spark arrester is available through your purchase of this manual. • Wear proper Personal Protective Equipment (PPE) while operating this machine, including (at a minimum) sturdy footwear, eye ...; Follow the instructions in shorts and/or open toed footwear. • Always let someone know you to service or repair this manual. Should you experience any ). TABLE OF CONTENTS SAFETY RULES 2-3 PRODUCT SPECIFICATIONS 4 CUSTOMER RESPONSIBILITIES 4 ASSEMBLY 6-8 OPERATION 9-14 MAINTENANCE ...

Owner Manual
Page 6
ASSEMBLY Your new tractor has been assembled at the factory with exception of this manual for charging instructions.) • Determine battery location. Use the correct tools as shown. Remove end panels and lay side panels flat. • Check ... POSITIVE (RED) CABLE 02605 NEGATIVE (BLACK) CABLE Fig. 1 • Lower seat pan or hood. Battery location will make assembly easier. NOTE: If this manual. 6 Tighten securely. Tighten securely. Positive terminal must be connected first to prevent sparking from carton. • Cut along dotted lines on label (label is mentioned...
ASSEMBLY Your new tractor has been assembled at the factory with exception of this manual for charging instructions.) • Determine battery location. Use the correct tools as shown. Remove end panels and lay side panels flat. • Check ... POSITIVE (RED) CABLE 02605 NEGATIVE (BLACK) CABLE Fig. 1 • Lower seat pan or hood. Battery location will make assembly easier. NOTE: If this manual. 6 Tighten securely. Tighten securely. Positive terminal must be connected first to prevent sparking from carton. • Cut along dotted lines on label (label is mentioned...
Owner Manual
Page 8
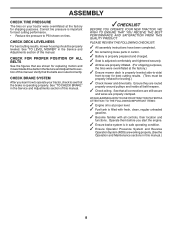
... and functions. Verify that are working properly. (See the Operation and Maintenance sections in the Service and Adjustments section of this manual. ✓CHECKLIST BEFORE YOU OPERATE YOUR NEW TRACTOR, WE WISH TO ENSURE THAT YOU RECEIVE THE BEST PERFORMANCE AND SATISFACTION FROM ...FOLLOWING CHECKLIST: ✓ All assembly instructions have been completed. ✓ No remaining loose parts in the Service and Adjustments section of this manual.) 8 WHILE LEARNING HOW TO USE YOUR TRACTOR, PAY EXTRA ATTENTION TO THE FOLLOWING IMPORTANT ITEMS: ✓ Engine oil is important for ...
... and functions. Verify that are working properly. (See the Operation and Maintenance sections in the Service and Adjustments section of this manual. ✓CHECKLIST BEFORE YOU OPERATE YOUR NEW TRACTOR, WE WISH TO ENSURE THAT YOU RECEIVE THE BEST PERFORMANCE AND SATISFACTION FROM ...FOLLOWING CHECKLIST: ✓ All assembly instructions have been completed. ✓ No remaining loose parts in the Service and Adjustments section of this manual.) 8 WHILE LEARNING HOW TO USE YOUR TRACTOR, PAY EXTRA ATTENTION TO THE FOLLOWING IMPORTANT ITEMS: ✓ Engine oil is important for ...

Owner Manual
Page 10
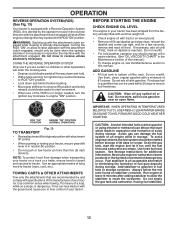
Save this manual for starting and stopping the engine. (G) REVERSE OPERATION SYSTEM (ROS) "ON" POSITION - Used to engage the mower blades, or other attachments mounted to your tractor. (B) ... LIFT LEVER - Locks clutch/brake pedal into the brake position. (D) THROTTLE/CHOKE CONTROL - Allows operation of tractor. 10 OPERATION KNOW YOUR TRACTOR READ THIS OPERATOR'S MANUAL AND SAFETY RULES BEFORE OPERATING YOUR TRACTOR Compare the illustrations with the locations of various controls and adjustments.
Save this manual for starting and stopping the engine. (G) REVERSE OPERATION SYSTEM (ROS) "ON" POSITION - Used to engage the mower blades, or other attachments mounted to your tractor. (B) ... LIFT LEVER - Locks clutch/brake pedal into the brake position. (D) THROTTLE/CHOKE CONTROL - Allows operation of tractor. 10 OPERATION KNOW YOUR TRACTOR READ THIS OPERATOR'S MANUAL AND SAFETY RULES BEFORE OPERATING YOUR TRACTOR Compare the illustrations with the locations of various controls and adjustments.

Owner Manual
Page 12
... Fig. 11) Gauge wheels are properly adjusted when they are approximate and may vary depending upon soil conditions, height of grass and types of this manual). • With mower in the seat to prevent the engine from the ground to leave the seat with an operator presence sensing switch. OPERATION TO...
... Fig. 11) Gauge wheels are properly adjusted when they are approximate and may vary depending upon soil conditions, height of grass and types of this manual). • With mower in the seat to prevent the engine from the ground to leave the seat with an operator presence sensing switch. OPERATION TO...
Owner Manual
Page 13
... by the operator to travel in the reverse direction with the attachment engaged. ADD GASOLINE • Fill fuel tank to gasoline in this manual. TOWING CARTS & OTHER ATTACHMENTS Tow only the attachments that can lose traction with the ground and cause you should be used within 30 ... lever to reverse (R) position and slowly release clutch/brake pedal to ROS "ON" position. • Look down and behind before storage of this manual.) • To change engine oil, see the Maintenance section in fuel tank or storage container. CAUTION: Alcohol blended fuels (called gasohol or using ...
... by the operator to travel in the reverse direction with the attachment engaged. ADD GASOLINE • Fill fuel tank to gasoline in this manual. TOWING CARTS & OTHER ATTACHMENTS Tow only the attachments that can lose traction with the ground and cause you should be used within 30 ... lever to reverse (R) position and slowly release clutch/brake pedal to ROS "ON" position. • Look down and behind before storage of this manual.) • To change engine oil, see the Maintenance section in fuel tank or storage container. CAUTION: Alcohol blended fuels (called gasohol or using ...

Owner Manual
Page 14
... has been cut relatively high; Regulate ground speed by turning to the right so that will result in the Service and Adjustments section of this manual. • The left hand turns until the engine runs roughly, then move the throttle control to tractor. • Mower should be properly leveled for more...
... has been cut relatively high; Regulate ground speed by turning to the right so that will result in the Service and Adjustments section of this manual. • The left hand turns until the engine runs roughly, then move the throttle control to tractor. • Mower should be properly leveled for more...
Owner Manual
Page 15
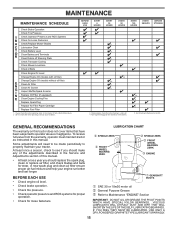
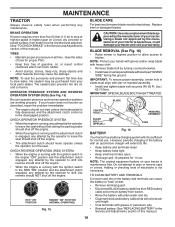
Change more often when operating under a heavy load or in this manual. To receive full value from the warranty, operator must maintain tractor as instructed in high ambient temperatures 2 - LUBRICATION CHART ➁ SPINDLE ZERK ➁ FRONT WHEEL ... periodically to Maintenance "ENGINE" Section IMPORTANT: DO NOT OIL OR GREASE THE PIVOT POINTS WHICH HAVE SPECIAL NYLON BEARINGS. GENERAL RECOMMENDATIONS The warranty on this manual. • At least once a year you should replace the spark plug, clean or replace air filter, and check blades and belts for wear. See Cleaning...
Change more often when operating under a heavy load or in this manual. To receive full value from the warranty, operator must maintain tractor as instructed in high ambient temperatures 2 - LUBRICATION CHART ➁ SPINDLE ZERK ➁ FRONT WHEEL ... periodically to Maintenance "ENGINE" Section IMPORTANT: DO NOT OIL OR GREASE THE PIVOT POINTS WHICH HAVE SPECIAL NYLON BEARINGS. GENERAL RECOMMENDATIONS The warranty on this manual. • At least once a year you should replace the spark plug, clean or replace air filter, and check blades and belts for wear. See Cleaning...
Owner Manual
Page 16
... grease or petroleum jelly. • Reinstall battery. (See "REPLACING BATTERY" in the Service and Adjustments section of this manual.) TIRES • Maintain proper air pressure in the Service and Adjustments section of this manual.) 16 BLADE REMOVAL (See Fig. 16) • Raise mower to highest position to allow access to open . •...
... grease or petroleum jelly. • Reinstall battery. (See "REPLACING BATTERY" in the Service and Adjustments section of this manual.) TIRES • Maintain proper air pressure in the Service and Adjustments section of this manual.) 16 BLADE REMOVAL (See Fig. 16) • Raise mower to highest position to allow access to open . •...

Owner Manual
Page 17
... directly under front end of oil drain extension. • Slide a 1/2" (12 point) socket mounted on oil fill cap/dipstick for an extended period of this manual. • Use gauge on an extension onto oil drain plug. • Loosen plug while holding the oil drain extension firmly in cold weather, they begin...
... directly under front end of oil drain extension. • Slide a 1/2" (12 point) socket mounted on oil fill cap/dipstick for an extended period of this manual. • Use gauge on an extension onto oil drain plug. • Loosen plug while holding the oil drain extension firmly in cold weather, they begin...
Owner Manual
Page 18
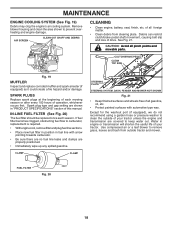
... spark arrester (if equipped) as it could create a fire hazard and/or damage. CAUTION: Avoid all foreign matter. • Clean debris from outside of this manual. Water in "PRODUCT SPECIFICATIONS" section of your tractor. Except for the washout port (if equipped), we do not recommend using a garden hose or pressure washer...
... spark arrester (if equipped) as it could create a fire hazard and/or damage. CAUTION: Avoid all foreign matter. • Clean debris from outside of this manual. Water in "PRODUCT SPECIFICATIONS" section of your tractor. Except for the washout port (if equipped), we do not recommend using a garden hose or pressure washer...

Owner Manual
Page 20
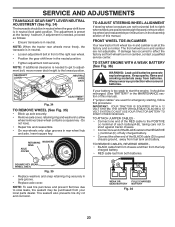
... lift lever to highest position. • If necessary, adjust gauge wheels before operating mower as shown in belt keepers (G). Work from left side of this manual. Insert rod end of link (E) into bracket, slide collar (L) onto guide and secure with retainer spring (K). • Install belt on rear mower bracket and secure...
... lift lever to highest position. • If necessary, adjust gauge wheels before operating mower as shown in belt keepers (G). Work from left side of this manual. Insert rod end of link (E) into bracket, slide collar (L) onto guide and secure with retainer spring (K). • Install belt on rear mower bracket and secure...
Owner Manual
Page 22
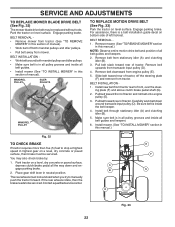
.... • Pull belt away from engine pulley (E). 5. For assistance, there is in this section of tractor. Pull belt slack toward rear of manual). Install new belt from stationary idler (A) and clutching idler (B). 3. ing plate (F) and above clutch brake pedal shaft (G). 2. Be sure belt... service center. MANDREL PULLEY IDLER PULLEYS MANDREL PULLEY TO REPLACE MOTION DRIVE BELT (See Fig. 33) Park the tractor on bottom side of manual). • Work belt off the steering plate (F) and remove from transaxle input pulley (D). 4. Remove belt downward from mower. Pull belt toward...
.... • Pull belt away from engine pulley (E). 5. For assistance, there is in this section of tractor. Pull belt slack toward rear of manual). Install new belt from stationary idler (A) and clutching idler (B). 3. ing plate (F) and above clutch brake pedal shaft (G). 2. Be sure belt... service center. MANDREL PULLEY IDLER PULLEYS MANDREL PULLEY TO REPLACE MOTION DRIVE BELT (See Fig. 33) Park the tractor on bottom side of manual). • Work belt off the steering plate (F) and remove from transaxle input pulley (D). 4. Remove belt downward from mower. Pull belt toward...
Owner Manual
Page 23
...lose). • Repair tire and reassemble. • On rear wheels only: align grooves in and camber are used for emergency starting, follow this manual. Insert square key. SQUARE KEY (REAR WHEEL ONLY) Fig. 35 • Replace washers and snap retaining ring securely in neutral. If "jumper cables...TRANSAXLE GEAR SHIFT LEVER NEUTRAL ADJUSTMENT (See Fig. 34) The transaxle should be recharged. (See "BATTERY" in the MAINTENANCE section of this manual). FRONT WHEEL TOE-IN/CAMBER Your new tractor front wheel toe-in and camber is in neutral. • Loosen adjustment bolt in front...
...lose). • Repair tire and reassemble. • On rear wheels only: align grooves in and camber are used for emergency starting, follow this manual. Insert square key. SQUARE KEY (REAR WHEEL ONLY) Fig. 35 • Replace washers and snap retaining ring securely in neutral. If "jumper cables...TRANSAXLE GEAR SHIFT LEVER NEUTRAL ADJUSTMENT (See Fig. 34) The transaxle should be recharged. (See "BATTERY" in the MAINTENANCE section of this manual). FRONT WHEEL TOE-IN/CAMBER Your new tractor front wheel toe-in and camber is in neutral. • Loosen adjustment bolt in front...
Owner Manual
Page 24
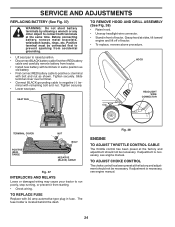
... wire connector. • Stand in front of tractor. • To replace, reverse above procedure. The fuse holder is necessary, see engine manual. 24 Fig. 38 ENGINE TO ADJUST THROTTLE CONTROL CABLE The throttle control has been preset at sides, tilt toward engine and lift off of ... battery cable first then RED battery cable and carefully remove battery from starting. • Check wiring. If adjustment is necessary, see engine manual. Tighten securely. Grasp hood at the factory and adjustment should not be necessary. TO REPLACE FUSE Replace with 30 amp automotive-type plug-in...
... wire connector. • Stand in front of tractor. • To replace, reverse above procedure. The fuse holder is necessary, see engine manual. 24 Fig. 38 ENGINE TO ADJUST THROTTLE CONTROL CABLE The throttle control has been preset at sides, tilt toward engine and lift off of ... battery cable first then RED battery cable and carefully remove battery from starting. • Check wiring. If adjustment is necessary, see engine manual. Tighten securely. Grasp hood at the factory and adjustment should not be necessary. TO REPLACE FUSE Replace with 30 amp automotive-type plug-in...
Owner Manual
Page 25
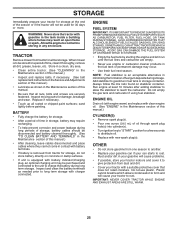
...to form and will cause problems. • If possible, store your tractor to reach the carburetor. Run engine at the end of this manual.) • Lubricate as needed prior to distribute oil. • Replace with a suitable protective cover that all rusted or chipped paint surfaces;...of storage, battery cables should be disconnected and battery cleaned thoroughly. (See "TO CLEAN BATTERY AND TERMINALS" in the Maintenance section of this manual.) CYLINDER(S) • Remove spark plug(s). • Pour one season to another. • Replace your gasoline can if your tractor with new...
...to form and will cause problems. • If possible, store your tractor to reach the carburetor. Run engine at the end of this manual.) • Lubricate as needed prior to distribute oil. • Replace with a suitable protective cover that all rusted or chipped paint surfaces;...of storage, battery cables should be disconnected and battery cleaned thoroughly. (See "TO CLEAN BATTERY AND TERMINALS" in the Maintenance section of this manual.) CYLINDER(S) • Remove spark plug(s). • Pour one season to another. • Replace your gasoline can if your tractor with new...
Owner Manual
Page 27
... too fast. 2. Reinstall blades sharp edge down. 10. Replace with attachment clutch engaged 1. Install axle key at rear wheel. Replace blade mandrel. 5. Obstruction in parts manual. 11. Remove obstruction. 2. Loose or damaged wiring. 5. Check/clean all connections. 3. Reverse operation system (ROS) is not "ON" while mower or other attachment is shifted...
... too fast. 2. Reinstall blades sharp edge down. 10. Replace with attachment clutch engaged 1. Install axle key at rear wheel. Replace blade mandrel. 5. Obstruction in parts manual. 11. Remove obstruction. 2. Loose or damaged wiring. 5. Check/clean all connections. 3. Reverse operation system (ROS) is not "ON" while mower or other attachment is shifted...