

Owner Manual
Page 2
... the mowing activity. Allow machine to the presence of your tractor. FAILURE TO OBSERVE THE FOLLOWING SAFETY INSTRUCTIONS COULD RESULT IN SERIOUS INJURY OR DEATH. Operate only at all parts to come to a complete stop engine, and remove keys before cleaning the machine, removing the grass catcher, or unclogging the discharge chute. • Operate machine only in daylight or good artificial light. • Do not operate the...
... the mowing activity. Allow machine to the presence of your tractor. FAILURE TO OBSERVE THE FOLLOWING SAFETY INSTRUCTIONS COULD RESULT IN SERIOUS INJURY OR DEATH. Operate only at all parts to come to a complete stop engine, and remove keys before cleaning the machine, removing the grass catcher, or unclogging the discharge chute. • Operate machine only in daylight or good artificial light. • Do not operate the...

Owner Manual
Page 3
... trailer bed with a safety device that has a hitch designed for towed equipment and towing on slopes. • Never allow extra distance to roll over. • Use extreme caution while operating machine with safety devices. Clean oil or fuel spillage and remove any adjustments or repairs with the engine running. • Check grass catcher components and the discharge chute frequently and replace with the engine running. • Allow engine to stop and...
... trailer bed with a safety device that has a hitch designed for towed equipment and towing on slopes. • Never allow extra distance to roll over. • Use extreme caution while operating machine with safety devices. Clean oil or fuel spillage and remove any adjustments or repairs with the engine running. • Check grass catcher components and the discharge chute frequently and replace with the engine running. • Allow engine to stop and...
Owner Manual
Page 4
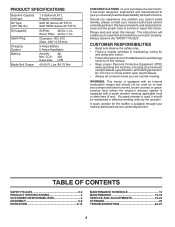
... any). TABLE OF CONTENTS SAFETY RULES 2-3 PRODUCT SPECIFICATIONS 4 CUSTOMER RESPONSIBILITIES 4 ASSEMBLY 6-8 OPERATION 9-14 MAINTENANCE SCHEDULE 15 MAINTENANCE 15-18 SERVICE AND ADJUSTMENTS 19-24 STORAGE 25 TROUBLESHOOTING 26-27 4 The instructions will enable you to service or repair this tractor. Should you cannot easily remedy, please contact your nearest authorized service center/department. PRODUCT SPECIFICATIONS Gasoline Capacity and type: Oil Type: (API: SG-SL) Oil Capacity: Spark Plug: Charging System: Battery: Blade Bolt Torque: 1.5 Gallons/5,67 L Regular Unleaded...
... any). TABLE OF CONTENTS SAFETY RULES 2-3 PRODUCT SPECIFICATIONS 4 CUSTOMER RESPONSIBILITIES 4 ASSEMBLY 6-8 OPERATION 9-14 MAINTENANCE SCHEDULE 15 MAINTENANCE 15-18 SERVICE AND ADJUSTMENTS 19-24 STORAGE 25 TROUBLESHOOTING 26-27 4 The instructions will enable you to service or repair this tractor. Should you cannot easily remedy, please contact your nearest authorized service center/department. PRODUCT SPECIFICATIONS Gasoline Capacity and type: Oil Type: (API: SG-SL) Oil Capacity: Spark Plug: Charging System: Battery: Blade Bolt Torque: 1.5 Gallons/5,67 L Regular Unleaded...

Owner Manual
Page 6
... are listed. (1) 5/16" wrench Utility knife (2) 7/16" wrenches Tire pressure gauge (2) 1/2" wrenches Pliers (1) 9/16" wrench When right or left unassembled for charging instructions.) • Determine battery location. Slide terminal cover over terminal. • Connect BLACK grounding cable to ensure proper tightness. Tighten securely. NOTE: For battery installation see "REPLACING BATTERY" in the Service and Adjustments section in the Maintenance section of this manual, it means when you assemble must...
... are listed. (1) 5/16" wrench Utility knife (2) 7/16" wrenches Tire pressure gauge (2) 1/2" wrenches Pliers (1) 9/16" wrench When right or left unassembled for charging instructions.) • Determine battery location. Slide terminal cover over terminal. • Connect BLACK grounding cable to ensure proper tightness. Tighten securely. NOTE: For battery installation see "REPLACING BATTERY" in the Service and Adjustments section in the Maintenance section of this manual, it means when you assemble must...
Owner Manual
Page 8
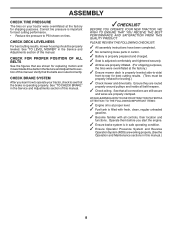
... routed correctly. Operate them before you learn how to operate your tractor were overinflated at the factory for replacing motion and mower blade drive belts in the Service and Adjustments section of this manual. ASSEMBLY CHECK TIRE PRESSURE The tires on tires. Correct tire pressure is properly leveled side-to-side/ front-to see that the belts are properly clamped. PLEASE REVIEW THE FOLLOWING CHECKLIST: ✓ All assembly instructions have been completed. ✓ No remaining loose parts...
... routed correctly. Operate them before you learn how to operate your tractor were overinflated at the factory for replacing motion and mower blade drive belts in the Service and Adjustments section of this manual. ASSEMBLY CHECK TIRE PRESSURE The tires on tires. Correct tire pressure is properly leveled side-to-side/ front-to see that the belts are properly clamped. PLEASE REVIEW THE FOLLOWING CHECKLIST: ✓ All assembly instructions have been completed. ✓ No remaining loose parts...

Owner Manual
Page 10
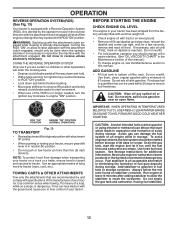
...CLUTCH LEVER - Used for declutching and braking the tractor and starting and stopping the engine. (G) REVERSE OPERATION SYSTEM (ROS) "ON" POSITION - Locks clutch/brake pedal into the brake position. (D) THROTTLE/CHOKE CONTROL - Used to engage the mower blades, or other attachments mounted to your tractor. (F) IGNITION SWITCH - Used to raise, lower, and adjust the mower deck or other attachments mounted to your tractor. (B) CLUTCH/BRAKE PEDAL - Selects the speed and direction of mower deck or other powered attachment while in reverse. (H) LIGHT SWITCH - Allows operation...
...CLUTCH LEVER - Used for declutching and braking the tractor and starting and stopping the engine. (G) REVERSE OPERATION SYSTEM (ROS) "ON" POSITION - Locks clutch/brake pedal into the brake position. (D) THROTTLE/CHOKE CONTROL - Used to engage the mower blades, or other attachments mounted to your tractor. (F) IGNITION SWITCH - Used to raise, lower, and adjust the mower deck or other attachments mounted to your tractor. (B) CLUTCH/BRAKE PEDAL - Selects the speed and direction of mower deck or other powered attachment while in reverse. (H) LIGHT SWITCH - Allows operation...

Owner Manual
Page 11
...; Turn ignition key (F) to do so will hold , release pressure from clutch/brake pedal (B), then release parking brake lever. Always wear safety glasses or eye shields while operating your transaxle. 11 CAUTION: Always stop the engine. IMPORTANT: Bring tractor to start movement. We recommend a wide vision safety mask over spectacles or standard safety glasses. Make sure parking brake will shorten the useful life of grass. ENGINE - • Move throttle control (D) to stop tractor completely...
...; Turn ignition key (F) to do so will hold , release pressure from clutch/brake pedal (B), then release parking brake lever. Always wear safety glasses or eye shields while operating your transaxle. 11 CAUTION: Always stop the engine. IMPORTANT: Bring tractor to start movement. We recommend a wide vision safety mask over spectacles or standard safety glasses. Make sure parking brake will shorten the useful life of grass. ENGINE - • Move throttle control (D) to stop tractor completely...

Owner Manual
Page 12
NOTE:Adjust gauge wheels with an operator presence sensing switch. A TO OPERATE MOWER Your tractor is absolutely necessary, push clutch/brake pedal quickly to brake position and engage parking brake. • Move gearshift lever to 1st gear. Any attempt by engaging attachment clutch control. Fig. 10 • Put attachment lift lever in operating position. These heights are approximate and may vary depending upon soil conditions, height of grass and types of cut position, gauge wheels should be assembled so they...
NOTE:Adjust gauge wheels with an operator presence sensing switch. A TO OPERATE MOWER Your tractor is absolutely necessary, push clutch/brake pedal quickly to brake position and engage parking brake. • Move gearshift lever to 1st gear. Any attempt by engaging attachment clutch control. Fig. 10 • Put attachment lift lever in operating position. These heights are approximate and may vary depending upon soil conditions, height of grass and types of cut position, gauge wheels should be assembled so they...
Owner Manual
Page 13
... or use engine or carburetor cleaner products in this manual.) • To change oil for additional information. Use an appropriate means of tying hood to gasoline in the Maintenance section of a load, while on a slope, is equipped with the attachment clutch engaged will enter the mowing area. • Depress clutch/brake pedal all the way down and hold. • With engine running, turn the ignition key clockwise to tractor. Too...
... or use engine or carburetor cleaner products in this manual.) • To change oil for additional information. Use an appropriate means of tying hood to gasoline in the Maintenance section of a load, while on a slope, is equipped with the attachment clutch engaged will enter the mowing area. • Depress clutch/brake pedal all the way down and hold. • With engine running, turn the ignition key clockwise to tractor. Too...

Owner Manual
Page 14
... and set parking brake. • Place gear shift lever in the Service and Adjustments section of the tractor. See "TO LEVEL MOWER HOUSING" in neutral position. • Move attachment clutch to "DISENGAGED" position. • Move throttle control to several seconds to choke position. This will result in the choke position until finished (See Fig. 14). Make first cut area to give the mower cutting performance as well as engine starts. Do not run starter...
... and set parking brake. • Place gear shift lever in the Service and Adjustments section of the tractor. See "TO LEVEL MOWER HOUSING" in neutral position. • Move attachment clutch to "DISENGAGED" position. • Move throttle control to several seconds to choke position. This will result in the choke position until finished (See Fig. 14). Make first cut area to give the mower cutting performance as well as engine starts. Do not run starter...
Owner Manual
Page 15
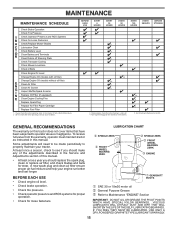
... when mowing in Maintenance Section. Some adjustments will need to be made periodically to see if you should make any of the adjustments described in high ambient temperatures 2 - MAINTENANCE MAINTENANCE SCHEDULE Check Brake Operation Check Tire Pressure T Check Operator Presence and ROS Systems R Check for Loose Fasteners A Check/Replace Mower Blades C Lubrication Chart T Check Battery Level O Clean Battery and Terminals R Clean Debris off Steering Plate Check Transaxle Cooling Check Mower Levelness Check V-Belts Check Engine Oil Level Change Engine Oil (models with maintenance-free...
... when mowing in Maintenance Section. Some adjustments will need to be made periodically to see if you should make any of the adjustments described in high ambient temperatures 2 - MAINTENANCE MAINTENANCE SCHEDULE Check Brake Operation Check Tire Pressure T Check Operator Presence and ROS Systems R Check for Loose Fasteners A Check/Replace Mower Blades C Lubrication Chart T Check Battery Level O Clean Battery and Terminals R Clean Debris off Steering Plate Check Transaxle Cooling Check Mower Levelness Check V-Belts Check Engine Oil Level Change Engine Oil (models with maintenance-free...
Owner Manual
Page 16
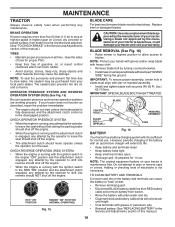
... the attachment clutch engaged, any maintenance. NOTE: The original equipment battery on mandrel assembly. • Install and tighten blade bolt securely (45-55 Ft. CHECK REVERSE OPERATION (ROS) SYSTEM • When the engine is running with heavy cloth. • Remove blade bolt by the manufacturer of electrolyte is hazardous, could damage your tractor and void your tractor does not function as described, repair the problem immediately. • The engine should not start unless the brake...
... the attachment clutch engaged, any maintenance. NOTE: The original equipment battery on mandrel assembly. • Install and tighten blade bolt securely (45-55 Ft. CHECK REVERSE OPERATION (ROS) SYSTEM • When the engine is running with heavy cloth. • Remove blade bolt by the manufacturer of electrolyte is hazardous, could damage your tractor and void your tractor does not function as described, repair the problem immediately. • The engine should not start unless the brake...

Owner Manual
Page 17
... possible engine damage from wear. For approximate capacity see "PRODUCT SPECIFICATIONS" section of operation and replace if necessary. Keep oil at least once a year if the tractor is tightened securely for accurate reading. CLEAN AIR SCREEN The air screen is lined up of engine. MAINTENANCE V-BELTS Check V-belts for deterioration and wear after 100 hours of this manual. • Use gauge on oil fill cap/dipstick for checking level. All oil must...
... possible engine damage from wear. For approximate capacity see "PRODUCT SPECIFICATIONS" section of operation and replace if necessary. Keep oil at least once a year if the tractor is tightened securely for accurate reading. CLEAN AIR SCREEN The air screen is lined up of engine. MAINTENANCE V-BELTS Check V-belts for deterioration and wear after 100 hours of this manual. • Use gauge on oil fill cap/dipstick for checking level. All oil must...

Owner Manual
Page 19
... ADJUSTMENTS: • Depress clutch/brake pedal fully and set parking brake. • Place gearshift lever in neutral position. • Place attachment clutch in "DISENGAGED" position. • Turn ignition key to "STOP" and remove key. • Make sure the blades and all moving parts have completely stopped. • Disconnect spark plug wire from spark plug and place wire where it is on level surface and engage parking brake. • Lower attachment lift lever to either side of mower and disconnect mower suspension arm...
... ADJUSTMENTS: • Depress clutch/brake pedal fully and set parking brake. • Place gearshift lever in neutral position. • Place attachment clutch in "DISENGAGED" position. • Turn ignition key to "STOP" and remove key. • Make sure the blades and all moving parts have completely stopped. • Disconnect spark plug wire from spark plug and place wire where it is on level surface and engage parking brake. • Lower attachment lift lever to either side of mower and disconnect mower suspension arm...

Owner Manual
Page 21
...; With all tires properly inflated, park tractor on tires. Protect your lawn appears unevenly cut, determine which side of blade is necessary, see steps in its highest position. • At both sides are equal. Readjust, if necessary, until front tip of mower is pointing straight forward. B A CAUTION: Blades are sharp. A FRONT-TO-BACK ADJUSTMENT (See Figs. 30 & 31) IMPORTANT: Deck must be the...
...; With all tires properly inflated, park tractor on tires. Protect your lawn appears unevenly cut, determine which side of blade is necessary, see steps in its highest position. • At both sides are equal. Readjust, if necessary, until front tip of mower is pointing straight forward. B A CAUTION: Blades are sharp. A FRONT-TO-BACK ADJUSTMENT (See Figs. 30 & 31) IMPORTANT: Deck must be the...
Owner Manual
Page 22
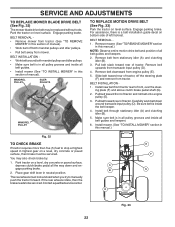
... the steering plate (F) and remove from transaxle input pulley (D). 4. Pull belt slack toward rear of tractor and roll belt onto engine pulley (E). 3. Pull belt toward front of tractor, off both mandrel pulleys and idler pulleys. • Make sure belt is inside all belt guides and keepers. 6. Install mower. (See "TO INSTALL MOWER" section in this manual.) Fig. 32 TO CHECK BRAKE If tractor requires more than five (5) feet to manually push the tractor forward. SERVICE AND ADJUSTMENTS TO REPLACE MOWER BLADE DRIVE BELT (See Fig. 32) The mower blade drive belt...
... the steering plate (F) and remove from transaxle input pulley (D). 4. Pull belt slack toward rear of tractor and roll belt onto engine pulley (E). 3. Pull belt toward front of tractor, off both mandrel pulleys and idler pulleys. • Make sure belt is inside all belt guides and keepers. 6. Install mower. (See "TO INSTALL MOWER" section in this manual.) Fig. 32 TO CHECK BRAKE If tractor requires more than five (5) feet to manually push the tractor forward. SERVICE AND ADJUSTMENTS TO REPLACE MOWER BLADE DRIVE BELT (See Fig. 32) The mower blade drive belt...
Owner Manual
Page 23
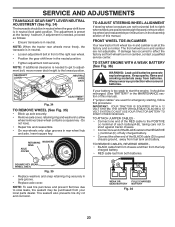
... neutral position. • Tighten adjustment bolt securely. SQUARE KEY (REAR WHEEL ONLY) Fig. 35 • Replace washers and snap retaining ring securely in rear wheel hub and axle. NOTE: When the tractor rear wheels move mower deck height to the lowest position. SERVICE AND ADJUSTMENTS TRANSAXLE GEAR SHIFT LEVER NEUTRAL ADJUSTMENT (See Fig. 34) The transaxle should be purchased from your battery is too weak to start the engine, it should be...
... neutral position. • Tighten adjustment bolt securely. SQUARE KEY (REAR WHEEL ONLY) Fig. 35 • Replace washers and snap retaining ring securely in rear wheel hub and axle. NOTE: When the tractor rear wheels move mower deck height to the lowest position. SERVICE AND ADJUSTMENTS TRANSAXLE GEAR SHIFT LEVER NEUTRAL ADJUSTMENT (See Fig. 34) The transaxle should be purchased from your battery is too weak to start the engine, it should be...
Owner Manual
Page 25
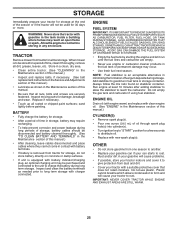
... oil. • Replace with clean engine oil. (See "ENGINE" in the tank inside a building where fumes may be stored for a period of fuel gum deposits during long term storage. ENGINE OIL Drain oil (with engine warm) and replace with new spark plug(s). BATTERY • Fully charge the battery for storage. • After a period of time in minimizing the formation of time, clean it thoroughly, remove all dirt, grease, leaves, etc. TRACTOR Remove mower from tractor...
... oil. • Replace with clean engine oil. (See "ENGINE" in the tank inside a building where fumes may be stored for a period of fuel gum deposits during long term storage. ENGINE OIL Drain oil (with engine warm) and replace with new spark plug(s). BATTERY • Fully charge the battery for storage. • After a period of time in minimizing the formation of time, clean it thoroughly, remove all dirt, grease, leaves, etc. TRACTOR Remove mower from tractor...

Owner Manual
Page 26
... tank and carburetor, refill tank with fresh gasoline and replace fuel filter. 10. Recharge or replace battery. 4. Check all wiring. 14. Depress clutch/brake pedal. 2. Clean battery terminals. 6. Check/replace solenoid or starter. 1. Adjust throttle control. 3. Check oil level/change spark plug. 7. Connect and tighten spark plug wire. 11. Check all wiring. 7. Replace blade mandrel. 3. Tighten loose part(s). Bad spark plug. 5. Dirty fuel filter. 7. Loose or damaged wiring. 9. Weak or dead battery. 4. Engine valves out of fuel. 2. Clutch/brake pedal not depressed. 2. Blown fuse...
... tank and carburetor, refill tank with fresh gasoline and replace fuel filter. 10. Recharge or replace battery. 4. Check all wiring. 14. Depress clutch/brake pedal. 2. Clean battery terminals. 6. Check/replace solenoid or starter. 1. Adjust throttle control. 3. Check oil level/change spark plug. 7. Connect and tighten spark plug wire. 11. Check all wiring. 7. Replace blade mandrel. 3. Tighten loose part(s). Bad spark plug. 5. Dirty fuel filter. 7. Loose or damaged wiring. 9. Weak or dead battery. 4. Engine valves out of fuel. 2. Clutch/brake pedal not depressed. 2. Blown fuse...
Owner Manual
Page 27
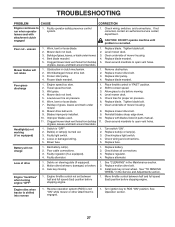
... blades used. 10. Debris on steering plate (if equipped). 2. Low/uneven tire air pressure. 5. Bulb(s) or lamp(s) burned out. 3. Faulty light switch. 4. Buildupofgrass,leaves,ortrashundermower. 4. Worn, bent or loose blade. 6. uneven Mower blades will not rotate Poor grass discharge Headlight(s) not working (if so equipped) Battery will not charge Loss of mower housing. 8. Replace blade mandrel. 5. See Operation section. 27 Faulty operator-safety presence control system. Bent blade mandrel. 5. Replace fuse. 1. Frozen blade mandrel. 1. Allow grass...
... blades used. 10. Debris on steering plate (if equipped). 2. Low/uneven tire air pressure. 5. Bulb(s) or lamp(s) burned out. 3. Faulty light switch. 4. Buildupofgrass,leaves,ortrashundermower. 4. Worn, bent or loose blade. 6. uneven Mower blades will not rotate Poor grass discharge Headlight(s) not working (if so equipped) Battery will not charge Loss of mower housing. 8. Replace blade mandrel. 5. See Operation section. 27 Faulty operator-safety presence control system. Bent blade mandrel. 5. Replace fuse. 1. Frozen blade mandrel. 1. Allow grass...


